
CAPTURE

Why its meteoric rise? It worked right out of the box.
MICHAEL NORTON
LOS ANGELES FINAL CUT PRO USER GROUP
Nothing can be done with any editing program if you do not have the video material stored on the hard drives of your computer. It is therefore essential to capture the material before you can begin the editing process. Before you can begin capturing you must instruct the computer where the captured video files will be stored — in Final Cut Pro this area is called the Scratch Disks.
Setting Scratch Disks
Setting Scratch disks is simple and straightforward. Getting this right is the key to successful media management. You need to know where your files are stored.
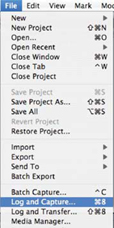
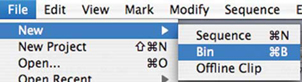
![]() Go to the File menu which is found at the top left of the screen.
Go to the File menu which is found at the top left of the screen.
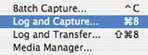
![]() Scroll down to Log and Capture and release your mouse button. The Log and Capture window will now open.
Scroll down to Log and Capture and release your mouse button. The Log and Capture window will now open.
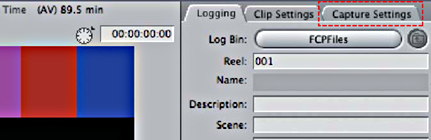
![]() Click on the Capture Settings tab which is located to the right of the Log and Capture window.
Click on the Capture Settings tab which is located to the right of the Log and Capture window.
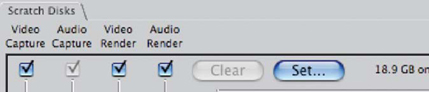
![]() Click the Scratch Disks button. This will reveal the Scratch Disks window.
Click the Scratch Disks button. This will reveal the Scratch Disks window.
![]() Press the Set button closest to the top — the reason there are several Set buttons is to allow one to set multiple scratch disks.
Press the Set button closest to the top — the reason there are several Set buttons is to allow one to set multiple scratch disks.
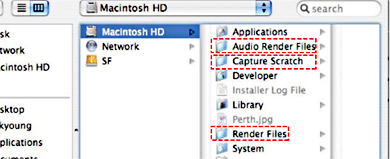
![]() Navigate to the hard drives on your computer.
Navigate to the hard drives on your computer.
![]() Double click a hard drive. This will set the hard drive as the first scratch disk in the list. If possible, select a drive that does not contain the operating system for your Mac (this ensures optimum performance when editing).
Double click a hard drive. This will set the hard drive as the first scratch disk in the list. If possible, select a drive that does not contain the operating system for your Mac (this ensures optimum performance when editing).

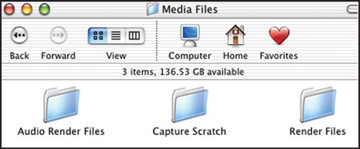
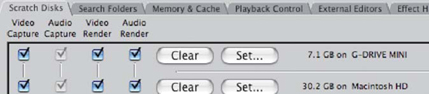
What you have done is to tell Final Cut Pro where to store your video files. You have selected a hard drive to store your footage. Final Cut Pro will then automatically create three folders on this drive:
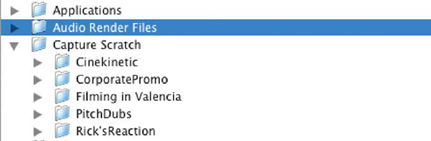
Capture Scratch — the video files you use to edit.
Audio Render — for audio render files.
Render — for video which is processed during rendering.
When you start a new Final Cut Pro project, once that project is saved and you have commenced the capture process, a folder will then appear inside of the Capture Scratch folder on the hard drive you selected. That folder is named the same as the project you are working on. Thus, all the files you Capture (or Transfer) end up inside the Capture Scratch folder in another folder named the same as your project. Similarly as you render material — for video or audio — then a folder is created in each of the Audio Render and Video Render folders, on the hard drive you have designated to be the Scratch disk. These are also named the same as your project.
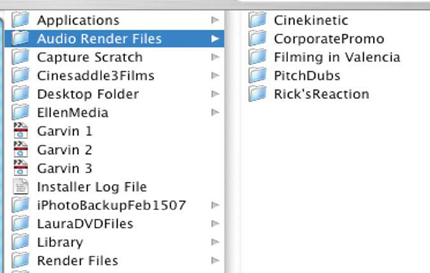
So as you work on multiple projects you will end up with folders based on your project name inside of the three folders — Capture Scratch, Audio Render and Render. Effectively what happens is Final Cut Pro, in an eloquent fashion, takes care of the difficulties of Media Management by always filing items away in the these three folders named the same as your project.
You can nominate up to 12 separate Scratch disks, the benefit of having multiple Scratch Disks is as one drive fills up then automatically Final Cut Pro will move onto the next available Scratch Disk to store further material.
The major difficulty people get into with Scratch Disks is when multiple projects are open at a time. It is possible to capture files into a project, other than the one you are working on. These files will then be mixed in with the files of another project.

There are two ways to avoid this:
![]() Only work with a single project open at a time thus ensuring your files will only be captured or transferred into that project.
Only work with a single project open at a time thus ensuring your files will only be captured or transferred into that project.
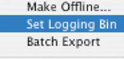
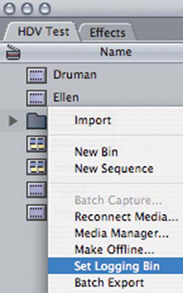
![]() Create and select a Logging Bin to capture into. This is done by this control-clicking on a bin and selecting Set Logging Bin.
Create and select a Logging Bin to capture into. This is done by this control-clicking on a bin and selecting Set Logging Bin.
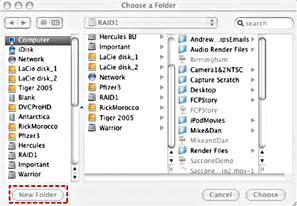
Finally, if one wishes, Scratch Discs can be set manually. This is achieved by following the method described earlier in steps 1–7 — however, when you get to the final stage where you double click the hard drive to set it as the Scratch Disc — you need to click the New Folder button — name it, and then the three folders for Audio Render, Capture Scratch and Render will appear inside the folder and location you have defined.
Setting scratch disks will become second nature once you have run through the process a few times. The methods described gives you the power to define exactly where you want your files to be stored. Providing you are disciplined you will be able to manage the media for each project you work on.
Working with Formats other than DV
Final Cut Pro 6 has been designed to natively capture material which originates on many different formats including DV, DVCam, HDV, DVCPro 50, DVCPro HD, XDCam, XDCam HD and MPG IMX.
When working with formats which do not work over Firewire or which require another protocol to capture into Final Cut Pro, you have two options. You can transfer the original material to an intermediary format such as DV/DVCam or DVCPro HD for editing, or you can purchase additional hardware which will enable you to capture the footage.
The choice is up to you which option you wish to pursue. Working at the higher levels of uncompressed standard or high definition may be quite alluring, however, be aware that the requirements to edit these formats may go beyond simply installing a card or external device to your Mac. There can be certain hard drive requirements and configuration issues when working outside the realms of DV and Firewire. This can bump up the cost of setting up a system considerably.
These points considered, Final Cut Pro provides a competitive and cost-effective solution for working with multiple standards of video or film. It is up to you whether you wish to move away from the simplicity of capturing and editing over Firewire.
Getting the Most Out of the Capture Process
An important part of preparing for the editing process is to watch your material. To edit your footage properly you have to know what there is to work with. I always use the capture stage as a dual purpose procedure: (1) to watch the footage, properly, in real time as it is captured and (2) to capture the footage onto hard drive.
In the film world, as soon as the footage made it back from the lab, the dailies would then be screened. A projector was laced up and the illuminated images thrown forth in a display of light onto the screen. Based on what the director saw the rest of the shooting could then be arranged.
You are the director, the Log and Capture facility is your projector. So watch your images and build the structure of your film in your mind before you cut a single shot to another shot. You decide what to take in, what to leave out, and what to reshoot if necessary.
Methods of Capturing Footage from Tape
There are three ways to capture DV or any tape-based footage when using Final Cut Pro: Capture Clip, Capture Now and Batch Capture.
Capture Clip, as the name suggests, is used to capture a single clip at a time. It requires the editor to first mark ‘in’ and ‘out’ points. An ‘in’ point refers to the position on the tape where the capture process is to begin and the ‘out’ point is where the capture process is to stop. Once the ‘in’ and ‘out’ points are marked the computer cues up the tape in the deck/camera to the appropriate point and transfers the material onto hard drive.
Capture Now is used to capture clips ‘on-the-fly’. This means the capture process begins the moment the editor instructs the computer to begin capturing and stops when the Escape button is pressed.
Batch Capture is used to capture multiple clips. Each clip is first ‘logged’ and the computer is then instructed to capture each of the clips in succession.
Deck Control
To capture video files to hard drive it is essential to know how to control the replay deck or camera from the computer. This is quite simple and has been well integrated into the editing interface. All operations are easily accessible using keyboard commands.
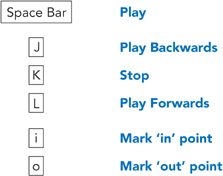
Each of the play commands J and L work in increments. By pressing J or L up to five times will speed up the result. This will be obvious as we get further into the Final Cut Pro workflow.
The Capture Window
The Capture window is the facility provided within Final Cut Pro to enable you perform the capture process. It is important to understand the controls within this window and how to use them.
![]() To open the Capture window first make sure your deck/camera is switched on. If you are using a camera make sure it is in VTR mode.
To open the Capture window first make sure your deck/camera is switched on. If you are using a camera make sure it is in VTR mode.
![]() Choose the File menu at the top left of the screen. Scroll to Log and Capture.
Choose the File menu at the top left of the screen. Scroll to Log and Capture.
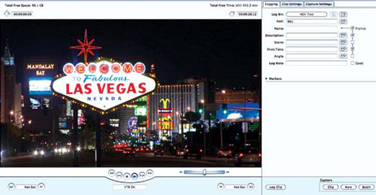
The Capture window will now open.
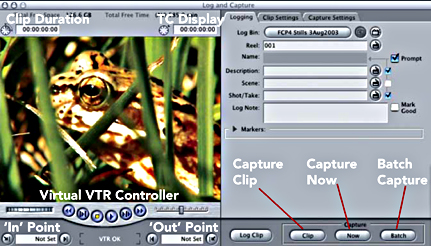
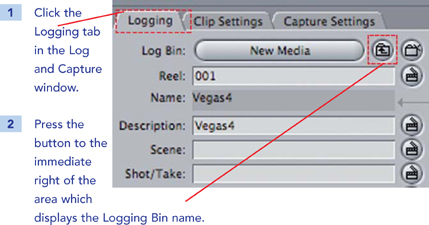
Above is marked the crucial areas one needs to understand to effectively use the Log and Capture window.
Clip Duration — when logging clips for Batch Capture or using Capture Clip, ‘in’ and ‘out’ points must first be marked. The duration of the clip is calculated by Final Cut Pro and displayed in the Clip Duration window.
Time Code Display — whenever a DV tape is playing, a running display will show the timecode numbers ticking over. If you stop the tape the timecode at the exact point where the tape is parked will be displayed.
‘In‘ Point — an ‘in’ point is marked by pressing the letter ‘i’. The marked ‘on’ point is displayed in this window.
‘Out’ Point — an ‘out’ point is marked by pressing the letter ‘o’. The marked ‘out’ point is displayed in this window.
Virtual VTR Controller — just like most VTRs have stop, play and shuttle commands — this virtual controller performs similar functions.
Capture Clip/Capture Now/Batch Capture — used to perform the capture functions.
Also note the display at the top of the Capture window which tells you how much free space is available on your computer and how much this capacity equals in minutes. The amount of space is the sum total available on the scratch disk or disks you set earlier.
You can therefore determine whether you have room on your hard drives to capture the material required for your project.

Capture Clip
If you wish to capture a single clip at a time this is easily achieved using the Capture Clip method. When using this method you need to first mark the ‘in’ and ‘out’ points for the clip you wish to capture.
![]() Put a tape into your deck or camera and make sure it is switched on. If you are using a camera make sure it is in VTR mode.
Put a tape into your deck or camera and make sure it is switched on. If you are using a camera make sure it is in VTR mode.
![]() Open the Capture window which is accessed through the File menu. Alternatively, press the Apple key and the number 8 and this will achieve the same result (the Apple key is located immediately left of the Space Bar).
Open the Capture window which is accessed through the File menu. Alternatively, press the Apple key and the number 8 and this will achieve the same result (the Apple key is located immediately left of the Space Bar).
![]() Press the Space Bar and your deck or camera will spring to life. If it doesn’t, press play on your deck/camera to engage the heads. From this point on remote control of your Firewire device will work direct from the keyboard.
Press the Space Bar and your deck or camera will spring to life. If it doesn’t, press play on your deck/camera to engage the heads. From this point on remote control of your Firewire device will work direct from the keyboard.
Once the tape is playing at speed, the result of having pressed the Space Bar, you can then spool through the tape using the J K L method. As mentioned earlier, pressing the letter J will run the tape backwards, K is for stop (or use the Space Bar to start/stop the tape) and the letter L is to run the tape forwards. By pressing the letters J and L multiple times affects the replay speed incrementally. If you press the letter J once the tape will spool backwards at normal speed, press it again and the tape will continue backwards, however, slightly faster. Press it again and the speed will increase until the maximum speed is attained after five taps. Likewise, when using the letter L the tape will shuttle forward in increments until a maximum speed is achieved after five taps.
![]() When you get to the point where you want the capture to begin press the letter ‘i‘ — this will mark the ‘in’ point. Similarly, press the letter ‘o’ to mark the ‘out’ point. If you look to the bottom of the Capture window, the timecode reference for the marked ‘in’ and ‘out’ points will be displayed.
When you get to the point where you want the capture to begin press the letter ‘i‘ — this will mark the ‘in’ point. Similarly, press the letter ‘o’ to mark the ‘out’ point. If you look to the bottom of the Capture window, the timecode reference for the marked ‘in’ and ‘out’ points will be displayed.

Note: when marking ‘in’ and ‘out’ points you can mark the points on-the-fly. This means you can mark ‘in’ and ‘out’ points by pressing the letters ‘i’ and ‘o’ at the appropriate points while the tape is running. If you prefer, while the tape is playing, hold down the letter ‘i’ and release it when you get to the point where you wish the ‘in’ point to be marked. The same applies for the ‘out’ point. Hold down the letter ‘o’ and release it to mark the ‘out’ point. Final Cut Pro is flexible in that the same result can be achieved in a variety of ways.
![]() Once the ‘in’ and ‘out’ points have been marked press the Clip button at the bottom of the Capture Window. You will then be prompted to name the clip.
Once the ‘in’ and ‘out’ points have been marked press the Clip button at the bottom of the Capture Window. You will then be prompted to name the clip.
![]() Name the clip and press OK. The Mac will then instruct the deck/ camera to cue up the clip which will then be captured to disk and placed into the Browser for you to access.
Name the clip and press OK. The Mac will then instruct the deck/ camera to cue up the clip which will then be captured to disk and placed into the Browser for you to access.
By repeating this process you can capture as many clips as you wish.
Capture Now
An alternative way to capture clips is to use the Capture Now facility. This is a simple method that does not require you first to mark the ‘in’ and ‘out’ points.
![]() Open the Capture window and play the tape in your deck/camera.
Open the Capture window and play the tape in your deck/camera.
![]() Press the Now button which sits immediately to the right of the Clip button in the Capture window. Immediately upon pressing ‘Now’ the capture process will begin. The images on the DV tape will be mirrored in a large window on your computer monitor. A message at the bottom of this window will confirm that capture is taking place.
Press the Now button which sits immediately to the right of the Clip button in the Capture window. Immediately upon pressing ‘Now’ the capture process will begin. The images on the DV tape will be mirrored in a large window on your computer monitor. A message at the bottom of this window will confirm that capture is taking place.
![]() Once the material you want has played, press the Escape key (located top left of your keyboard) to exit Capture Now. The capture process will stop and the clip will be placed into the Browser.
Once the material you want has played, press the Escape key (located top left of your keyboard) to exit Capture Now. The capture process will stop and the clip will be placed into the Browser.
You can then name the clip by overtyping the name assigned to it by Final Cut Pro.
Always remember to close the Capture window once you have completed the capture process (do this by clicking the extreme top left of the Capture window). Failure to do so will prevent video and audio from playing through the Firewire — to your deck or camera — and onto your television monitor (assuming you are working with this configuration). By closing the Capture window this problem will be avoided.
Batch Capture
Batch Capture is an extremely useful facility for capturing many clips at a time. It is necessary to first log the clips you wish to capture, name them and then invoke the Batch Capture function.
![]() Cue the tape in your deck/camera to the point where you wish to mark the first ‘in’ point. Mark the ‘in’ point and ‘out’ point for the first clip you wish to capture.
Cue the tape in your deck/camera to the point where you wish to mark the first ‘in’ point. Mark the ‘in’ point and ‘out’ point for the first clip you wish to capture.
![]() Press the Log Clip button — located at the bottom the Log and Capture window.
Press the Log Clip button — located at the bottom the Log and Capture window.
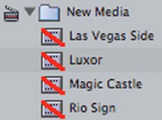
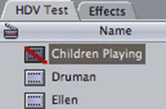
![]() You will now be prompted to give the clip a name. Do this and notice the clip appears with the name you assigned to it in the Browser window with a diagonal red line through it. The red line indicates that the clip is logged but not yet captured to disk.
You will now be prompted to give the clip a name. Do this and notice the clip appears with the name you assigned to it in the Browser window with a diagonal red line through it. The red line indicates that the clip is logged but not yet captured to disk.

![]() Log as many clips as you wish to capture from the tape in your camera/deck.
Log as many clips as you wish to capture from the tape in your camera/deck.
![]() Once you have logged the clips you wish to capture stop your DV tape by pressing the Space Bar or stop button on your deck/camera.
Once you have logged the clips you wish to capture stop your DV tape by pressing the Space Bar or stop button on your deck/camera.
![]() Look at the Browser area where your clips are logged — each clip will have a diagonal red line through it. Notice that the last clip you logged is highlighted. Click once anywhere in the Browser to deselect it. This is particularly important — otherwise when you try to Batch Capture, only the highlighted clip(s) will be captured.
Look at the Browser area where your clips are logged — each clip will have a diagonal red line through it. Notice that the last clip you logged is highlighted. Click once anywhere in the Browser to deselect it. This is particularly important — otherwise when you try to Batch Capture, only the highlighted clip(s) will be captured.
![]() In the Log and Capture window press the Batch button located bottom right. You will now be prompted with a screen full of information. Check that the Capture Preset corresponds with the format you are working with. If not, click the Capture Preset bar to select the format you are working with. Click OK to continue.
In the Log and Capture window press the Batch button located bottom right. You will now be prompted with a screen full of information. Check that the Capture Preset corresponds with the format you are working with. If not, click the Capture Preset bar to select the format you are working with. Click OK to continue.
![]() A window will now appear stating the number of clips which are ready to capture. Press the Continue button.
A window will now appear stating the number of clips which are ready to capture. Press the Continue button.
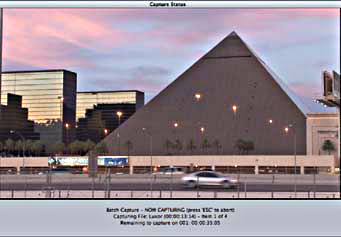
![]() After a short pause your deck/camera will cue up the first of your clips and the Batch process will commence. As each clip is captured the device will stop and shuttle to the next clip and so forth until all the clips have been captured.
After a short pause your deck/camera will cue up the first of your clips and the Batch process will commence. As each clip is captured the device will stop and shuttle to the next clip and so forth until all the clips have been captured.
![]() Once all the clips have been captured you will be prompted with a dialog box which tells you the numbers of clips that have been successfully captured. Click the finished button and, as if by magic, all the red lines will disappear from the clips in the Browser, signifying that they are stored on hard disk and accessible to work with.
Once all the clips have been captured you will be prompted with a dialog box which tells you the numbers of clips that have been successfully captured. Click the finished button and, as if by magic, all the red lines will disappear from the clips in the Browser, signifying that they are stored on hard disk and accessible to work with.
If working with DV, always remember to close the Capture window once you have completed the capture process or video and audio will not play through the Firewire cable to your deck or camera.
Selectively Capturing using Batch Capture
When you are working with Batch Capture you can be selective about what items you wish to capture. You can choose to capture Selected Items, Offline Items or All Items in the Logging Bin.
![]() Highlight the items in the Browser which you wish to capture by holding down the Apple key and clicking on the individual clips.
Highlight the items in the Browser which you wish to capture by holding down the Apple key and clicking on the individual clips.
![]() Open the Log and Capture window.
Open the Log and Capture window.
![]() Click the Capture bar at the top of the Capture window and choose Selected Items in Logging Bin.
Click the Capture bar at the top of the Capture window and choose Selected Items in Logging Bin.
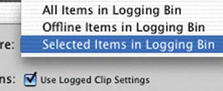
![]() Press OK followed by Continue.
Press OK followed by Continue.
Setting a Logging Bin
It can be advantageous to specify a Bin where material will be placed into directly on capture. This works for Capture Clip, Capture Now and Batch Capture.
Working with Bins is dealt with in the next chapter. For now it is sufficient to say that Bins in Final Cut Pro are the equivalent of folders as used throughout the Mac operating system. Bins provide a place to file things away.
Capturing into a Logging Bin is particularly important when working with Batch Capture as there are times when Final Cut Pro will try to capture items in the Browser, including material which has already been captured. This could be due to the user failing to number reels correctly or trying to Capture Clips with matching timecode to clips which have already been captured.
To create a Logging Bin:
![]() Click in the Browser to make it active.
Click in the Browser to make it active.
![]() Select the File menu and scroll to New Bin. You will see the Bin appear in the Browser window.
Select the File menu and scroll to New Bin. You will see the Bin appear in the Browser window.
![]() Name the Bin by clicking and overtyping.
Name the Bin by clicking and overtyping.

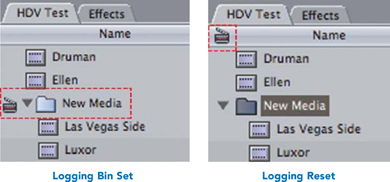
![]() Control click on the Bin and choose Set Logging Bin from the menu which appears.
Control click on the Bin and choose Set Logging Bin from the menu which appears.
The Logging Bin is now set and this is made obvious by the little Final Cut Pro clapperboard which sits to the left of the clip.
Use the Log and Capture window to Log the clip(s) you wish to capture. Notice they go directly into the Bin you have designated as the Logging Bin. All logged clips will go directly into this Bin.
![]() Log your clips directly into the Logging Bin.
Log your clips directly into the Logging Bin.
![]() Press Batch and all of your clips will then be captured into the Logging Bin.
Press Batch and all of your clips will then be captured into the Logging Bin.
By following the above instructions will give you trouble-free capture at all times. This is the method I recommend when using Batch Capture.
To create a new Logging Bin create a new Bin and repeat the above procedure.
Clearing a Logging Bin
It is very simple to clear the Logging Bin so that clips will be captured directly into the Browser.
This will reset the Logging Bin so that the little Final Cut Pro clapperboard is placed at the top of the Browser. This is the default position and only changes when a Logging Bin has been set.
The Clip Settings Tab
The middle tab in the Log and Capture window provides controls which let you be specific about how your material is captured. You can choose to capture audio or video only and you can also choose whether you want your audio to be captured as Stereo Pairs or separate Mono Channels.

Capturing Multi-channels of Audio
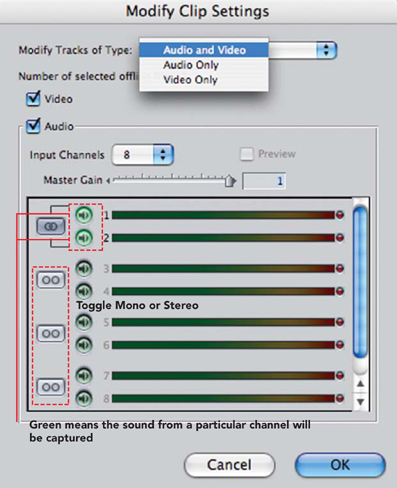
A big criticism of previous versions of Final Cut Pro was the fact that it could only capture 2 channels of audio at a time. For formats such as Digibeta, which records 4 channels of audio, this was a serious limitation. To capture more than 2 channels at a time would require several passes.
Providing you are using Final Cut Pro version 5 or 6, one can now capture up to 24 channels of audio at a time.
To capture up to 2 channels of audio follow the procedure already described.
To capture more than 2 channels of audio requires you to first Log the clip and then choose the command to Modify Clip Settings.
This process can be achieved in one of two ways:
![]() Open the Log and Capture window.
Open the Log and Capture window.
![]() Mark ‘in’ and ‘out’: points on the clip you wish to capture.
Mark ‘in’ and ‘out’: points on the clip you wish to capture.
![]() Log the clip.
Log the clip.
![]() Clck the clip in the Browser to highlight it.
Clck the clip in the Browser to highlight it.
![]() Cick the Modify menu and scroll down to Clip Settings.
Cick the Modify menu and scroll down to Clip Settings.
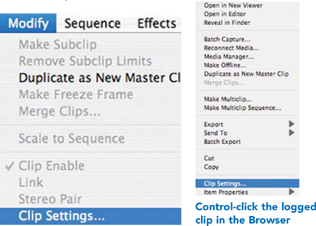
Alternatively Control click the logged clip in the Browser— this will give you the option to choose Clip Settings.
![]() Specify the number of channels you wish to capture by clicking the green radio buttons. Green indicates that a particular channel will be captured.
Specify the number of channels you wish to capture by clicking the green radio buttons. Green indicates that a particular channel will be captured.
![]() Choose if you want channels to be linked together as Stereo Pairs.
Choose if you want channels to be linked together as Stereo Pairs.
![]() Click OK.
Click OK.
![]() Click Batch, bottom right of the Log and Capture window, and Final Cut Pro will now capture the clip and all the audio channels you have specified.
Click Batch, bottom right of the Log and Capture window, and Final Cut Pro will now capture the clip and all the audio channels you have specified.
Capturing HDV
There is very little difference when capturing HDV footage to capturing any other footage, however, be aware the Log and Capture window appears more modern and stream-lined.
There are a few differences:
![]() By default, when capturing the clips these are broken Into separate shots. Think of this as being an auto-DV-Start-Stop-Detect function (refer to page 61). This function can be switched off in the Clip Settings tab of the HDV Log and Capture window.
By default, when capturing the clips these are broken Into separate shots. Think of this as being an auto-DV-Start-Stop-Detect function (refer to page 61). This function can be switched off in the Clip Settings tab of the HDV Log and Capture window.
![]() While your HDV footage is captured over Firewire you can only play it back over Firewire as a standard definition DV signal. It is not possible to playback a high definition HDV signal over Firewire.
While your HDV footage is captured over Firewire you can only play it back over Firewire as a standard definition DV signal. It is not possible to playback a high definition HDV signal over Firewire.
![]() When capturing, the display in the HDV Capture window is widescreen to accommodate the HDV format.
When capturing, the display in the HDV Capture window is widescreen to accommodate the HDV format.
Note: The Capture window when working with HDV is widescreen as is the display while capturing.
Log and Transfer
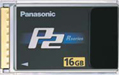
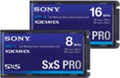
When working with Panasonic P2 media, or Sony SxS cards, the procedure for getting the files into Final Cut Pro is different to working with tape.
Solid-state media, unlike tape, has no moving parts and the files can be accessed in a non-linear fashion. There is no spooling, transfer can take place faster than real-time, there are no dropouts and the media is designed for acquisition but not for archiving. Recording to solid-state media also provides for variable frame-rate recording — known as undercranking and overcranking (terms borrowed from the film world.) This provides for high quality, film-like, slow motion and fast motion.
As with tape based media one needs to set the Scratch Disks so that Final Cut Pro is told where to store the files.
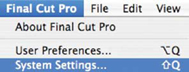
![]() Go to the file menu and choose System Settings. The familiar Scratch Disks window will appear. Select a drive to store your files and follow the procedure already described earlier for setting the Scratch Disks with tape based media.
Go to the file menu and choose System Settings. The familiar Scratch Disks window will appear. Select a drive to store your files and follow the procedure already described earlier for setting the Scratch Disks with tape based media.
![]() Go to the file menu and scroll down to Log and Transfer, located immediately below Log and Capture.
Go to the file menu and scroll down to Log and Transfer, located immediately below Log and Capture.
![]() Assuming you have a P2 or SxS card mounted on the desktop of your Mac, you will then be greeted by a visual list of the media on the card.
Assuming you have a P2 or SxS card mounted on the desktop of your Mac, you will then be greeted by a visual list of the media on the card.
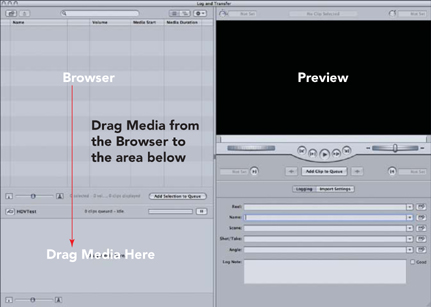
The upper left section of the Log and Transfer window provides a clip Browser which will display all of the clips contained on the solid-state card. If you select a clip, you can then play the clip in the Preview window located to the right of the screen. ‘In’ and ‘out’ points can be set thus one can define the portion of the clip to be imported, and clips can be named and other details entered.
![]() When you have viewed and named the clips highlight and drag clip/clips from the Log and Transfer Browser into the area labeled ‘Drag media here.’
When you have viewed and named the clips highlight and drag clip/clips from the Log and Transfer Browser into the area labeled ‘Drag media here.’
Alternatively click ‘Add Selection to Queue.’
Import will now take place.
If you choose you can also import clips one at a time from the Preview window by clicking on the ‘Add Clip to Queue’. If you click on the ‘Import Settings’ tab you can choose to import audio and video, audio only or video only.
There is a spinning arrow that indicates import in progress. As each clip is imported into FCP it disappears from the clip queue.
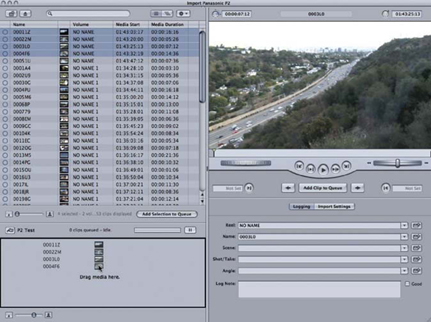
Image: Ken Stone (www.kenstone.net)
Essentially importing media from sold-state cards is a remarkably simple process. You can completely skip all the detail, if you choose.
Simply load your P2 card so it is recognized by the Mac and then drag your media from the Browser area into the area labeled ‘Drag Media Here.’ This is quick and easy and one can then name the files once the clips have been imported into Final Cut Pro.
Importing Music from CD
Films are primarily made up of sound and picture. Much of the sound is recorded at the same time the picture is recorded. When it comes to music, more often than not, this will be sourced from compact disc.
Importing tracks from CD into Final Cut Pro is straightforward. To begin with you need to hide the Final Cut Pro application (press Apple H) and go to the desktop to access the CD.
![]() Insert the CD into the Mac’s CD/DVD drive. Quit iTunes when it opens.
Insert the CD into the Mac’s CD/DVD drive. Quit iTunes when it opens.
![]() Double click the CD icon on your desktop to open it.
Double click the CD icon on your desktop to open it.
![]() Drag the track/s you wish to work with direct from the CD to the desktop — wait while the copy process takes place. You may wish to rename the CD track/s once the copy process is finished.
Drag the track/s you wish to work with direct from the CD to the desktop — wait while the copy process takes place. You may wish to rename the CD track/s once the copy process is finished.
Once the track or tracks have been copied, you need to go back into Final Cut Pro to import the tracks.
![]() Make sure Final Cut Pro is open in front of you.
Make sure Final Cut Pro is open in front of you.
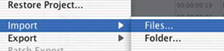
![]() Select the File menu and scroll down to Import. Scroll right and select Files.
Select the File menu and scroll down to Import. Scroll right and select Files.
![]() Navigate to the desktop and locate the track/s you wish to import.
Navigate to the desktop and locate the track/s you wish to import.
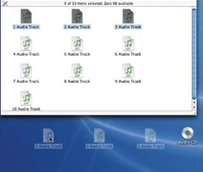
![]() Highlight the track or tracks you wish to import. If you want to import more than one track hold down the Apple key and click each of the tracks with your mouse button.
Highlight the track or tracks you wish to import. If you want to import more than one track hold down the Apple key and click each of the tracks with your mouse button.

![]() Press the blue glowing Choose button.
Press the blue glowing Choose button. ![]()
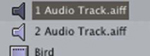
The CD track/s will now appear in the Browser and these are represented by a speaker icon. Rename the track/s if you choose.
An alternative way to import files into Final Cut Pro is to drag them direct from the desktop into the Browser. This will achieve exactly the same result as using the Import Files command.
It is important now to convert the audio sample rate of the imported track/s to match the rest of the audio in your project.
Converting Audio Sample Rates
It is easy to import CD tracks into Final Cut Pro — the complicated part of the process is to get the CD sample rate to match that of the rest of your project. This is important. Mismatching sample rates can cause a variety of problems including pops, clicks and sync drift.
You will remember DV audio is recorded at either 16 bit–48 kHz or 12 bit–32 kHz (refer to page 16). The key to trouble-free audio editing within Final Cut Pro is to make sure that all audio is of the same sample rate. Commercial CDs are recorded at 44.1 kHz. It is therefore advisable to convert the sample rate of the CD track to match the rest of the audio in your project.
![]() Highlight the CD audio track which needs to be converted in the Browser.
Highlight the CD audio track which needs to be converted in the Browser.

![]() Select the File menu, scroll to Export and select Using QuickTime Conversion.
Select the File menu, scroll to Export and select Using QuickTime Conversion.
![]() Click on the Format bar to reveal a list of options.
Click on the Format bar to reveal a list of options.
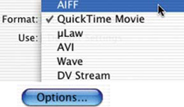
![]() Select AIFF.
Select AIFF.
![]() Click the Options button to the right.
Click the Options button to the right.
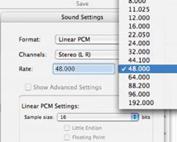
This will reveal a series of settings. Where it reads Rate — click the two arrows facing in opposite directions. This will reveal a list of audio sample rates.
![]() Set the sample rate to 48 kHz and check that 16 bit and Stereo are selected. Click OK.
Set the sample rate to 48 kHz and check that 16 bit and Stereo are selected. Click OK.
![]() Name the file and save it to hard disk. The conversion process will now take place.
Name the file and save it to hard disk. The conversion process will now take place.
![]() Go to the File menu and select Import. Locate the CD file you just exported and import this into the Browser. The sample rate has now been converted to 48 kHz and will now match the rest of your project.
Go to the File menu and select Import. Locate the CD file you just exported and import this into the Browser. The sample rate has now been converted to 48 kHz and will now match the rest of your project.
Converting Audio Sample Rates Using QuickTime Pro
Final Cut Pro and Final Cut Studio both come with QuickTime Pro. QuickTime has been described as one of Apple’s ‘jewels’ in the software stakes. It is crossplatform and is used for video production, the creation of Internet content, DVD authoring and even in mobile phone technology. It is not essential that you understand a great deal about QuickTime other than to appreciate if it weren’t there video as we know it on the Mac would not exist.
Audio files on CD can be quickly and easily converted from 44.1 kHz to 48 kHz using QuickTime. There are fewer stages involved than with the method described in the previous pages. The advantage of converting directly to disk, using QuickTime, is that you can open up your audio files directly in the QuickTime Player and then convert the file before it is recorded to disk. Therefore, you will only end up with one file which is sampled at 48 kHz.
Before you begin drag the QuickTime Player from your Applications folder onto the Dock for easy access.

![]() Insert the CD into your Mac.
Insert the CD into your Mac.
![]() Quit iTunes when it opens.
Quit iTunes when it opens.
![]() Double click the CD on the desktop to open it.
Double click the CD on the desktop to open it.
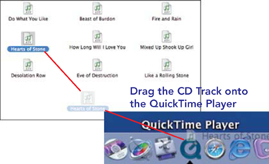
![]() Choose an audio track and drag it onto the QuickTime Player on the Dock.
Choose an audio track and drag it onto the QuickTime Player on the Dock.
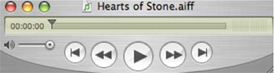
![]() Release the audio file and it will open in the QuickTime Player.
Release the audio file and it will open in the QuickTime Player.
![]() Go to the File menu, top left of screen and scroll to Export.
Go to the File menu, top left of screen and scroll to Export.
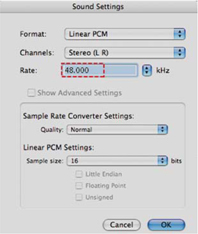
![]() From the dialogue box which opens choose Sound to AIFF and click on the button titled Options.
From the dialogue box which opens choose Sound to AIFF and click on the button titled Options.

The Sound Settings box will now open.
![]() Confirm the sample rate is set to 48 kHz; the Sample size needs to be 16 and Channels should be set to Stereo.
Confirm the sample rate is set to 48 kHz; the Sample size needs to be 16 and Channels should be set to Stereo.
![]() Save the audio file to a location of your choice.
Save the audio file to a location of your choice.
![]() Import the audio file into the Browser of Final Cut Pro or drag directly from the saved location into the Browser.
Import the audio file into the Browser of Final Cut Pro or drag directly from the saved location into the Browser.
Once the audio file is accessible in the Browser of Final Cut Pro you can confirm that the sample rate is correct.
![]() Control click on the audio file.
Control click on the audio file.
![]() Scroll to Item Properties and scroll right to Format.
Scroll to Item Properties and scroll right to Format.
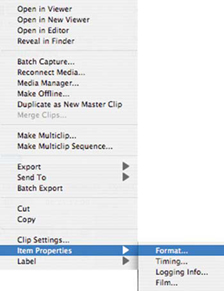
![]() Check the audio sample rate listed towards the bottom of the Item Properties window.
Check the audio sample rate listed towards the bottom of the Item Properties window.

At any time you can check the audio sample rate of any of the files in the Browser. It’s simply a matter of Control clicking, choosing Item Properties, scrolling to Format and then checking the setting. If sample rates mismatch this can be easily identified and corrected. Export the file from Final Cut Pro using QuickTime Conversion, then re-import the new file into the Browser.