
GETTING STARTED
The Digital Laboratory
Think of your computer loaded with Final Cut Pro as being like a digital laboratory. In the days when cine-film was the only means for movie-making, everyone relied on the lab. Film would be processed at the lab; there were work prints; answer prints; release prints; opticals … the lab was central to virtually every facet of the post-production process.
Your Mac is a digital lab, just waiting for you to stir the potions.
Essentially the post-production process is the same as it has always been. While the means to achieving results has changed, digital filmmaking requires similar methods and procedures to that of filmmaking in the world of celluloid and chemicals.
While film needed to be developed the images recorded on videotape need to be transferred from tape to hard drive — this process is known as capture or transfer.
The raw material must then be ordered and structured. In the film world this would take place in the cutting room where the editor would take reels of film and break these into smaller more manageable sections — when using Final Cut Pro an electronic equivalent to the cutting room is provided in the layout of the interface. It is here that the editing takes place.

Once the picture was edited the sound needed to be mixed. Dubbing suites with many machines running in synchronization were traditionally used. Inside your computer multiple audio tracks are electronically mixed to be output in sync with picture.
Final Cut Pro is compatible with external Sound Surfaces (using the Mackie Control Protocol, MCP). If one has an MCP compatible control surface you can ride your faders and directly mix your film inside of Final Cut Pro.

The software will record all the fader movements that you have put into the system. You can then play back your mix with full fader automation.
Effects and titles were traditionally created using a device known as an optical printer. Film exposed in the optical printer would then be immersed in developing tanks, in total darkness, to emerge, as if by magic, with hundreds of tiny transparent images. When projected these images would light up a room … Final Cut Pro uses electronic processes to achieve these results. Video tracks are layered in order of priority to build effects which can be made up of many different layers. This process is known as compositing.

Finally, the original negative would be cut and matched by technicians, wearing pure white gloves, in dust-proof rooms. Release prints were produced so the film could be distributed to cinemas and later television stations throughout the world. Release prints in the modern world are recorded onto digital tape, DVD or the final edit may need to be prepared for CD-ROM or Internet delivery. This phase of the process is known as output.
It should be obvious that a distinct set of processes takes place in the editing of any production. When using Final Cut Pro these processes can be broken down into five distinct areas.
(i) capture or transfer (ii) editing (iii) sound mixing (iv) compositing (v) output
Learn how to perform these essential tasks and you will be well armed with the knowledge needed to edit any program. Once these processes are learnt, you, as the editor, will be able to concentrate on the creative aspects of the editing process. Only when one moves beyond the mechanics of the editing can Final Cut Pro be used to its full potential.
Hardware and Software Requirements
At the most basic level the following hardware is needed to use Final Cut Pro:
![]() A Firewire camera or deck.
A Firewire camera or deck.
![]() A minimum of a G4 Mac (1.25 GHz or faster) with at least 1 GB of RAM and enough free hard drive space to store your video files. A minimum of 4GB of disk space is required to install all the applications in the Final Cut Studio suite and a whopping additional 55 GB is required to install all optional templates, content and tutorials — these may be installed on separate disks.
A minimum of a G4 Mac (1.25 GHz or faster) with at least 1 GB of RAM and enough free hard drive space to store your video files. A minimum of 4GB of disk space is required to install all the applications in the Final Cut Studio suite and a whopping additional 55 GB is required to install all optional templates, content and tutorials — these may be installed on separate disks.
Note: An AGP or PCI Express Quartz Extreme graphics card is required. For best performance use one of the Intel Macs.
![]() Mac OS X 10.4.9 or later; QuickTime 7.1.6 or later; a DVD drive for installation.
Mac OS X 10.4.9 or later; QuickTime 7.1.6 or later; a DVD drive for installation.
Your digital video deck or camera will need DV ‘in’ and ‘out.’ Ideally you should also have a television monitor and a pair of external speakers.
If hard drive space is limited you may well choose to install Final Cut Studio without the additional content files. This could be advantageous if you are working on a Powerbook, iBook or MacBook. While it is desirable to install all the content, and therefore giving you access to the full potential of the Final Cut Studio Suite, a great deal of disk space can be saved by only installing the applications.
Inside your Mac
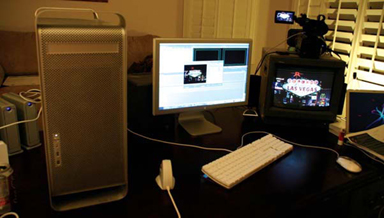
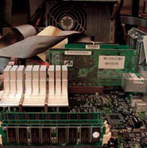
Your Mac is made up of many different components all specifically engineered to work together. There are hard drives, fans, a motherboard, memory, circuits, a power supply, ports and slots. Data pumps through the internal system while the keyboard and mouse act as the interface between the computer and the mind of the operator. While it is not essential to understand exactly what goes on inside your Mac it is helpful to have a general overview — particularly with regards to memory and available hard drive space. These two areas are critical to having an efficient and well-managed machine.
How Much Hard Drive Space?
The hard drives are the place where you store your video files. Any video editing system requires large hard drives capable of storing vast amounts of data. While ‘the more, the better’ rule applies, each and every one of us is on some sort of limit and we all have to stop somewhere.

When DV technology first became available it was all SCSI — these were hard drives with limited capacity; very expensive and a lot more difficult to set up than Firewire. These days when additional hard drives are needed it is as simple as ordering Firewire drives online or buying from your favorite computer store. One can also choose more sophisticated options such as external RAID boxes which come in several forms including SCSI, Firewire and SATA. SATA is an improved drive technology which gives sustained and reliable fast performance when using many drives RAIDED together.
A lot has been written over the years of the benefits of working with the operating system of your computer on one drive and storing your captured clips to a separate drive. This is really the best way to configure your system, but in the real world, a lot of people will have to use a single hard drive for the operating system and media storage for the simple reason that they only have one hard drive physically installed inside their computer. The professional MacPro towers allow for a total of four drives to be installed inside the computer — G5 towers have room for two internal drives.
Should you require more drives than your computer allows internally the simplest option is to go for external Firewire drives. Beyond this one would look toward SATA RAIDS.
Video at DV resolution chews up approximately 1 GB to 4.5 minutes of sound and video. It is easy, therefore, to work out how much material you can store on hard disk. Simply multiply the capacity of your hard drive by 4.5 and then divide the result by 60. This will calculate the amount of storage you will get in hours and minutes. The measurement of 4.5 minutes to the gigabyte is a conservative estimate. You actually get slightly more. Therefore a 60GB drive will provide room for between 4 and 5 hours of digital video. A 200 GB drive stores approximately 15 hours at DV resolution.
If you are working with formats of higher resolution than DV then the amount of storage per gigabyte drops dramatically. While 1 minute of DV footage consumes 216 MB, 1 minute at the uncompressed standard definition will use 1.4 GB, and for top-of-the-range high definition the same 1 minute will eat up 7.3 GB of hard drive space. Furthermore, uncompressed and high definition video formats are far more demanding and often require expensive RAIDs — this is when several drives work together to provide fast and reliable transfer of large amounts of data. HDV has the same requirements as DV. Other formats such as XDCam may have variable bit rates, thus the space required will vary according to the chosen quality setting, whereas DVCPro HD, by Panasonic, uses up 4 times the space of DV.
Firewire
Firewire is an Apple invented technology which also goes under the name of iLink and IEEE1394. One of the remarkable features of Firewire technology, unlike USB, is that it is intelligent. Firewire serves not only as a data transfer bus, it also allows for device control. It is for this reason that video and audio can be transferred through a Firewire cable and deck control can take place. Furthermore, Firewire is also bi-directional which means video and audio can flow in both ways through the cable. Thus video and audio can be transferred from a deck/camera to a computer and then back again — or, alternatively, one can perform deck to deck editing.
The golden rule when connecting your Mac and camera/deck with a Firewire cable is to make sure the connector is the correct size. Without sounding too basic, make sure you insert the Firewire connector correctly — if you jam it in backwards you will end up with a bent Firewire port.
Firewire ports are identified by a symbol (which looks remarkably similar to a nuclear warning symbol).
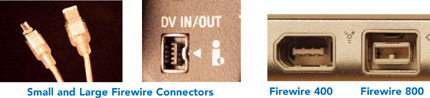
Firewire cables come in several forms. Cables can be made up of any combination of small to small, large to large, or small to large connectors. The larger 6-pin Firewire port is found on the back or side of your Mac (depending which Mac you have), while the smaller 4-pin Firewire connector is located on your camera or deck. The latest version of Firewire, known as Firewire 2, or IEEE 1394b, has a maximum transfer speed of 800 Mb per second which is twice the speed of the original version, known as Firewire 400.
Simply plug the large end of the Firewire cable into your Mac and the small end into your camera or deck. Firewire cables are hot-pluggable which means they can be connected or disconnected while the Mac is switched on or off, although, ideally, the devices should be plugged together prior to launching Final Cut Pro. Otherwise a warning message will appear to alert you to the fact that no Firewire device in being seen.
Before and After Firewire
It was all analog. Everything tangled up in a mass of cables. There were wires everywhere and different standards too. We’re talking 1980s’ technology. Composite Video, S-Video, Component Video.
All through the 1980s the standard was Sony Betacam. First there was standard Betacam, followed by Betacam SP and eventually, well into the 1990s, Digibeta emerged as the standard for professional digital production. Sony may have lost the format war to VHS but when it came to the professional arena Sony was untouchable.
Before Betacam it was U-matic, available in low-band and hi-band versions. There were various one inch formats: A, B and C. C-format was the best by a long shot. It was like working with 35 mm film and coincidentally the tape was about the same in measurement. Before one inch there was Quad — two-inch tape that originated in the 1950s when Ampex first invented videotape.
The 1990s. Digital is everywhere. Digibeta, D1, D2, D3, D5, D9. Avid ruled the non-linear market, with Media 100 chasing at its heels. DV hadn’t even been invented. Final Cut Pro wasn’t even a whisper.
Everything changed in 1996 with the introduction of one camera: the Sony VX-1000. When this camera appeared on the market the world went crazy. I remember the BBC had purchased 100 of these and the camera had only just been released. Then I started hearing the BBC had a VX-1000 in every single department in the whole of the BBC. Documentaries were filmed with this camera, multi-camera shoots were produced and the professional world with all their big cameras sat back in astonishment as the world of acquisition was redefined, apparently, overnight!
DV blew the whole scene apart. The quality of DV, as a recording format, is equivalent to Beta SP Perhaps on a technical chart DV might score slightly less, but then DV doesn’t suffer from the drop-out problem which plagued Beta SP due to shedding and flaking of oxide.
DV was just the sort of technology the world wanted desperately. Finally, a low-cost, lossless, high quality camera/editing solution had arrived. This exact same technology forms the basis of Firewire editing systems today — only the deck or camera is usually connected to a computer rather than editing from camera to deck or vice versa.
When using a DV Firewire-based editing system you can work with either a camera or deck — providing the deck/camera has both Firewire ‘in’ and ‘out.’ The advantages of having a deck are (i) you don’t beat up your camera every time you capture footage (ii) a deck offers other features such as different inputs, the ability to work with large or small size tapes, a large time-code display, a jog/shuttle wheel and often a built-in edit controller. More recent formats use solid-state media and therefore have no moving parts.
Video Formats
The world we live in operates with several different video formats.
DV-NTSC applies to the USA, Japan and many other parts of the world; whereas DV-PAL is used throughout most of Europe, Australia, and parts of Asia. There are other formats such as SECAM which is used in France, Russia and North Africa, and variations on PAL and NTSC are used in South America. However, PAL and NTSC remain the dominant formats.
If you are working with HDV the standard for the USA and the rest of the ‘NTSC world’ is 60i. If you are working with HDV in the ‘PAL world’ the standard is 50i.
Final Cut Pro is geared to edit everything from DV to standard and high definition video. It is also capable of film production.
Television Aspect Ratio
Another consideration is whether the footage you are working with has been filmed in widescreen anamorphic — 16:9, or standard television format — 4:3. Do not confuse letterbox (cropped 4:3) with true widescreen. Many consumer cameras do not offer a true widescreen anamorphic mode of operation. However, many offer a cropped 4:3 letterbox setting.
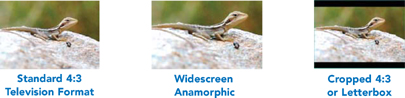
Note: All the HD formats are widescreen.
Loading the Software
![]() Put the Final Cut Studio Install DVD into the DVD drive of your Mac.
Put the Final Cut Studio Install DVD into the DVD drive of your Mac.
![]() Double click the Install Final Cut Studio icon.
Double click the Install Final Cut Studio icon.
Follow the on-screen instruction making sure you agree to the licence agreement.
![]() Highlight the hard drive where you wish to install the software and click continue.
Highlight the hard drive where you wish to install the software and click continue.

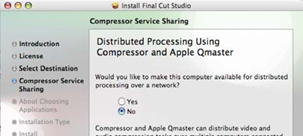
![]() Choose the option No when asked if you want to make your computer available for distributed processing over a network, unless you specifically wish to be able to do this.
Choose the option No when asked if you want to make your computer available for distributed processing over a network, unless you specifically wish to be able to do this.
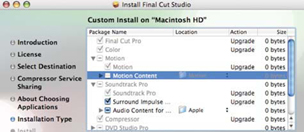
You now need to decide which of the associated media you wish to install. All of the applications will be installed, meaning Final Cut Pro, DVD Studio Pro, Compressor, Motion, Soundtrack Pro, Color, Livetype, Cinema Tools and Apple Qmaster — however, it is up to you to decide if you want all of the media for each of the applications to be installed. Remember, installing everything will take more hard drive space. If you have plenty of space this isn’t an issue.
To choose specific content you wish to install click the arrows to the left of each of the applications and then check or uncheck accordingly.
![]() You will then be prompted to insert the different DVDs according to which options you checked for installation.
You will then be prompted to insert the different DVDs according to which options you checked for installation.
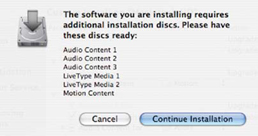
Simply follow the instructions as they appear. If you are installing all of the content for the Final Cut Studio suite it will take a considerable amount of time for the entire installation process to complete. You need to feed the appropriate DVDs into your Mac in the order requested.
![]() Finally, you will be prompted to choose the format you will be working ...th by clicking on the drop-down menu which appears.
Finally, you will be prompted to choose the format you will be working ...th by clicking on the drop-down menu which appears.
This can be easily changed once you start using the software.
![]() Cick OK.
Cick OK. ![]()
Initial Setup
Once Final Cut Pro has been successfully installed you need to be able to access Final Cut Pro and the other applications which are installed on your system.
Final Cut Pro and all of the other applications you have installed can be accessed by going to the application folder which is located on the hard drive where the operating system of your computer is installed.
The easiest way to get to the Applications folder is to choose the menu at the top of the desktop screen titled Go.
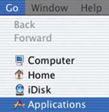
![]() Select the Go menu and scroll down to Applications.
Select the Go menu and scroll down to Applications.
![]() Locate the Final Cut Pro application icon in the Applications folder.
Locate the Final Cut Pro application icon in the Applications folder.
![]() Drag the Final Cut Pro icon onto the dock.
Drag the Final Cut Pro icon onto the dock.

![]() Do the same with the other applications you have installed, such as Livetype, Soundtrack Pro, DVD Studio Pro, Compressor and Color.
Do the same with the other applications you have installed, such as Livetype, Soundtrack Pro, DVD Studio Pro, Compressor and Color.

![]() Click once on the Final Cut Pro icon to launch the program. You are now ready to begin work within Final Cut Pro.
Click once on the Final Cut Pro icon to launch the program. You are now ready to begin work within Final Cut Pro.
Easy Setup
Apple have made it very easy to set up Final Cut Pro, however, it is up to you to make sure you get these settings right. If you set the audio sample rate incorrectly the result will be sync drift; if you set the video to widescreen anamorphic when it was shot in standard 4:3 your images will not fit the frame correctly.
The simplest way to set up Final Cut Pro is to access the Easy Setup menu.
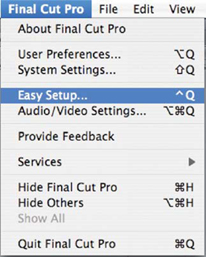
Open the Final Cut Pro menu at the top left of the screen. Scroll to Easy Setup and release your mouse button.
Take a good look at the options presented to you in the Easy Setup menu.
There are three areas which need to be investigated:
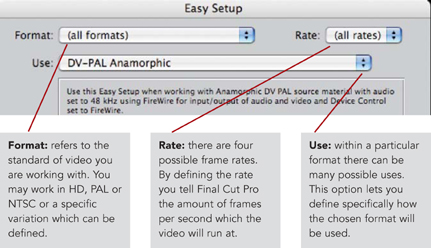
By clicking each of these options you will see that a drop down menu will appear displaying the options for each of these categories present. It is important to be aware that the options presented in the Use menu will be determined by the selection you have have made with the first two options: Format and Rate.
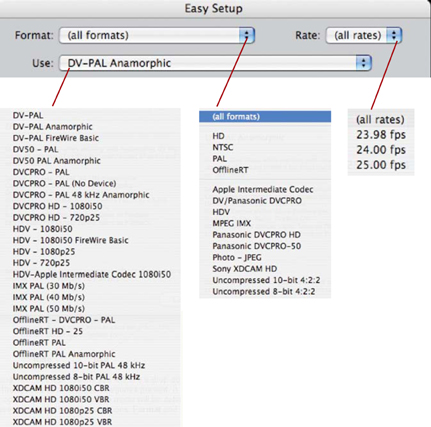
What Apple has done is to provide choice to the user and in providing choices this forces the user to make a decision. The images above and left show all the possible choices. Straight away one can see that there are several frame-rates, many different formats and the use provided by the formats is extensive.
Now look what happens when one chooses a specific frame-rate or format to work with — the Use then becomes narrower. When choosing HD as the Format at the Rate of 25 frames per second then the only options which will be offered
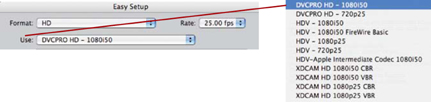
in the Use column are those which correspond to this format and frame-rate.
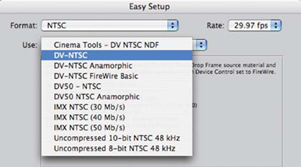
Again, in another example, when choosing to work in NTSC at the frame rate of 29.97 the following options are offered:
With previous versions of Final Cut Pro all the options for Easy Setup were offered in one long list. Because there are now many more video frame-rates and formats than in the past, the Easy Setup procedure has been streamlined to categorize the choices. The three headings: Format, Rate and Use means that the user has to simply select the Format they are working with, choose the Frame-Rate and then select from the Use column that which corresponds to their requirments.
Once that is done simply press the Setup button and you are done. ![]()
Do not be confused or intimidated by the many formats, multiple frame-rates and wide selection of uses on offer. You are simply telling Final Cut Pro the standard you wish to edit at. Once done you can then move forward with the editing process.
Note: when you make the first edit to the Timeline of a new Sequence, if the frame-rate or format does not match the Sequence setting, you will then be offered the choice to change the Sequence Setting regardless of what you set the Easy Setup to. Effectively this provides a quick and easy way of changing the settings without going through the Easy Setup Warning process. However, it is extremely useful to use the Easy Setup as you can then specifically determine the Sequence setting manually
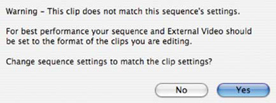
so this matches the format you wish to work at. It could be a disadvantage to have Final Cut Pro make this choice for you.
DV Audio
It is important to understand how DV audio works. Otherwise you can end up in a lot of trouble when you begin the capture process. DV audio can be recorded at two different sample rates:
16 bit — 48 kHz provides the highest quality and allows for two channels of audio, or a single stereo pair to be recorded.
12 bit — 32 kHz provides lesser quality, though still very good, and allows for two sets of stereo pairs, or four individual tracks to be recorded.
By default, the DV-PAL and DV-NTSC Easy Setups are set to the highest possible sample rate of 48 kHz.
For the most, 16 bit audio is the preferred option, unless one specifically needs to access four independent channels. While this may sound ideal it is rare for any DV cameras to actually have inputs to record four independent channels of audio. The main advantage to setting a camera to 12 bit — 32 kHz is that audio dubbing can then take place onto the remaining free set of stereo pairs.
Unless you specifically plan on accessing these tracks I recommend setting your camera to 16 bit — 48 kHz. This is usually accessed through the menu settings in your camera.
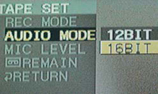
The Audio Sample Rate is Set in the Menu of your DV Camera