ORGANIZING YOUR FOOTAGE
Final Cut Pro’s benefit is that it is more productive. It allows the editor to get more done.
MICHAEL VITTI
NEW YORK FINAL CUT PRO USER GROUP
Viewing Clips
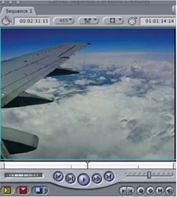
Now that you have captured your clips you need to be able to view them. This is the first step towards sorting through your footage. To view your material double click any of the clips in the Browser and immediately the clip will open in the Viewer. Press the Space Bar and the clip will play.
The controls in the Viewer window can also be used to play the clip. You can move quickly through the clip using the yellow Scrubber Bar ![]() , located below the image in the Viewer. Simply click once with the mouse and move the Scrubber Bar backwards or forwards.
, located below the image in the Viewer. Simply click once with the mouse and move the Scrubber Bar backwards or forwards.
It is also possible to shuttle through the clip using the J K L method. By tapping the ‘J’ or ‘L’ key up to five times the speed will increase in increments. Press ‘K’ or the Space Bar to stop. Press the Space Bar again to play.
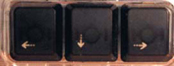
To jog through the clip a frame at a time press the horizontal arrow keys located to the right of the Space Bar. The left arrow takes you backwards a frame at a time while the right arrow takes you forward a frame at a time. Hold down the Shift key and press either of the arrow keys and this will move forwards or backwards through the clip a second at a time.
Playing Video through Firewire
When working with video designed to be watched on television it is desirable to play the video signal through a deck or camera and onto a standard television screen. This is because the images on a television screen provide a true representation of the final quality of your finished movie. Otherwise, you will be working exclusively off the computer monitor which provides a different type of picture to that of a television set. Much of the content produced today will be watched over the internet, on iPods, Playstations or on computer screens. However the most popular viewing medium remains television. There would barely be a household in the modern world which does not own at least one TV.
When editing DV footage the deck or camera must be set to receive video through the Firewire cable. A large 6-pin to small 4-pin Firewire cable will link your computer to the Firewire device. You must make sure the correct input is selected if you are using a deck, or, if using a camera, make sure that it is switched to VTR mode. Beyond this the output from the Firewire device needs to be fed into the television set.
Within Final Cut Pro check that the External Video is set to play all frames through Firewire.
![]() Choose the View menu found at the top center of the screen.
Choose the View menu found at the top center of the screen.
![]() Scroll to video and select All Frames.
Scroll to video and select All Frames.
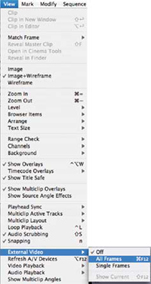
The video signal will now play direct from the Mac to your deck or camera and onto the television set.
DV Start/Stop Detection
Back in the old days the film editor would take the workprint when it returned from the lab and cut it into pieces. These pieces were individual shots or sequences of film. The problem with having a huge amount of film on a reel, which had not been broken down into shots, was that it was unwieldy and time consuming to work with. Imagine if the editor of 40 years ago had a machine that would do that part of the process for them.
Well you do have it. Inside of Final Cut Pro is a remarkable feature that will break up long captured clips into individual shots. Each time the record button is pressed on a DV camera a signal is recorded to the tape — another signal is then recorded to tape when the recording stops. Final Cut Pro recognizes this recorded signal and once footage has been captured you can run your footage through what is called Scene Detection. Effectively Scene Detection scans through your footage and breaks it up into individual shots.
![]() Highlight a clip or group of clips in the Browser (a group of clips can be selected by dragging a lasso with your mouse around several clips or by holding down the Apple key while clicking on the individual clips).
Highlight a clip or group of clips in the Browser (a group of clips can be selected by dragging a lasso with your mouse around several clips or by holding down the Apple key while clicking on the individual clips).
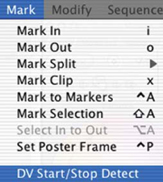
![]() Select the Mark menu and scroll down to DV Start/Stop Detection — release your mouse button.
Select the Mark menu and scroll down to DV Start/Stop Detection — release your mouse button.
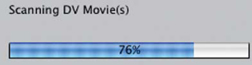
![]() A progress bar will appear as the clip or clips are scanned by the computer.
A progress bar will appear as the clip or clips are scanned by the computer.
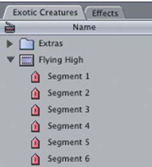
![]() Look to the clip(s) you have just scanned. Notice there is a little arrow next to the clip name. Click the arrow and this will reveal a set of pink arrows. Each of these arrows represents a time when the DV camera has started and stopped recording. If you click any of the segments you can then view each of the shots in the Viewer.
Look to the clip(s) you have just scanned. Notice there is a little arrow next to the clip name. Click the arrow and this will reveal a set of pink arrows. Each of these arrows represents a time when the DV camera has started and stopped recording. If you click any of the segments you can then view each of the shots in the Viewer.
DV Start/Stop Detection is a very useful function. If you wish you can capture an entire tape’s worth of material and then have the computer break up the footage into individual shots. Effectively the computer does a great deal of sorting through the raw material for you. What it doesn’t do is name the individual shots or sort out the good takes from the bad. That is something you must do.
Working with Bins
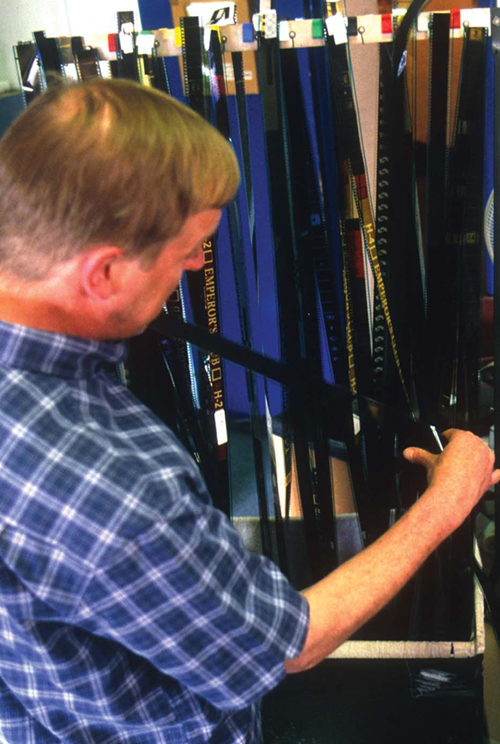
In the old days before videotape was invented, and certainly before digital cameras and computers were used to acquire and edit productions, a film editor would organize strips of film in an area known as a trim bin. These film strips were hung on a horizontal rack and ordered according to the wishes of the film editor.
While a lot has changed technologically, when working with a non-linear editing system such as Final Cut Pro, it is still crucial to order your material. Otherwise, it soon becomes impossible to track down your shots, particularly if you are working with hours of footage and thousands of clips. Final Cut Pro certainly has the power to handle productions of this magnitude!
To facilitate a simple way of ordering your material it is possible to create what are called bins within the Browser window. Within each of these bins you can store individual clips. The term bin, as you may have guessed, is taken from the era of film editing.
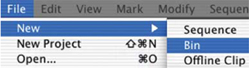
![]() To create a new bin select the File menu at the top left of the screen — scroll down to New and select Bin. Alternatively, press Apple B (the Apple button is located immediately left of the Space Bar).
To create a new bin select the File menu at the top left of the screen — scroll down to New and select Bin. Alternatively, press Apple B (the Apple button is located immediately left of the Space Bar).
![]() In the Browser a box will appear titled Bin 1. This box is clear and different in shape to the clips so there is little likelihood of confusion. You can rename the bin by typing a name immediately after it has been created. Should you wish to rename the bin later, simply click once on the text area, then pause, and click again in the text area. You can now overtype the title and name the bin whatever you wish. Press return once you have renamed the bin.
In the Browser a box will appear titled Bin 1. This box is clear and different in shape to the clips so there is little likelihood of confusion. You can rename the bin by typing a name immediately after it has been created. Should you wish to rename the bin later, simply click once on the text area, then pause, and click again in the text area. You can now overtype the title and name the bin whatever you wish. Press return once you have renamed the bin.
Now that you have created and named a bin you can place clips inside it. Clips can be moved, one at a time, by clicking once on the clip and dragging into a bin with the mouse. To select multiple clips use the mouse to drag a lasso around the clips you wish to highlight. Drag the highlighted clips over a bin and release the mouse button. The clips will then be dropped inside the bin.
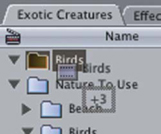
Highlight Clips and Drag these into a Bin
Several clips can also be selected, one at a time, by holding down the Alt/Option key (located second to the left of the Space Bar) and clicking on each of the clips you wish to highlight. Drag the highlighted clips into the bin and release your mouse button.
To view the contents of a bin:
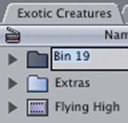
![]() Click the triangle to the left of the bin’s title and the contents will be displayed in descending order.
Click the triangle to the left of the bin’s title and the contents will be displayed in descending order.
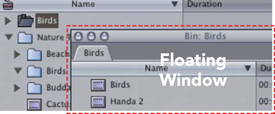
![]() Alternatively, double click the bin and a floating window will appear with the bin’s contents visible in front of you. To close the floating window click the button at the top left and the bin will return to its original position within the Browser.
Alternatively, double click the bin and a floating window will appear with the bin’s contents visible in front of you. To close the floating window click the button at the top left and the bin will return to its original position within the Browser.
You can create as many bins as you like. And you can also store bins within bins. Simply drag a bin over another bin and release your mouse button. The result is a bin stored within a bin.
Items can be moved from one bin to another by highlighting and dragging. Should you wish to move an item from within a bin back to the Browser, you must double click the bin to open it as a floating window and then drag the item or items out of the bin and into the Browser where they will be positioned.
If you want to delete either a clip or a bin highlight the item and press the delete key. Note that the items are only deleted from the Browser and not from your hard drive. Everything inside of Final Cut Pro works by referencing to the original files which exist in the scratch disk folder/s which you set up earlier. Original clips remain stored on the hard disk of your Mac unless you actually go into the hard drive, remove the items and then place them in the trash on the dock. By emptying the trash the items are then deleted.
Working in Icon View
By default Final Cut Pro will display clips in list mode, which means the clips are represented by the names you give to them during the logging process. It can be advantageous to view your clips as icons, or miniature pictures, particularly if you are the sort of person who prefers to work visually. It can be easier to identify a clip by a picture icon, rather than scrolling through an alphabetical list of words.
To view clips in icon mode:
![]() Click in the Browser to make the Browser active.
Click in the Browser to make the Browser active.
![]() Select the View menu at the top of the screen and scroll down to Browser Items.
Select the View menu at the top of the screen and scroll down to Browser Items.
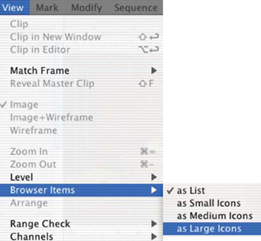
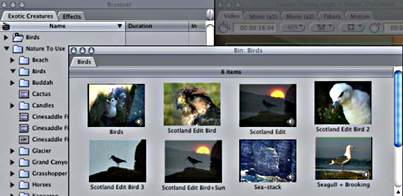
![]() Choose any of the icon views — you will notice it is possible to view as Small, Medium or Large Icons. The items in the Browser will now be represented by pictures, rather than by words.
Choose any of the icon views — you will notice it is possible to view as Small, Medium or Large Icons. The items in the Browser will now be represented by pictures, rather than by words.
By selecting the Arrange function, found under the View menu, the icons can be lined up by name (alphabetically) or by size.
My preference is to keep the items in the Browser in list view and items inside each of the bins in Icon view. By using this combination one has the advantage of being able to view the material both ways. If one clicks on the arrow to the left of any of the bins, the clips will be displayed in list view; whereas if one double clicks a bin the contents can then be displayed as icons.
Setting Poster Frames
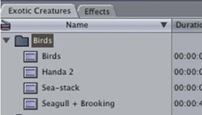
As described, when you work in icon view, each clip is represented visually in the form of a miniature icon. The picture used to represent each of the clips is called the Poster Frame. The Poster Frame is determined by the first frame of the clip.

A problem arises when the first frame of the captured clip is not representative of the shot. Look at the above example. The image on the left does nothing to represent a Seagull, whereas the image on the right says it all.
It is possible to set any image from within the clip to be the Poster Frame.
![]() Open the clip into the Viewer and position the Scrubber Bar on the frame you wish to display.
Open the clip into the Viewer and position the Scrubber Bar on the frame you wish to display.
![]() Select the Mark menu at the top of the screen and scroll down to Set Poster Frame. Release the mouse button and the image on the thumbnail will now change to that which you have selected.
Select the Mark menu at the top of the screen and scroll down to Set Poster Frame. Release the mouse button and the image on the thumbnail will now change to that which you have selected.
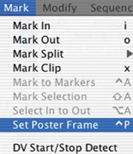
It is also possible to reset the Poster Frame to the first frame of the shot simply by selecting the Clear Poster Frame command which is also found under the Mark menu.
Searching for Clips
Final Cut Pro is a powerful editor capable of referencing to thousands of clips stored on the hard drives of your computer. As the editor you have to know what footage is there and how to get to it. It is all very well to know that it is there somewhere — if you can’t find it you are lost.
The most useful database of all is the human mind. An editor will constantly refer to the list in their mind to retrieve a shot ephemerally before actually doing so electronically.
When working on a large project, with hundreds or thousands of separate clips, you need a system to find what you need. Providing you have taken care to label each of your clips in a way that is easy for you to identify with, you will then be able to search for any clip in your project. Apple has made this possible in an extremely simple and elegant way.
To search for a clip:
![]() Click once anywhere in the gray area of the Browser.
Click once anywhere in the gray area of the Browser.
![]() Hold down the Apple key and press the letter F. This will open the Search/Find dialog box. Alternatively, this can be accessed from the Edit menu by scrolling to the Find command.
Hold down the Apple key and press the letter F. This will open the Search/Find dialog box. Alternatively, this can be accessed from the Edit menu by scrolling to the Find command.
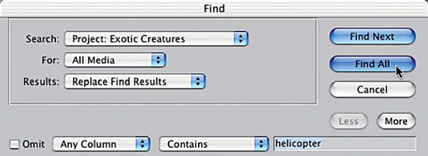
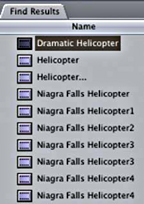
![]() Type the name of a clip or part of the name you wish to search for and then press Find All. All relevant items will then be placed in a bin in front of you.
Type the name of a clip or part of the name you wish to search for and then press Find All. All relevant items will then be placed in a bin in front of you.
What would have taken a lot of effort in the past, when working with film or tape, has now been reduced to only a few seconds’ work. You still need to rely on your mind to know what you are looking for, however, the difficult work of actually locating the clips has been made very easy. That is assuming you have labelled your clips correctly and that you know what you are looking for in the first place.
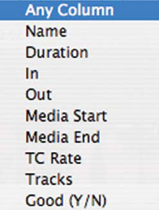
The Search facility within Final Cut Pro can be quite sophisticated. There are many options available beyond the simple method of searching within the Browser as just described. It is possible to search by name, column, through the log notes and a variety of other criteria.