RENDERING

It is a unique editor. And there’s nothing like it out there.
CHARLES ROBERTS
MEDIA PROFESSOR, AUTHOR, EDITOR
Rendering is the process by which your computer builds each of the individual frames needed to produce an effect. When you play back straight cuts in the Timeline nothing needs to be rendered. The computer simply refers to the hard drive where the original shot has been recorded and uses your edit information to determine which section of the original shot is needed. When an effect is applied to a clip a different process must take place.
People often complain about rendering — to wait seconds or minutes for a computer to produce an effect can often drive people mad. I always smile at these situations. My background was in the world of on-line tape editing where the editor would work with several videotape machines, a separate vision mixer, character generator, audio mixer and Digital Video Effects (DVE) generator. To produce effects in this setup would often require an editor to record one or more of the shots to separate tapes. Several tape machines would then be run in sync with the layered effects built through the mix-effects banks of a vision mixer. The output would be in real time, however, real time was only achieved at the expense of the time used in the setup of an effect. These effects would often take a considerable amount of time to set up.
It is not always necessary to render effects in Final Cut Pro to see a result. Through the facility known as RT Extreme it is possible to see many effects play back in real time directly through Firewire. One should be aware, however, that the output quality is not always full quality and that the results are intended for the purpose of gauging timing and other critical decisions, rather than for producing full resolution output. The final output will still need to be rendered. The advantage of RT Extreme is that it allows the editor, in many situations, to build effects without having the render process getting in the way of one’s creative flow.
Dynamic RT is a mode in RT Extreme which allows the computer to automatically adjust image quality and frame-rate on-the-fly so you always get the best possible real-time playback on your system. So if an effect is complex the frame-rate and image quality will drop, so you can see the result with lesser quality. A simpler effect will playback at full frame-rate and higher quality.
The amount of real time one gets through RT Extreme and Dynamic RT depends on the processor inside your Mac, which Mac you are using, the amount of installed memory, the system bus speed of the computer, how many layers, filters, transitions and generators are being used and the complexity of the effects created.
A further factor to consider is the setting chosen in the Real-time Effects pop-up menu. The output quality for RT Extreme is customizable. You choose the quality you want the output to be played back at.
Unlimited RT allows Final Cut Pro to play the maximum possible in the way of real-time effects; however, the trade-off is an increased likelihood of dropped frames. Choosing Safe RT will eliminate dropped frames, however, this will limit the overall ability to playback effects in real time.
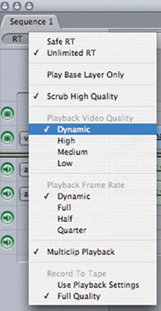
My choice is to leave Unlimited RT set. I can live with dropped frames. If I need full quality results then I render.
I leave Dynamic RT switched on for both Playback Video Quality and Playback Frame Rate. This means the computer will vary the output quality according to the complexity of the effects.
Leave Record to Tape on Full Quality as this will give you full resolution output when recording.
Multiclip Playback is relevant to Multicam (dealt with later). I always leave this switched on.
Don’t stress out about your RT Extreme and Dynamic RT settings. You set these according to your choice and then forget about them.
The Render Settings
In the early versions of Final Cut Pro the render settings were basic. One could choose to render everything in the Timeline or one could choose to render a particular section. Now the choices are far greater. The choices give power to the editor. One can be quite specific about which sections of the Timeline one wishes to render.
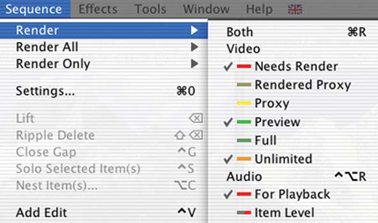
![]() Choose the Sequence menu and scroll to Render — a window opens displaying various colors. These are the options one can choose when setting the level to which you want the Render command to apply.
Choose the Sequence menu and scroll to Render — a window opens displaying various colors. These are the options one can choose when setting the level to which you want the Render command to apply.
![]() You can choose as many or as few of the colors to apply to this .setting as you wish. Each level, represented by a color, works by means of a toggle. A tick means a color is selected; no tick means it is not selected. You need to choose the colors you want to apply to the Render Selection setting. This is achieved by clicking on a setting and releasing your mouse button. The color that you clicked will now have a tick next to it. Each time you wish to activate or deactivate a particular setting you need to repeat the process.
You can choose as many or as few of the colors to apply to this .setting as you wish. Each level, represented by a color, works by means of a toggle. A tick means a color is selected; no tick means it is not selected. You need to choose the colors you want to apply to the Render Selection setting. This is achieved by clicking on a setting and releasing your mouse button. The color that you clicked will now have a tick next to it. Each time you wish to activate or deactivate a particular setting you need to repeat the process.
![]() Do the same for the Render All settings under the Sequence menu and the Render Only setting. Render All applies to the entire Timeline, whereas Render Only applies to a particular color, or level of render, throughout the Timeline. Once the settings have been chosen these settings will be remembered by Final Cut Pro each time you open the program.
Do the same for the Render All settings under the Sequence menu and the Render Only setting. Render All applies to the entire Timeline, whereas Render Only applies to a particular color, or level of render, throughout the Timeline. Once the settings have been chosen these settings will be remembered by Final Cut Pro each time you open the program.

At a basic level, one could select the color red. When a red bar is exhibited above a clip, it means the real-time capabilities of Final Cut Pro have been exceeded and the material must then be rendered for playback.

The following is a basic summary of what the most important of the individual colors mean:
Dark Gray — no rendering is required.
Steel Gray — material in the Timeline has been rendered.
Dark Green — will play back through RT Extreme at full quality.
Green — will play back through RT Extreme, however, motion and scaling effects will be approximate only.
Yellow — will play back through RT Extreme with an approximate representation of the effect. Some filter controls may be ignored.
Orange — effects will be played back with a high likelihood of dropped frames.
Red — requires rendering for playback.
The render commands I use most are to Render a particular part of the Timeline — accessed by holding down the Apple key and the letter ‘R’, or Render All, accessed by holding down the Alt/Option key and pressing ‘R’. This will render all the video in the Timeline that requires rendering. By accessing the Sequence menu the commands can also be executed. One can choose to render Both — which means Video and Audio, or Video or Audio Independently.
Apple − R × Render highlighted video in the Timeline
Alt/Option − R × Render all video in the Timeline
You need to configure the render options to suit your needs. My choice is to keep life really simple. I select all the options possible. This means I know that everything necessary for a full quality render will be performed when I hit any of the render commands.
Whenever you see a red bar at the top of the Timeline (above a shot to which an effect has been applied) this means this section must be rendered. It is possible to render individual clips or to instruct the computer to render everything in the Timeline that needs rendering.
When a shot requires rendering, go to the Sequence menu at the top of your screen and scroll down to Render. Providing you have the appropriate colors selected to match the color of what needs to be rendered, the process will then begin.
A progress bar will display in percentage terms how much material has been rendered.
Once the render is complete you can then play the rendered clip/s in real time. If you are happy with the result, carry on editing. If you are not happy make the necessary adjustments to the parameters of the effect and then render again.
At any time you can stop a render in mid-progress by pressing the Escape key (located top left of your keyboard). The render will cease, however, the portion of the shot or Sequence already rendered can be played back. This is a particularly useful feature as one can choose to render a small portion of a shot or Sequence, then play back this section to determine whether or not to go ahead with the complete render. Once you restart the render process begins again at the point where it was previously stopped. Thus, you do not need to re-render material that has already been rendered just because you stopped the process mid-render to look at the result of an effect.
A final useful work tip. If you mark the ‘In’ and ‘out’ points in the Timeline, you can then choose the Render Selection command found under the Sequence menu. This will render everything between the ‘in’ and the ‘out’ points. Very useful!
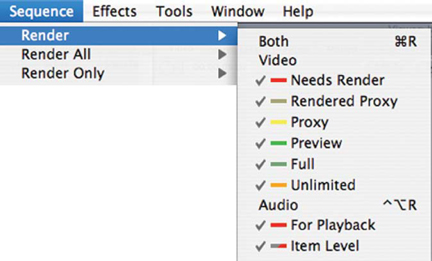
One can choose to be selective about what gets rendered in the Timeline, or simply switch on all the render controls and this will ensure that everything that needs rendering will be rendered when the command is given.
Open Format Timeline
One of the new features in Final Cut Pro 6 is the ability to edit mixed formats into the Final Cut Pro Timeline and to be able to play back the different formats in real time without having to render until final output.
It used to be when one set up their Timeline in Easy Setup everything would work for the format which was specified. Choose DV-PAL and you cut DV-PAL, but introduce some DVCPro HD and some DVCPro 50 footage and suddenly the render bars would appear. This interrupts the creative flow as the editor hits Apple − R and then waits until the render process is done.
That’s how it used to be.
With Mixed Format editing you get a lot more. Many formats at different frame rates play together in real time. While there can still be some render bars which appear, depending on the complexity of the codecs at work and the power of your Mac, for the most one can cut from one format to another with a lot less pain than in previous versions of Final Cut Pro. A final render is still needed for final output. While editing, for the most, the different formats play together in real time.
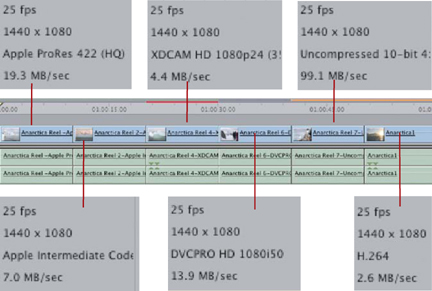
The mixed format Timeline on the previous page shows most formats will play in real time. Final Cut does have some difficulty playing back in real time H.264, however this is designed as a distribution format and not as an editing format, so this is to be expected. Note the XDCam 1080p24 gave a red bar for rendering the audio and not the video. The test machine was a MacBook Pro with Intel dual core duo 2.33 GHz and 2 GB ram. The Timeline was set to DVCPro HD 1080i50.
It is important to be aware of how the Open Format Timeline handles scaling.
Go to User Preferences and look to the second tab at the top titled Editing.
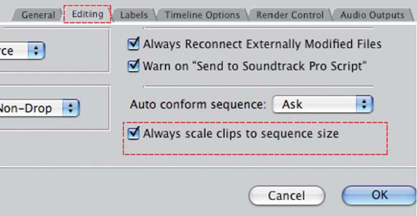
To the bottom right is an option to scale your clip in size according to the Sequence Settings of your Timeline. This can be toggled on off.
When leaving this option on it means that SD footage in a HD timeline will be scaled larger to fill the HD frame — or vice versa, scaled down in size if HD footage is edited into a SD Timeline.

