
HIGH DEFINITION
Affordable High Definition
Just as DV set the world on fire when it burst on the scene in late 1995/early 1996, HDV has also captured the minds and revved up the imaginations of independent filmmakers and video professionals when it exploded like a supernova close to a decade later.
HDV has two faces. One is that of a shining goddess with incredible beauty that stands tall as being something incredible to look at. Yet in post-production stakes HDV also has the head of Medusa — look closely and you may not like what you find.
My analogies may seem somewhat over-the-top but HDV has given to us an acquisition medium which provides incredible quality at an amazing price. But when it comes to editing the images unfortunately the picture has been muddied by the difficulties which are inherent with the HDV format.
The compression used with HDV is known as long GoP MPEG-2 encoding. The signal is recorded onto DV tape and requires the same amount of disc space as DV That’s where the similarity ends. In technical terms DV is a frame-based codec — every frame stands alone — while HDV (MPEG-2) use interframe compression, this is where compression takes place according to the difference between frames. This makes HDV a very computationally difficult format to work with. As such everything works slower and the computer has to work a lot harder to achieve results.
With the powerful Macs of today, when editing HDV, everything may appear to be working as normal, particularly if it is cuts only in your HDV timeline. But start adding the layers and effects and suddenly you may find that everything becomes unwieldy.
This is because MPEG is muddy. It’s all mashed together in a way where a single frame is designated as the master frame for what is known as a Group of Pictures (GOP). Each GOP occurs every 15 frames with Sony HDV or with the JVC system, HDV2 or short GOP MPEG-2, the frames are 6 frames apart. So each of the frames in the GOP, other than the master frame, is created by referring to the master frame — analysing what moves and changes in all the other frames that proceed it — and then building each of the frames in the GOP for Final Cut Pro to access. Sounds complicated and it is. The result is a codec that is cheap and sometimes dirty, difficult for your computer to work with, but which can also produce very good pictures.

Sony HVR-Z1 HDV Camcorder: 15 frame GOP structure, records HDV2

JVC HD-100 HDV Camcorder: 6 frame GOP structure, records HDV 1

Panasonic HVX-200 DVCPro HD Camcorder: Records DVCPro HD, a frame-basaed codec, which uses 4 times the bandwidth of HDV
Working Around the HDV Problem
There are alternatives. A method I have worked with is to transcode my HDV footage to the Panasonic DVCPro HD codec. The important point to understand is that DVCPro HD, as a format, is frame independent. Every frame stands alone. This is huge at many levels. First, each frame that is recorded can be edited in and out as you choose. Also, each frame is independently capturing data and assigning compression value to important areas of the frame (like details in the shadows and color values). At no time during recording does the next frame cause the algorithm to give away detail, as it does in HDV recording.
However, converting footage to the DVCPro HD codec requires one to jump through several technical hoops and hurdles. The conversion can be done inside your Mac by using Batch Export.
Batch Export In Final Cut Pro
![]() Highlight in the Browser those items which you want to Export.
Highlight in the Browser those items which you want to Export.
![]() Choose File and scroll to Batch port.
Choose File and scroll to Batch port.

The Export Cue will now appear showing the items you chose to export.
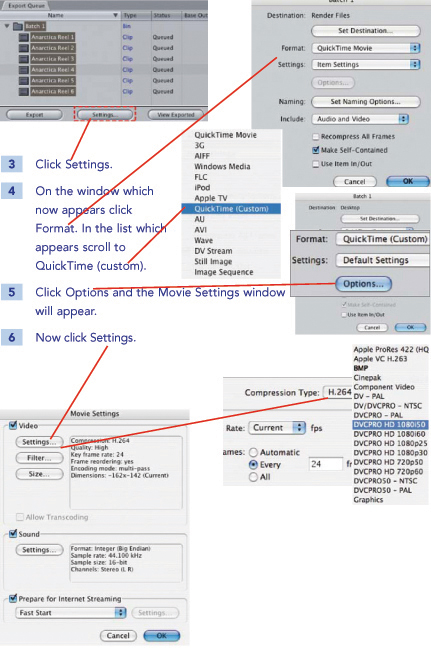
![]() Yet another window will open. Click to the right of Compression Type and an extensive list of codecs will appear. Choose the one you wish to work with — in this case one of the DVCPro HD codecs. Click and release your mouse button.
Yet another window will open. Click to the right of Compression Type and an extensive list of codecs will appear. Choose the one you wish to work with — in this case one of the DVCPro HD codecs. Click and release your mouse button.
![]() Once you have set the Codec, . .ick in the Movie Settings window uncheck the box where it says Prepare for Internet Streaming. Click OK.
Once you have set the Codec, . .ick in the Movie Settings window uncheck the box where it says Prepare for Internet Streaming. Click OK.

![]() Now, back at the Batch Window — check the Destination has been set. This is where your encoded files will end up on hard drive.
Now, back at the Batch Window — check the Destination has been set. This is where your encoded files will end up on hard drive.
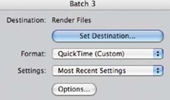
Once the destination is set press OK. ![]()
![]() Now — back at the Export Queue window you are ready to encode. You have set the video format and destination, now press Export and all the files you have selected will be encoded to the format and location you have specified.
Now — back at the Export Queue window you are ready to encode. You have set the video format and destination, now press Export and all the files you have selected will be encoded to the format and location you have specified.
Wait and be patient. When you are converting to DVCPro HD it is going to take time. Don’t forget you’re coming from HDV which is muddy to begin with. What you are doing is sifting through the mud and cleaning it all up to work, literally, as a frame-based codec.
My experiences with editing DVCPro HD is that the format is super robust. No crashes for days on end. The downside to DVCPro HD is that it takes up 4 times the space of DV or HDV, so therefore a 500GB drive which gives close to 37 hours of storage when working with DV or HDV will give less than 10 hours when working with the DVCPro HD codec.
The Apple Intermediate Codec (AlC)
An alternative to editing HDV is to edit with what is known as the Apple Intermediate Codec or AIC. This is a frame-based codec which, like DVCPro HD, produces large file sizes. 1080i AlC clips are four times the size of DV or HDV files.
AIC also involves a re-encode and therefore there is a barely imperceptible drop in quality from the original HDV files. This provides a quick and easy way to edit HDV files though one needs to be aware that the original timecode is lost on capture making recapture, in the event of disaster, impossible.
The procedure for setting up your system to work with the AIC codec is simple.
![]() Choose Apple Intermediate Codec from the Easy Set-up at the frame rate which you are working with.
Choose Apple Intermediate Codec from the Easy Set-up at the frame rate which you are working with.

![]() Got to Log and Capture.
Got to Log and Capture.

You will notice that you do not get a Log and Capture window to work with. All you get is a very basic window which provides the means to capture your footage. There is no facility to choose audio or video independently and no means to capture timecode. This is capture on the most basic of levels. The most you get is to name your clips. Think of it like using Capture Now without being able to access the Timecode information.
![]() Capture your material — one clip at a time, or one tape at a time.
Capture your material — one clip at a time, or one tape at a time.
One your clips are captured, set up an Apple Intermediate Codec Timeline and begin editing.
Rendering will be much slower than you are used to with DV though nothing like as slow as when working with HDV. The editing process with AIC is reliable and stable. Editing is smooth and trouble free.
Encoding Using ProRes 422
Fortunately the Final Cut Pro development team at Apple keep a close watch on what is going on and they are very much aware of the difficulties the post-production community deals with. As such a new feature has been added to Final Cut Pro 6 for those working with HDV or Sony’s XDCam HD format. One can now choose to render native long GoP MPEG-2 footage using the Apple ProRes 422 format. As mentioned in the previous chapter ProRes 422 has been designed to reduce massive files such as uncompressed HD files — but there is another advantage which is it is frame-based codec.
![]() Set up an HDV Timeline.
Set up an HDV Timeline.
![]() Click in the Timeline to make it active.
Click in the Timeline to make it active.
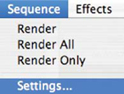
![]() Click the Sequence menu and scroll to Settings.
Click the Sequence menu and scroll to Settings.
![]() Click the fourth tab — Render Control.
Click the fourth tab — Render Control.
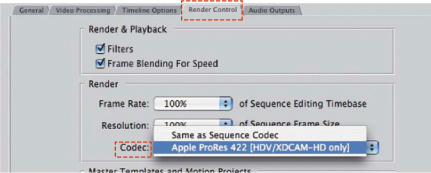
![]() Click the drop-down menu for Codec and choose Apple ProRes 422.
Click the drop-down menu for Codec and choose Apple ProRes 422.
![]() Click OK.
Click OK.
You have now set up your HDV Timeline so that all of the rendering will now be handled by ProRes. So Final Cut Pro is effectively working between MPEG-2 editing and a frame-based high quality codec. MPEG is used for the cuts only material in the HDV Timeline — while ProRes is used for everything which needs to be rendered. The result is a smoother editing experience and while it takes time to render ProRes, more so that DV, there is none of the pain of conforming the HDV signal for those areas which require rendering — at least while you are editing. When it comes to output we find ourselves staring back at the head of Medusa and another set of problems to deal with.

Previewing Your HDV Signal As DV Over Firewire
![]() Make sure your camera/deck is connected to your Mac via Firewire. Switch it on and set the input to DV. If it is an HDV device make sure the format is set DV and not HDV.
Make sure your camera/deck is connected to your Mac via Firewire. Switch it on and set the input to DV. If it is an HDV device make sure the format is set DV and not HDV.
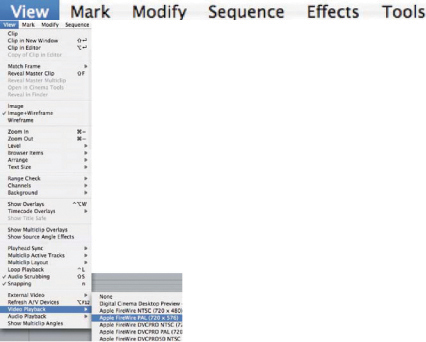
![]() Choose the View menu in Final Cut Pro and select the DV standard you are working with (i.e., DV-PAL DV NTSC).
Choose the View menu in Final Cut Pro and select the DV standard you are working with (i.e., DV-PAL DV NTSC).
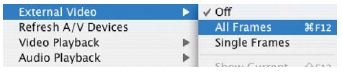
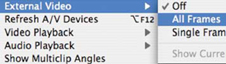
![]() Again choose the View menu, scroll to External Video and choose All Frames.
Again choose the View menu, scroll to External Video and choose All Frames.
Provided you have a television connected to your deck or camera you can then watch your footage in SD as you edit in HD.

First choose Video playback and set to the DV format you wish to output and then select External Video — All Frames — the shortcut is Apple + F12.
Previewing Your HD Signal Without Firewire
A fantastic feature of Final Cut Pro, when editing in high definition, is the ability to preview your footage as a HD signal right on your computer monitor as you work. It used to be that one needed to purchase an expensive HD monitor to watch HD footage — in today’s world HD material can be viewed directly on a computer monitor.
If you are working with dual monitors the process is ideal as you can have one display set to the Final Cut Pro interface and the other to preview the HD signal. If you are working with a single monitor, or a laptop without a second monitor attached, then one can flick between the Final Cut Pro interface and the HD display.

Above: Dual Monitor Display choose Digital Cinema Desktop Preview
![]() Choose the View menu and scroll to Video Playback.
Choose the View menu and scroll to Video Playback.
![]() Choose Digital Cinema Desktop Preview Main (for single monitor setup) or Digital Cinema Desktop Preview for a dual monitor setup.
Choose Digital Cinema Desktop Preview Main (for single monitor setup) or Digital Cinema Desktop Preview for a dual monitor setup.

Above: Single Monitor Display choose Digital Cinema Desktop Preview — Main
![]() Select the View menu and scroll to AH Frames (the shortcut is Apple + F12).
Select the View menu and scroll to AH Frames (the shortcut is Apple + F12).
You can then preview your HD signal as you work. This system works fine for both HD and SD signals, though the real benefit is that it provides a low-cost way of viewing HD material as you edit without external hardware or investing in expensive monitors.
One needs to begin thinking differently when working with HDV and the other HD formats. The tapeless workflow already exists in the post-production environment as soon as the footage touches your hard drives, regardless of whether the rushes originated on tape or not. Capture or Transfer this material into Final Cut Pro and then, once your production is cut, decide how you wish to archive the finished edit. When working with HD, encoding files and storing the finished edit on some form of optical disc or hard drive can make more sense then going back to tape.
What Next?
We’re a long way from the days when Beta SP ruled the video market. DV with its simplicity and reliability is still strong but diminishing as the HD formats becomes a priority amongst many in the video community. There are other developments at the higher levels of video production as systems which promise the quality of film emerge as strong contenders in the high-end world of feature film production. Check out http://www.red.com to find out more about what’s in store for those wishing to shoot and edit video at film resolution.
And amongst all the turmoil and change, right at the epicenter of the storm Final Cut Pro stands as a mature, reliable and affordable post-production
system, catering to all formats at all levels. Final Cut works the same whether it is DV or HDV or any format which is thrown at it. The interface does not change. What does change is the method, codec and settings by which the media is processed. Which buttons you press when editing, where your fingers fly as your creative mind taps away at the keyboard to produce your cuts and dissolves, sound mixes and effects, that is all format independent. This is one of the great strengths of Final Cut Pro as an editing system.