
MULTICAM
Working with Multiple Cameras
There are two ways to cut between multiple camera sources. The most efficient way in terms of time is to cut live. This requires each of the cameras to be plugged into a vision switcher which is then used to mix the program in real time.
The output of the vision mixer is then recorded to tape or broadcast live.
The other way is do it in post. This used to be a nightmare. It was immensely time consuming and difficult to achieve. With Final Cut Pro and Multicam this is dream-way of working.
For over a decade I punched buttons on vision switchers in live studio environments. I directed live programs and earned my living as a studio director. As such, the way I use Final Pro with Multicam is very similar to using a live vision switcher. I more or less cut the program live and fine tune the results either as I work, or after the live cut has been done.
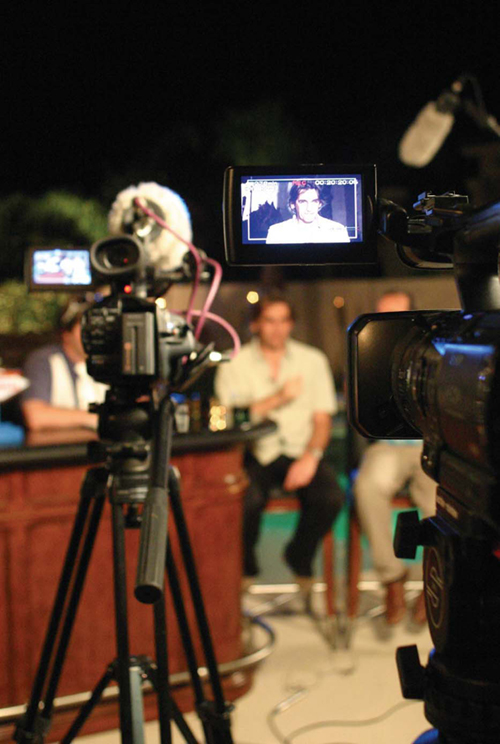
The key to using Multicam in Final Cut Pro begins with acquisition. When shooting, make sure that all cameras run continuous. No switching off, no stop-starting, continuous shooting is critical.
If this rule is adhered to, it will make your time in post-production very simple indeed.

Mixing Live vs. Cutting in Post
Before non-linear systems were around, online edit suites with many tape machines running in sync were used to simulate a live multi-camera environment. Threaded up on each of the tape machines were the individual reels or each of the cameras takes. The machines were then run in sync and each source would be cut on a vision switcher. The fact that one was working in an edit suite provided the flexibility of stop-starting or running continuous. This was the only way to do a multicam edit outside of a live studio environment.
So the advantage of doing a multi-camera edit in post is clear. In this environment one can stop-start. When doing it live you only have one shot at it. No matter how good one is as a live director/switcher the fact-of-the-matter is one can achieve better results cutting in post than in a live environment.
Preparation
Just to hammer-home the point, the success of a multi-camera shoot begins in the acquisition stage. Let all cameras roll continuous. No stop-starting.
If you shoot for an hour performance on three cameras you will end up with 3 hours of footage. If you shoot for an hour on four separate cameras you will acquire 4 hours of footage.
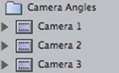
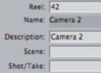
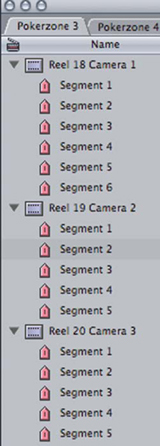
Once the footage has been shot for your Multicam production each of the camera angles needs to be captured into Final Cut. I strongly suggest numbering your reels on capture and labelling the captured material as Camera 1, Camera 2, Camera 3 and so-forth.
![]() Open the Log and Capture window (the shortcut is Apple+8).
Open the Log and Capture window (the shortcut is Apple+8).
![]() Label the Reel Number and enter a name for the clip which is to be captured.
Label the Reel Number and enter a name for the clip which is to be captured.

![]() Mark the ‘in’ and ‘out’ points for the reel.
Mark the ‘in’ and ‘out’ points for the reel.
![]() Press Log Clip.
Press Log Clip. ![]()
![]() Capture the reel.
Capture the reel.
Now repeat the above procedure for the remaining camera angles so that you end up with the amount of reels captured that corresponds to the amount of camera angles which were filmed.
Creating Multiclips (Syncing Up the Reels)
Once your material is captured you need to make what is known as a Multiclip. A Multiclip is several clips grouped together into a single clip. This single clip references to all the camera angles which you have grouped together. Simply put, several reels are synced together and this clip, termed the Multiclip, is what you work with when cutting your Multicam sequence.
Making a Multiclip is a very easy procedure. The most involved part of the process is to sync up the different camera angles on each of the reels.
There are three ways to do this:
![]() by ‘in’ Point
by ‘in’ Point
![]() by ‘Out’ Point
by ‘Out’ Point
![]() by ‘Timecode’.
by ‘Timecode’.
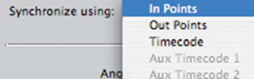
The first two methods are easy to use and the way I tend to work. In fact more often than not I will sync by ‘in’ point.
The third method, by ‘timecode’, is designed to be used on jobs where matching timecode exists on each of the camera tapes. This is achieved by using a process known as jam-syncing. Unless you are working with a reliable method of jam-syncing cameras I suggest you stand clear of this method.
Syncing by ‘In’ Point
This is the easiest way to sync up your reels.
![]() Place a clip of one of the camera angles in the Timeline.
Place a clip of one of the camera angles in the Timeline.
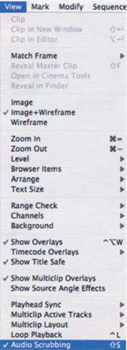
![]() Find an easy sync point to work with. If a clapperboard or handclap has been used on location then use this, otherwise an audio cue such as the first spoken word of sentence can be used. (It is useful to turn on Audio Scrubbing found under the View menu).
Find an easy sync point to work with. If a clapperboard or handclap has been used on location then use this, otherwise an audio cue such as the first spoken word of sentence can be used. (It is useful to turn on Audio Scrubbing found under the View menu).
![]() Mark an ‘in’ point in the Timeline.
Mark an ‘in’ point in the Timeline.
Notes: a visual and audio cue provides the ideal way to sync up separate reels. Cue to the exact point where the handclap occurs and mark an ‘in’ point. Do the same on each of the different reels. If no handclap or clapperboard has been used you need to find a common audio point on each of the reels.
![]() Mark an ‘out’ point, if you wish to define the end point for a particular camera angle. It is not absolutely necessary to mark an ‘out’ point.
Mark an ‘out’ point, if you wish to define the end point for a particular camera angle. It is not absolutely necessary to mark an ‘out’ point.
Repeat the above procedure with the other camera angles.
To be clear about how to sync by ‘in’ point you need to find a point on the tape which can be used to sync up each of the reels. An audio cue is usually a good option to work with. The best option is a combination of audio and visual cue.
If, for example, the first word of a sentence is WELCOME, then scrub frame by frame to the first utterance of the letter W. Watch the lips on the subject if these are visible, though it is possible to work with an audio cue only. So long as you can hear the audio cue, syncing up the reels can be achieved. Without an audio cue it is much more difficult.
So once a sync reference point has been established you mark the ‘in’ point and then repeat the procedure for each of the reels which will make up the Multiclip.
Once you have marked the ‘in’ point (and ‘out’ points if you wish to define an exit point) you need to lock these clips together through the Make Multiclip command.
![]() Make sure the ‘in’ points are marked on each of the separate reels.
Make sure the ‘in’ points are marked on each of the separate reels.
![]() Highlight each of the camera angles in the Browser.
Highlight each of the camera angles in the Browser.
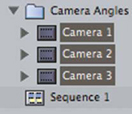
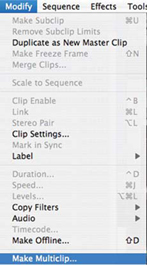
![]() Select the Modify Menu and scroll down to Make Multiclip.
Select the Modify Menu and scroll down to Make Multiclip.
![]() Sync up the reels (see page 200). Click OK.
Sync up the reels (see page 200). Click OK.
The Multiclip will now appear in the Browser.
Working with Multiclips
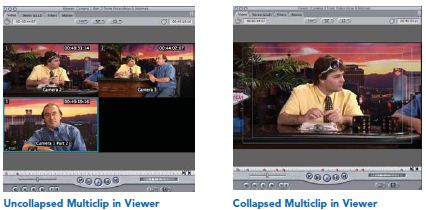
If you double click the Multiclip it will open in the Viewer just like any other clip, the major difference being obvious as soon as the Multiclip is open.
You can immediately see that the clip is made up of separate camera angles.
A few important details to note at this stage.
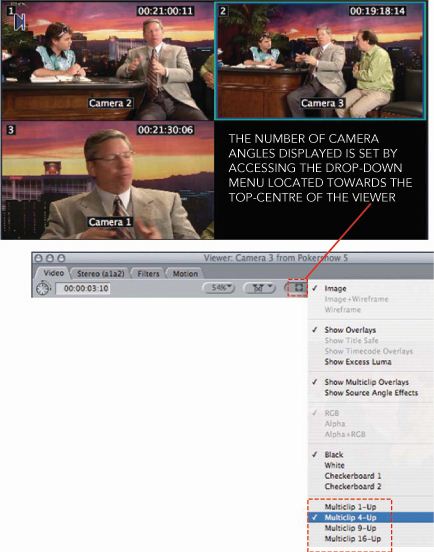
First, Multicam is very flexible in Final Cut Pro 5, you can work with a display of 4, 9 or 16 different sources.
In the above example there are 3 sources, if there were more it is simply a matter of changing the display setting.
The display is set by selecting the controls found under the drop-down menu toward the top center of the Viewer.
Begin by working with the 4 camera display.
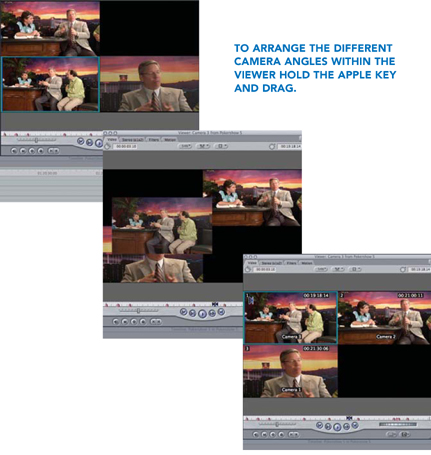
Also, note that within each of the camera angle displays, there is information such as clip name and Timecode. This is useful. Providing one has labeled each reel appropriately then the display makes it easy to see which camera angle is being shown. Furthermore, you can accurately go back to any point on any of the reels by using the information provided in the timecode display.
If you hold down the Apple key you can easily slide each of the angles around within the Viewer. Therefore, you can line up the camera angles in whatever order you wish.
Before you get started with Multicam be aware that Multiclips need to be rendered. That doesn’t mean you have to render everything just to see what’s going on — it means a final render at the end. While you are working it all happens in real time. All video streams will play together and the live switching happens in real-time. If you find you need greater performance buy a modern Mac or boost your ram.
Cutting your Multicam Sequence
It is important to understand the relationship between the Timeline/Canvas and the Viewer when working with Multicam.
The Viewer must be set so that while you run your Multiclip in the Timeline the various camera angles play back, all running in sync, within the Viewer window.

The procedure is easy to set up.
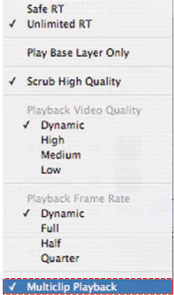
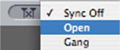
![]() Choose the RT drop-down menu located top left of the Timeline. Scroll down and make sure that Multiclip Playback is checked. This is vital.
Choose the RT drop-down menu located top left of the Timeline. Scroll down and make sure that Multiclip Playback is checked. This is vital.
![]() Edit the Multiclip you have created into Timeline — this can be achieved by dragging the Multiclip from the Browser into the Timeline or by opening the Multiclip in the Viewer and then performing an Insert or Overwrite edit.
Edit the Multiclip you have created into Timeline — this can be achieved by dragging the Multiclip from the Browser into the Timeline or by opening the Multiclip in the Viewer and then performing an Insert or Overwrite edit.
![]() Once the Multiclip is in the Timeline double click it. The Multiclip will now open in the Viewer.
Once the Multiclip is in the Timeline double click it. The Multiclip will now open in the Viewer.

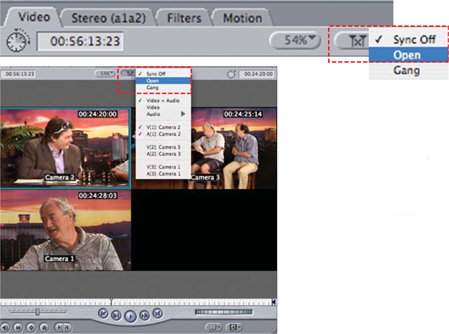
![]() Click the drop-down box located at the top of the Viewer that looks like the letter X surrounded by two lines. Scroll down and select Open. This is important. If you do not select this, the live Multicam play-back will not work.
Click the drop-down box located at the top of the Viewer that looks like the letter X surrounded by two lines. Scroll down and select Open. This is important. If you do not select this, the live Multicam play-back will not work.
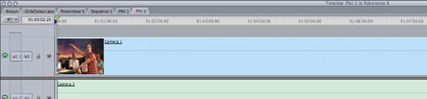
![]() Click the yellow Scrubber Bar in the Timeline and place this at the beginning of your Multiclip sequence.
Click the yellow Scrubber Bar in the Timeline and place this at the beginning of your Multiclip sequence.
![]() Press the Space Bar to play.
Press the Space Bar to play.
Providing you have followed the above steps, the Multiple angles displayed in the Viewer will play in sync while the Canvas will display the Active Angle.
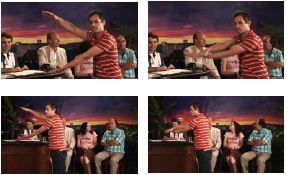
![]() To cut between camera angles simply click in the Viewer on each of the angles as they play in sync. The result will then appear in the Canvas.
To cut between camera angles simply click in the Viewer on each of the angles as they play in sync. The result will then appear in the Canvas.
Notice cut points in the form of blue markers appear as you switch from angle to angle. When you stop playback the cut points become cuts in the Timeline.

At any time you can stop playback and review the edits you have made. You can continue editing by simply positioning the yellow Scrubber Bar in the Timeline and pressing play. You can then continue cutting live in the Viewer.
If you find that playback in the Viewer does not follow that in the Timeline then repeat points 3 to 5 listed on the previous pages. This will make the Multiclip active and run the angles in sync in the viewer.
If the camera angles play, however they are out of sync with each other, then you need to remark the ‘in’ points on each of the separate reels and make a new Multiclip. The problem will be that the points have not been marked correctly.
Working with Multicam without Cutting the Soundtrack
You will notice that when you cut between the various camera angles that picture and sound cut together. This is far from ideal, due to the fact that most often with a multicamera shoot a master camera is used to record sound. For example, a concert will have a line-feed out from the mixing deck plugged into one of the cameras. Thus the last thing one would want is to cut between line sound and that recorded through the camera mics.
My method is to take the master camera sound and lay this onto separate audio tracks in the Timeline. For example I would put the Multiclip Video onto V1 and the Multiclip Audio A1 and A2.
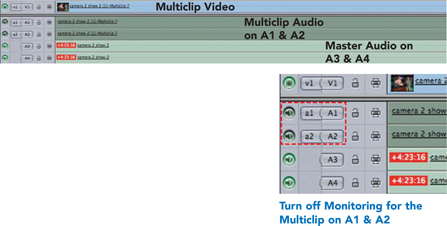
I would then edit the sound from the master camera onto A3 and A4.
Finally, turn off the monitoring on A1 and A2.
The result is you hear the sound from the master camera and do not hear the distracting sound of cutting between the different camera angles.
Here’s an overview of the procedure to work with a Multiclip and listen to a master audio track while editing:
![]() Edit the Multiclip into the Timeline — video to V1, audio to A1 and A2.
Edit the Multiclip into the Timeline — video to V1, audio to A1 and A2.
![]() Edit the master soundtrack to audio tracks A3 and A4. Do not edit video — sound only!
Edit the master soundtrack to audio tracks A3 and A4. Do not edit video — sound only!
![]() Turn off the monitoring to audio tracks A1 and A2.
Turn off the monitoring to audio tracks A1 and A2.
![]() Double click your Multicam sequence to make it active in the Viewer.
Double click your Multicam sequence to make it active in the Viewer.
![]() Click the drop-down box located towards the middle of the Viewer and select Open.
Click the drop-down box located towards the middle of the Viewer and select Open.
![]() Click the yellow Scrubber Bar in the Timeline and run your Multicam sequence. The Soundtrack you hear will be the master soundtrack playing back on A3 and A4. The sound from A1 and A2 will be mute.
Click the yellow Scrubber Bar in the Timeline and run your Multicam sequence. The Soundtrack you hear will be the master soundtrack playing back on A3 and A4. The sound from A1 and A2 will be mute.
The result is you hear the sound from the master camera and will not hear the distracting sound of cutting between the different camera angles.
Fine Tuning your Multicam Sequence
The beauty and power of cutting a multi-camera sequence in a post-production environment is you can get the editing just right. Better than a live cut!
There are two strategies to achieving this. First you can fine tune as you go; stop-starting and making whatever alterations are necessary.
Alternatively, you can do the entire Multicam edit as a live mix and then go back afterwards for the fine tuning.
For fine-tuning edits your best friend is the Roll tool, accessed by pressing the letter R on the keyboard or by selecting from the Toolbar. The Roll Tool looking like a figure 8 and lets you extend or reduce edits without affecting the length of your sequence. All that is affected is the duration of the shot you are extending or reducing and the shot immediately next to that which you are altering.
Once you have performed your multi-camera edit select the Roll tool and place this at the junction of a cut, then click and drag and very easily you can move the edit in either direction, lengthening or shortening the camera angles on either side.
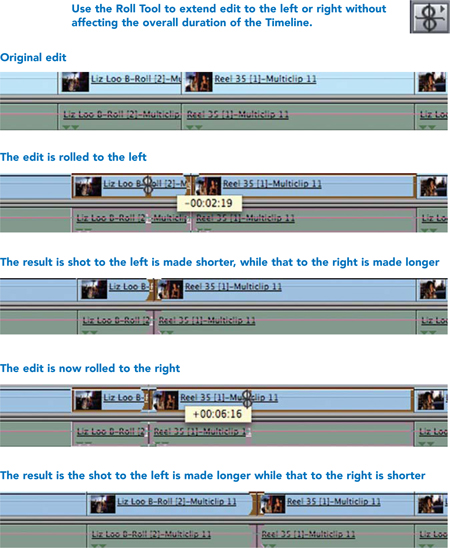
Note: as you work with the Roll Tool a display in seconds and frames will show you the change in duration to the edit you are changing.
You can also change the active angle of any part of the Multiclip, after you have cut done your ‘live cut’, to any other angle. Simply, Control click on any portion of the Multiclip and select the angle you wish to use. This will only affect the portion of the Multiclip on which you have Control-clicked.
Another way to change the Active Angle or a particular section of the Multiclip is to double click the Multiclip and then simply select the angle of choice. This will work whether you are playing the camera angles live or if it is stationary.
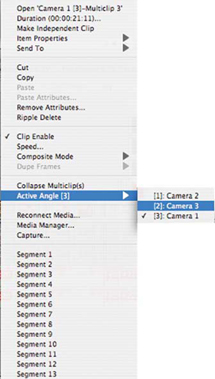
Click the angle you wish to make active and then you will have it.
If, at any point, you just can’t get your Multiclip to play in the Timeline with all the angles following in the Viewer simultaneously, simply double click the Multiclip in the Timeline, select the Open command in the Viewer and then click the yellow Scrubber Bar in the Timeline. Then, press the Space Bar to play. This will get you back on track.
A repeat of the above: when the separate camera angles in the Viewer do not all play together, in sync with the Multiclip playing in the Timeline, then do the following:
![]() Double click the Multiclip in the Timeline.
Double click the Multiclip in the Timeline.
![]() Select Open from the drop-down menu toward the center of the Viewer.
Select Open from the drop-down menu toward the center of the Viewer.
![]() Click the yellow Scrubber Bar in the Timeline and position at the point you want the Multiclip to play.
Click the yellow Scrubber Bar in the Timeline and position at the point you want the Multiclip to play.
![]() Press the Space Bar to play.
Press the Space Bar to play.
What you are doing is making the Timeline active and instructing the Viewer to play the separate angles that make up the Multiclip in sync with that in Timeline. Play is the GO button. Everything will play together.
Always remember, as long as the camera angles are running in sync within the Viewer window, and your Multiclip is playing in the Timeline, then everything is working as it should. If any of the camera angles are out of sync with each other this is the result of incorrect syncing of clips when the ‘in’ or ‘out’ point were marked. Multiclips do not drift or ever lose sync. Everything is locked together. If anything is out of sync it is caused by incorrect sync points when the Multiclip was created.
When editing with Multicam, providing you have a camera or deck with a monitor connected to your Mac, you can then preview the out through Firewire (assuming you are working with a DV set-up). Just the same as previewing DV over Firewire — connect up your deck or camera and then plug this into a television or broadcast monitor and start cutting.
Multicam will work with DV, SD or HD. This is not a format specific feature. It works with everything.
Note: playback of HDV over Firewire can only be output as SD.
Final Tips
Multiclips can be collapsed by Control clicking and selecting the Collapse Multiclip command. This gives you the ability to make the selected active angle represent a single clip in the Timeline. Once the Multiclip is collapsed it will act like any other clip. Double click it and it will open in the Viewer. You can then place filters or any adjustments to it in the same way as any other clips.
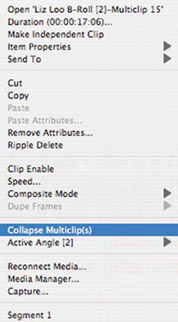
Once collapsed multiclips or sections of multiclips can be uncollapsed by Control clicking and selecting Uncollapse Multiclip.

Note: multiple cuts within a Multiclip can be collapsed or uncollapsed by highlighting multiple sections within the Multiclip itself and then selecting either the Collapse Multiclip(s) command or the Uncollapse Multiclip(s) command. This is a quick way to deal with large sections of the Timeline in one go.
Dealing with ‘Buttoning On and Off’
Trigger happy videographers have a tendency to hit the record button repeatedly through a filming session. By habit or instinct these people have an in-built resistance to the idea of running tape continuously in the camera. As such, you will need to know how to deal with a situation where multiple cameras have been used and there is not continuous take. Rather you may have a selection of incomplete takes, perhaps timecode breaks and switching on and off between cameras at different points.
These situations can present a nightmare situation for an editor to work with. However, none of these predicaments are a nightmare with no way out.
The solution is to make up many Multiclips and extract the good from the bad when it comes to dealing with the masses of camera rushes.
![]() Capture all of the footage.
Capture all of the footage.
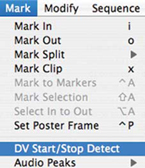
![]() Once captured, run all of the footage through DV Start/Stop Detect (found under the Mark Menu).
Once captured, run all of the footage through DV Start/Stop Detect (found under the Mark Menu).
![]() Once your footage has been processed by e DV Start/Stop Detect facility, click the triangle next to the clip to reveal a list showing every time the camera operator has hit the record button (‘buttoned’ on or off). If you are dealing with 4 to 10 times or less, no problem. If you are dealing with 50 or a 100 separate times then you have your work cut out for you. Never-the-less it can be done.
Once your footage has been processed by e DV Start/Stop Detect facility, click the triangle next to the clip to reveal a list showing every time the camera operator has hit the record button (‘buttoned’ on or off). If you are dealing with 4 to 10 times or less, no problem. If you are dealing with 50 or a 100 separate times then you have your work cut out for you. Never-the-less it can be done.
![]() Watch through your material and identify corresponding angles which exist on the separate tapes and where the stop-starts take place. For example, you may have two cameras: one has the first 5 minutes of a performance and the other has the first 8 minutes. You can then sync up the first 5 minutes as a two camera shoot. The first camera ‘buttoned’ on again 10 minutes into the performance and then cut at 23 minutes. The other camera filmed continuous. So then you have ingredients needed to make another Multiclip.
Watch through your material and identify corresponding angles which exist on the separate tapes and where the stop-starts take place. For example, you may have two cameras: one has the first 5 minutes of a performance and the other has the first 8 minutes. You can then sync up the first 5 minutes as a two camera shoot. The first camera ‘buttoned’ on again 10 minutes into the performance and then cut at 23 minutes. The other camera filmed continuous. So then you have ingredients needed to make another Multiclip.
It is simply a matter of marking an ‘in’ point; marking an ‘out’ point (if you wish) and then highlighting the clips and invoking the Make Multiclip command.
If there is no hand clap, slate or clapperboard to work with then finding a common audio sync point is the simplest way forward.
Syncing without Sound
The DV and HDV cameras of today are much more sophisticated than the first generation of DV cameras which appeared in 1996.
Very few early DV cameras had XLR inputs; you couldn’t set the Timecode; no fold-out screens; sloppy zooms; slow response when hitting the record button; these machines were battery-eaters. Things have come a long way.
With sophistication comes complexity. As the DV cameras evolved many new features were added. To get at these features requires one to work through many menus. Some of these cameras are so menu-laden one virtually needs to be a computer programmer to get at the manual controls which are buried away like unreachable treasures.
I’ve seen cameramen swear at menu setups when all they want to do is switch over from camera mic to external mic. The one plugged into the XLR. The one with the good sound.
So screw-ups happen.
Perhaps the worst case scenario is no sound at all. When putting together a Multicam sequence, the key to success is getting your Multiclip right. If you get everything synced up correctly the battle is won. This is a lot harder to do if you’ve got no sound to work with.
In this situation the only way to sort out the problem is by use of a visual cue. You need to find a reference point where something happens. This could be easy or incredibly difficult.
If you were filming a rocket taking off with eight different cameras it would not be a difficult process. Simply line up each take of the rocket blasting off and mark an ‘in’ point using a common visual cue. For example, the ignition of the engines.
Yet, if you were cutting an interview with two or three separate cameras, without sound on one or more of the cameras, then this is quite difficult. Unless you are a lip reader then finding a sync point is not easy. You need to look for the subtle details: the raise of a hand, bursting into laughter, a smile, a blink of the eyes & these are the only reference points you will have to work with other than actually reading the lips of the person speaking.
From experience, I can tell you that these are real situations which must be dealt with in the real world of multi-camera production.
I consider Multicam in Final Cut Pro to be the launch-point for a new way of making films. In previous decades shooting with multiple cameras was shunned by small or no budget filmmakers for the simple reason that it created a nightmare in the editing and cost a fortune to hire the cameras.
The cameras are now affordable and Multicam in Final Cut Pro provides an excellent means to achieving a truly professional multi-camera edit. You can cut between 2 and 16 camera angles at any one time with everything running in sync.
Multicam works and it works well.
Having this facility integrated into Final Cut Pro makes this application a dream system that puts other, more expensive editors, to shame.
The golden age of filmmaking burns bright.