
OUTPUT

I can’t tell you how amazed I was when I did my first output from Final
Cut Pro in the living room of my apartment And I was dancing all
around the room just as happy as can be.
KEVIN MONAHAN
SF CUTTERS
Once your production is complete it is time to output your movie.
The simplest form of output is to roll record on your camera or deck and then play the movie direct from the Timeline and straight to tape. This is something you should do regularly throughout the editing process to ensure you have a backup of your film should a technical catastrophe or any other sort of problem render your project useless.
When working with DV I always back up my material to digital tape in the form of several different versions: with and without graphics and effects and with separate audio tracks, both mixed and unmixed. One pass may include voiceover, another music, and another sound effects. By doing backups in this way all of the raw elements of the film are preserved so that in the event of a corrupt file, human error, or power failure, you will be able to rebuild your film from the elements recorded to tape. It takes discipline to back up your work regularly, however, unless you have tremendous amounts of hard drive space, so that you can afford a true backup of all of the project files in the form of data, then backing up to digital tape is the best option.
Print to Video
Print to Video is a function Apple built into Final Cut Pro to give a professional look to a finished film. Here the project can be named, color bars can be inserted at the head and black can be added at the end of the production. It is also possible to loop the film so that several copies can be recorded onto a single digital tape, or one can choose to record sections of the movie by defining ‘in’ and ‘out’ points and only printing these sections to tape.
Print to Video also serves another purpose. If any material is unrendered then the computer will render this material prior to invoking the Print to Video command and if your audio mix is complex then a mixdown will take place. This ensures all the components of your production should play without problem. Sometimes dropped frames may be encountered during normal playback and the problem will be cured when the Print to Video instruction is given.

Selecting Print to Video is often the final stage of the editing process. Think of it as getting the release print off to the lab once the hard work in the cutting room has been done.
![]() Select the File menu at the top left of Final Cut o and scroll down to Print to Video.
Select the File menu at the top left of Final Cut o and scroll down to Print to Video.
![]() Release the mouse button and a box will appear zing you many options to choose from. Check those boxes which apply to your specific needs.
Release the mouse button and a box will appear zing you many options to choose from. Check those boxes which apply to your specific needs.
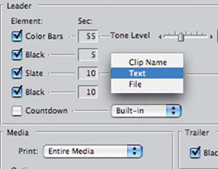
Add color bars if you wish and enter a duration for the amount of bars you wish to record. Instruct Final Cut Pro if you want black to be recorded after the bars. Enter a title for your production in the text column and select Print Entire Media or Print In to Out depending upon your requirements. If you choose the Print In to Out option you need to mark ‘in’ and ‘out’ points in the Timeline.
![]() Once you are satisfied that you have correctly selected the options you require click the OK box. The computer will pause as all the elements are gathered together.
Once you are satisfied that you have correctly selected the options you require click the OK box. The computer will pause as all the elements are gathered together.
Now sit back and enjoy your movie. It is worth keeping a close eye on the output. Print to Video is the last stage in the editing process (unless you are using it to label sections of a work in progress) and therefore it is wise to make sure everything is exactly right as the signal is recorded onto tape. Once you have at least one master safely dubbed you can relax knowing that the vital information has made it from the original camera masters, onto your computer’s hard drives, through the editing process, and finally back onto digital tape. Don’t forget to do a second and maybe even a third backup. This may just help you to sleep better at night.
Other Forms of Distribution
Final Cut Pro is designed as a video editor, however, just because it is designed to work with video does not mean that your final output must end up on videotape. There are other forms of distribution in this modern world that need to be considered; for example: DVD, CD-ROM, iPod, Mobile Phone, PowerPoint and Internet delivery.
For most purposes, those on limited budgets would acquire and edit the material on DV/DVCam or HDV tape before compressing to another format. If possible back up your program to tape — also compress the final edit into a single file which may be the native codec used to edit the program or another format. Backing up of material is often a neglected area of the editing room. Losing an entire program can be a hard way to learn ‘always backup!’
QuickTime is a cross-platform (Mac and PC) technology designed and developed by Apple. This is often the format of choice for both Internet delivery and CD-ROM production. QuickTime is powerful and achieves results. It is particularly suited to producing encoded files on a Mac for the simple reason that QuickTime is part of the Mac operating system. It had been described as the ‘the thing’ that makes video on the Mac possible. However, before choosing the exact form of compression, you need information as to how and where the product will be used.
When outputting to standard definition DVD MPEG-2 is the format to be used. For high definition DVDs H.264 is the format of choice. Both formats work with QuickTime.
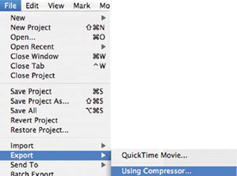
To output compressed files using Final Cut Pro you can choose to export using Compressor, which runs as a separate application to Final Cut Pro, or you can export Using QuickTime Conversion.
Compressor
Compressor is a program designed to encode files to different formats.
It runs as a separate application to Final Cut Pro, though the two programs have been built to work together The first release of the software was aimed primarily at DVD authoring and encoding files to MPEG-2. The capability was also there to encode files to QuickTime, AIFF and MPEG-4 for Internet delivery.
Compressor has evolved and improved. Using what Apple terms as ‘optical flow technology’ it is possible to produce high-quality format conversions. One can encode from NTSC to PAL and vice versa; from standard definition to high definition; images can be processed to H.264 for high definition DVD production or encoded for iPod use. The algorithms used in Compressor are the same algorithms used in Shake which is Apple’s affordable high-end digital compositing application. Shake has been used to create visual effects for feature films such as Star Wars Episode 3, The Matrix and Lord of the Rings. The output quality has been described as being ‘absolutely pristine.’
The brilliant thing about Compressor, aside from the output quality, is that it is very easy to use. Apple has always been the ‘master of the interface’ and they have lived up to that reputation with the latest version of Compressor. One can use the built-in Apple presets or one can create their own.
The following is a brief overview of how to get results using Compressor. Like many software applications, Final Cut Pro included, one can use the program on a very simple or more sophisticated level. Even using Compressor at the most basic of levels can still produce excellent results.
Let’s get started.
Working with Compressor 3
Nothing gets easier than this. Using Compressor is as simple as following these steps:
![]() Select a Sequence or clip to Export from Final Cut Pro.
Select a Sequence or clip to Export from Final Cut Pro.
![]() Export your Clip or Sequence from Final Cut Pro into Compressor.
Export your Clip or Sequence from Final Cut Pro into Compressor.
![]() Choose a format which you wish to encode your material to.
Choose a format which you wish to encode your material to.
![]() Define a destination — meaning where you want your encoded files to be stored.
Define a destination — meaning where you want your encoded files to be stored.
![]() Press the Submit button to start the encoding process.
Press the Submit button to start the encoding process.
These above steps are possibly the most basic overview anyone could give to work with Compressor, however, providing you can fulfill these then you will get results.
![]() Highlight a Sequence or Clip in the Browser of Final Cut Pro, or click in the Timeline to make a Sequence active.
Highlight a Sequence or Clip in the Browser of Final Cut Pro, or click in the Timeline to make a Sequence active.
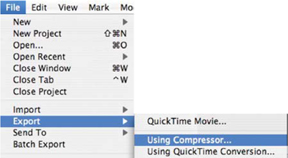
![]() Choose the File menu, top left of screen and scroll to Export Using Compressor.
Choose the File menu, top left of screen and scroll to Export Using Compressor.
The Compressor interface will now open in front of you.
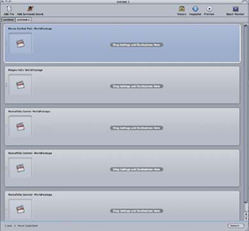
![]() Choose Window Layouts and the display of the interface can then be set. Run through the options and see the different layouts. Don’t be intimidated by the options. Compressor is very simple to use. At this stage there are two windows you need to concern yourself with — the Batch window and the Settings window. The Batch window is where you line up your files to be encoded and Settings is where you choose the encoding format.
Choose Window Layouts and the display of the interface can then be set. Run through the options and see the different layouts. Don’t be intimidated by the options. Compressor is very simple to use. At this stage there are two windows you need to concern yourself with — the Batch window and the Settings window. The Batch window is where you line up your files to be encoded and Settings is where you choose the encoding format.


There is certainly no reason why you must encode one file at a time. The Batch window is termed ‘Batch’ as it provides the means to encode many files.
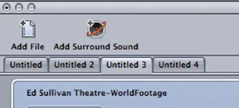
If you choose to Export several Sequences or Clips individually from Final Cut Pro these will be represented by separate Tabs ready to encode.
If you highlight several Clips or Sequences within Final Cut Pro and then choose Export Using Compressor from the file menu these will be represented within a single Batch window with all the files in one area.
![]() Go to the Settings window and click the triangle to the right of the presets to reveal the encoding options. You need to choose an option which you wish to encode to.
Go to the Settings window and click the triangle to the right of the presets to reveal the encoding options. You need to choose an option which you wish to encode to.
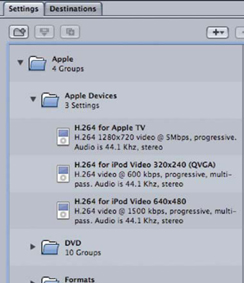
The settings are categorized into separate areas — you can choose to encode to Apple devices such as Apple TV or iPod; there are options to encode to DVD at various levels of quality (MPEG-2 for standard definition DVDs or H.264 for high definition DVDs); you can choose MPEG-1, MPEG-4 or H.264 for Internet delivery; there are various settings within Formats to encode to MPEG-1, MPEG-2, MPEG-4, and QuickTime options. Within Other workflows one can choose various setting from NTSC-PAL and vice versa; Settings for Mobile Devices, Podcastlng and the Web are also offered. This is a powerful application which offers many encoding possibilities.
![]() Choose an encoding option from the Settings window and drag it into the Batch window where indicated. Release your mouse button.
Choose an encoding option from the Settings window and drag it into the Batch window where indicated. Release your mouse button.
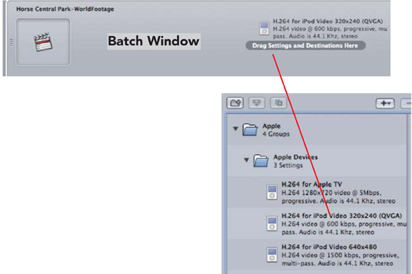
In the above example the file will be encoded for Video iPod at the frame size of 320 × 240. It really is as simple as drag and drop.
The setting you have chosen will now be displayed in the Batch window with Source indicated to the right. This means the file produced will be stored in the same area as the original file. This can be convenient some of the time but it is also useful to manually define where the encoded file will be placed.

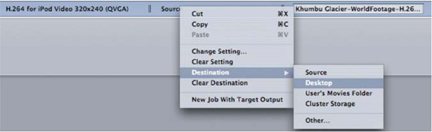
![]() Control-click the area labeled Source and you can then manually set the destination where the encoded file will be stored.
Control-click the area labeled Source and you can then manually set the destination where the encoded file will be stored.
![]() Press the Submit button at the base of the Batch window d the encoding process will begin.
Press the Submit button at the base of the Batch window d the encoding process will begin.
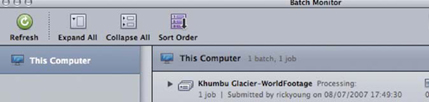
![]() Press the Batch Monitor icon at the top of the Batch Window and then click This Computer. You can then monitor the progress bar to get an idea of how long it will take for the encoding process to complete.
Press the Batch Monitor icon at the top of the Batch Window and then click This Computer. You can then monitor the progress bar to get an idea of how long it will take for the encoding process to complete.

Note: if you export your files into Compressor from Final Cut Pro you will not be able to continue editing as the encoding process ties up Final Cut Pro. To get around this problem first export your Sequence/s or Clip/s from Final Cut Pro as a Self-Contained Movie, using Export as QuickTime Movie — alternatively use Export Using QuickTime. If you choose Export as QuickTime Movie make sure you check the box Make Movie Self-Contained. This means an entire duplicate of your filmwill be encoded. Once this process is complete click the Add File icon at the top of the Compressor interface or drag the file you have created directly from its location on hard-drive and


into the Batch window of Compressor. Choose a format, begin the encoding process and then continue editing with Final Cut Pro.
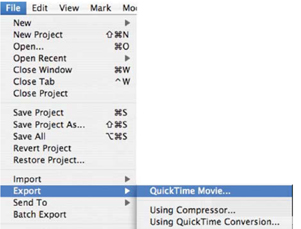
Export Using QuickTime Conversion
When compressing video for the web, CD-ROM or DVD, decisions must be made about what level of compression will be used. When compressing large amounts of data there are always compromises which must be made. For example, when preparing material for Internet delivery the goal is to reduce the overall file size to a minimum while maintaining the best possible quality.
The purpose of this section is not to give detailed instructions of how to achieve these forms of output, what levels of compression to use, and exactly how to go about this — but rather to give you an overview of the areas you need to explore. There are entire books written about compression and the best ways to achieve results. What I will provide here is an introduction to the compression process using QuickTime as a means for facilitating the conversion process, and how it can be achieved using the tools provided with Final Cut Pro.
![]() Highlight a Sequence or clip you wish to export in the Browser of Final Cut Pro.
Highlight a Sequence or clip you wish to export in the Browser of Final Cut Pro.

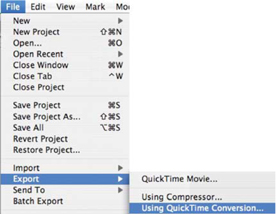
![]() Choose the File menu, scroll to Export. Choose Using QuickTime Conversion.
Choose the File menu, scroll to Export. Choose Using QuickTime Conversion.
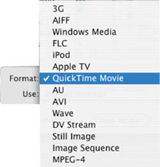
![]() Look to the bottom of the window that opens. Next to the word Format is a bar labeled QuickTime Movie. Click this bar to reveal a selection of options. You need to choose the setting appropriate to the purpose you are working towards.
Look to the bottom of the window that opens. Next to the word Format is a bar labeled QuickTime Movie. Click this bar to reveal a selection of options. You need to choose the setting appropriate to the purpose you are working towards.
Some of these options were available using Compressor, however, there are other options which are not. For example, you can export as an AVI file — used for creating files compatible with Windows Media Player or you could choose to export a single frame as a still image.
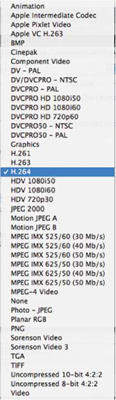
Be aware that under each of the possible compression choices are further options. For example, if you choose QuickTime Movie and click the Options setting to the right, then you can choose the quality of the video, which format you wish to compress the video to, and the audio sample rate.
You need to experiment. Look through the options, make a choice, export a movie and see the results. You can set different levels of compression, different samples rates for sound, decide whether the movie is to be prepared for Internet streaming or not. There is no easy option. You really need to know what you are trying to achieve before you start.
And, as you can see to the right, there are other possibilities to consider beyond simply choosing QuickTime.
Audio, for example, can be exported as an AIFF file. When exporting as an AIFF file consider: is the sound mono or stereo? what is the sample rate?

Exporting Audio

Exporting Still Images
Images can be exported as Still Images. Choose PNG, TIFF, Pict or Photoshop to name just a few of the options.
If all this sounds confusing it is because we are dealing with a confusing subject — video and audio compression is constantly evolving and therefore changing. However, having access to the tools gives you access to the knowledge you need to work within this area. The beauty of working on the computer is you always get a second shot at it, and a third, fourth and hundred and thirty-first shot if you need it. A little bit of knowledge will take you a long way and your knowledge will accumulate as you go. Remember — knowledge is power! The power of distribution is at your fingertips through the process of compression. Press the buttons, wait for the encoding, and see the result.
H.264 Encoding
H.264 is a codec which was introduced with QuickTime 7 and is used for encoding files for HD DVD production, iPod, AppIeTV and internet delivery of video material. H.264 can be used to produce very high quality video for distribution without creating huge files.

It is important to understand that H.264 is a distribution format and not an editing format. It’s primary purpose is to get material out there so that people can play content on their computers, DVD players and other devices.
Over time expect H.264 to become more widely used as HD pushes SD content to the sidelines. H.264 is a codec that compresses well, can be used for many different purposes and can produce extremely high quality video for internet download.
Expect H.264 integration with Flash by the time you read this.
To check out the incredible quality of H.264 go to: http://www.apple.com/quicktime/hdgallery/
ProRes 422
ProRes 422 is a new codec built into Final Cut Pro 6 designed for editing high bandwidth content such as uncompressed HD and SD files. One of the main benefits of the codec is it provides uncompressed high definition quality at standard definition data-rates. The quality difference between ProRes 422 files and uncompressed HD or SD has been described as being visually indistinguishable — even after multiple generations of re-encodes.
The strength of ProRes is that it can take large files and shrink them down into a smaller size. Because the data rates are low one can work with portable Firewire drives and get uncompressed HD quality.
ProRes is very efficient with bandwidth demands — as a result this codec provides an alternative for edit facilities which have traditionally relied on expensive RAID setups to be able to move around huge uncompressed HD files — this can now be done with ProRes files which are much more manageable and much smaller in size.
ProRes is 4:2:2 which means the format is full bandwidth. Unlike some other formats ProRes provides full 1920 × 1080 images or 1280 × 720 with different frame rates and with full chroma specification for those formats. ProRes is therefore suitable for effects production where high quality output is needed.

Notice there are two separate quality setting for ProRes: Apple ProRes 422 and AppleProRes 422 (HQ). HQ, as you might have guessed, stands for High Quality and is particularly good for producing encodes with very few compression artifacts.
While some formats are computationally difficult to edit with, such as HDV, ProRes is designed for the editing environment. It can be used to process material that requires rendering for the HDV or XDCam format, or it can be edited natively. When using ProRes in combination with HDV or XDCam this gets around some of the issues these formats suffer from due to the MPEG recording process.
ProRes has therefore been designed as an edit format, whereas H.264 is still Apple’s preferred distribution format. H.264 can be used for web video, the iPod, the iPhone, Apple TV and HD DVDs.
When it comes to editing, ProRes has exceptionally high quality, low data rates and is built right into Final Cut Pro 6, ready for you to access.
Working with ProRes
To talk about working with ProRes on one level can be summed up by saying it is the same as working with any format in Final Cut Pro: you set up your Timeline, you edit, you output.
On another level it isn’t really as straightforward as that.
Working in DV feels different to working in DVCPro HD; working in HDV feels different to working with 10-bit uncompressed SD. Some formats are slow to render, others zip along like a pepped up sports car; some codecs are slow to respond when dragging through the Timeline.
When working with Offline RT files in Final Cut everything is snappy, quick and fluid without a hint of hesitation. And the rendering process is joyfully quick. That’s because Offline RT uses the PhotoJPG codec which compresses the signal heavily so that the footage take up very little space on hard drive. As it is compressed into small files this means it is easy for the computer to work with. The data rates are very low.
So it is with ProRes.
If you want to experience what I’m talking about then render off some DV Footage as 10 Bit Uncompressed standard definition. See how that performs in the Timeline of Final Cut Pro. Then render off some ProRes footage.
Feel the difference…
If you don’t know how to do the above then follow the instructions below. Essentially rendering from one codec to another using Final Cut is the same each time. You’ve just got to pick the codec you want to work with.
Converting Files to ProRes
This can be achieved in three ways:
![]() Export using QuickTime Movie.
Export using QuickTime Movie.
![]() Export using QuickTime Conversion.
Export using QuickTime Conversion.
![]() Export Using Compressor.
Export Using Compressor.
Export to ProRes Using QuickTime Mowie
![]() Highlight the file you wish to convert in the Browser of Final Cut Pro.
Highlight the file you wish to convert in the Browser of Final Cut Pro.
![]() Choose File and then Export Using QuickTime Movie.
Choose File and then Export Using QuickTime Movie.

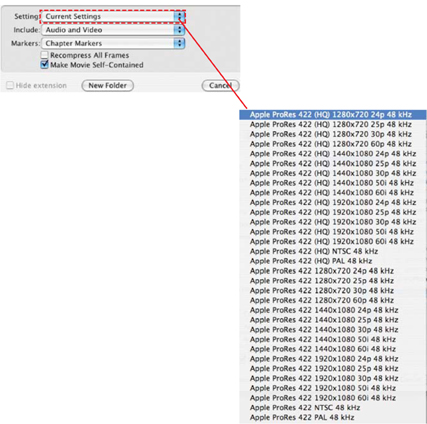
![]() Click where Current Settings is displayed and a drop-down menu will appear. Here you have a list of settings to choose from including different sizes and frame-rates. Choose the ProRes setting to which you wish to encode your video.
Click where Current Settings is displayed and a drop-down menu will appear. Here you have a list of settings to choose from including different sizes and frame-rates. Choose the ProRes setting to which you wish to encode your video.
![]() At the top of the window which now appears you should name your file and choose where you wished the file to be saved. Also check that Make Movie Self-Contained is checked.
At the top of the window which now appears you should name your file and choose where you wished the file to be saved. Also check that Make Movie Self-Contained is checked.
![]() Press Save.
Press Save.
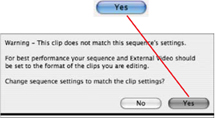
Once your file is saved you can then Import it into Final Cut Pro and then begin editing in the ProRes format. Remember to set your Easy Setup or when Final Cut Pro asks if you wish to match your Sequence to that of the clip click Yes.
Encoding to ProRes Using QuickTime Conversion
![]() Highlight the file you wish to convert in the Browser of Final Cut Pro.
Highlight the file you wish to convert in the Browser of Final Cut Pro.
![]() Choose File and then Export Using QuickTime Conversion.
Choose File and then Export Using QuickTime Conversion.
![]() Click Options.
Click Options.

![]() Click Settings under Video and from the drop-down list choose either Apple ProRes422 or Apple ProRes422 (HQ).
Click Settings under Video and from the drop-down list choose either Apple ProRes422 or Apple ProRes422 (HQ).
![]() Click OK and save your file.
Click OK and save your file.
Encoding to ProRes Using Compressor
![]() Highlight the file you wish to convert in the Browser of Final Cut Pro
Highlight the file you wish to convert in the Browser of Final Cut Pro
![]() Choose File and then Export Using Compressor.
Choose File and then Export Using Compressor.
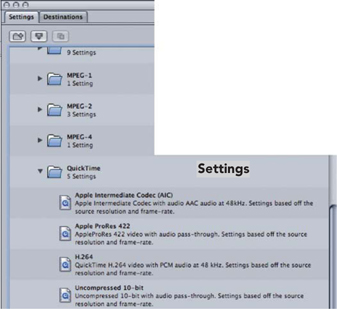
In the Settings window of the Compressor interface scroll to QuickTime which contains 5 separate settings. It is here that you will find ProRes.
![]() Drag the ProRes setting onto your file in the Batch Window.
Drag the ProRes setting onto your file in the Batch Window.
![]() Set a destination.
Set a destination.
![]() Presss Submit.
Presss Submit.

![]() Presss Batch to monitor the status of your file as It encodes.
Presss Batch to monitor the status of your file as It encodes.
When to Use ProRes
As mentioned earlier one of the big advantages of ProRes is that it enables one to shrink down large files to consume a smaller amount of hard drive space with a lesser throughput of data.
Look to the examples to the left for proof of just how efficient ProRes is with bandwidth.
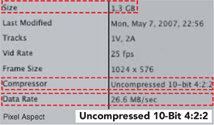
The item properties to the left show that the file format is 10-bit uncompressed standard definition video which runs at a data rate of 26.6 MB per second and consumes 1.3 GB of space.
When this is encoded to Apple ProRes the file size is 302 MB with a data rate of 6.1 MB per second. And when encoded to ProRes 422(HQ) the result is a file of 444 MB with a data rate of 9MB per second.

For lower bandwidth formats, which don’t have vast storage and data-throughput requirements, there may be no need to use ProRes. ProRes files can sometimes end up larger than the original file, encoding from standard definition DV, for example. But for more demanding formats there are definite advantages. So ProRes does exactly what Apple says. It makes large files smaller enabling them to run at lower data rates.
So when should one use ProRes? — whenever you are using a format which gulps huge amounts of storage space and is so taxing on your processor that your system has to work exceptionally hard to process the data. For lower bandwidth formats, which don’t have vast storage and data-through-put requirements there may be no need to use ProRes. But for other more demanding formats the advantages are clear.
