
6
understanding sensors
The LEGO MINDSTORMS NXT 2.0 robotics kit includes three types of sensors: Ultrasonic, Touch, and Color. You can use these sensors to build a robot that makes sounds when it sees you or to build a vehicle that drives around while avoiding walls or that follows the black line on the Test Pad. This second part of the book will teach you what you need to know in order to create working robots with sensors.
To learn how to work with sensors, you’ll upgrade the Explorer robot by adding several sensor attachments to it to create the Discovery robot shown in Figure 6-1. You’ll learn to create programs for robots with sensors as you upgrade your robot with an Ultrasonic Sensor attachment. Once you have a good working knowledge of how to program with sensors, you’ll continue creating more sensor attachments for this robot in Chapter 7.
what are sensors?
LEGO MINDSTORMS robots can’t actually see or feel the way humans do, but by adding sensors to them, they can collect and report information about the environment around them. Your programs can interpret sensor information in ways that will make your robot seem to respond to its environment as if it is experiencing it. For instance, you could create a program that makes the robot say “Blue” when one of its sensors sees a piece of blue paper.
understanding the sensors in the NXT 2.0 kit
Your NXT kit contains three sensors, as shown in Figure 6-2. The Ultrasonic Sensor reads the distance to objects, the Touch Sensors detect button presses, and the Color Sensor detects the color of a surface (among other things, as you’ll learn in Chapter 7).

Figure 6-1: The Discovery robot: an enhanced version of the Explorer equipped with an Ultrasonic Sensor to make the robot “see”
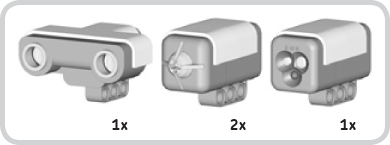
Figure 6-2: The NXT kit comes with an Ultrasonic Sensor (left), two Touch Sensors (middle), and a Color Sensor (right).
You connect the sensors to the NXT via input ports, numbered 1 through 4, as shown in Figure 6-3.
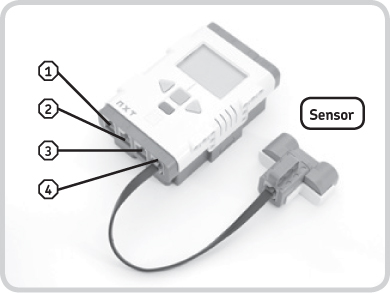
Figure 6-3: Sensors are connected to input ports.
In this chapter, you’ll explore the Ultrasonic Sensor, and you’ll take a more detailed look at the other sensors in Chapter 7. The programming techniques that you’ll learn for the Ultrasonic Sensor can be used for all the sensors in the kit.
understanding the ultrasonic sensor
The Ultrasonic Sensor serves as your robot’s eyes. To “see,” the sensor measures the distance between it and other objects (as shown in Figure 6-4). The NXT retrieves the information from the sensor and uses its measurements in programs. For example, using input from this sensor, you could make your robot say “Hello” when the ultrasonic sensor reports an object in front of it that’s nearer than 50 cm.
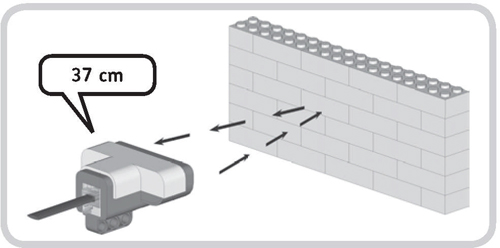
Figure 6-4: The Ultrasonic Sensor is used to detect objects by measuring the distance to them. It can see things up to 200 cm (80 inches) away, but the farther the object is, the harder it is for the sensor to see it. When the sensor doesn’t see anything, it reports a value of 255 cm.
As you’ll learn in this and the following chapters, you can use the Ultrasonic Sensor in a number of interesting ways. For example, you can use it to make a vehicle avoid walls (Chapter 6), create an intruder alarm and detect targets to shoot at (Chapter 8), find objects to grab (Chapter 13), and even detect a ceiling so that a vertical climber knows to go down again (Chapter 15).
creating the ultrasonic sensor attachment
To begin, add an Ultrasonic Sensor to the Explorer robot as shown in the directions on the following page.
NOTE If you have trouble following these steps, try disconnecting the motor cables and then reattaching them after you connect the Ultrasonic Sensor. Be sure to connect the Ultrasonic Sensor to input port 4 on the NXT using a medium-sized cable.
polling sensors
Without having to do any programming, you can view the sensor readings on the NXT’s View menu. Gathering information from a sensor is sometimes referred to as polling. To poll a sensor, follow these steps:
1. Turn on your NXT, navigate to the View menu (Figure 6-5), and select the sensor you want to poll.
2. Choose Ultrasonic cm (or Ultrasonic Inch).
3. Select the input port the sensor is connected to (port 4), and you should see the sensor’s measurement, which is 37 cm in this case.
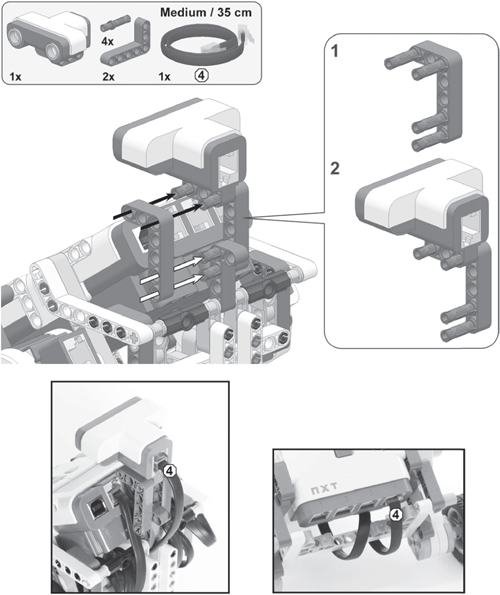

Figure 6-5: Polling a sensor with the View menu
programming with sensors
You’ve just seen how to poll a sensor yourself. Programs can also poll a sensor in order to use the sensor’s data. As an example, you’ll create a program that has the robot play a sound when the Ultrasonic Sensor sees something that’s closer than 50 cm (20 inches), as shown in Figure 6-6.
You can use several programming blocks to poll sensors including the Wait and Loop blocks as well as the Switch block.
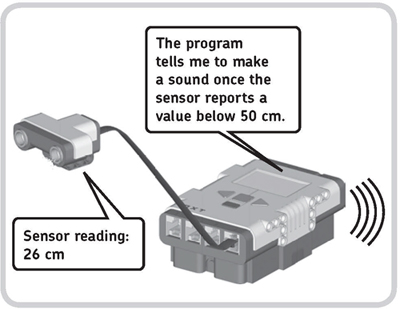
Figure 6-6: The program that runs on the NXT polls the sensor constantly. The program pauses until a sensor reading less than 50 cm is reported, at which point it plays a sound.
sensors and the wait block
You can use a Wait block to pause a program for several seconds, but also to pause until a sensor reading goes above or below a certain value. For example, Figure 6-7 shows a Wait block halting a program until the Ultrasonic Sensor detects a sensor value less than 50 cm. This value of 50 cm is called the trigger value. Once this trigger value is reached, the sensor is triggered, the Wait block stops waiting, and the next block in the program (i.e., a Sound block) runs.
using the configuration panel
You’ve just learned how a Wait block is used to poll a sensor. Now you’ll have a look at the configurations of this block.
First select the Wait block configured to poll the Ultrasonic Sensor from the Programming Palette, as shown in Figure 6-7. (This is really just the Wait block you’ve been using with the Control setting set to Sensor instead of Time.)
* You use the Port setting to select the input port to which the sensor is connected.
* You set the trigger value in the Distance setting in the Until box by entering its value or by dragging the slider to the left (closer) or right (farther). You use the Distance setting to select whether the block should wait until a value above (>) or below (<) the trigger value is reached.
* You use the Show setting to choose Centimeters or Inches.
seeing the sensors and the wait block in action
Now you’ll create the Discovery-Wait program that plays a sound when the Ultrasonic Sensor sees something closer than 50 cm (20 inches), as shown in Figure 6-8.
Before running this program, make sure that there is nothing in front of your robot. When you run the program, nothing should happen at first, but as you move your hand in front of the Ultrasonic Sensor, the sensor should detect your hand once it’s closer than 50 cm. Once your hand is detected, the Wait block should stop waiting, and your robot should play a sound.
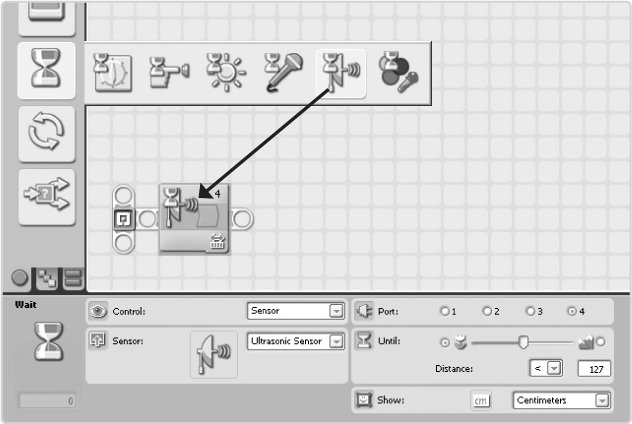
Figure 6-7: The Wait block configured to poll an Ultrasonic Sensor
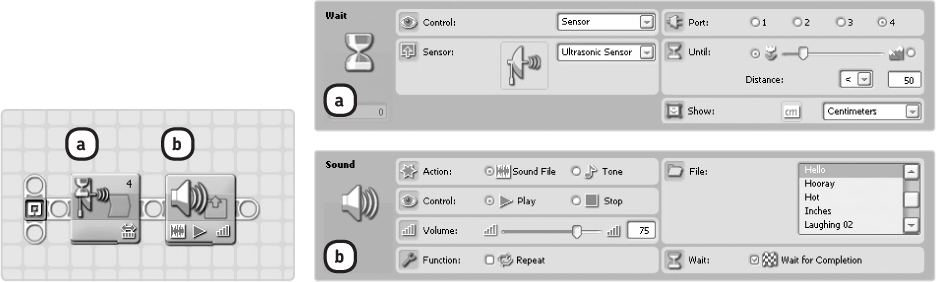
Figure 6-8: The configuration of the blocks in the Discovery-Wait program. Experiment with the trigger value (50 cm here) by changing it to make the robot respond differently.
Now, before you proceed with other sensor programming techniques, try to solve Discovery #20 to get a better understanding of how to work with sensors.
avoiding walls with the ultrasonic sensor
The next program, Discovery-Avoid, will make the Discovery robot drive around a room and turn around when it sees something in order to prevent it from bumping into an obstacle such as a wall. You can see an overview of the program in Figure 6-9.
Next you’ll re-create the program with programming blocks. You can accomplish each action described in Figure 6-9 with one block. You’ll use a Move block to turn on the motors with the Duration option set to Unlimited, and then you’ll wait for the sensor to be triggered with a Wait block. (Note that while the program waits, the robot is still moving forward.)
Once the robot sees something, you use a Move block to turn it around (and stop its unlimited movement). For turning around, the block’s Duration option is set to a specific number of rotations. After the robot turns around, the program returns to the beginning, which is why you must place the three blocks used inside a Loop block that’s configured to loop forever.
Create the program now, as shown in Figure 6-10.
sensors and the loop block
As you learned in Chapter 5, you can configure a Loop block in many ways. You can configure Loop blocks to loop a certain number of times, loop for a specified amount of time, or loop forever. These conditions indicate when a Loop block should stop looping.
You can use a sensor to make a Loop block stop repeating. For example, you can repeat a sequence of Move blocks inside a Loop block until the Ultrasonic Sensor sees something that’s closer than 25 cm (10 inches).
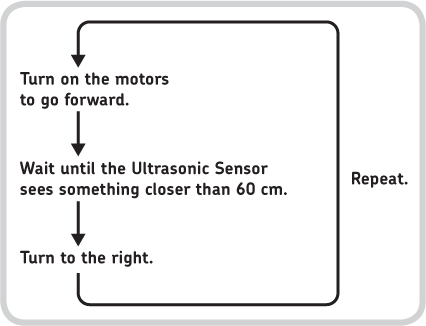
Figure 6-9: The program flow for the Discovery-Avoid program. After turning right, the program returns to the start, and the robot moves forward again.
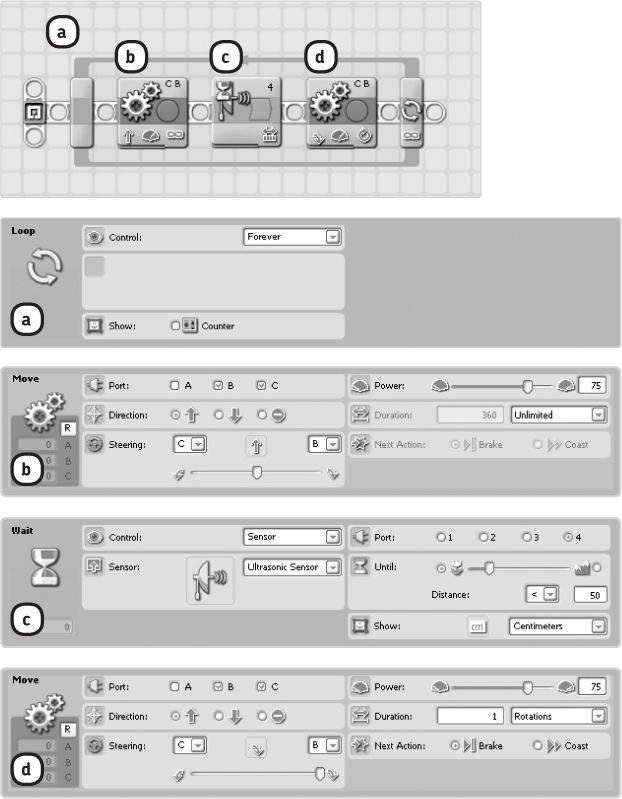
Figure 6-10: The configuration of the blocks in the Discovery-Avoid program
To use a sensor to control when a loop should stop, select Sensor in the Control box, and then select the sensor (Ultrasonic) you would like to use and the port (4) to which the sensor is connected. Set the trigger value in the Until box to specify exactly when the loop should stop. You can see how to make these configurations in the following sample program.
seeing the sensors and the loop block in action
Now make the Discovery-Loop program shown in Figure 6-11. When you run this program, the robot should move back and forth repeatedly until the sensor spots something closer than 25 cm (10 inches).
This program doesn’t always respond to objects visible within 25 cm of the robot because it polls the sensor only once per repetition, just after all the blocks inside the loop complete. For this reason, when you quickly move your hand in front of the robot while the first block is running, the robot won’t notice your hand.
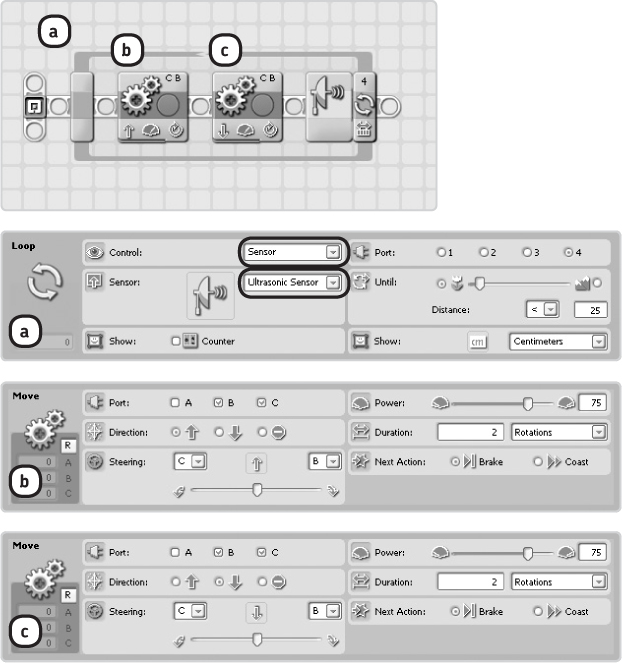
Figure 6-11: The configuration of the blocks in the Discovery-Loop program
sensors and the switch block
You can use Switch blocks to have a robot make decisions based on sensor data. Until now, your robots have been preprogrammed, meaning that each time you ran a program, the robot would behave in the same way. Switch blocks allow your robots to choose what to do based on a sensor reading. For example, you can make your robot move backward if the Ultrasonic Sensor sees something nearer than 50 cm, or you can have it say “Distance” if there is no object closer than 50 cm, as shown in Figure 6-12.
Similar to the question asked in Figure 6-12, the robot checks whether a given condition (a statement, such as “The sensor reading is less than 50 cm”) is true or whether it is false, as shown in Figure 6-13.
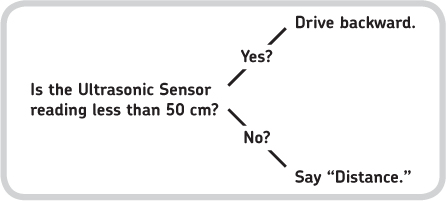
Figure 6-12: A robot can make decisions based on the Ultrasonic Sensor reading.
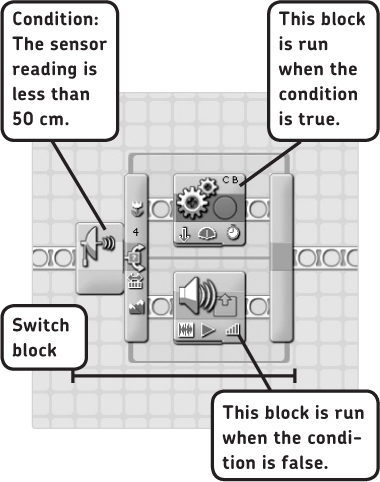
Figure 6-13: The Switch block checks whether the condition is true or false and runs the appropriate blocks. You specify the condition in the settings of the Switch block.
The Switch block in this program contains two blocks in separate parts of the switch; the switch decides which of the two blocks to run. If the condition is true, the block in the upper part of the switch is run, and the robot moves backward; if the condition is false, the lower block is run, and you should hear a sound.
configuring a switch block
Figure 6-14 shows the Switch block’s Configuration Panel. By changing the Switch block’s settings, you define the condition (like the one in Figure 6-13), and the program will check whether it’s true. If it is true (the sensor reading is less than 50 cm), the upper blocks in the switch should run. If the condition is false (the reading is 50 or greater), the blocks in the lower part of the switch should run.
You select the Sensor option in the Control box to indicate that you want to make a decision about a sensor reading. In the Sensor box, you select the sensor to poll, which is the Ultrasonic Sensor in this case. On the right half of the block’s Configuration Panel, you specify the condition. For example, you could set the block to check whether the sensor sees something that’s farther away than 25 cm (10 inches).
seeing the switch block in action
The Discovery-Switch program that you’ll now create has the robot drive forward for four seconds. Then, if the robot sees something closer than 50 cm, it goes backward for a short while. If the robot does not see an object closer than 50 cm, Discovery will say “Error.” Finally, regardless of the Switch block’s decision, the robot will play a tone.
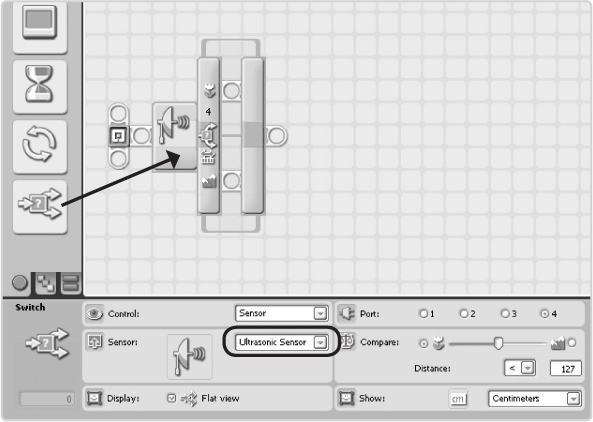
Figure 6-14: The Configuration Panel of a Switch block configured to poll the Ultrasonic
Create the program now as shown in Figure 6-15.
Run this program multiple times to determine when you must keep your hand in front of the sensor to make the robot go backward. Doing so should demonstrate that when you use the Switch block in your programs, the robot polls the sensor only once and compares the sensor value to the trigger value to see whether the particular condition is true. In this program, the sensor value is measured after the robot finishes going forward (when the Move block finishes).
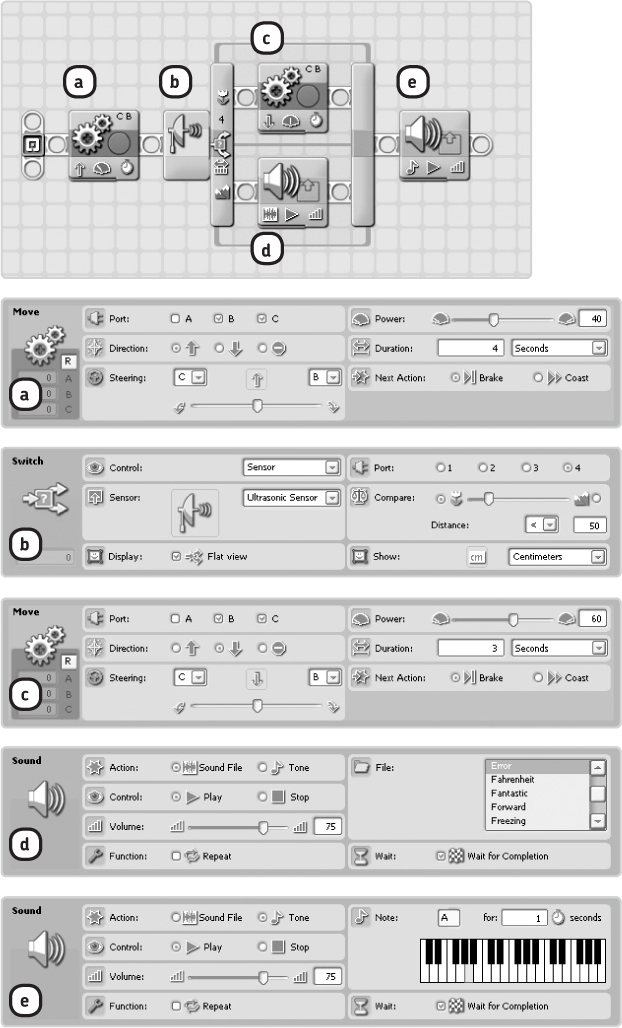
Figure 6-15: The Discovery-Switch program has the robot decide what do based on a sensor reading.
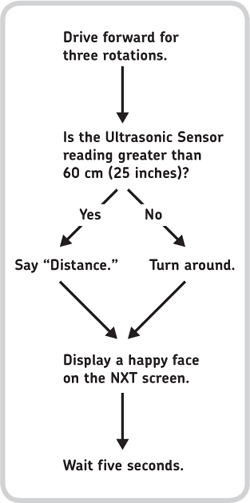
Difficulty: Easy
Let’s practice with the Switch block! Try to create a program to implement the decision tree shown in Figure 6-16. How do you configure the Switch block, and why do you have to put a Wait block at the end of the program?
When either block c or d finishes running, the program continues, and the next Sound block is activated to play a tone.
adding blocks to a switch block
There’s no limit to the number of blocks you can place inside a Switch block. If one part of a switch has multiple blocks, they’re simply run one by one, as shown in Figure 6-17. You can also leave one of the two parts of a Switch block empty, as shown in the figure.
Run this modified program to see what happens. If the condition is true (the robot sees you), the robot should move backward and say “Error,” and the program should continue by playing the tone. If the condition is false (the robot does not see you), the program should find no blocks in the lower part of the switch and instantly move on to the Sound block after the switch (block e), which plays the tone.
using the flat view option
The Switch block’s Flat View option in the Configuration Panel displays the complete Switch block on the Work Area. When you make large programs containing Switch blocks, it’s easy to lose track of how your program actually works. In such cases, uncheck the Flat View checkbox to decrease the size of the Switch block, as shown in Figure 6-18. Both parts of the switch are still in the program, but they’re on separate tabs, which you can open by clicking them.
You won’t need to use Flat View often with smaller programs, but as you continue creating programs for your robot in the next chapter, you’ll learn that it can be useful to disable Flat View, especially when part of a switch contains no programming blocks.
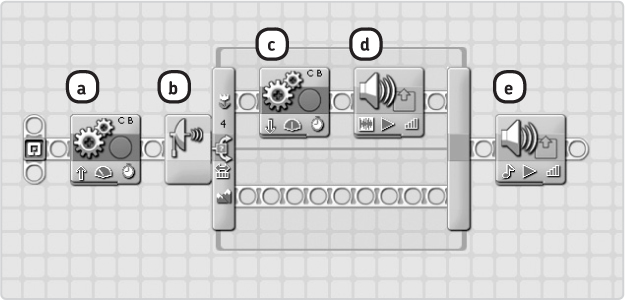
Figure 6-17: A modified version of the Discovery-Switch program. You move Sound block d formerly in the lower part of the switch (which runs when the condition specified in the Switch block is false) to the upper part of the switch (which runs when the condition is true).
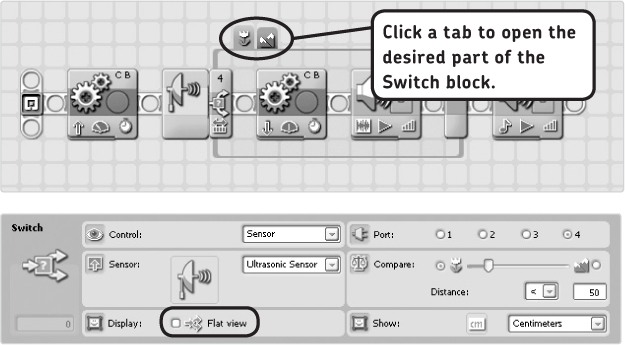
Figure 6-18: Decrease the size of a Switch block by deselecting the Flat View option in its Configuration Panel. This options changes your view of the block only; it won’t affect the way the program works.
repeating switches
Switch blocks poll the Ultrasonic Sensor once and compare the measured value to the trigger value. Then, depending on how a condition is configured, blocks in the true or false part of the switch are run.
To have a robot make decisions more than once, you can drag a Switch block into a Loop block. For example, you could program a robot to say “Yes” when it sees something closer than 100 cm (40 inches) and say “No” otherwise. If you place a Switch block with this configuration in a Loop block, the robot will continue to say “Yes” and “No” based on the sensor reading.
Create the Discovery-Repeat program shown in Figure 6-19 now.
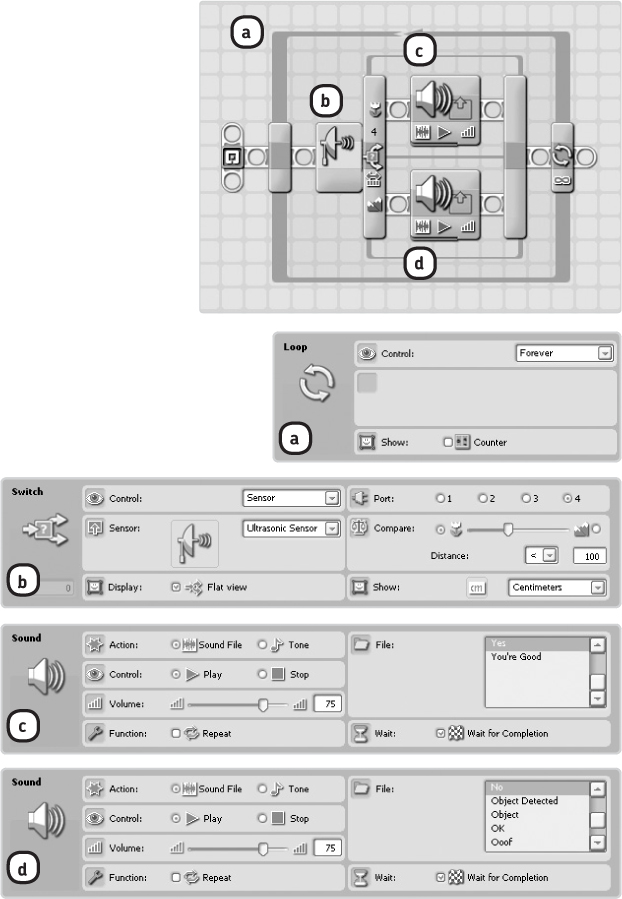
Figure 6-19: The configuration of the blocks in the Discovery-Repeat program
further exploration
Robots use sensors to gather input from their environments, and in response to this input you can create an NXT-G program to make a robot do different things. To make a program for a robot that uses sensors, you use Wait, Loop, and Switch blocks, each configured to control a sensor. Your choices will be based on what your program should do.
You’ve been using only the Ultrasonic Sensor so far, but you can use all the programming techniques you’ve learned in this chapter when working with each of the other sensors. In Chapter 7, you’ll play with the Touch Sensors and the Color Sensor and use them in the Discovery robot.