3. Integrating PayPal with Your Site

You’ve evaluated the options and decided to use PayPal for online payment processing. Perhaps you want to integrate PayPal into your existing e-commerce website. Or, you might be an established retailer but new to online selling. Or perhaps you’re launching a completely new venture.
You’ve determined which of the many PayPal products is best for your business. Now it’s time to implement PayPal on your website. Read on to learn how to integrate the PayPal features you need with those offered on your existing site—or, if you’re starting from scratch, how to build a new site with PayPal in mind.
Integration Options
When it comes to integrating PayPal features with your website, there are several approaches you can take, each associated with specific PayPal offerings. As you might suspect, some of these approaches are easier to execute than others.
In general, integration means inserting some sort of code into the underlying code of your existing website. Some of this code inserts things like buttons and links necessary for your customers to purchase items and access their shopping cart and checkout system. Other code links information on your site, and input by your customers, to functionality hosted by PayPal. Still other code generates forms to accept customer information or even checkout pages. Which and how much code you need to insert depends on the PayPal products you choose.
If this all sounds a bit technical, it is. If you know your way around HTML, great. If you’re more of a businessperson than a developer, that’s okay, too; you can always arrange for a developer to do the coding for you. In fact, you really don’t need to handle any of the technical details—just choose the PayPal solutions you want and let the technical folks handle the integration.
HTML Integration
The simplest type of PayPal integration involves the use of blocks of HTML code. HTML integration can be undertaken by anyone with a basic familiarity with HTML coding. In the simplest forms of integration, PayPal generates the actual code—all you have to do is insert it into the appropriate page on your site.
There are two PayPal solutions you can implement via simple HTML coding:
• Website Payments Standard. With this option, favored by many smaller retailers, PayPal services are integrated with your website or e-commerce application via HTML code. The simplest approach is to create payment buttons using PayPal’s button creation tool; you can create Buy Now, Add to Cart, View Cart, Subscribe, and Donation buttons that link to the proprietary PayPal Shopping Cart. You can also use HTML code to link these buttons to third-party shopping carts and checkout systems.
Learn more about these and other PayPal payment options in Chapter 2, “Choosing the Product that Fits.”
• Payflow Link. This HTML-based product provides a gateway between your shopping cart and your merchant services account. Payflow Link gives you secure order pages, hosted at PayPal, that you can customize.
Whichever solution you choose, HTML integration is pretty much a one-time setup. You go to the PayPal site to generate the HTML code for the elements you need, and then insert that code into your web pages. You only have to update or add new code if you change the products or features you offer on your site.
PayPal’s HTML-based solutions are simple to implement because all the back-end operations take place on the PayPal site. As you can see in Figure 3.1, you don’t host the shopping cart or checkout system, and thus don’t have to generate shopping cart and checkout pages. Instead, clicking a Purchase or Payment button takes customers to PayPal’s site, where all the heavy lifting takes place. (Customers are returned to your site at the end of the process.)
Figure 3.1. PayPal’s HTML-based checkout process; customers are directed to PayPal’s site for completion.

The transfer to PayPal’s site is seamless and can be invisible, depending on how you configure your checkout pages on PayPal’s site.
Let’s say you’re an individual who’s offering a single product for sale, something like a self-published book or manual. You can easily create a page on your website to promote this book and add the requisite PayPal payment button. For that matter, you can insert a payment button on your site’s home page, or even in the sidebar of your blog. It’s a one-time thing; insert the code and forget it. PayPal will handle all subsequent orders and notify you when there’s been a purchase and you need to ship your product.
When a customer clicks the Buy Now button, he’s taken to the checkout system on PayPal’s site, where the transaction is completed. It’s not an entirely customized solution, in that it isn’t as branded as it would be if you built your own checkout system. However, as an individual or small retailer, you get a ready-made payment processing system with minimal effort (and zero upfront cost) on your part. However, if you have a larger variety of products, or if your offerings change frequently, it can be tedious to keep updating the bits of code on your site.
API Integration
If you do not want to use PayPal’s hosted checkout, then you must make use of their APIs to integrate PayPal features into your website. These APIs link data from your website to the PayPal system in real time, thus providing a constant connection between your site and PayPal. Unless you’re using a third-party shopping cart, this adds another level of complexity.
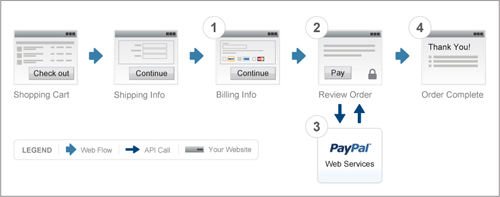
As you can see in Figure 3.2, PayPal’s API-based solutions keep customers on your website throughout the checkout process; the APIs “talk” to PayPal to obtain necessary information or perform required functions. PayPal does the payment processing, and then sends the resulting information back to your site (or to a third-party checkout system, if that’s what you’re using) for completion and display.
API stands for Application Programming Interface. An API is a set of rules or specifications that a web or software developer can work with to access and make use of services and resources provided by another website or software program. In essence, an API acts as an interface between different web pages or software programs.
If you’ve developed and are hosting your own shopping cart and checkout pages, the API programming is more involved than simply inserting a few lines of HTML code into a web page. The API functions must be incorporated within the code or script that retrieves information from the customer, sends that information to PayPal, calls the appropriate PayPal function, and then returns the processing information back to your website for display and further use. As such, API programming is not for the technically inexperienced; you’ll need a qualified developer to do the appropriate programming on your website.
Figure 3.2. PayPal’s API-based checkout process; customer and product data is transferred to PayPal and back again for completion.
PayPal products that utilize API integration include
• Website Payments Pro, an all-in-one payment solution that functions as both a merchant account and a payment gateway.
• Payflow Pro, which uses PayPal APIs to provide a payment gateway between your existing merchant credit card account and PayPal, so you can process credit card transactions online.
• Express Checkout, which is typically used with another PayPal service (such as Website Payments Pro and Payflow Pro) and gives users with PayPal accounts a streamlined experience.
Advantages of the API-Based Approach
The HTML button solution is great for small or occasional sellers. But if you have more products for sale, the many buttons that were each added by hand become a challenge to maintain. Also, you might decide that you don’t want to send all of your paying customers to the PayPal site for order completion. It’s better to keep them on your site (for generating additional orders) and in a fully customized and branded environment.
With any of PayPal’s API-based options, you (or your developer of choice) must do a bit more programming, as you have to build your own checkout pages and integrate a custom or third-party shopping cart solution. But using PayPal’s APIs lets you keep the customer on your site, with only the customer’s payment and shipping information flying back and forth to PayPal for processing. The customer stays on the branded checkout page you designed and is still on your site in case he wants to buy anything else.
In terms of cost, PayPal’s API solutions cost no more than the HTML solutions—zero, in terms of PayPal charges. (You still pay for each transaction, of course.) You will incur greater development charges to build your own shopping cart and checkout system, but that’s the cost of creating a fully functional, fully customized solution for your site.
Obviously, if you’re running a big box-sized business, it’s worth the expense to build a branded checkout solution; you wouldn’t want to rely solely on PayPal Buy Now buttons and send all your customers to PayPal to pay.
Third Party Shopping Carts
Let’s not forget that API integration exists for most major third-party shopping carts. If a shopping cart offers integration with PayPal, chances are it’s done via APIs—but you don’t have to deal with all the programming. This is a popular choice for many mid-sized businesses.
There might be PayPal-specific configuration settings for the cart, but if the product is any good they should walk you through what’s needed. If you have unusual needs the cart might accommodate a bit of custom scripting, but in general there should not be any coding required. It’s a great way to get what looks like a custom solution with a minimal amount of technical investment—and look like you’re a big operation.
Implementing the Integration
If you’ve decided on HTML buttons or homegrown API-based payment solutions, how do you integrate it into your website? There’s a bit of work involved, no matter which approach you select.
Examining the Process
Implementing PayPal processing is a multistep process. Here’s what you and your developer need to do:
1. Select the best product for your business.
2. For HTML-based solutions, generate the code for the buttons you wish to use, or for API-based solutions, obtain the code necessary to call the appropriate APIs from your website.
3. Insert the necessary code into the appropriate pages on your website.
4. Test the integration, using the PayPal Sandbox testing environment (or third party shopping cart site).
5. Based on the test results, update your integration configuration as necessary.
6. Go live with your updated web pages.
If you’ve chosen a third-party shopping cart, you’ll need to read the documentation for that product with respect to integrating PayPal.
Who Does the Work?
All of that sounds simple enough. But who does all the work?
It depends.
Again, if you’re already using a third-party shopping cart service that offers PayPal integration, you may not have any work to do. For many merchants, this is probably the easiest way to go.
If you’re implementing a relatively simple HTML-based solution (a few payment buttons, let’s say) and you’re somewhat technically adept, then you may be able to do the work yourself. Implementing this type of solution involves generating a snippet of HTML code and then inserting that code on your web page where you want the payment button to appear. If you’re comfortable with doing a little behind-the-scenes HTML work, then by all means feel free to tackle the project on your own.
How easy is an HTML-based solution to implement? Adding PayPal payment for an item can be as simple as inserting the HTML <form> code for a payment button.
PayPal INSIDER![]() Playing in the Sandbox
Playing in the Sandbox
• Buy Now buttons
• Subscribe buttons
• Donate buttons
• Shopping Cart buttons
• Refunds
• Payment Data Transfer
• Instant Payment Notifications
• Simulated transactions
The full code looks something like this example:
<form action="https://www.paypal.com/cgi-bin/webscr" method="post">
<input type="hidden" name="cmd" value="_s-xclick">
<input type="hidden" name="hosted_button_id" value="value">
<input type="image" src="https://www.paypal.com/en_US/i/btn/![]() btn_buynowCC_LG.gif" border="0" name="submit" alt="PayPal - The
btn_buynowCC_LG.gif" border="0" name="submit" alt="PayPal - The![]() safer, easier way to pay online!">
safer, easier way to pay online!">
<img alt="" border="0" src="https://www.paypal.com/en_US/i/scr/![]() pixel.gif" width="1" height="1">
pixel.gif" width="1" height="1">
</form>
If this code makes basic sense to you, and you know where to insert it into your website HTML, and how to get it live on your site, then you’re good to go. Remember, PayPal generates the exact code you need to insert; you don’t need to write it.
If, on the other hand, looking at this HTML makes your head turn, or if you simply don’t have the time to do it yourself, then you’ll need to pass the job off to a developer. Implementing an HTML-based integration is fairly easy for an experienced developer, and shouldn’t take much time; it’s something you can budget lightly for (unless you have many buttons!).
If you already have shopping cart and checkout pages on your site, it’s probably not a major project for an experienced developer to connect with PayPal using their API. This is especially true if you find one that is familiar with PayPal. Remember, you don’t want an amateur touching the code of your critical business functions, so leave it to a professional!
However, if you want to build a custom API-based solution for your site, that requires a lot more development time and effort. You’ll need in-house IT staff or an outside developer, and you can expect a new custom system to be a longer and more involved (and thus more costly) project.
Finding a Developer—or a Shopping Cart
If you need a developer to help you with your PayPal integration, or you need to add a shopping cart to your site or even build an online store from scratch, PayPal can help. Search the PayPal Partner Directory to find developers in your area who can deliver the solutions you need.
The PayPal Partner directory lists developers and other businesses that offer all manner of PayPal-related products and services. Some PayPal partners provide prepackaged shopping cart, checkout, and storefront solutions; others can develop customized options for your business.
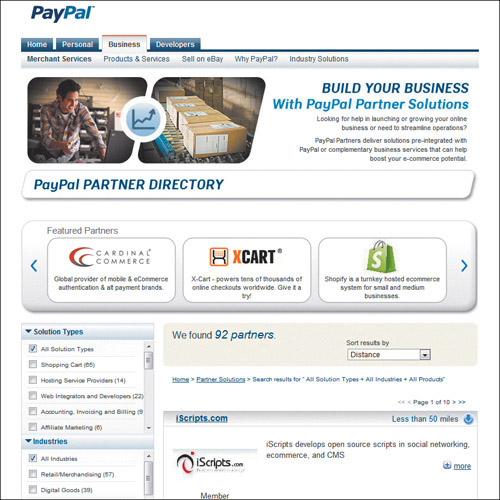
To access the Partner Directory, go to www.paypal.com and under the Business tab click the Partners subtab. On the Partner Program screen you’ll see the Find a Partner button. When the Partner Directory page appears, as shown in Figure 3.3, you can scroll through the featured partners or filter the list by solutions offered or industries served. Click the link for any given partner to learn more about services offered, and then contact that developer.
Figure 3.3. Finding a developer in the PayPal Partner Directory.
Getting Help from PayPal
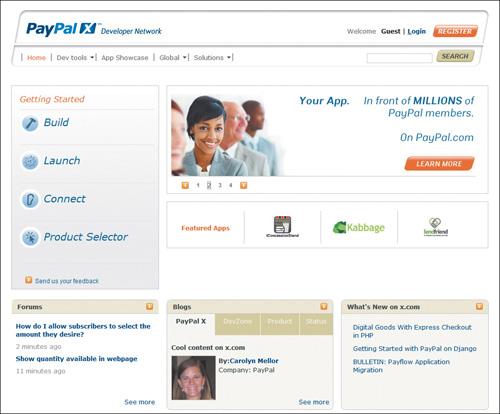
If you’re using in-house staff to implement your PayPal integration, they’re going to need documentation, API calls, and other assistance to get the job done. All of that information—and more—is available on the PayPal Developer Network website (www.x.com), shown in Figure 3.4.
To get full use of the PayPal Developer Network site, you’ll want to formally register—although you can access much of the available information as an unregistered guest. Once you’ve registered, you can use the site to determine the best solution for your business, generate HTML code for payment buttons and the like, download powerful developer tools, access documentation for PayPal’s various APIs, view video demos, interact with other developers and PayPal staff in online forums, and utilize a bevy of other resources.
Figure 3.4. The PayPal Developer Network website.
Much useful information can be found in the various product-specific developer’s guides available for reading or downloading from the website. Select Dev Tools > Documentation from the menu bar to display a list of available documentation; most of the guides can be viewed or downloaded in either HTML or PDF format. These are essential reading for anyone doing the actual work of implementing a PayPal solution.
Example 1: HTML Integration with Payment Buttons
We’ve talked a bit about PayPal integration in general terms. But let’s look at a few examples, so you’ll get a better feel for what’s involved.
Our first example deals with the easiest method of integration: using the HTML-based Web Payments Standard to insert payment buttons on your website. These buttons send your customer to PayPal’s website to complete the transaction; checkout does not happen at your site. You generate the necessary HTML code for each button using PayPal’s Button Creation Tool.
Generating the Button Code
Before you implement this particular solution, you want to open a PayPal Business account, as discussed in Chapter 2, “Choosing the Product that Fits.” With said account established, follow these steps:
1. Log onto the PayPal website (www.paypal.com).
2. Select the Merchant Services tab.
3. When the next page appears, as shown in Figure 3.5, click the Buy Now Button link.
4. When the Create PayPal Payment Button page appears, as shown in Figure 3.6, pull down the Choose Button Type list and select Buy Now. (You can also create Shopping Cart, Donations, Gift Certificates, Subscriptions, Automatic Billing, and Installment Plan buttons.)
Figure 3.5. Getting ready to create a PayPal payment button.

Figure 3.6. Fill in the form to generate the button code.
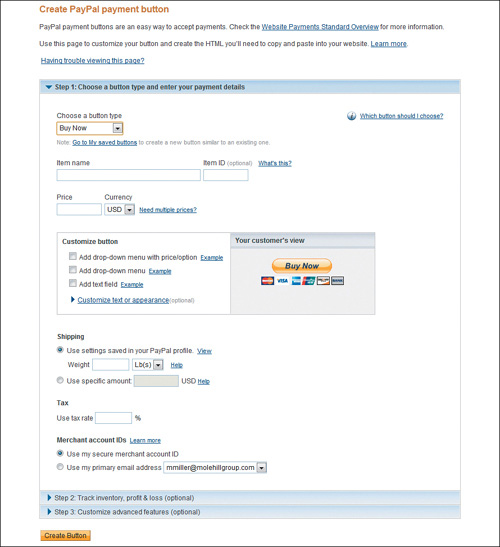
5. Enter the name of the item you’re selling into the Item Name box; if the item has a product number, enter that into the optional Item ID box.
6. Enter the selling price of the item into the Price box; pull down the Currency list to select a currency other than U.S. dollars (USD).
7. Customize the button, if desired (as described below).
8. Choose shipping specifics. Generally, you will check Use Settings Saved in Your PayPal profile and enter the shipping weight of the item and its packaging. To charge a different amount for shipping, check the Use Specific Amount option and enter that amount.
9. If you charge sales tax, enter the amount of tax into the Use Tax Rate box.
10. You can link sales to your PayPal merchant account using either your Secure Merchant Account ID or your email address.
11. Click the Create Button button.
12. PayPal generates the HTML code for this button, as shown in Figure 3.7. Click the Select Code button, copy the code, and then paste the code into your web page’s underlying code where you want the button to appear.
Figure 3.7. The HTML code for a PayPal Buy Now button.

As you can see, this process is relatively simple; all you need is basic information about the item you’re selling and it’s easy to generate the button code. Of course, you’ll need someone with a certain level of technical expertise to paste the button code onto your website, but it doesn’t get much simpler than this.
Customizing the Button
You don’t have to settle for the basic button. There are all sorts of customization you can add. For example, if you sell an item that has multiple variations, each at a different price, you can create a button with a pull-down options list, like the one in Figure 3.8; just select the Add Drop-Down Menu with Price/Option option within the Customize Button box. The customer selects which version he wants from the list, and that information is sent to PayPal along with the order.
Likewise, if you sell an item in multiple colors or sizes, all at the same price, select the Add Drop-Down Menu option. This creates a pull-down menu with the size or color options you specify, as shown in Figure 3.9.
You can also select options regarding the button’s text and appearance. You can display a smaller button, hide the various credit card logos, change the text to another language, or have the button say Pay Now instead of Buy Now. You can even use your own button image, instead of the standard orange PayPal button. It’s your choice.
Figure 3.8. A button with pull-down option/pricing list.

Figure 3.9. A button with a pull-down size list.
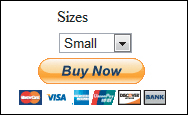
Figure 3.10. Configuring PayPal to track inventory and profit/loss of an item.
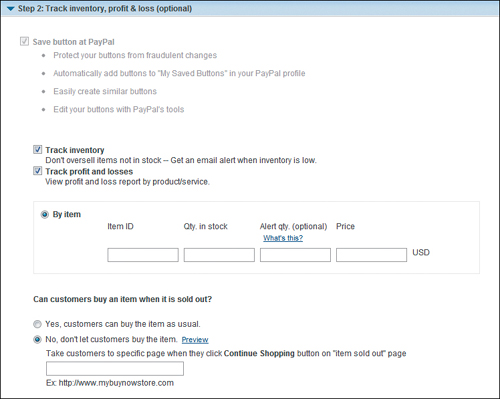
You can also have PayPal track your inventory of the item associated with this button, as well as the running profit or loss for that item. Expand Step 2 on the Create PayPal Payment Button page, shown in Figure 3.10, and enter the appropriate inventory and cost information; PayPal will do all the tracking and calculating when an item is sold.
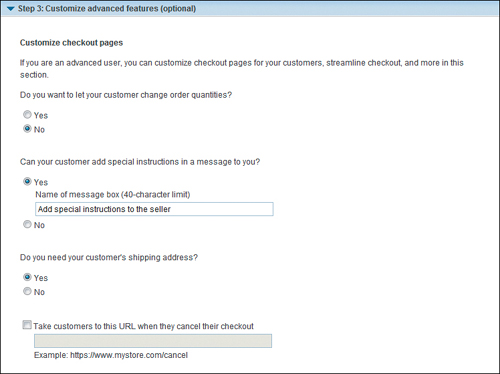
Additional options are available when you display the Step 3 section of the Create PayPal Payment Button page, shown in Figure 3.11. You can select any or all of the following options for the customer’s checkout page:
• Let the customer change order quantities.
• Let the customer add special instructions.
• Require the customer’s shipping address, or not.
• Direct customers to a specific URL on your site after checkout is completed or cancelled.
As you can see in Figure 3.11, there’s a lot you can customize—if you want.
Figure 3.11. Configuring advanced options for the checkout page.
Example 2: API Integration with Express Checkout
Creating HTML-based payment buttons does not make sense if you have already developed shopping cart and checkout pages on your website. Remember, to add PayPal to your existing system will require working with PayPal’s API.
As this is a book for businesses, not developers, we won’t go into the nitty gritty of API programming. Instead, we’ll leave you with a sense of what’s involved in implementing PayPal’s API-based Express Checkout solution (as an example). In general, here’s what your developer will be doing:
1. Place the code for the PayPal Express Checkout button in your site’s checkout flow.
2. Modify the page’s underlying code to handle the button click for each button you insert, using the PayPal Express Checkout API operation to set up the interaction with PayPal and redirect the user’s web browser to PayPal to initiate buyer approval for the payment.
3. Write code on your site’s order confirmation page to obtain the payment authorization from PayPal and use PayPal Express Checkout API operations to obtain the customer’s shipping address and accept the payment.
4. Test the integration using the PayPal Sandbox.
5. Make the pages live.
As you can see, there’s quite a bit for a developer to do when you use this method, and it’s all custom to your specific site and checkout system. Your developer can learn more about the necessary code at the PayPal Developer Network website (www.x.com).
The Bottom Line
There are three ways to integrate PayPal payment processing with your website. If you want to keep it really simple, you can use Web Payments Standard and HTML coding to insert payment buttons on your site. The customer is then sent to PayPal’s site to complete the transaction. Remember, PayPal provides the code for you!
Alternatively, you can take advantage of one of the many third-party shopping cart products that integrate with PayPal (using either Website Payments Standard or Website Payments Pro).
Finally, you can integrate Website Payments Pro with your new or existing e-commerce system. This approach sends customer information to PayPal for payment processing, but then sends the resulting information back to your website or checkout system (custom or third party product) for finalization. This gives you more control over the checkout process overall but requires some developer time to be sure everything is coded correctly and tested.