
8. Managing Inventory

Inventory management is a challenge for retail businesses of all sizes. Whether you keep one or a thousand units of an item in stock, it’s all too easy to deplete your inventory—and disappoint your customers. What you need is a way to keep track of what’s in stock, so you know when to make or order more.
PayPal’s Website Payments Standard offers just this kind of inventory management—adjusting inventory as sales are made—and much more, as you will see. After you read this chapter and spend some time setting up your configuration, you can start taking advantage of the robust inventory management features that PayPal has to offer.
Inventory Management with Website Payments Standard
Website Payments Standard packs a lot of features into its innocuous-looking payment buttons. You’re familiar with how you can use the buttons to initiate sales from your website and have the transactions processed via the PayPal Shopping Cart. Now you’ll learn that you can also configure them to keep track of your inventory levels: you enter how many units you start with initially, and it will track how many you’ve sold, and how many you have left.
PayPal can also notify you by email when your inventory levels run low (you specify the notification level), so you won’t sell items that aren’t in stock. This prevents erroneous transactions—and associated refunds—that result from selling merchandise that’s not really available. You can even use Website Payments Standard to run regular inventory and sales reports, and help you identify sales patterns that affect your inventory management. It’s all a matter of configuring your payment buttons with the proper information.
How Inventory Management Works
To use a payment button for inventory management, you need to configure certain settings for that button, and then save the button in your PayPal account setup. You can then track inventory levels for the item associated with that button. And if an item you sell has multiple options—color, size, and so forth—you can track inventory by each of these options. So if you’re running low on a particular red sweater in XL, you’ll know.
Even better, your customers will know. Instead of enabling customers to place orders for out-of-stock items, you can configure PayPal to notify them when an item is sold out. You can let a customer go ahead and place an order (creating a backorder for that item) or invite her to order another item, instead. If you wish, you can even transfer her to another URL (for a similar item, for example) when their original choice is out of stock.
Of course, PayPal will track your inventory levels for you and generate a helpful inventory report. You can also enable profit and loss tracking for each item in your inventory; PayPal not only tracks units sold, but also the gross profit generated for each item.
Inventory Management by Example
Let’s look at how PayPal’s inventory management works for a typical merchant.
For this example, consider a fictitious online merchant called the Super Big Shoestore, which sells shoes—and lots of them. Super Big uses PayPal’s Website Payments Standard, and creates a Buy Now button for each SKU it carries.
Super Big receives a special shipment of 100 women’s boots, in black. These boots cost $60 per pair, and Super Big sells them for $100. So Super Big generates a purchase button for these boots, and specifies the unit’s cost, selling price, and initial inventory level. Super Big also specifies an alert point at the 30-unit level—that is, the retailer will be alerted when inventory drops to just 30 units in stock. That should provide enough lead time for Super Big to place a reorder with its supplier.
Super Big sells a lot of shoes, and this is a popular style; right out of the gate, they’re selling five units per day of these black boots. With each order placed online, Super Big’s inventory is automatically adjusted downward. At the end of the first day, Super Big’s inventory is down to 95 units. After day two, inventory is 90 units. And so on.
This example is admittedly simplified; a real-world shoe retailer probably would have carried that boot in several different colors and a variety of sizes. In that instance, the retailer would track sales and inventory for each specific variation.
Within 14 days, then, Super Big’s inventory on this item is down to 30 units. While Super Big’s inventory manager would have seen this when he accessed PayPal’s inventory report, he doesn’t read that report every day. Fortunately, PayPal generates an email alert and notifies Super Big that inventory on this SKU is now at the 30-unit level. The inventory manager receives this email and promptly places a new order with his supplier. The shipment arrives five days later, as expected, and Super Big never goes out of stock on this popular item.
This is quick and easy inventory management, and it’s available to any merchant using PayPal’s Website Payments Standard. It doesn’t matter how many items you stock, how many units you keep in inventory, or even how many variations of a unit exist; PayPal keeps track of what’s sold and what’s on hand, automatically.
Configuring PayPal’s Inventory Management—and Building Your Inventory
Inventory management in Website Payments Standard is activated when you create a Buy Now or Add to Cart button for a given item you’re selling. The option to track inventory is available during the button creation process.
Let’s return to the button-creation process discussed previously. In Step 1 on the Create PayPal Payment Button page, you determine what type of button to create, provide the item name and ID, specify the item price, and add shipping and tax details. This is also where you add a drop-down menu for various item options, such as size and color.
When you’re using PayPal for inventory management, nothing changes in the Step 1 process—with one exception. While an item ID is optional with a normal payment button, this field is mandatory when you want to activate inventory management. So you must enter an identification number of some sort into the Item ID box, as shown in Figure 8.1.
Figure 8.1. Enter a model or ID number into the Item ID box located in the Step 1 section.
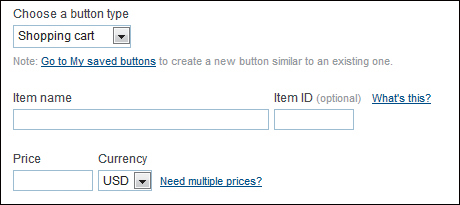
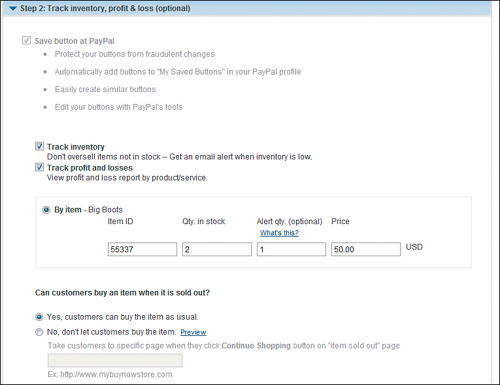
Figure 8.2. Entering inventory information in Step 2.
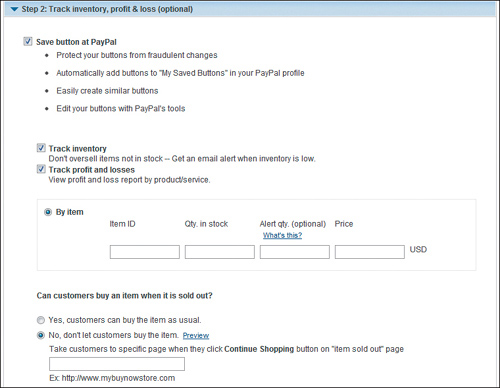
With Step 1 complete, you now proceed to and expand Step 2, shown in Figure 8.2. Let’s walk through the specific steps you need to execute:
1. Check to Save the button at PayPal.
2. Check the Track inventory option.
3. If you want to include cost info to track this item’s profit and loss, check that option.
4. Go to the By Item section. The Item ID should be prefilled, based on the entry you made in the Item ID field in Step 1. If not, enter the item number here.
5. Enter the number of units you currently have in stock into the Qty. in stock box.
6. If you want to be alerted when inventory reaches a reorder level, enter that level in the Alert qty. box. If you don’t want a reorder alert, leave this box empty.
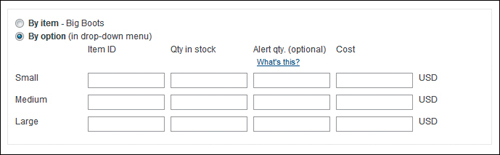
Figure 8.3. Entering inventory information for an item with multiple options.
7. If you want to track profit and loss for this item, enter the item’s unit cost in the Price box.
8. If you want customers to be able to order this item even when it’s out of stock, select the “Yes, customers can buy the item as usual” option.
9. If you’d rather they not be able to order out-of-stock items, select the “No, don’t let customers buy the item” option. You then enter the URL of a specific landing page on your site that customers will be directed to when they try to order a sold-out item. For example, you might construct a page that notes the specific item is currently not available but suggests another item to buy, instead.
10. Click the Create Button button to generate the button code.
As you can see, the process is actually fairly straightforward. It gets slightly more complex if you have an item with additional options, such as size or color. When you create a button for a multioption item, the Step 2 section changes to reflect this, as shown in Figure 8.3. Select “By option (in drop-down menu)” and you see a grid with rows for each available option—in our example, Small, Medium, and Large. Enter the item ID, quantity in stock, alert quantity, and cost information for each option, and then complete the rest of the process as normal.
You can only track inventory against the options in one drop-down menu; you can’t track options from two different drop-down menus. If you have more than one set of options, you’ll need to break the second set of options into a separate payment button.
Monitoring the Customer Experience
When you add inventory management functionality to a payment button, it doesn’t affect the customer experience at all—if the item is in stock. That is, the buyer clicks the Buy Now or Add to Cart button and the item is either purchased at that point or added to the shopping cart for future check out. All inventory information is passed to you, of course, but the customer doesn’t see any of that; the inventory management happens behind the scenes.
If an item is out of stock, however, one of two things can happen.
If you opted to let the customer buy sold-out items, the purchase continues as normal. Obviously, the item doesn’t ship, but you can then place the item on backorder for shipment when additional quantities arrive.
If you opted not to let the customer purchase sold-out items (this is the default, by the way), her experience is different. When she clicks the Buy Now or Add to Cart button, she’s taken to the PayPal website, which displays a “Sorry, this item is sold out” error message. The customer then clicks the Continue Shopping button on that page to return to your website. She’s returned to the page you specified when you created the button.
If there is some quantity of the item in stock but not enough to fulfill the customer’s complete order, PayPal displays a suggestion that the customer adjust her order to match the quantity on hand.
Tracking Reorders—and Replenishing Inventory
When you activate the inventory management functionality in Website Payments Standard, PayPal automatically tracks inventory levels with each customer purchase. A customer buys one unit of an item and your inventory level is automatically reduced by one unit. There’s nothing you have to do in this regard.
This real-time tracking becomes more important when you specify a reorder level (alert quantity) when you create the payment button. As soon as the inventory level for an item reaches this level, PayPal sends you an email alerting you to this fact. You can then act on this alert accordingly, by placing a reorder with your supplier or otherwise replenishing stock. (Of course, you can also ignore the alert to let inventory levels run down on an older item you don’t want to restock.)
If you do reorder the item, you then have to adjust your inventory levels when new quantities arrive. You do this by editing your saved button. Follow these steps:
1. Go to your profile, click My Selling Tools on the left, and then, under the Selling Online heading, click to update your PayPal buttons.
2. Select the button you wish to edit; the Qty Available and Price columns are now visible, as shown in Figure 8.4.
3. Click the Action drop-down menu for this item and select Edit Button.
Figure 8.4. Viewing your saved buttons.
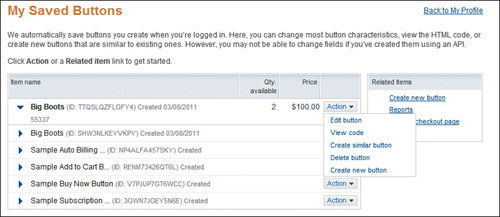
Figure 8.5. Editing a button’s inventory information.
4. When the Edit your PayPal Payment Button page appears, scroll to and expand Step 2, shown in Figure 8.5.
5. Change the quantity in the Qty. in Stock box to reflect your new inventory level (that is, add the new units received to the existing units in the box).
6. If the new inventory was purchased at a different cost than the original inventory, enter that new cost into the Price box.
7. Click the Save Changes button.
PayPal now displays the code for the button, but you don’t have to repaste it into your web page’s underlying code; it’s the same code as previously generated. What you’ve just done is update PayPal’s system with your new inventory levels. Nothing needs to change on your website.
Running Inventory Reports
To better manage your inventory—and your business—you’ll want to view data about the items you’ve sold and your stocking levels. You do this by displaying PayPal’s Inventory and Profit & Loss Report, which you can access by selecting the My Account tab, and then clicking History > Reports. When the next page appears, click the Inventory and Profit & Loss Report link. When the next page appears, select a date range for the report, and then click the View Report button.
Figure 8.6. PayPal’s Inventory and Profit & Loss Report.
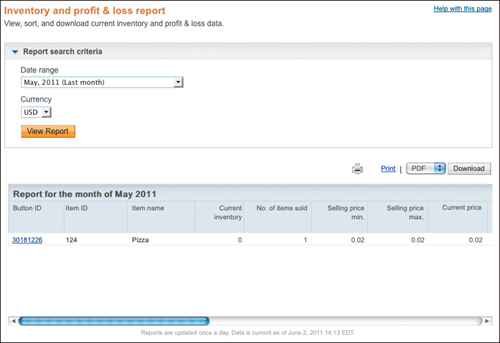
As you can see in Figure 8.6, this report lists all the items for which you’ve created payment buttons. For each item, you see the following information:
• Button ID
• Item ID
• Item name
• Current inventory level (quantity currently in stock)
• Number of items sold (during the selected time period)
• Minimum selling price
Unless you’ve allowed discounts or sale pricing, the minimum and maximum selling prices will probably be the same.
• Maximum selling price
• Current price (the price specified on the button itself)
• Cost price minimum (the minimum you paid per unit for inventory of this item)
• Cost price maximum (the maximum you paid per unit for inventory of this item)
• Discount amount (the total discount allowed from your stated item price—the total dollar amount generated from sales subtracted from the current price listed, for all items sold)
• PayPal fees (all transaction fees associated with sales of this item)
• Refunds (any refunds you’ve had to offer customers who returned this item)
• Shipping amount (total amount of shipping and handling fees paid)
• Tax amount (total amount of taxes collected on the items sold)
• Gross amount (the total dollar amount generated from sales plus the total of all shipping/handling fees)
• Profit (the total dollar amount generated from sales minus the total cost for all items sold)
• Profit margin (the dollar profit from the previous column divided by the total dollar amount generated from all items sold)
Naturally, totals for each column are displayed at the bottom of the report. To print the report, click the Print link above the report. To download a copy of the report in spreadsheet format, select Excel from the pull-down list above the report, and then click the Download button.
Inventory Management with Website Payments Pro
So far we’ve examined inventory management with Website Payments Standard. How, then, do you manage your inventory if you use Website Payments Pro instead?
The answer is, you manage your inventory using the same mechanisms you did before you signed in to PayPal. That’s because Pro doesn’t integrate directly with the items you have for sale on your website, as Standard does. Instead, Pro integrates with your shopping cart system. If you’re using Pro, you’re likely to have an existing inventory system and only rely on PayPal for some (or all) transaction processing. It’s your shopping cart that manages your inventory (or interfaces with a separate inventory management or content management system), not PayPal.
If you’re using a third-party shopping cart, it may look as if PayPal integrates with your inventory; that’s a sign that the shopping cart provider did a good job designing things. (You want the entire process to appear as seamless as possible.) But all PayPal receives is data related to the customer’s payment, not data related to what the customer is purchasing, so it can’t track anything for you.
The Bottom Line
PayPal offers detailed inventory and sales tracking for merchants using PayPal-hosted payment buttons, typically those signed up for Website Payments Standard. When you create a payment button, you specify the quantity on hand (and optionally the item cost); when a customer purchases that item by clicking the payment button, PayPal automatically adjusts the quantity on hand so you can re-order the item as needed. You can also configure PayPal to send an email alert when inventory drops to a specified level—ideal for restocking popular merchandise. You track your inventory levels via PayPal’s Inventory and Profit & Loss Report, which also helps you track essential sales data for each item you carry, such as quantity sold, minimum/maximum selling price, and profit margin.