
7. Shipping Orders

From the customer’s standpoint, the checkout process is just a small part of a transaction. Granted, it’s the part where he pays for what he bought, but that’s just a minor inconvenience. Much more important—and certainly more fun—is the part where the customer receives the item(s) he purchased.
Which brings us right to the process of shipping those orders you receive. PayPal is intimately involved with several parts of the shipping process, starting right up front—where you decide how much you’re going to charge the customer for shipping.
Configuring Shipping Options for Website Payments Standard
As noted in Chapter 4, “Getting Paid,” you set up a lot of information about your business when you first create your PayPal business account. Among the most important of these details are your shipping rates—how much you charge to ship items to your customers.
When you’re using Website Payments Standard, PayPal lets you set universal shipping rates for all items purchased on your site. You can charge by the item, by the pound, by type of service used—you can even configure your account to offer free shipping on certain types of orders. It’s all a matter of the settings you choose.
To configure your universal shipping settings: go to your profile, click My Selling Tools, and then, under the Shipping My Items heading, update your Shipping Calculations. From the Shipping Calculations page, shown in Figure 7.1, you can set up domestic and international shipping separately. We’ll deal with domestic shipping first, and save non-U.S. shipping for the “Shipping Internationally” section later in this chapter. Click the Start button in the Set Up Domestic Shipping Methods section to begin setting your options.
Figure 7.1. Getting ready to configure shipping options.

Selecting Where You Ship To
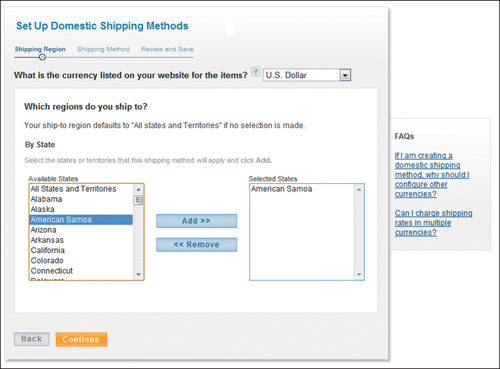
The first shipping option to configure is which locations you ship to. When you see the Shipping Region page, shown in Figure 7.2, select the states and territories you ship to. By default, PayPal assumes you ship to All States and Territories, but this is easy enough to change. If you only ship to selected states, select those states in the Available States list and click the Add button. This places them in the Selected States list—the list of states where you do offer shipping services. Click Continue when done.
Figure 7.2. Selecting which states you ship to.
Selecting a Shipping Method
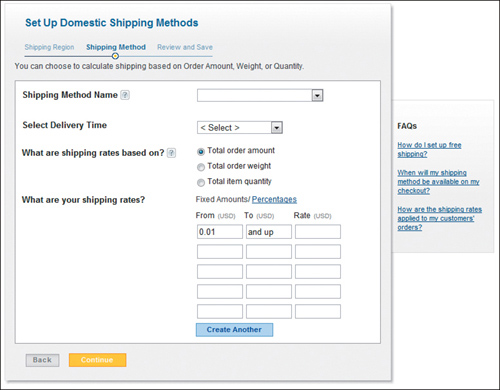
Next, you need to tell PayPal what shipping methods you offer. The Shipping Method page, shown in Figure 7.3, lets you specify the types of shipping you offer, and then set rates for each of them.
You can offer as many different shipping methods as you like, or as are feasible. For example, you might offer standard ground shipping and some form of expedited shipping, and let customers make their choice during the checkout process. Obviously, you can charge more for the costlier services.
Figure 7.3. Setting shipping methods and rates.
What shipping methods can you offer? PayPal doesn’t let you list specific services (UPS, FedEx, etc.), but rather more generic shipping types. Here’s the list you can choose from:
• Air Service
• Economy
• Expedited Air Service
• Expedited Flat Rate Shipping
• Express
• Express Domestic
• Free Shipping
• Ground
• Global Priority
• International Economy
• International Expedited
• International Express
• International Express Air
• International Priority Air
• Next Day
• Next Day Air
• Next Day Air Economy
• One-Day Shipping
• Overnight
• Overnight Flat Rate Shipping
• Standard International
• Standard Shipping
• Store Pickup
• Two-Day Shipping
• Worldwide Shipping
• 2-Day Air
You should select the methods that best match the shipping services you typically use. For example, if you use U.S. Postal Service Parcel Post, you might specify Standard Shipping. If you use UPS Ground, you might specify Ground. Of course, if you offer free shipping, choose the Free Shipping option.
Whichever shipping method you choose, you also need to specify the typical delivery time for that option. Some combinations are obvious; if you select One-Day Shipping option, then you’d select One Business Day from the Select Delivery Time list. For other shipping methods, go with the average delivery time specified by the service you use.
If you offer more than one shipping method, you’ll need to click the Create Another button after you specify shipping rates for the first method. You can then enter different shipping rates for the next method.
Setting Shipping Rates
You now need to specify the exact shipping rates for each of your shipping methods. You base these rates on:
• Total order amount. For example, you could charge $5 shipping except for orders over $100 which would receive free shipping. You can set up as many price brackets as you like.
• Total order weight. For example, you could charge $5 for orders under 10 pounds and $10 for orders over 10 pounds—or simply charge $2 per pound.
• Total order weight. For example, you could charge $5 per item, or $5 for the first item and $2 for each subsequent item, and so forth.
You set your rates by filling in the boxes on the Shipping Method page. The box labels change according to how you determine your shipping rates, of course. If you select Total Order Amount, the boxes register U.S. dollars (USD). If you select Total Order Weight, the boxes register either pounds (lbs) or kilograms (kg). If you select Total Item Quantity, the boxes register the number of items.
Enter the lower range in the From box and the higher range in the To box, and then enter the shipping rate for this range into the Rate box. Use additional rows to enter rates for other ranges.
By the way, if you charge by total order amount, you can opt to calculate shipping on either a dollar rate or percentage basis. If you choose the percentage option, you charge a set percentage of the total order amount for shipping. For example, if you charge 10 percent shipping, an order of $150 would be accompanied by a $15 shipping charge.
When you’re done entering your shipping rates, click the Continue button. PayPal now displays the Review and Save page. Click the Save Shipping Methods button to finalize your settings.
Setting Shipping on an Item-by-Item Basis
While it’s recommended that you establish sitewide shipping settings, you can set shipping fees for specific items. This lets you charge more for large or difficult-to-ship items, or offer free shipping on selected specials.
You set item-specific shipping rates while you’re creating the item’s Add to Cart button.
You can also set a specific shipping fee for individual SKUs on your site. In this instance, the shipping fee is hard-coded into the Add to Cart button for that product. Simply enter the shipping fee into the Shipping box when you create the button.
Figure 7.4 shows the PayPal button creation page for an Add to Cart button. Just enter the shipping rate for this item in the Shipping box. The rate entered here will override the universal shipping rates specified elsewhere, and be applied to the customer’s order during the checkout process.
Figure 7.4. Setting the shipping rate for an individual SKU.

Shipping Your Orders
When it comes to shipping, PayPal’s assistance doesn’t end when the customer places an order. PayPal offers a variety of shipping tools to help you manage all your customer shipping needs, at no additional cost to you.
Orders should only be shipped when the payment status is completed and PayPal gives the okay. Never ship before you receive notice of payment completion.
Printing a Packing Slip
The initial part of the shipping process involves preparing the item to ship. You’ll want to include some sort of packing slip, of course; if you have your own company packing slips, that’s great, otherwise you can print free packing slips from your PayPal account.
To print a PayPal packing slip, go to your account overview or History page, click on the individual transaction, then, when the Order Details page appears, scroll to the bottom of the page and click the Print Packing Slip link. This displays a packing slip page, like the one in Figure 7.5.
If you want to customize the packing slip, click the Edit button on the packing slip page. This displays the Edit Printable Packing Slip page, where you can opt to include your business’s logo, address, phone number, and a personal message. To save your changes for all future packing slips, check the Save the Above Settings as My Packing Slip Preferences option; click the View Printable Packing Slip button to return to the main packing slip page. You can then click the Print button to print the packing slip.
Figure 7.5. Printing a packing slip.

Packing the Order
Next, you need to pack the item (and its packing slip) in an appropriate shipping container. You have to choose the right type of container for each item you sell.
The first decision to make is whether to use a box or an envelope for shipping. If you have a very large item to ship, the choice is easy. But what if you have something smaller and flatter, such as a baseball card or a coin? Your choice should be determined by the fragility of your item. If the item can bend or break, choose a box; if not, an envelope is probably a safe choice.
Whichever you choose, pick a container that’s large enough to hold your item without the need to force it in or bend it inappropriately. Also, make sure that the box has enough extra room to insert cushioning material. On the other hand, the container shouldn’t be so big as to leave room for the item to bounce around. Also, you pay for size and weight; you don’t want to pay to ship anything bigger or heavier than it needs to be.
After you pack your item, weigh and measure the package. You’ll need this information when creating the postage-paid shipping label.
After you pack the item, you need to seal the box or envelope and affix the shipping label to the outside. Where does that shipping label come from? That’s what we’ll talk about next.
Shipping Individual Packages
PayPal lets you print shipping labels with prepaid postage for any item sold through the PayPal system. You can print labels one at a time, or batch multiple labels together with PayPal’s MultiOrder Shipping. PayPal currently prints prepaid shipping labels for items shipped via the U.S. Postal Service, UPS, Canada Post, and the Royal Mail Group.
Let’s start with one-at-a-time label printing. After an order has been processed (and payment received), follow these steps:
1. Log in to your PayPal account.
2. Click the My Account tab and select either the Overview or History subtab.
3. Click the Print Shipping Label button for this order.
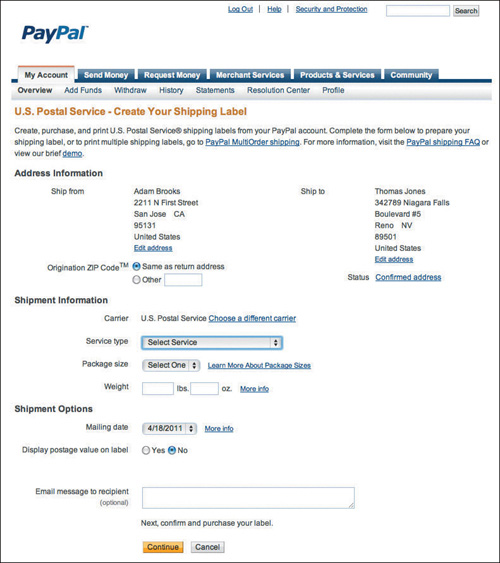
Figure 7.6. Entering shipment information.
4. When the Order Details page appears, scroll to the bottom of the page and click the Print Shipping Label link.
5. When the Create Your Shipping Label page appears, as shown in Figure 7.6, confirm your desired shipping carrier. If you want to change carriers for this shipment, click the Choose a Different Carrier link and make a new selection.
6. Select the specific shipping service from the Service Type list.
7. Select the approximate package size from the Package Size list.
8. Enter the weight of the package (in pounds and ounces) into the Weight boxes.
9. Review the shipping information in the Shipment Options sections, and make any necessary changes or selections.
10. Click the Continue button.
11. When the Confirm and Purchase Your Shipping Label page appears, confirm the information (and the shipping charges), and then click the Pay and Continue button.
12. PayPal now displays a pop-up window with a preview of the label to print, like the one in Figure 7.7. If everything looks fine, make sure you have label paper in your printer, and then click the Print Label button.
Figure 7.7. Printing a shipping label.

PayPal now prints the label and deducts the shipping cost from your account. Attach the label to your package and either drop it off at your nearest carrier office or arrange a pickup.
If you use a shipping service outside of PayPal, you can still enter tracking information into the PayPal system, so that the customer can track the shipment. Go to the Details section of the PayPal payment page and click the Add Tracking Information link.
Shipping Multiple Packages
If you ship many packages each day, you’ll probably want to take advantage of PayPal’s MultiOrder Shipping. This tool lets you print up to 50 prepaid shipping labels in a single batch. MultiOrder Shipping is a lot faster than printing one label at a time, a real time-saver for larger merchants—and, like other PayPal shipping tools, it’s totally free.
Configuring MultiOrder Shipping
Before you use PayPal MultiOrder Shipping, you need to configure some settings. Follow these steps:
1. Log in to your PayPal account.
2. Click the Merchant Services tab.
3. On the next page, go to the Shipping & Tax section and click the MultiOrder Shipping link.
4. When the next page appears, click the Start Shipping button.
5. When MultiOrder Shipping opens in a new window, click Edit on the menu bar, and select Settings. (The first time you access MultiOrder Shipping, the Getting Started dialog box is displayed. Click the Close button to close this dialog box.)
At present, MultiOrder Shipping works only with U.S. Postal Service shipping. For other shipping services, use PayPal’s manual shipping tool.
Figure 7.8. Configuring print settings.

6. When the Settings dialog box appears, you will see four categories listed in the panel on the left. Select Ship From Information and choose the appropriate address. If you want your customers to receive a shipping notification via email, check the Send Email Notification to Recipient box.
7. Select Print Settings, shown in Figure 7.8, and choose a printer. You can also indicate whether you want to print accompanying package lists, packing slips, or receipts.
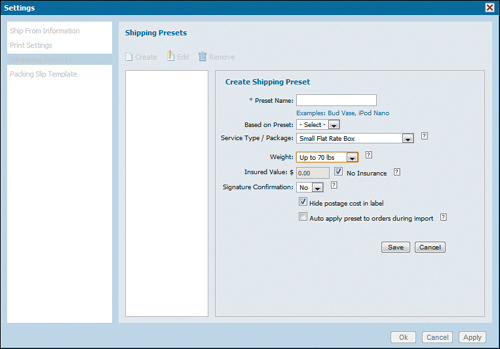
8. Select Shipping Presets and click Create. As you can see in Figure 7.9, this is how you quickly assign shipping details to a customer order. Give the preset a name, select the service type and package, choose a weight, decide if you want to provide shipping insurance, indicate whether you want to require signature confirmation, check if you want to hide the postage cost on the label, and then click the Save button.
Figure 7.9. Creating shipping presets.
9. Repeat Step 8 to create additional shipping presets.
10. Select Packing Slip Template to customize the packing slip you include in your package. You can add your company logo and a message to the customer.
11. When you’re done configuring these settings, click the OK button.
Creating a Batch Shipping Order
Once you have MultiOrder Shipping properly configured, you can start shipping. For each batch you ship, you need to import your recent PayPal orders and assign a shipping preset to each order. Follow these steps:
1. Open the MultiOrder Shipping tool.
2. Click the Import button on the toolbar, and then select PayPal Orders.
3. Click OK when your orders are finished importing.
Figure 7.10. Creating a batch shipping order.

4. Make sure you have the Orders to Ship tab selected. You should see all your imported orders, as shown in Figure 7.10. Highlight an order to view the details for that order on the right side of the window.
5. Click one or more orders that will be using the same shipping preset. Hold down the Ctrl button on your keyboard to select multiple items (Command button on Mac).
6. Pull down the Apply Preset list and select the shipping preset. Information about the selected items is filled in automatically.
7. Repeat Steps 5 and 6 to apply presets to other orders.
8. To enter information about an order that doesn’t fit any of your presets, manually select Service Type, Package, Weight, and Dimension for that item.
9. When you’re done applying presets and entering information, click the Print button on the toolbar to begin the printing process.
10. The Print Preview tab is now displayed. Verify that everything is correct, and then click the Pay and Print button.
11. PayPal now contacts the U.S. Postal Service to obtain necessary information, and displays the standard Print dialog box. Select Print Labels, and then click the OK button to initiate batch printing.
PayPal now prints your labels and charges your account for the shipping fees incurred. Labels are printed in alphabetical order by last name.
Note that you can use the History tab to view past orders.
Shipping Internationally
So far we’ve discussed using PayPal’s shipping tools to ship domestically. PayPal also provides tools for international shipping.
In many ways, PayPal’s international shipping tools are similar to its tools for domestic shipping. You select a shipping service, specify a shipping charge to the customer, and print a prepaid shipping label.
The big difference between international and domestic shipping is the need to fill out appropriate customs forms. While this is a somewhat tedious task, PayPal helps to automate the process.
Because of the higher incidence of fraud outside the U.S., international shipments do not qualify for PayPal’s Seller Protection Policy.
Configuring International Shipping Settings
You configure PayPal’s international shipping settings much the same way you configure domestic settings. From your profile, click My Selling Tools, and then, under the Shipping My Items heading, update your Shipping Calculations. When the next page appears, click the Start button in the Set Up International Shipping Methods section.
From here the set up should be familiar to you. Use the Shipping Region page to select the countries you ship to. Use the Shipping Method page to specify shipping methods and rates. Review and then save your settings.
Making an International Shipment
When shipping internationally, you have to ship manually, one order at a time, as batch shipping is only available for domestic orders. Go to your account overview or History page and click the Print Shipping Label button for the order you wish to ship.
Depending on the type of item you’re shipping and the weight of your package, you’ll need either Form 2976 (green) or Form 2976-A (white). Customs forms aren’t required on nonduty items that weigh less than 16 ounces.
The big difference here is that in addition to the prepaid shipping label, PayPal prints all necessary customs forms for shipping to the designated country. Just fill out the forms and have them available when you take the package to the post office for shipping.
The Bottom Line
PayPal helps to automate your shipping process from start to finish. You can configure your PayPal account to include various shipping methods and rates, and have those rates applied automatically during the checkout process. You can then use PayPal to print packing slips and shipping labels with prepaid postage, for both domestic and international shipments. MultiOrder Shipping even lets you batch together up to 50 different shipments, for faster processing and label printing. It’s a complete shipping solution, all handled from within your PayPal account.