
12. Managing Business Info and Data

When you’re running a business, you’re constantly making decisions. To make good decisions, you need good information, information that’s current, accurate, and relevant. In a retail or service business a key source of information is what people bought, how many they bought, what they paid—you get the idea.
PayPal helps you track and manage all of your customer transactions. PayPal keeps a record of every customer transaction for which it handles payment, and lets you view this data online and download it for further analysis.
Tracking Order Activity
You can view all of your PayPal transactions in several places on the PayPal site. How often you access this data—and what you use it for—is up to you.
Checking your Account Overview
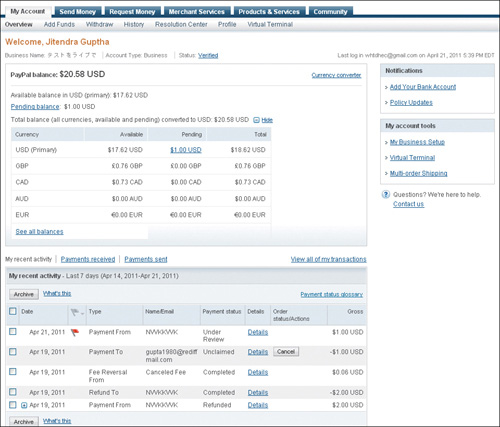
When you want to view your most recent customer transactions, turn to your overview page. Depending on your preferences, it’s probably the first thing you see after you’ve logged in. If not, just click the My Account tab, and then select the Overview subtab. Scroll to see your recent activity presented in a table near the bottom of the page.
As you can see in Figure 12.1, all of your recent customer transactions are listed here. You can filter transactions by payments sent or payments received, just by clicking the links above the data table.
Each item on this page lists different information about each transaction:
• Date, the date the transaction was completed.
• Type, the type of transaction recorded—payment, sale, debit, credit, refund, authorization, void, and the like.
• Name/Email, the name or email address of the customer.
• Payment status, the status of the current payment.
• Details, a link which, when clicked, displays the Transaction Details page for this item.
• Order status/Actions, which displays any pending actions you need to take regarding this transaction.
• Gross, the gross amount of funds generated (or debited) by this transaction.
Figure 12.1. Tracking recent order activity from your account overview page.
Viewing Transaction History
A more complete transaction history is available from your History page. You get there by logging in to your account, clicking the My Account tab, and then selecting the History subtab. This is the place to go to view older transactions.
Figure 12.2. Tracking all order activity from the History page.

As you can see in Figure 12.2, the History page displays the same data for each transaction as was shown on the overview page, with two additions:
• Fee, the PayPal fees charged for this transaction.
• Net amount, the net value of the transaction transferred to your PayPal account—the gross amount paid less the PayPal fees.
By default, the History page displays all transactions for the past month or so. You can, however, display transactions for a selected data range (Today, This Week, Last Week, This Month, Last Month, or Last Three Months) by selecting a range from the first pull-down list (labeled Select) above the data table. Alternatively, you can display transactions from a custom date range by entering a start and end date in the boxes above the data table.
You can also filter the History page by a variety of criteria. Click the More Filters arrow above the data table and select one of the following filters:
• Payments received
• Payments sent
• Credits
• Currency conversion
• eChecks
• Financial products and services (gift cards, PayPal credit, PayPal credit payment, or reward voucher)
• Money added and withdrawn (mass payments, money added, or money withdrawn)
• Payment received to a specific email address (if you hold multiple addresses)
• Payment received via PayPal Mobile
• Referrals
• Refunds
• Reversals
• Shipping (items to ship or items shipped)
• Subscriptions and agreements (billing agreements, pay list—payments received or payments sent, recurring payments, or subscriptions)
• Reserves (all, placed, or released)
• Payment holds (all, on hold, or released)
• Payment review transaction (all, under payment review, cleared by payment review, or canceled by payment review)
And, as with your account overview, click the Details link for any specific transaction to view the details for that transaction.
You can also use the History page to find a specific transaction. Click the Find a Transaction link at the top of the page; when the next page appears, enter one or more keywords and select where to search—in email, transaction ID, last name, last name/first name, receipt ID, invoice ID, auction item number, billing agreement, or profile ID. Select a date range for your search and then click the Search button.
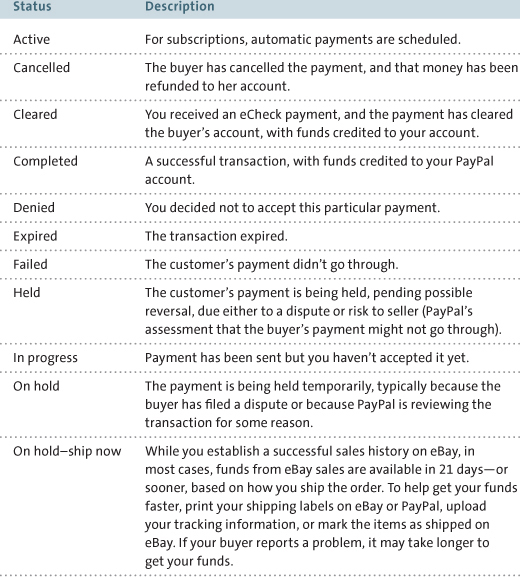
Understanding Payment Status
What’s the status of a given payment? The status is listed in the Status column of your account overview and History pages, but what types of status might you encounter? Table 12.1 details the possible status types.
Table 12.1. PayPal Payment Status Types


Downloading Transaction Data
You’re not limited to viewing your transaction history online. You can also download your transaction history to your computer, to work with on your own time.
Downloading Data
To download PayPal transaction data, follow these instructions:
1. Log in to your PayPal account.
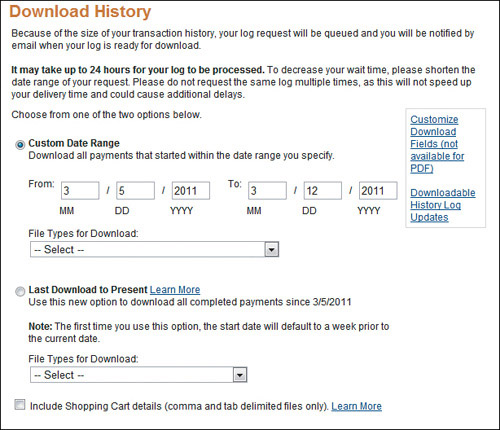
2. Go to the My Account tab, hover over the History subtab, then select Download History.
3. When the Download History page appears, as shown in Figure 12.3, select the date range to download (in the Custom Date Range section) or select the Last Download to Present option to download all transactions you haven’t yet downloaded.
4. Pull down the File Types for Download list and select the type of file to download.
5. Click the Download History button (not shown).
Figure 12.3. Downloading PayPal transaction history.
Selecting a File Download Format
PayPal enables you to download your transaction history in a number of different file formats. Which file format you select depends on how you’ll be using the downloaded information. Table 12.2 details the available download formats.
Table 12.2. Transaction History Download Formats
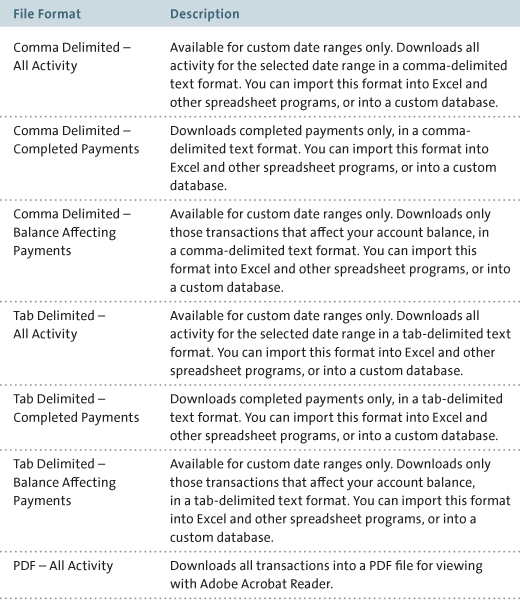
Of the major file formats available (comma delimited, tab delimited, Quicken, QuickBooks, or PDF), which should you use? Here are some tips:
• If you want to view and edit your data in Microsoft Excel, use either the comma- or tab-delimited formats; both of these formats import easily into an Excel spreadsheet.
• If you want to store your data in Microsoft Access or another database program, use either the comma- or tab-delimited formats; both of these formats import easily into most database programs.
• If you manage your business with Quicken, use a Quicken QIF.
• If you manage your business with QuickBooks, use a QuickBooks IIF.
• If you simply want to view your data onscreen or in printed format and not manipulate the data in any way, download to a PDF.
Customizing Download Fields
You can also customize the fields you download, for all download file formats except PDF. This lets you import only those fields you need for your own particular analysis or data storage. It’s also a great way to import specific fields into Quicken or QuickBooks.
To select which fields to download, click the Customize Download Fields link on the right side of the History page. This displays the Customize My History Download page, shown in Figure 12.4.
By default, PayPal downloads the following fields:
• Date
• Time
• Time Zone
• Name
• Type
• Status
• Currency
• Gross
• Fee
• Net
• From Email Address
• To Email Address
• Transaction ID
• Reference Transaction ID
• Receipt ID
To select other fields, check those fields you wish to download and uncheck those you don’t want to download. Click the Save button to save your preferences and return to the transaction download process.
Figure 12.4. Customizing the fields to download.

Downloading Shopping Cart Transactions
If you’re downloading in comma- or tab-delimited formats (ideal for importing into Excel) and using the PayPal Shopping Cart in Website Payments Standard, PayPal lets you download details of each shopping cart transaction. With this option selected, each shopping cart line item appears on a new row under the transaction in the download file. The Type column indicates Shopping Cart Item for each of these rows.
What you get, then, are multiple rows in the download file for each shopping cart purchase. The first row (Type: Shopping Cart) holds transaction-level details; the second row (Type: Shopping Cart Item) displays item details. If there are multiple items in the shopping cart, there will be multiple Shopping Cart Item rows—one row for each item.
To include shopping cart details as part of your download, make sure you’re downloading in either tab- or comma-delimited formats, and then check the Include Shopping Cart Details box on the Download History page.
Tracking Transactions via Multiple Email Addresses
If you maintain multiple websites, you can track sales by website by using a different email address for each site. You simply configure PayPal with up to eight separate email addresses corresponding to each of the sites you maintain. You can then track payments from different sites in your PayPal history.
Configuring PayPal for Multiple Email Addresses
Assuming that you have different email addresses (perhaps with different domains) for each of your websites, you then need to add each of these to your PayPal account. These site-specific addresses should be in addition to the main email address you used when you created your PayPal account.
Even if you maintain a single website, you can still add a separate PayPal email address for that site. This lets you route payment notices to one email address and PayPal news and information to a separate email address, as we’ll discuss shortly.
Your main PayPal address, dubbed your Primary PayPal address, is where PayPal sends general notices, news, and information. The site-specific addresses you add should be in addition to (and separate from) your Primary PayPal address.
Follow these steps to add multiple addresses to PayPal:
1. Go to your profile, click My Business Info on the left, and click to update your email address(es).
2. When the Email page appears, click the Add button.
3. When the Add Email Address page appears, as shown in Figure 12.5, enter the new email address and click the Save button.
Figure 12.5. Adding a new email address to your PayPal account.

4. PayPal now sends a confirmation email to the new email address. Click the link in the email to confirm the address.
Configuring PayPal Payment Buttons for Multiple Email Addresses
After you’ve added site-specific email addresses to your PayPal account, you then need to configure your PayPal payment buttons with the email address associated with each website. You do this when you’re creating your payment buttons.
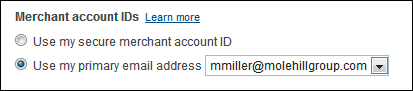
From the Create Payment Button page, scroll to the Merchant account IDs section, shown in Figure 12.6. Select that site’s email address from the email address list, and then proceed with the rest of the button-creation process.
Figure 12.6. Selecting an email address for a PayPal payment button.
Tracking Transactions via Email Addresses
With your payment buttons configured properly, when a customer pays for a purchase at one of your websites, PayPal sends the transaction notification to the email address associated with that site. PayPal also tracks your transaction history via the site’s email address, which makes it easy to sort or filter transactions for each site you maintain.
To display only transactions from a given website, go to your account History page and click the More Filters link. From the pull-down menu, select “Payment received to,” and then select the email address associated with a particular website. PayPal then displays only those payments made on that site (i.e., sent to that email address).
Filtering Incoming PayPal Email
You can better manage all the emails sent to you by PayPal by creating some smart filters in your email program. For example, if you use Microsoft Outlook for email, you can filter your incoming messages so that emails associated with the different addresses you’ve registered with PayPal feed into different Outlook folders. How you do this, of course, varies from program to program; consult your email application’s Help files for more detailed instructions.
If you maintain multiple websites, create a filter and a folder for transactions from each website. You should also create a filter and folder for email coming from your Primary PayPal email address; this is where all of PayPal’s system notices, news, and information is sent to. Even if you maintain a single website, it’s still good practice to have a separate email address (and filter and folder) for that address, and another filter and folder for the informational emails sent to your Primary PayPal address.
You can then check each of the PayPal-related folders separately for incoming messages. Put a priority on messages sent to your site-specific email addresses; this is where all of the payment and transaction notifications will come, and you should check them regularly. Less important are messages sent to the folder you created for your Primary PayPal address, so you don’t need to check that folder as often.
The Bottom Line
PayPal tracks and keeps records of all the transactions for which it processes payments. You can access this data from your account overview (for most recent transactions) and your History page. You can view transaction data onscreen or download it in a variety of formats for import into Excel, Access, or other programs. If you run multiple websites, you can configure PayPal with different email addresses for each site, and then more easily track transactions (and transaction notification emails) for each site separately.