9. Making Payments

So far in this book we’ve addressed using PayPal to process online payments from your customers. But it goes both ways; you can also use PayPal to make payments to customers, suppliers, and your employees. It’s a nice adjunct to PayPal’s basic function of processing your incoming payment, and it can make your life easier.
Of course, you can transfer the funds in your PayPal account to your bank account and send payments to vendors the old-fashioned way. But once you have customer purchases building up a nice balance in your PayPal account, you might consider skipping those steps and simply sending payments directly from PayPal.
PayPal Payments: More than Payment Processing
PayPal facilitates all sorts of monetary transactions. Of course, PayPal handles payments from customers to retailers, either at the point of sale or when invoiced. PayPal also handles payments from eBay buyers to eBay sellers. People can also use PayPal to send money to other individuals—parents sending money to college kids, for example, or someone sending a monetary gift to a family member or friend.
More important to retailers, you can use PayPal to send money to individuals and other businesses. You can refund money to customers who’ve returned products or overpaid; you can pay your suppliers or contractors. You can even use PayPal to pay your own employees, in the form of one-time bonuses or ongoing salary. They’re all just different types of online payments, after all.
PayPal’s outgoing merchant payments are available to any business using PayPal, no matter which (if any) product you subscribe to. You don’t need to use Website Payments Standard or Pro or any other business product to send money to another business or individual via PayPal. All you need is a PayPal account and some means of funding (typically your bank account, although you can also fund payments via credit card), and you’re ready to go.
Issuing Customer Refunds
Let’s start by examining how you can use PayPal to issue refunds to your customers. It’s really quite easy.
Refunding Money from a PayPal Transaction
All of PayPal’s order processing products have built-in refund functionality. You process refunds one at a time; in this scenario, a refund is linked to a specific sales transaction.
You can refund Completed, Pending, Cleared, or Uncleared payments; naturally, you can’t refund payments that haven’t been received. In addition, refunds issued against a specific transaction have to be made within 60 days of the original payment. (To issue refunds after 60 days, see the next section in this chapter.)
Here’s how to issue a refund for any transaction processed by PayPal:
1. Log in to your PayPal account. If the transaction you are seeking does not appear in your Recent Activity click to see more transactions (or click the History tab).
If for some reason you do not see the option to issue a refund, click to see the transaction details and the “Issue a refund” link should appear there, if the transaction is eligible for a refund.
2. When you see the transaction listed, look under the Order status/actions column. You should see either an Issue Refund button, or a drop down where that is one of the choices, as shown in Figure 9.1. Don’t panic, choosing this does not send the refund yet!
Figure 9.1. Initiating a customer refund from the Activity or History list.
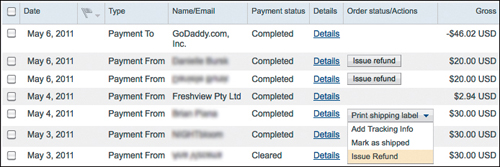
Figure 9.2. Enter details of a customer refund.

3. When the transaction details page appears, click the link under the transaction amount: Issue a refund.
4. When the Issue Refund page appears, as shown in Figure 9.2, enter the amount of the refund. Click Continue.
5. Review the refund details, then click the Issue Refund button—this actually sends the refund.
You can issue either a full or partial refund. For most commercial transactions you’re not limited to refunding the entire amount of the transaction, but for pending (or personal) transactions you can only refund the full amount.
When you issue a full refund, PayPal credits back to you the original transaction fee paid, minus a 30-cent processing fee. When you issue a partial refund, PayPal credits back to you a portion of the original transaction fee.
Making Payments to Vendors
You can use PayPal send money to your vendors to pay open invoices. The recipient does not need to have a PayPal account. The one caveat for using PayPal to pay vendors is that the vendor will have to pay a nominal transaction fee to retrieve the funds. In this instance, your vendor functions as any PayPal seller, and is charged accordingly.
Here’s how to do it:
1. Log in to your PayPal account and select the Send Money tab.
Make sure your vendor accepts PayPal payments—and is willing to pay the corresponding transaction fee—before you send the payment.
2. When the Send Money page appears, enter the recipient’s email address into the To box.
3. Enter the amount you’re paying into the Amount box; make sure USD is selected in the associated pull-down list. (If you’re sending funds in a different currency, select that currency instead.)
4. Select the Purchase tab, as shown in Figure 9.3.
5. Assuming that you’re paying for goods delivered from a vendor, select the Goods option.
6. Click the Continue button.
Figure 9.3. Sending a payment to a vendor for goods received.

7. PayPal now displays the Review your payment and send page. Review the details of the payment, then confirm or change the payment method.
8. Enter the subject of the email in the Subject box.
9. Enter your own message (such as the invoice number you’re paying) in the Message box.
10. Click the Send Money button.
The vendor receives email notification of the payment and can access those funds from their PayPal account.
Making Payments to Contractors and Employees
You can use PayPal to pay contractors and freelancers under your employ, as well as your regular employees. The process is similar to that used to pay vendors. Note, however, that any contractor or employee you pay must have a PayPal account, and will be liable for the corresponding transaction fees.
1. Log in to your PayPal account and select the Send Money tab.
2. When the Send Money page appears, enter the recipient’s email address into the To box.
As contractors and employees may not be accustomed to having processing fees being taken out of their paychecks, you may want to increase the amount paid to cover the fees.
3. Enter the amount you’re paying into the Amount box; make sure USD is selected in the associated pull-down list. (If you’re sending funds in a different currency, select that currency instead.)
4. Select the Purchase tab.
5. Select the Services option.
6. Click the Continue button.
7. PayPal now displays the Review your payment and send page. Review the details of the payment, then confirm or change the payment method.
8. Enter the subject of the email in the Subject box.
9. Enter your own custom message (such as the job or invoice number for the contractor or freelancer) in the Message box.
10. Click the Send Money button.
The recipient receives notification of the payment and can access those funds from her PayPal account.
Using PayPal’s Mass Payment
So far we’ve discussed single payments to individuals and businesses. This approach is fine if you make only occasional payments of this type, but it can be cumbersome if your payment load increases.
If you make a lot of payments via PayPal, consider using PayPal’s Mass Payment option. This product enables any entity with a Premier or Business account to send payments to multiple recipients with relative ease.
When to Use Mass Payment
When might you use PayPal’s Mass Payment? Here’s a short list:
• Affiliate commissions
• Customer rebates
• Pay-to-surf rewards
• Employee benefits/bonuses
• Lottery prizes
• Survey incentives
And, of course, to handle your entire employee payroll.
Individual payments to recipients cannot exceed $10,000 U.S. (Limits vary from country to country.)
Paying for Mass Payments
Mass Payment itself is free, and available to all businesses using PayPal. You pay for each payment processed—that is, for each payment to an individual. Your fee is 2% of the payment amount, up to a maximum of $1.00 US per payment.
Funding a Mass Payment
Unlike other forms of payments, a Mass Payment can only be funded from money transferred from your bank account to your PayPal account. You cannot use credit cards to fund Mass Payments.
Creating a Mass Payment File
Before you create a Mass Payment, you need to collect some basic information—in particular, the payees’ email addresses and payment amounts. That’s actually less than you need to process a conventional check payment, where you typically need the payee’s street address, too.
Next, you need to create a Mass Payment file. This is a tab-delimited text file that contains a list of all the people you’re paying and how much you’re paying them.
You can easily create this file in Microsoft Excel. Just open a new spreadsheet with three columns (and optional fourth and fifth columns), as follows:
• Column 1 should contain the payees’ email addresses, one per row.
• Column 2 should contain the payment amount for each payee.
Each Mass Payment file can contain payments in only one currency. To make payments in different currencies, you must create separate Mass Payment files.
• Column 3 should contain a three-letter code for the currency in which the payments will be made. The three-letter code for U.S. dollars is USD; you can find codes for other currencies on the PayPal website.
• Column 4 (optional) can contain recipient IDs you can use to track and reconcile payments. Each ID must be no more than 30 characters long, and cannot contain any spaces.
• Column 5 (also optional) can contain a customized note to each recipient. (The note will be inserted into the email notice of payment.)
Figure 9.4 shows what a typical Mass Payment file might look like.
Figure 9.4. Creating a Mass Payment file in Excel.

Once created, you should save the Excel file as a Text (Tab delimited) file. Now you’re ready to upload the file and send the Mass Payment.
Sending a Mass Payment
Once you’ve created your Mass Payment file, follow these steps to send the payments:
1. Log in to your PayPal account and select the Send Money tab.
2. Select the Make a Mass Payment subtab.
3. When the Mass Payment page appears, as shown in Figure 9.5, click the Upload button. When the Open dialog box appears, navigate to and select your Mass Payment file, then click the Open button.
4. Pull down the My payment recipients are identified by list and select Email address.
Figure 9.5. Sending a Mass Payment.

5. Enter a subject for the emails you’ll send in the Email subject box.
6. Enter a customized message to your payees in the Message to recipient box.
7. Click the Review button.
8. Review the information on the next page, then click the Submit button.
Receiving Funds
Once you send the Mass Payment, PayPal automatically transfers funds from your account to the accounts of all your payees. PayPal also sends email messages to the payees, notifying them that they’ve been paid.
You should notify each payee in advance that you’re sending payment via PayPal, and that they’ll each need a PayPal account to accept payment.
If the payee already has a PayPal account, and the email the payment was sent to is confirmed, the money automatically shows up in the payee’s bank account. If the payee doesn’t have a PayPal account, or has not yet confirmed her email address, then she needs to click the link in the payment notification email and complete the account setup and receive the funds.
Figure 9.6. Viewing Mass Payment transactions.

Record Keeping
PayPal tracks all the payments you make on your History page, as shown in Figure 9.6. You can see which payments have been accepted and which are yet unclaimed, and reconcile your account accordingly.
It’s also possible to send mass payments using your own internal payment system, via the PayPal MassPay API. Go to www.x.com/community/ppx/mass_pay for more details and programming assistance.
The Bottom Line
PayPal can be used for all manner of outgoing payments. You can issue full or partial refunds for any PayPal-based transaction. You can also use PayPal to pay vendors, contractors, and employees on an individual basis. PayPal also offers Mass Payment, which enables you to process multiple payments—such as large payroll transactions—via a single uploadable file.