
4. Getting Paid

Part and parcel of the online shopping experience is the shopping cart and checkout system, which is how customers pay and you get paid. There’s also the matter of invoicing your customers, if that’s the way your business works, or managing recurring payments—subscriptions or installment payments.
If you don’t yet have a shopping cart for your website, PayPal can provide one, at no additional charge and with little effort on your part. Otherwise, you can integrate PayPal’s payment processing into your existing shopping cart—including those provided by third-party suppliers.
How Shopping Carts Work
If you offer more than just a single item for sale, chances are some customers will purchase more than one item, which is a good thing. Since you don’t want to force these customers to make two or more separate payment transactions, you need to consolidate multiple purchases into a single shopping cart. That shopping cart then feeds into a checkout page, where customers provide shipping information and pay for their purchases.
The Checkout Process
Most online shoppers are familiar with shopping carts and the online checkout process. Figure 4.1 shows how the process works, from the customer’s viewpoint, using the PayPal Shopping Cart with Website Payments Standard. Steps in blue are generated pages hosted on the PayPal site; steps in white take place on the merchant’s site.
The process starts when the customer clicks the Add to Cart button for a particular product. This button is hosted on the merchant’s website, although it’s generated via code supplied by PayPal. This adds the item to the virtual shopping cart, hosted by PayPal; customers can continue shopping—and add more items to the shopping cart—or go directly to the checkout page.
Figure 4.1. The three steps of the PayPal Shopping Cart checkout process, in the context of an online shopping experience.

When the customer clicks to checkout, they will see the checkout page hosted by PayPal, although it can be branded for the merchant. At this point the customer signs in and pays with a PayPal account, or enters the necessary credit or debit card information. When paying via credit or debit card, the customer also has to enter a shipping address and other relevant information. (These details are already known if the customer pays via a PayPal account.)
The shopper confirms the transaction details and then PayPal processes the payment. Assuming the customer’s payment is approved, PayPal generates a confirmation screen and transmits information about the purchase to the merchant. The customer is then returned to the merchant’s website, and receives (from PayPal) an email confirmation of the purchase.
Behind the Scenes
Most shopping cart/checkout systems are built from the following components:
• Payment buttons or links that enable the customer to place individual items into the shopping cart.
• A database that stores information about the products in the customer’s shopping cart.
• Web pages that display information about shopping cart contents, as well as checkout pages that are used when the customer is ready to pay.
• Controls for administering the shopping cart system.
• Reports that detail shopping cart transactions.
These components work together to provide a unified shopping and payment experience for the customer, allow you to access and manage your inventory, and provide you with information that triggers the shipment of purchased products. The system itself is actually a software application. This application can run on the computer or server that hosts your company’s website, or it can run on a third-party website. In the case of the PayPal Shopping Cart, it runs on PayPal’s servers.
Wherever it’s hosted, the shopping cart integrates with the rest of your website. When a customer clicks the Buy Now or Add to Cart button, that information is transmitted to the shopping cart. When the customer opts to check out, all items in the basket are displayed on a dynamically generated checkout page. The customer then enters appropriate payment and shipping information, the payment is processed, and the transaction is concluded—all in the shopping cart/checkout system.
The product and customer information is stored temporarily in the shopping cart database. The shopping cart system creates the final checkout on the fly, in real time, based on the information stored in the database; unlike the static HTML product pages on your website, all checkout pages are dynamic web pages.
Integrating a Shopping Cart
If you’re using a third-party shopping cart, this software needs to be tied into your existing storefront and inventory systems. This requires some degree of programming expertise; how much programming is necessary depends on the complexity of the shopping cart.
For example, PayPal’s Website Payments Standard provides the fully featured PayPal Shopping Cart. With this solution, all you have to do is insert HTML code for the individual product payments buttons; the checkout process itself resides on the PayPal site, so you don’t have to create new pages for checkout or other activities. The integration process is relatively easy.
If you use another shopping cart solution, however, the integration process can be more complicated. PayPal’s Website Payments Pro integrates with most third-party shopping carts, but may require additional programming to implement the necessary calls to various PayPal APIs.
That said, many third-party shopping carts come with PayPal integration built-in, which makes it easy for you. Some shopping cart providers build in integration with Website Payments Pro; others (those that provide their own merchant credit account solutions) use the gateway approach and tie into PayPal’s Payflow Payment Gateway. In either instance, integrating PayPal with a third-party shopping cart is often as easy as providing your PayPal credentials to the shopping cart service and checking a few options on a sign-up form.
Do You Need a Shopping Cart Partner?
When it comes to implementing a shopping cart on your site, you have several options. You can
• Build your own shopping cart from scratch. This is expensive and time consuming, but it provides you with a totally customized solution that exactly matches the look and feel of the rest of your website. Plus, with your own shopping cart, there are no ongoing monthly or usage fees—although you’ll still have to pay PayPal or another firm for payment processing.
• Partner with a third-party shopping cart service. These services offer ready-to-run shopping cart/checkout systems that can be somewhat customized in look and feel to match the rest of your website. Integration with your site is less costly and time consuming than building your own system from scratch, although some programming is still necessary. (The integration of the shopping cart with PayPal, however, is typically seamless; it’s integrating the cart with your site that takes a bit of effort.) You’ll pay a set monthly fee for the use of the shopping cart, a fee per transaction or one based on your transaction volume, and payment processing fees.
• Use the PayPal Shopping Cart. This is the easiest solution to implement. All you have to do is generate and insert Add to Shopping Cart button codes for each SKU on your site; PayPal handles everything else. There’s no integration programming necessary (beyond the button codes, of course), and no additional programming needed on your site. You don’t even have to pay for this service; the PayPal Shopping Cart has no setup fees and no ongoing monthly fees. (You do have to pay PayPal’s normal payment processing fees, of course.) The primary downsides are that you send visitors away from your site for the checkout process and that PayPal’s checkout pages aren’t as specific to your brand or company as custom-built checkout pages.
Where do you go to implement each of these solutions? It depends on which choices you make.
Building It Yourself
If you want to build it yourself, you’ll need to contract with a website development firm—typically the same folks building the rest of your site. Make sure you’re dealing with a firm that has experience building e-commerce sites and systems.
Finding a Shopping Cart Partner
If you want to go with a third-party shopping cart, there are many firms you can partner with—hundreds of them, in fact. Make sure that the shopping cart you choose integrates with PayPal, of course; in fact, many third-party shopping carts come with PayPal functionality built in.
More specifically, you need to make sure the shopping cart integrates with the PayPal product you’ve chosen for your business; you still need to choose between Website Payments Standard, Website Payments Pro, and the other services. Once you’ve ensured this compatibility, it’s a matter of selecting the features, functionality, and price that work best for you.
Where can you find a shopping cart partner? PayPal maintains a list of compatible shopping carts in their Partner Directory. Go to the Solution Types pane and check Shopping Cart; PayPal now displays dozens of shopping cart providers, as you can see in Figure 4.2. You can sort the results by distance, company name, or PayPal partner level (Platinum, Gold, or Member.) Click through to learn more and contact any given company.
Figure 4.2. Browsing for shopping cart partners in the PayPal Partner Directory.

Selecting the PayPal Shopping Cart
The PayPal Shopping Cart is available with Website Payments Standard. When you sign up for your PayPal account, this is the solution you want to choose.
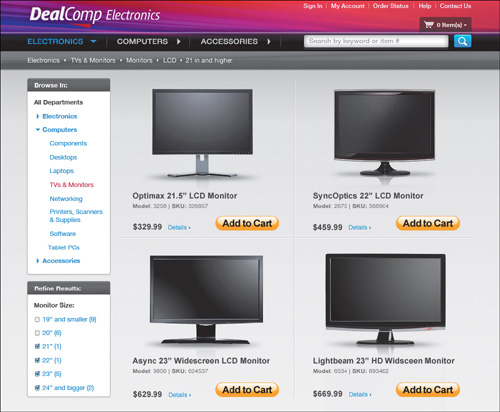
Once you’ve signed up, integrating the PayPal Shopping Cart into your site is a simple matter of generating HTML code for an Add to Cart button for each SKU on your site, and then inserting that code into each product page. (Figure 4.3 shows typical results.) You’ll also want to generate code for and insert View Cart buttons, so that your customers can check out and pay when they’re ready.
Once all the buttons are generated and inserted, and you take your new product pages live, your shopping cart is also live. Since all the processing occurs on PayPal’s site, your setup work is now done; any customer who makes a purchase will use the PayPal Shopping Cart.
Figure 4.3. PayPal Add to Cart buttons on a typical product page.
Configuring the PayPal Shopping Cart
When it comes to implementing the PayPal Shopping Cart, there are several payment options you need to configure, such as tax rate, shipping charges, and the like. While you can specify some of these settings on an SKU-specific basis when you create the product’s Add to Cart button, most settings are applied universally to your entire shopping cart.
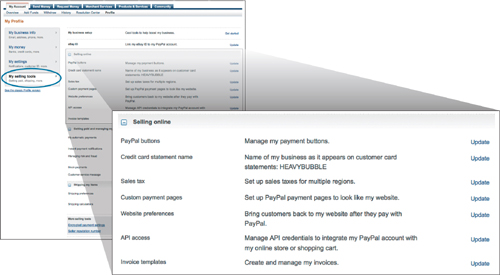
You configure these universal payment settings under the Selling Online heading of your profile, shown in Figure 4.4. To open this page, log in to your PayPal account, select the Profile subtab on the My Account tab and, on the left, select My Selling Tools.
Take some time to become familiar with the choices available under the My Account tab, Profile subtab. In the future this text will simply refer to “your profile”—which, of course, you must be logged in to view.
Figure 4.4. Your PayPal profile with My Selling Tools selected on the left. This is where you configure your account’s payment settings, under the Selling Online heading, by clicking to update the default settings.
Figuring Taxes
As an online business, you may or may not be required to charge sales tax on the items you sell; it depends largely on what kind of traditional retail presence you have, and where. If you have to charge tax, go to your profile, click My Selling Tools on the left and then, under the Selling Online heading, update Sales Tax settings.
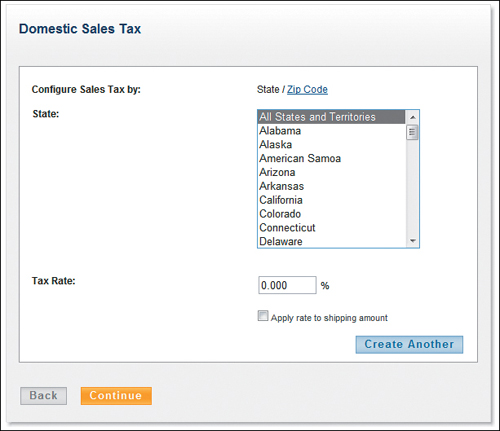
This displays the Sales Tax page, shown in Figure 4.5. Go to the Set Up Domestic Sales Tax Rates section and click the Add New Sales Tax link. When the Domestic Sales Tax page appears, as shown in Figure 4.6, select a state and enter the applicable tax rate for that state; if you need to apply sales tax for a specific city or county, click the Zip Code link and enter the ZIP code, instead. By default, the sales tax is applied only to the product price; if tax must be applied to the entire purchase price, including shipping, check the Apply Rate to Shipping Amount box.
Figure 4.5. Getting ready to configure sales tax settings.

Figure 4.6. Specifying sales tax by state.
If sales tax is different for a specific SKU, you can set a product-specific tax rate when you’re creating that item’s Add to Cart button. Just enter the applicable tax rate into the Tax box when you create the button.
In most instances, you charge sales tax only for those states in which you have a physical presence. If you have a physical presence in multiple states, you’ll have to specify tax rates for each state in which you do business. Click the Create Another button to add another state to your list. When you’re done specifying tax rates, click the Continue button.
Determining Shipping and Handling Fees
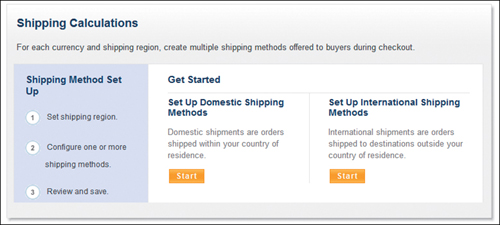
You also set universal shipping and handling fees from the same area in your profile. Click the Set Up Shipping Calculations link under the Selling Preferences heading; this displays the Shipping Calculations page, shown in Figure 4.7. From here, click the Start button in the Set Up Domestic Shipping Methods section. (To set up shipping fees for shipments outside the U.S., click the Start button in the Set Up International Shipping Methods section.)
What follows is a somewhat detailed process, only because you can be very specific about the shipping services you use and the fees you charge your customers. In essence, you can set shipping fees dependent on where the item is being shipped, the shipping service used, and either the item weight or price.
Figure 4.7. Getting ready to set shipping and handling fees.
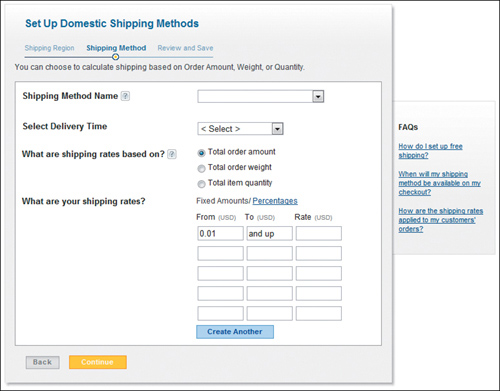
Start by specifying where you ship to on the Shipping Region page shown in Figure 4.8. Click Continue and you see the Set Up Domestic Shipping Methods page shown in Figure 4.9. Here you select a shipping method, set your standard delivery time, determine how your rates are based (on total order amount, total order weight, or total item quantity), and then set your shipping rates, either by dollar amount or percentage. You can create multiple shipping fee schedules, for multiple shipping methods; just click the Create Another button. Click Continue when you’re done.
Figure 4.8. Specifying where you ship.
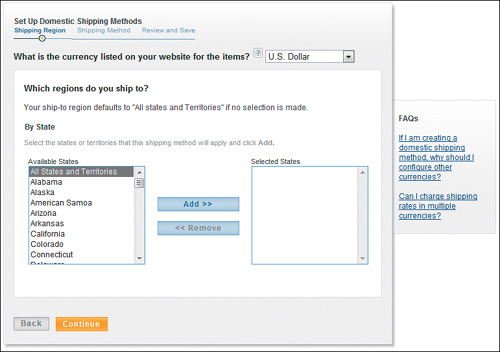
Figure 4.9. Specifying how you ship—and how much you charge for shipping.
PayPal now displays the Review and Save page, like the one shown in Figure 4.10. If what you see is correct, click the Save Shipping Methods button.
You can also set a specific shipping fee for individual SKUs on your site. In this instance, the shipping fee is hard-coded into the Add to Cart button for that product. Simply enter the shipping fee into the Shipping box when you create the button.
Customizing the Payment Confirmation Page
By default, PayPal displays somewhat generic pages (with your business name at the top) to accept and confirm a customer’s payment, like the one in Figure 4.11. That’s fine for many businesses, but you may want to provide a more branded experience to your customers.
Figure 4.10. Reviewing your shipping settings.
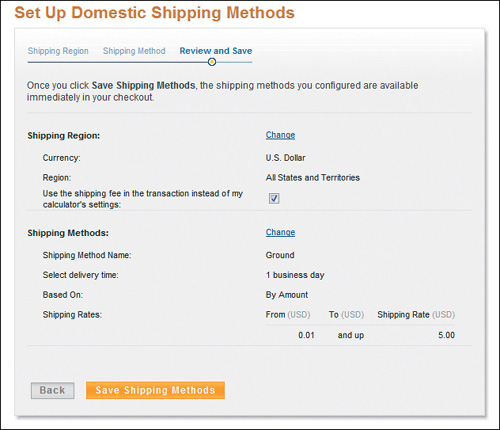
Figure 4.11. A standard payment confirmation page.

To that end, PayPal lets you customize the various checkout pages with your own logo, header image, and custom colors. Go to your profile, select My Selling Tools on the left, and under the Selling Online heading, click to update your Custom Payment Pages. When the Customize Your Payment Page appears, make sure you have the Page Styles tab selected, and then click the Add button.
When the Edit Custom Page Style page appears, all you have to do is fill in the blanks:
1. Enter a new name in the Page Style Name box.
2. Enter the URL for your logo image file in the Logo Image URL box. Your logo image file should be no larger than 190 pixels wide by 60 pixels high, and must be hosted on the Web, preferably on a secure server. This logo will appear at the top of the order summary.
3. Enter the HTML hex code for the desired page color in the Cart Area Gradient Color box.
4. Enter the URL for your desired header image in the Header Image URL box. Your header image file should be no larger than 750 pixels wide by 90 pixels high, and must be hosted on the Web, preferably on a secure server. This image will appear on the top left of the payment page.
5. Enter the HTML hex code for the desired header background color in the Header Background Color box.
6. Enter the HTML hex code for the desired header border color in the Header Border Color box.
7. Enter the HTML hex code for the desired background color for the payment page in the Background Color box.
8. Click the Preview button to see what your page will look like, and then click Save to save and apply the new template.
The result will look something like the page shown in Figure 4.12. Note the custom header image, and gradient color.
Figure 4.12. A customized payment page.

Receiving Notification of Payment Activity
How do you know when a customer makes a purchase from your site?
If you’re using the PayPal Shopping Cart, PayPal notifies you by email of all PayPal-related transactions—purchases and otherwise. If you’re integrating PayPal into an existing shopping cart, PayPal will notify the shopping cart system directly—and can send you an email notification, as well. In particular, you’re notified of
• Instant payments, including direct credit card payments.
• E-check payments and associated status.
• Recurring payment and subscription actions.
• Chargebacks, disputes, reversals, and refunds.
If you have a more sophisticated back-end system, you can take advantage of PayPal’s Instant Payment Notification (IPN). This messaging service automatically notifies your system of all PayPal-related transactions, with no human intervention required.
IPN messages are detected and processed via a listener script or program that is integrated into your back-end system. (You’ll need to write your own listener scripts.) When the listener receives an IPN message, it then passes that message to the appropriate process to respond to the message. For example, an IPN message about a customer purchase can trigger order fulfillment processes, update your customer list, and update your accounting records. You can configure the IPN messages you receive by clicking the Instant Payment Notification Preferences link on your profile.
Configuring Other Options
There are several other options you can configure from the My Selling Tools area of your PayPal profile. These include
• Selling Online. This section includes a variety of links to help you manage your online selling activities. From here you can manage your PayPal payment buttons; change the company name that appears on your customers’ credit card statements; set up sales tax options; configure PayPal payment pages to look more like your own website; determine which web pages customers are directed to after they pay with PayPal; manage API credentials for integrating PayPal with your own online store or shopping cart; and create and manage your invoice templates.
• Getting Paid and Managing My Risk. This section includes a variety of links to help you manage customer payments. From here you can manage subscriptions and other automatic payments; integrate PayPal’s instant payment notifications with your website; manage PayPal’s risk and fraud controls to automatically accept or decline certain types of payments; block payments based on specified criteria; and create a personalized message to use when faced with customer disputes.
• Shipping My Items. This section helps you configure PayPal’s shipping functionality. From here you can edit your shipping preferences, including carriers and labels, as well as set up shipping methods and pricing for each of your customers.
You’ll also find links to additional selling tools, including encrypted payment settings, PayPal button language encoding, PayPal shops, and your seller reputation number.
Your Seller Reputation Number reflects the number of unique verified PayPal members who have paid you.
The three other entries on the left panel of your profile pertain to any PayPal member—they are not specific to a business that is selling through PayPal. These are:
• My Business Info. Where you edit your contact information such as email address, phone number.
• My Money. Where you set your payment and banking information, including credit card and bank account numbers.
• My Settings. Where you will find your basic account settings such as notifications, customer ID, and so forth.
Dealing with Foreign Currency Transactions
If you do business outside the United States, there are two ways to handle payments in foreign currencies. You can either keep payments in foreign currency and then convert those payments at some point to withdraw them, or you can have payments automatically converted into your primary currency at the time of the transaction.
As such, you can use PayPal to help you deal with foreign currency transactions. There are two primary settings you’ll want to configure.
Managing Currency Balances
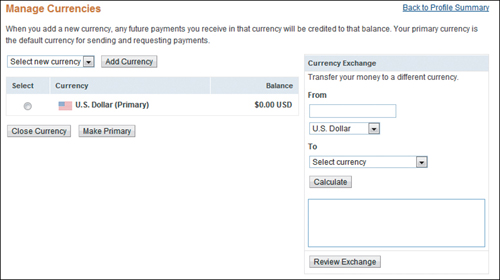
For day-to-day management of foreign currency transactions, go to your profile, click My Money on the left, and look for the line displaying your PayPal balance. At the end of that line, instead of the usual Update link, there is an invitation to see More, with a downward arrow. When you hover over this, click the Currencies link which appears—displaying the Manage Currencies page, shown in Figure 4.13. From here you can add new currencies, select your primary currency, and convert funds from one currency to another.
Figure 4.13. Managing foreign currencies.
Accepting or Denying Cross-Currency Payments
You can also configure your PayPal account to accept or deny payments from selected currencies. When a customer pays in a currency you accept, funds appear in your PayPal account in the balance for that currency. When a customer tries to pay in a currency that you do not accept, you can opt to accept or deny that payment.
To configure these settings, go to your profile and click the My Selling Tools option on the left. Under the Getting Paid and Managing My Risk heading, update how you want to block payments. The Payment Receiving Preferences page appears. Here, you will see an option to “Block payments sent to me in a currency I do not hold.” You can check Yes to block these payments; check No to accept them and convert them to U.S. dollars; or check Ask Me if you want to determine your course of action on a case-by-case basis.
Recurring Payments
PayPal also enables you to offer subscriptions and other services that depend on recurring payments, such as service and support plans, automatic product upgrades, monthly club memberships, payment plans, and the like.
For example, an electronics retailer might want to offer an enhanced support plan for customers who purchase a particular product. The merchant charges $9.95 per month for this plan. The retailer can set up PayPal’s recurring payments to automatically charge customers this amount each month.
As another example, a camera retailer might offer an email newsletter for aficionados of a particular type of photography, such as nature or sports photography, and charge $4.99 for each monthly issue. This merchant can set up PayPal’s recurring payments to automatically charge subscribers this amount each month.
PayPal’s recurring payments are available with all of PayPal’s payment processing solutions: Website Payments Standard, Website Payments Pro, and Express Checkout. With the basic Website Payments Standard there is no charge for the recurring payments service, aside from normal PayPal transaction fees.
Adding a Subscribe Button to Your Site
With Website Payments Standard, you integrate recurring payments by creating a Subscribe button that you then add to your website, like the one in Figure 4.14. Follow these instructions:
Figure 4.14. A PayPal Subscribe button.

1. Log in to your PayPal account and select the Merchant Services tab.
2. Go to the Create Buttons section of the page and click the Subscribe link.
Figure 4.15. Creating a Subscribe button.
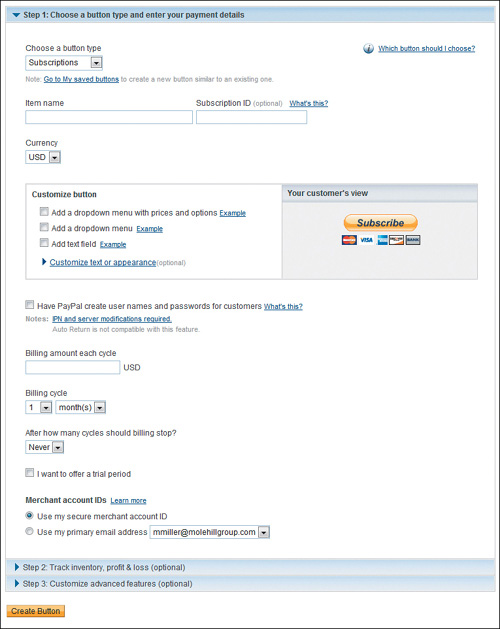
3. When the Create PayPal Payment button page appears, as shown in Figure 4.15, make sure Subscriptions is selected in the button type list.
4. Enter the item name and optional subscription ID in the appropriate boxes.
5. To customize the appearance of the button, click the “Customize text or appearance” link and make the appropriate selections.
6. If you want PayPal to create user names and passwords for your subscribers, check that option.
7. Enter the amount to be billed each cycle.
8. In the Billing Cycle section, select the billing cycle in terms of X number of periods.
9. Select after how many cycles the billing should stop.
10. If you want to offer a trial period, check that option and then enter the required information for the free or discounted trial.
11. Select which Merchant account ID this button should apply to.
12. Click the Create Button button.
13. This displays the HTML code for this button. Copy and paste the code into the web page(s) on your site where you want the button to appear.
Using the Recurring Payments API
With Website Payments Pro and Express Checkout, the process is a bit more involved. You have to create a recurring payments profile for the service or subscription offered, and implement the various Recurring Payment APIs in your checkout process. PayPal then automatically handles all payment activity for customers who sign up for what you offer.
See the PayPal Developer Network website (www.x.com) for detailed instructions.
Creating and Sending Customer Invoices
For many businesses, such as contractors and medical offices, you have to ask to get paid. That is, instead of customers paying directly when they purchase something from your website, you send out invoices after the fact for products sold or services rendered.
PayPal facilitates sending out invoices via Online Invoicing. This is an option with all PayPal payment solutions, or a service that can be used separately. You pay nothing for the invoicing service, only the typical PayPal transaction fees when your customer pays.
Creating an Invoice
If you only do occasional invoicing, you can create and send single invoices with relative ease. Follow these steps:
1. Log in to your PayPal account and click the Request Money tab.
2. Select the Create Invoice subtab.
3. When the Create a New Invoice page appears, it uses the default template. To change this, use the pull down to select another template. (If you have not set up any templates yet, we’ll get to that shortly.)
4. Confirm your contact information, and enter your recipient’s email address—which can be selected from your Address Book.
5. Enter the overall attributes of the invoice (invoice number, date, and so forth as shown in Figure 4.16).
Figure 4.16. Enter overall invoice information.
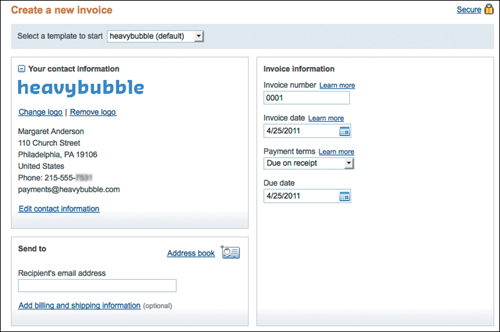
Figure 4.17. Adding line items and other details to the invoice.
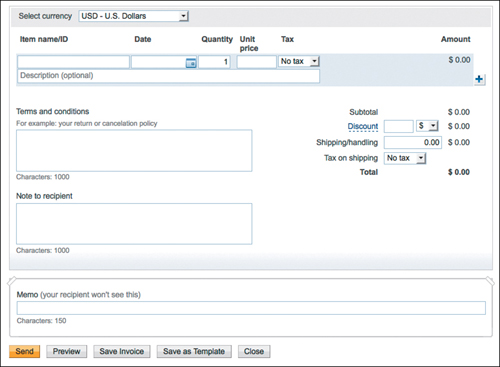
6. Further down on the same page (shown in Figure 4.17), select the appropriate currency and start entering items for your invoice. Enter the item ID, date, quantity, unit price, and optional description for each item billed. You should also select if this is a taxable item. Use the plus sign to add additional items as needed.
7. Enter any applicable discount, shipping, and tax information. Add your terms, and any desired notes to recipient. The memo field is available for your internal notes which will not be seen by the customer.
8. At the bottom of Figure 4.17, you can see five options for next steps:
Send, to send the invoice to your customer
Preview, to see what the customer will be able to see
Save Invoice, to keep for sending later (perhaps after additional editing)
Save as Template, to conveniently send similar invoices later
Close, to exit from the screen without saving
The customer now receives your invoice via email. The invoice includes a PayPal payment button; to pay the invoice, the customer simply clicks this button and is taken to the PayPal site where payment can be made via credit card, bank account, or the customer’s PayPal account.
Creating an Invoice Template
If you do a lot of online invoicing, it helps to create templates for your most common invoice types. This speeds up the invoice creation process over time.
As noted previously, you can create a template based on any invoice you send. You can also create templates from scratch. The process is similar to creating a new invoice. Follow these steps:
1. Log in to your PayPal account and click the Request Money tab.
2. Select the Invoice Settings subtab.
3. When the Invoice Templates page appears, click the Add button.
4. When the Create Invoice Template page appears, select an existing template on which to base this new template, and then click the Continue button.
5. When the next page appears, enter all necessary information about the invoice recipient and items to be billed, and then click the Continue button.
6. When the Preview Invoice Template page appears, click the Save Template button.
This invoice template now appears in your list of saved templates.
Managing Your Invoices
You can track your invoice activity from the invoice History page. Access this page by going to the Request Money tab and then clicking the Manage Invoices subtab.
As you can see in Figure 4.18, the History page lists all recent invoices you’ve sent. Each listing includes the date sent, type of invoice, recipient’s email address, payment status, and PayPal fees due on this transaction. You can filter the invoices by payments sent, payments received, and the like; just click the More Filters list and make a selection.
Figure 4.18. Managing invoice activity.

To perform an action on a given invoice, select an option in the Order Status/Actions column for that item. You can, for example, send a reminder notice or cancel a transaction. To view the complete invoice, click the Details link.
The Bottom Line
For most merchants, customers pay via an online shopping cart and checkout system. You can build your own shopping cart as part of your e-commerce website, contract with a third-party to provide shopping cart services, or use the PayPal Shopping Cart included free with PayPal’s Website Payments Standard. When you use the PayPal Shopping Cart, you can specify taxes and shipping fees, customize the payment pages your customers see, and configure how you deal with transactions in foreign currencies.
If you offer subscriptions or other services that require recurring payments, PayPal lets you add a Subscription button to your site, along with corresponding information on the recurring payments. And if your business is one where the customer is billed for goods or services, you can use PayPal’s Online Invoicing to email invoices to your customers; customers can pay the invoice by clicking the PayPal payment button included within it.