5. Pricing

If you have your own shopping cart or content management system on your website, you control all aspects of product pricing; the price you set is transmitted to the shopping cart when the customer makes a purchase. PayPal only sees the total value in the shopping cart when it comes time to process the customer’s payment.
If you use the PayPal Shopping Cart, however, PayPal becomes an integral part of your pricing process. That’s because you set the price for each item when you create the item’s payment button; PayPal picks up the price you set and uses it throughout the balance of the checkout process.
How Product Pricing Works
When you use PayPal’s Website Payments Standard, with the accompanying PayPal Shopping Cart, pricing information about each item you sell is hard-coded into the payment button you create for that item. This is true for both single-item sites (the Buy Now button) or sites offering multiple SKUs (the Add to Cart button).
When a customer clicks the Buy Now or Add to Cart button, the price of that item (along with other product information, such as color or size) is transmitted to PayPal and stored in the PayPal Shopping Cart. The price you set is included in the calculations when the customer checks out and pays.
This means, of course, that if you enter the wrong price for an item when you’re creating its payment button, that incorrect price will be used when PayPal is calculating the amount due from the customer. It doesn’t matter if the product web page says the item price is $9.99, if you mistakenly coded the payment button at a price of $999.99, the customer will be billed the incorrect price. (PayPal is only as accurate as you are.)
It’s imperative, then, that you have accurate pricing available when you generate the code for your PayPal payment buttons. You have to get the pricing right when you create a button—or regenerate the button code with updated pricing information.
Note that you can assign multiple prices to a single button. This is useful if you sell an item in different sizes or colors, or with different options; you can charge different prices for different variations. The customer will see a pull-down list of the available options, with the price for each option listed. When the customer makes a selection from the list, the price for the selected variation is transmitted to the PayPal Shopping Cart.
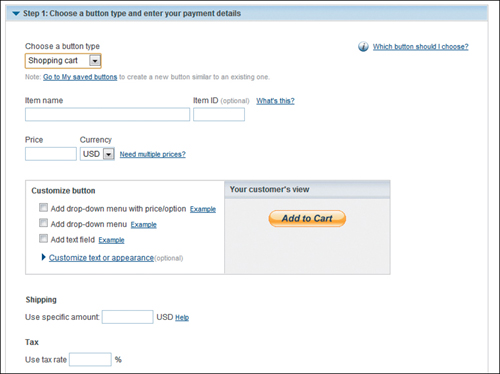
Figure 5.1. Creating an Add to Cart button, complete with item price.
Setting Product Pricing
You set your product pricing when you create the payment button for a given item, as shown in Figure 5.1.
You learned how to create a payment button in Chapter 3, “Integrating PayPal with Your Site,” so those details won’t be repeated here. Basically, you fill in the Price box and choose the desired currency.
It gets a bit more complicated when you have different prices for an item depending on options selected. In this instance, follow these steps:
1. While creating the button, leave the Price box blank and go directly to the Customize Button section.
2. Check the Add Drop-Down Menu with Price/Option box. This expands the Customize Button section as shown in Figure 5.2 (on the next page).
3. Enter a name for this drop-down menu. For example, if you offer an item in different sizes, name the menu “Sizes.” If you offer an item in different colors, name the menu “Colors.”
Figure 5.2. Specifying different prices for different product options.

4. Go to the first Menu Option Name box and enter the text for the first option.
5. Enter the price for the first option in the first Price box.
6. Repeat Steps 4 and 5 for additional options and prices; click the Add Another Option link if you have more than three variations.
7. Continue with the rest of the button-creation process as normal.
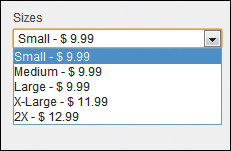
What you end up with is a button with a drop-down menu that looks something like the one in Figure 5.3. The customer makes a selection from the drop-down menu, and the code for that selection (which includes the price) is then transmitted to the PayPal Shopping Cart.
Figure 5.3. A pull-down menu for an item with different sizes available (at different prices).
Setting Subscription Pricing
What do you do if you offer a subscription-based product, or one that requires recurring billing? Maybe you publish a print or online newsletter that sells for x dollars a month. Or maybe you sell a maintenance plan for a certain product that costs x dollars a year. In either case, you need to sign up your customers to pay you a set amount each time period, automatically.
Not surprisingly, PayPal’s price-setting process is similar for subscription-based sales. You specify the price of the subscription and that price is hard-coded into the Subscribe button.
Figure 5.4. Creating a Subscribe button.

The big difference with subscriptions is that you need to specify the billing period (every x number of days, weeks, months, or years). You can also offer a trial period, so that customers can get a free or reduced-price view before they commit to a full subscription.
To set subscription pricing, follow these steps:
1. Begin the button creation process as normal.
2. Pull down the Choose a Button Type list and select Subscriptions. The page changes to that shown in Figure 5.4.
3. Enter the subscription name and identifying number into the Item Name and Subscription ID boxes.
4. Select the desired currency from the Currency list.
5. Enter the regular billing amount into the Billing Amount Each Cycle box.
6. Go to the Billing Cycle section and select your billing cycle—how often you bill, in x number of days, weeks, months, or years.
7. Set the length of the subscription in the After How Many Cycles Should Billing Stop list.
8. If you offer a trial period at a free or reduced price, check “I want to offer a trial period.” Enter the charge for the trial period; if it’s a free trial, enter “0.” Then, under Define the trial period, enter the length of the trial period.
9. If you want to offer a second trial period, check that option, and then fill in the necessary information.
10. Continue with the rest of the button creation process as normal.
Changing Prices
Since your pricing is hard-coded into the PayPal payment buttons, what do you do when you need to change prices? You have a few options.
Creating a Replacement Button
First, you can simply create a new button for the item at the new price. You then replace the existing button code on your web page with this new button code.
This process is made easier if you save the buttons you create, which is an option when you create each one. Here’s how to create a new button from a saved button:
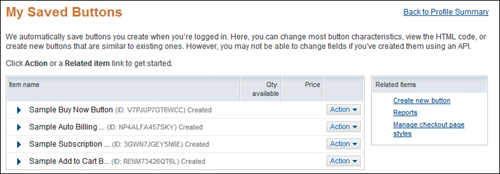
Figure 5.5. Viewing saved buttons. The link to this screen is in your profile.
1. Log in to your PayPal account, click the My Account tab, then select the Profile subtab.
2. When your profile appears, click My Selling Tools on the left to display those settings. Under the Selling Online heading, click to update your PayPal buttons.
3. When the My Saved Buttons page appears, as shown in Figure 5.5, click the Action button for the button you wish to change and select Edit Button.
4. When the Edit Your PayPal Button page appears, change the price as necessary.
5. Click the Save Changes button when done.
Editing Button Code
If you’re fluent in HTML code, you can edit the button code on your website to change the associated price. The button code itself is a block of code that starts with the following line, or something similar:
<form target="paypal" action="https://www.paypal.com/cgi-bin/![]() webscr" method="post">
webscr" method="post">
Within the block of code, look for the line or lines that include the value variable. This variable should be followed by a price, like this:
value=”9.99”
In an Add to Cart button, this variable is included in an input line, similar to this one:
<input type="hidden" name="amount" value="9.99">
Once you’ve located the value variable and its associated value, simply change the value to the item’s new price. Once you save the web page and take it live, the new price will be transmitted the next time a customer clicks on the payment button.
If an SKU has multiple prices for different options, you’ll see multiple value variables, one for each option. You’ll need to change all relevant value variables.
Edit this HTML with care—you can cause serious problems by simply forgetting to close quotation marks! Also, there is a unique identifier for every button that you must leave as provided by PayPal.
The Bottom Line
When you use PayPal’s Website Payments Standard, pricing information is hard-coded into a product’s payment button. The product price is then transmitted to PayPal when a customer clicks the payment button. You can configure your payment buttons for products with multiple options, such as size and color, and different prices for each option. In addition, if you offer subscription services, you can set different subscription periods as well as trial subscriptions. When a product’s price changes, simply generate a new button code for that item—or edit the existing button code on your website.