3. Fundamentals of the IOS SDK
Chefs have kitchens.
Stylists have salons.
Physicians have clinics.
Mechanics have garages.
And Apple mobile app designers have the iOS Software Development Kit (SDK).
Like the rest of these workspaces, you won’t necessarily use all the available features all the time. In fact, you may never use certain features. And if you’re like me, you’ll probably never try some of the things that are available in Xcode.
But we can’t design apps without Xcode and Simulator, so this chapter explores some basics about how to use them as you work your way through the rest of the book. And, you’ll begin to appreciate just how well you’ve tricked them out with the addition of NimbleKit!
Xcode, the integrated development environment (IDE) that Apple has created for aspiring app designers like us, is an amazing computer program. And I tend to put it in the same category as Adobe Photoshop: It has so many settings, menus, submenus, and features that I know I’ll never master it. It’s just too big and, frankly, I have yet to find a reason to try.
And after Objective-C itself, using Xcode is one of the more challenging aspects of exploring iOS app design. Fortunately, adding a code framework such as NimbleKit makes both Objective-C and Xcode much easier to put into action. So after learning some basics, we’ll dive directly into app design.
This chapter provides an overview of Xcode from the beginning to the end of the app design process, so you might find yourself coming back to this chapter repeatedly to remind yourself of Xcode-specific issues throughout your app design journey.
Starting a new Xcode project
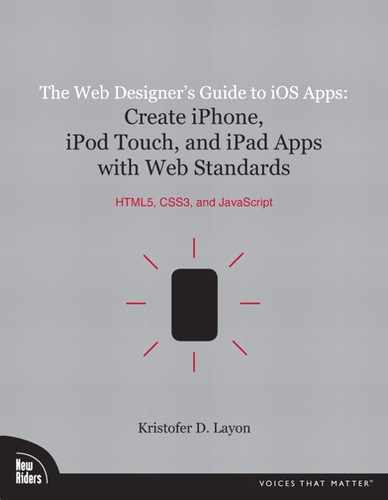
When you start a new project in Xcode by clicking on the File menu and choosing Project (File > New Project), you’re presented with a number of choices (Figure 3.1). Several of them relate to the types of navigations and views that are available, while others relate more to the app’s function or mode of operation. For us, the choice is simple: We’re going to create a NimbleKit application.
3.1 Starting a new NimbleKit project in Xcode.
Under the app type choices, you also see a Product drop-down menu with the options iPhone, iPad, and iPhone/iPad. These choices might initially seem a bit confusing — after all, if you design an iPhone app won’t it work just fine on an iPad, too? Yes, it will. But there are still some things to consider with the three main options being presented:
• iPhone project: If the above reasoning is good enough for you, and you’re not designing a separate iPad version of your app, then selecting the iPhone project is sufficient. And, it covers both iPhone 4 and pre-iPhone 4 models.
Note
For working through this chapter’s examples, create an iPhone project.
• iPad project: If your app is designed explicitly for the iPad in one way or another (via interface, content, or both), this is the option for you. This is also the route to take if you have an iPhone version of your app but you want to, for example, release an iPad version separately as a premium version.
• iPhone/iPad: This is also considered a “universal app,” and contains screen layouts and graphics scaled for all iOS devices. That way a customer need only purchase a single version of the app and that version runs natively on the iPhone as well as the iPad. This might result in a happier customer if he owns more than one Apple iOS device and it’s an app he would want on all of them. Or, it could disappoint you, because you just sold two versions of your app for one price.
I’m not going to steer you in one direction or another with app types, as it truly depends on how you want to reach your audience, the value you want to deliver, what you want to earn, and how well your app runs on either platform. I don’t believe there is just one best answer—you need to trust your gut but, more importantly, you need to design intentionally for one device or the other, or both, as your content and other purposes best suggest.
After you click Choose, you’re prompted to name your project. At this point, don’t fret too much about the final name of your app, as it has nothing to do with the name of the project file. You can always rename your project later (see “Naming a Project and Creating the App Bundle” later in this chapter).
Groups & Files, Detail View, and Editor View panes
Once you’ve created your new project, you’re sent to the main Xcode view (Figure 3.2). The first thing you’ll notice is that it looks like a souped-up Mac OS X Finder window. In many respects, that’s exactly what it is and—especially in the case of using an Objective-C code framework—this is also how we’ll use Xcode much of the time.
3.2 The three panes of an Xcode project window.

Under Xcode’s toolbar are three primary areas, or panes, of information that function similarly to the panes of a Finder window. On the left of the window is the Groups & Files pane, with the .xcodeproj file at the top (named icondemo in Figure 3.2). Before you click around, this file is highlighted by default and you see all of the project’s other file components in the Detail View to the right.
The third pane of an Xcode project window is the Editor View. As you might expect, the biggest difference between Xcode and a Finder window is the Editor View; this is where you do most of your app work within Xcode. In the Groups & Files pane, click on a right-pointing triangle to the left of a folder to reveal its file contents, and then highlight a file. Its contents appear in the Editor View pane. This code becomes the new default view of this pane; even when you go back to highlighting folders, the Editor View continues to display the contents of the last file you selected.
In fact, the Editor View always shows the last file you worked on, even if you save and exit the project and reopen it.
The NimbleKit file structure and contents
Before we go any further, now is a good time to mention what is in the folders of a new NimbleKit project. As I provide more details, please keep your web designer hat on, because there are similarities to designing sites here that should be familiar to you.
To begin, the top folder is entitled HTML and contains exactly that: your starting content in the form of a single file named main.html. Highlight the file and you’ll see this in the Editor View:
Note
Web designers typically organize their markup by placing JavaScript in the head of an HTML file. The main.html file in the NimbleKit download places it in the beginning of the body instead. Not how I typically do it, so I wanted to mention this. (Still, it doesn’t matter where it goes as long as it’s before the </body> tag.)
You can also stash additional files in this HTML folder and treat it like the root directory of a server for a website. So CSS and image files can all live here together.
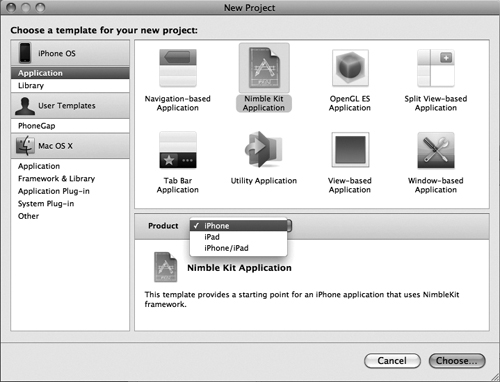
Before we proceed to editing anything or adding files, it’s important to understand that the remaining folders and files are basically off-limits. Don’t become curious and edit anything in the Classes, Other Sources, Resources, or Frameworks folders. Do! Not! Do! It! (Figure 3.3 on the next page).
3.3 When you see files like the ones shown here, with .h, .m, .xib, and .framework file extensions, do not edit them. Editing them will disable the NimbleKit framework!

Why shouldn’t you edit these files? NimbleKit comes with a veritable treasure chest full of great code in these folders, just like code frameworks for websites. And all of this richness is in these folders. So just as you would never download a JavaScript framework like jQuery or a CSS framework like Blueprint, and then start messing around with the files, you shouldn’t do anything to the files outside the HTML folder until explicitly instructed to do so. (There are a few isolated reasons to make changes in some of the files there, and I will carefully explain why at the end of this chapter.)
Naming a project and creating the app bundle
I should probably not admit to this, but until recently, I foolishly spent a lot of time manually renaming a variety of files in my Xcode projects. The app name can inform the name of many other things including some of its key resource files, so changing the name manually requires you to change it in several different files and locations. But then I learned that there is a much, much easier way to do this.
Aren’t you glad I figured this out in time to tell you?
So here is the secret: Project > Rename.
I know—it could not have been labeled any more clearly, right? Well, fret not—I am feeling plenty sheepish.
When you select Rename, you’re prompted with a small window that allows you to select up to five items to include in the renaming process (Figure 3.4).
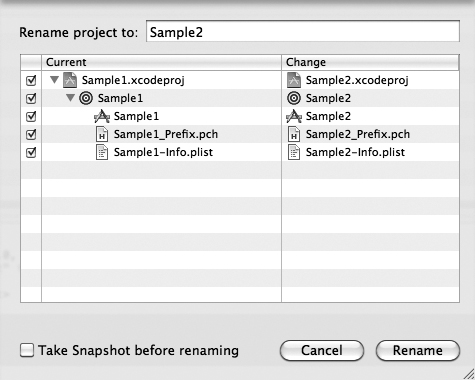
These are five of the items that comprise a project’s app bundle (more on this later in this chapter):
• Project file (name.xcodeproj)
• Target (name)
• App name (name)
• Precompiled header (name_Prefix.pch)
• Information property list file (name-Info.plist)
For consistency’s sake, I suggest checking all of them so your name is propagated across all of these items.
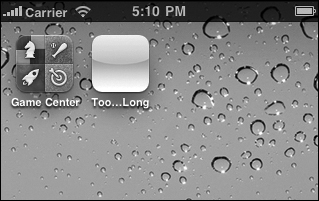
There appear to be no significant limitations to project or app names. For example, Apple limits app names to 255 characters. I’m not sure why you would ever want an app name that long, and neither is Apple because they recommend that the name not exceed 35 characters. At that length, the entire name shows up in the App Store app on iOS devices. Figure 3.5 shows a filename that is too long, indicated by the ellipsis.
3.5 This is what you get when your app name for the home screen is too long—a truncated version with an ellipsis.
But there’s a more important limitation to the name that you probably want to consider: The name that can appear under the device icon is much shorter than 35 characters. And to make it somewhat complicated, there is no set maximum because Helvetica is not a monospaced font, so the more narrow characters in your app name (i, l, j), the longer your app name can be; the wider the characters (O, D, Q), the shorter. Practically speaking, an app name that fits under its screen icon is 10–12 characters in length.
Note: Close also counts in screen names and iTunes names
The app’s screen name doesn’t need to be identical to its name in iTunes. For example, you might use Wonder App as a screen name but Wonder App iPad Edition for the full iTunes name. Apple prefers that both names are the same (or very similar to each other), and Apple has other requirements, for example, the name cannot be trademarked by others. For all of these details, check the iTunes Connect Developer Guide.
Making your app icon
Another key part of your app’s identity is its icon. A new NimbleKit-based Xcode project does not come with a default app icon, so you will have to make one.
Or, several. How about up to seven for a universal app?
Until April 2010, designing an app icon was a simpler process. You just made three sizes: a small one for the device’s home page, a smaller one for Spotlight search results, and a much larger one for the iTunes App Store.
But with the advent of the iPad and then the iPhone 4, things got really interesting with the app icon because each of these devices has a resolution that is different from the iPod touch and earlier iPhones. So now each screen size needs its own home screen and Spotlight search icons if you want them optimized for their native resolutions.
To be perfectly honest, I am not convinced that the Spotlight search icon is particularly important. If your icon is designed to be viewed at 57 × 57 pixels, there’s a good chance that the results you get by resizing to 29 × 29 pixels will not be noticeably better than what the device does when it scales it for you. And do you really want to design an icon that is optimized for 29 × 29 pixels? Unlikely — it’s quite a tiny size for trying to optimize any design.
But if you are a pixel perfectionist and extremely picky about graphics being scaled properly, you will want to resize (or redesign) your app icon as needed for each use scenario. Table 3.1 shows the specifications for the icon files that are bundled with the app.
Table 3.1 Size (in pixels) and name specifications for iOS app icons

For the iTunes App Store, the icon is 512 × 512 pixels (but the name is not strictly specified by Apple like those that are bundled with the app). And regarding format specifications, save all your icons in PNG format with a bit depth of 24 bits and no transparency.
Though your icons will probably not vary like these examples (see “Sample icon files: Download them from the web!” for why they vary here), this is an otherwise complete set of app icons for a universal app. Note that the iPhone 4 icons are twice the size of the regular iPhone app icons, even larger than the iPad icons (Figure 3.6).
3.6 The full range of home screen icons and Spotlight search icons for the iPhone, iPhone 4, and iPad. The first six are part of the app bundle; you submit the 512 × 512 pixel icon separately to iTunes for display in the App Store.

Note: Sample icon files: Download them from the web!
I like sample files, and I bet you do, too. So I’ve created a sample set of icon files for you to download. Just visit http://iosapps.tumblr.com and download the app-icons.zip file. When you open it, you’ll have a sample app called icondemo and the set of files shown in Figure 3.5. I’ve made each one a different color so you can see how the Simulator loads different files depending on whether you’re testing as an iPhone, iPhone 4, or iPad. And I made three different grayscale versions so you can see how they come up in a search.
There are two more steps to successfully getting your app graphics into your app:
1. Add them to the project.
2. Add their file names to the information property list, or name–Info.plist, file.
Finally, note that Chapter 12, “Using iTunes Connect and the App Store,” provides some additional guidelines and suggestions for how to graphically design your app icons.
Adding files to your project
Adding files to a project is another example of where Xcode is a lot like the Mac OS Finder. While you can’t use Finder to drag your new icon graphics from where you first saved them to your project directory (and have them show up in the project), you can drag them from a Finder window to your Groups & Files pane in Xcode. You can also add them via the Project > Add to Project menu.
In either case, I suggest that you store your app icons in the Resource directory of your app. It’s important to note that the folders of an app project that you see in the Groups & Files pane are for your benefit, not Xcode’s. It’s a flat file structure, so where you keep your files is usually unimportant (though there are a few exceptions). In this case, I simply suggest that you keep the icons in Resources so they don’t clutter your HTML directory. Plus, the HTML directory is for app content, so the app icons don’t really belong there anyway.
When you move the icons into the Resources folder using one of the aforementioned methods, be sure to check the box labeled Copy Items Into Destination Group’s Folder (If Needed) before clicking Add (and you can leave the top radio button regarding recursively creating groups checked).
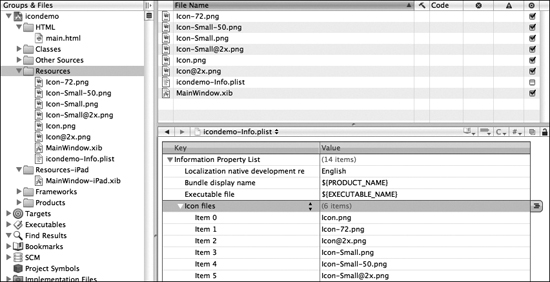
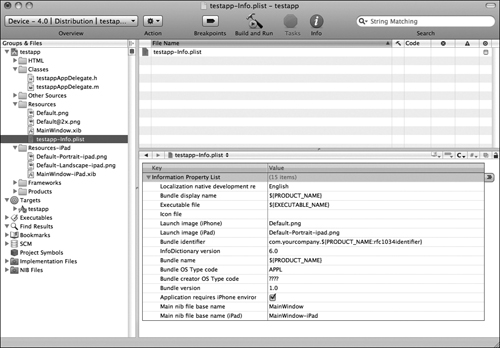
After adding the files to the bundle in this manner, you have to update your project’s Information property list (.plist) file. If you highlight the .plist file in the Groups & Files view (you will find it in the Resources folder), several rows of data are displayed in the Editor view. Select the Icon file row to highlight it, and some small up and down arrows will appear. Click on them and you’ll get a dropdown menu of all of the data types that can be specified in the .plist file for your app. Few of these are used or changed for a NimbleKit-based application, but in this case just change Icon file to Icon Files. Now you can add more than one icon to your application bundle.
After you do this, you’ll get a large gray disclosure arrow to the left. Click on it and you’ll see the first icon row, Item 0 (Figure 3.7). Enter Icon.png as the first icon file. For each additional icon file that you’re bundling into your app, click the + button to the right of the row and you’ll get a new row with one item number larger. Repeat until all your icon files are listed (but don’t include the 512 × 512 iTunes icon, which is not bundled into the project file).
3.7 Your app icons in the project’s Resources folder (Groups & Files and Detail views) and as listed in the .plist file (Editor view).
Designing a launch graphic
The launch graphic for an app is not necessarily what you think it is. It is not meant to be a title screen for your app (though if you design it this way, Apple might still accept it). But Apple recommends including a launch graphic for user experience reasons, not marketing reasons. And here’s why.
It usually takes a few seconds for an app to launch and get its act together, so Apple has made a provision for a launch graphic to display during the app’s launch process. But here’s the catch: You can’t control how long the graphic displays, so you can’t specify that it show for a certain period of time (for example, if there’s a line or two of text on it for the user to read). And for a smaller or more quickly loading app, the load time might be pretty fast, so the launch graphic flashes only briefly on the screen.
Still, the graphic is intended to serve a particular purpose and provide a smoother transition between the home screen and the app. This prevents the user from being jolted from the home screen to a completely blank screen and then to your app. You’re welcome to read a more detailed explanation of this in Apple’s human interface guidelines for the iPhone and iPad, but the main takeaway is this: Design the launch graphic to look as much like the initial view of the app as you can, minus any content, and this will help your app reinforce Apple’s preferred iOS user experience.
To better understand this, let’s look at what Apple has done with one of its own apps. Although we use some of these apps all the time, the very effectiveness of their design details is often lost on us. So we need to look a little more closely and stop the action. It’s like dissecting a frog in science class. Sure, we know that a frog can hop far, but we can’t see all the reasons why until we have a closer look at its legs! And, er, we need to stop the frog in order to take an even closer look inside at the bones and muscles used to hop.
But in this case, you don’t need to kill an app to dissect it. Figure 3.8 shows some screenshots of Apple’s Clock app on the iPhone to illustrate my point.
3.8 The launch graphic (left) and alarm screen (right) in the Clock app.
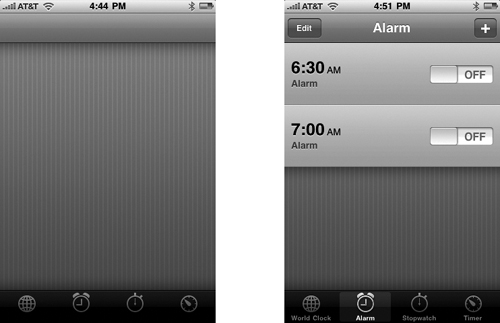
Note how the launch graphic incorporates the pinstripe background of the app as well as the tab bar navigation at the bottom of the screen. And after Clock finishes launching on my iPhone and I go to my Alarm view, I see the image shown on the right in Figure 3.8. The two alarms that I’ve set appear, the Alarm tab is highlighted, and a few items (an Edit button, the Alarm title, and a + button for adding a new alarm) appear in the navigation bar. The launch graphic eased me into this view very smoothly—it’s like a three-page flip book, and when it’s designed according to Apple’s specs it’s just as convincing as a well-drawn cartoon animation.
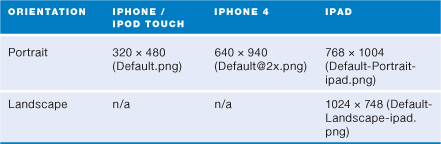
As you might have guessed, the launch graphic also needs to be sized to the device. Table 3.2 shows the specs.
Table 3.2 Size (in pixels) and name specifications for iOS launch graphics
After adding your image files to your Resources folder, you need to modify your property list file just like you do when you add your app icons. Xcode allows you to specify launch images for both the iPhone and iPad platforms. Add the Default.png and Default-Portrait-ipad.png images to the list. Following the naming conventions shown in Table 3.2 allows your app to automatically load the iPhone 4 image when the app runs on an iPhone and allows the iPad landscape image to automatically load when in landscape mode on the iPad. When you’re all done, Figure 3.9 (on the next page) displays what you should see.
3.9 The Groups & Files pane shows the launch image files and the info. plist file shows the launch images specified for iPhone and iPad.
Setting the app version
Further down the rows in the Information Property List (-Info.plist) file is the bundle version (1.0, as shown in Figure 3.8). When you design your app, decide on a versioning nomenclature that will best suit the lifecycle of your app and its content. Will the app’s content be updated regularly and, if so, how often? Or, if your app is for a client, does the client expect frequent design updates for any particular reason? As we know, a lot of retail product packaging is redesigned regularly, so if your app is tied to a product or service that encounters frequent brand updates, your app might have these same encounters and merit updates such as 1.2, 1.3, and 1.4 instead of 1.0, 2.0, 3.0, and 4.0.
The bundle version is an internal record of the app’s version number that resides in the app bundle itself, whereas you also submit a version number via iTunes Connect with your packaged app binary (more on that in Chapter 12). I suggest that you always make these numbers match to avoid any confusion (either your own or Apple’s), just in case having them not match could cause a problem.
Testing and building your app binary
Note that the app building process—part of both provisioning and testing your app on a device, as well as submitting to Apple for distribution via iTunes—requires you to be a registered and paid member of the Apple Developer Program. It also requires you to have purchased a license for NimbleKit. These processes are described in greater detail in Chapter 12.
But before you provision and test on a device, you can use the iOS SDK’s Simulator for free. So we’ll learn the settings via the Simulator process, and change them along the way for provisioning to a device and then eventually for submission to Apple.
Testing on Simulator
Testing on Simulator used to be a very straightforward process, and fortunately it’s still one of the easier steps of iOS app design. But as with the other complications that the expansion of the iOS device family has caused, the three device types have made testing apps on Simulator a little less elegant than it used to be.
To launch and install the new NimbleKit app on Simulator, go to the Overview drop-down menu in the left corner of the Xcode project window. It is the extra-wide drop-down menu that should read Simulator – 4.0 | Debug followed by the name of the app you created at the beginning of this chapter. And if you’ve since closed that one or got rid of it, just create a new NimbleKit app project again.
When you click the Overview menu (Figure 3.10), make sure that Simulator is checked in the top group of options. In the next group, Active Configuration, Debug should also be selected. The next group, Active Target, will have only one item in it: the name of your app project file.
3.10 Xcode’s Overview menu showing device and active configurations.
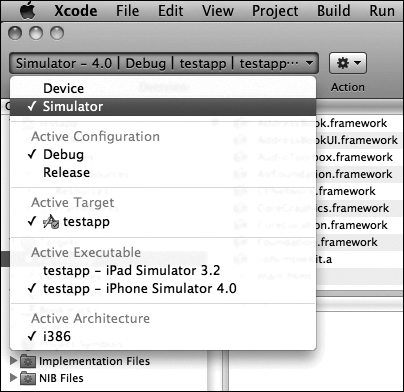
The next group, Active Executable, is where you specify which device you want Simulator to emulate when you begin testing your app. For our purposes, make sure that iPhone Simulator 4.0 is selected. Disregard Active Architecture; it is set automatically.
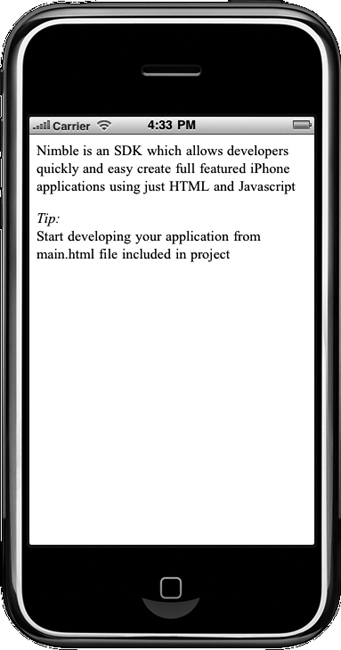
Here’s where it gets a little exciting already: You’ll install your first app on the Simulator, even though you haven’t designed anything yet. Just for practice!
Doing this is very easy: Just click on the Build and Run icon in the middle of the Xcode project toolbar. Look for the clever Build and Run icon (a hammer and a green play button). The result looks like Figure 3.11 (on the next page).
3.11 A new NimbleKit app after installation on the iPhone Simulator.
If you want to tinker with the Simulator a bit, do so now. It behaves just like a real iPhone with a few exceptions, like not having several of the standard apps (including Camera, Maps, Calendar, and so on). Also note that because there is no App Store app, you can’t purchase and install other apps on Simulator—you can only install them through Xcode.
After playing with the screen version of the iPhone, try testing your universal app in the iPad Simulator. Close the Simulator, toggle back to Xcode, then use the Overview menu to specify iPad Simulator 3.2 as the Active Executable instead. Click the trusty Build and Run button again and you’ll see a slightly different view of the new NimbleKit app, this time in the iPad Simulator (Figure 3.12).
3.12 A new NimbleKit app after it’s been installed on the iPad Simulator.

The default view of iPad Simulator is 50 percent. You can change the view by clicking the Window menu and selecting Scale, where you can then choose 100 percent.
The last device you can simulate is iPhone 4, which I’ve saved for last because it is the easiest one to do. In fact, you’ve already installed your app on the iPhone 4 Simulator—congratulations! (You did this when you installed it on the iPhone Simulator.)
To view it there, go to the Simulator’s Hardware menu, select Device, and then select iPhone 4. The Simulator’s iPhone screen transforms into the iPhone 4 screen. Another reason I saved this for last is that, oddly, the iPhone 4 screen looks a lot more like the iPad screen you just saw than it does the iPhone screen. It lacks the chrome surround of the actual device. Don’t fret about this, that’s just what Apple did.
If the white app icon isn’t displaying on the home screen, just flick over to the second home screen, where it was likely installed.
So congratulations again—now you can test apps on three devices in the Simulator! But testing there is never enough. Once you’ve designed an app of your own for distribution or sale, you need to test it on at least one actual iPhone, iPod touch, or iPad (and preferably more than one)—not just for extra quality assurance and control, but in some cases what you’re testing can’t fully function in Simulator. An example of this is an application with a map link that opens in the Maps application; there is no Maps app in Simulator, so testing that function on an iPhone is the only alternative.
Provisioning and testing on a device (debugging)
The first steps to creating the app binary for testing on a device are obtaining developer and provisioning certificates from the iOS Provisioning Portal, a section of developer.apple.com. This requires you to be a paid member of the iOS Developer Program (remember, it has an annual cost of $99), so I’ve put that section in the last chapter of this book because I wouldn’t anticipate you taking this step until you’ve honed your app design skills. Whenever you decide to take that step, follow the directions in Chapter 12 and then return here to proceed with testing an app on a device.
After obtaining and installing your developer and provisioning certificate, you need to verify that Xcode has assigned the correct values to the app’s build settings. The reason for this is in case the Development Provisioning Assistant, an online tool in the Provisioning Portal on developer.apple.com, hasn’t properly set everything for you. Should that happen, the following directions will help you troubleshoot the situation and proceed with provisioning and device testing.
There are three areas in the project where build settings are defined and, mysteriously, sometimes they all need to be double-checked because setting them correctly in one place doesn’t guarantee that they’ll be correct in all three areas.
No, I’m not making this up. Furthermore, this has, at times, been a source of some of my most frustrating moments. I swear that I’ve set them all correctly and tried to test on my device, only to then return to see that a setting has changed. So I rub my eyes in disbelief, change the setting again, and then it works.
This is simply how it goes with Xcode at times. So be patient, take a deep breath, and recheck your settings whenever you run into a dead end.
The first place to check your settings is in the Overview menu in the upper left corner of the main Xcode project window. As covered previously in this chapter, make sure that this is set to
• Device
• Active Configuration: Debug (same as installing in Simulator)
• Active Target: the name of your app (there should only be one option here)
• Active Executable: the name of your device (again, there should only be one option)
The build settings can be reached via the information window of two different files:
• The Project file
• The Target file
You reveal these settings by selecting them one at a time and clicking the blue info button in Xcode’s settings (or by just right-clicking the file and selecting Get Info) (Figure 3.13).
3.13 The Project and Target files. (On screen, these will be shown selected in blue.)

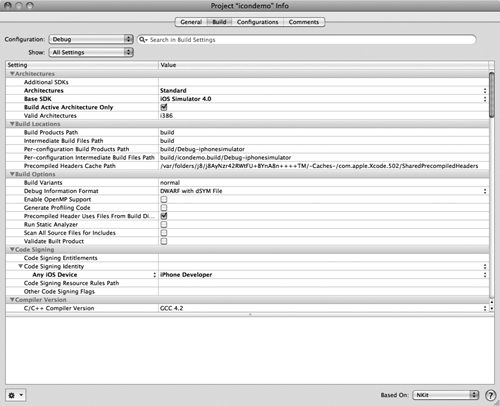
When you do this, you’ll get a large Project Info window with four tabs: General, Build, Configurations, and Comments. There are a ton of settings in these tabs but, fortunately, there are very few that you need to understand or change. The settings for our current purposes are found under the Build tab (Figure 3.14):
• Configuration: set to Debug
• Base SDK: set to the most current SDK (iPhone Simulator 4 in this example)
• Code Signing Identity: set to any iPhone device on the left and Automatic Profile Selector | iPhone Developer on the right
• Based On: set to NKit
3.14 The Build tab of the Project Info window.
Now the trick of this is—and I kid you not—you can’t just submit these values for the project file and expect them to always show up in the app file as well. (Though this can sometimes happen—and even often.) I’m afraid it’s a hard lesson to learn about how Xcode works, and sometimes these details even vary a bit from app to app. However, I do believe that the Development Provisioning Assistant in the Provisioning Portal has made this more consistent.
So at any point when you click Build and Run and your app is not installed on your device, double-check these same settings in the Target Info window too. Make sure everything is set as outlined above.
Building and submitting (distributing)
When you submit an app to Apple for review and placement in the iTunes App Store, the process isn’t that different from using Xcode to install the app on a device. And again, the details of building and submitting make more sense at the end of this journey, so they are covered in Chapter 12.
Purchasing and Activating Your NimbleKit License
In addition to needing a valid Distribution Provisioning Profile for your app, you’ll need a licensed version of NimbleKit. At the time of this writing, a NimbleKit license requires a one-time fee of $99. After purchasing the license, you’ll receive a 16-digit serial number.
After receiving the number, go to the Classes folder in your app’s project. Yes, as previously mentioned, this is one of the areas that is normally off-limits to you. But this is one time you’re allowed to go here. Open the folder, then double-click the AppDelegate.m file. You’ll see a bunch of Objective-C code that you would normally not touch.
Look for this line of code:
![]()
Copy and paste your NimbleKit serial number between the double quotes, so you see this (only the Xs below represent your actual serial number):
![]()
Then save, exit, and do not tamper with an Objective-C file again. You are now licensed to use NimbleKit and distribute NK-based apps to iTunes!
After creating a Distribution Provisioning Profile on the iOS Provisioning Portal and downloading it to your computer, drag it onto your Xcode app icon to install.
Open your app project and select the Project file at the top of the Groups & Files pane. View its information and then click the Configurations tab. Duplicate the Release configuration and then rename the copy Distribution. You have now completed one of the strangest steps of distributing an app. Weird, huh?
Fortunately from here on out, it feels a lot like provisioning the app for testing.
Set the Overview drop-down menu’s settings as follows:
• Destination: set to Device
• Active Configuration: set to Distribution
Set the Project and Target files settings in their info windows, under the Build tab:
• Configuration: set to Distribution (Figure 3.15)
3.15 The Overview menu showing Distribution settings.

• Base SDK: set to the most current SDK (iPhone Device 4 in this example)
• Code Signing Identity: set to any iPhone device on the left and Automatic Profile Selector | iPhone Distribution on the right
• iPhone OS Deployment Target: iPhone OS 3.0
• Based On: set to NKit
Have you verified that these are your settings for both the Project file and Target file? Good. And remember that if you encounter a build error, double-check all of these again—sometimes Xcode can be very finicky and seemingly even a bit scatterbrained.
Now that your app settings are in order, it’s time to build your app binary!
Before doing so, go to the Build menu and select Clean All Targets. This should ensure that anything generated during Simulator and device testing won’t interfere with the generation of a clean app binary.
Then—drumroll, please—return to the Build menu and click Build. Nope, this isn’t a typo: There’s a Build command in the Build menu!
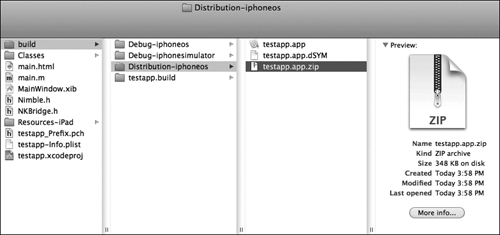
Xcode should then take a moment to process the binary, and if you get no warnings or errors, this process should result in the file you will then submit to iTunes Connect for approval by Apple. The file is an .app file that is located in the Distribution-iPhoneos subdirectory. When you find it, select it and compress it (right-click or Ctrl-click, and then choose Compress). You should see what is shown in Figure 3.16.
3.16 Your app binary, prepared for distribution. Don’t forget to compress it!
At this point you’ve learned the basics of Xcode and Simulator, the two main tools in the iOS SDK. To complete the examples in this book and design your own apps, you’ll continue to add files to the HTML directory, edit them in the Editor pane, and test your work in Simulator.
Summary
In this overview of Xcode and Simulator, you have learned how to
• Start new NimbleKit app projects in Xcode for iPhone and iPod touch, iPad, or for all iOS devices (universal app).
• Use the Groups & Files, Detail, and Editor panes to manage files, app settings, and edit code.
• Avoid the NimbleKit framework files so you don’t inadvertently disable the Objective-C code (which allows your project to run natively and, eventually, be approved by Apple).
• Name (and later rename) your app.
• Design and add icon and launch graphics to your app that meet Apple’s specifications and user experience guidelines.
• Set the app version.
• Build your app binary for Simulator and device testing.
• Build and compress your app binary so you can submit it to iTunes Connect for Apple approval.
Now that you know the ins and outs of using Xcode and creating a project, it’s time to start learning about iOS apps themselves! You’ll begin by learning about some standard iOS interface elements.