12. Provisioning and Distributing your Apps
This journey started with the big picture of iOS app design, moved into the primary tools and methods for app design work, and has spent the last several chapters detailing various content-focused approaches to designing apps with web standards and NimbleKit’s Objective-C code framework.
So what do you do when you are about to complete an app and start thinking about testing, distributing, and selling it?
That’s what this chapter is about. One of the major reasons to “go native” and design an Objective-C iOS app is Apple’s iTunes software and distribution channel. iTunes Connect is your interface with Apple’s digital marketplace, and the iOS Dev Center is where you’ll find the technical resources you need to make iTunes Connect work on your behalf.
Using the iOS Dev Center
The iOS Dev Center has added a lot of new technical content since the introduction of the iPad and iPhone 4 (and has always had a lot of information about the iPod touch). The Dev Center is a large, sprawling portal of information, resources, and forums for supporting your work as an app designer. This book will not attempt to catalog everything that’s there—that would take several volumes, and it’s actually just as effective and fun to poke around the place much like you would at any other large emporium. Rather, I’ll focus on two key areas: the iOS Provisioning Portal and iTunes Connect.
Using the iOS Provisioning Portal
The iOS Provisioning Portal is the place where you can provision an app to any of the iOS devices you own or have access to. I’ll walk you through the process, as it is somewhat tedious at times.
The reason that the app provisioning and distribution process is so tedious can be summed in one word: security. At least, this is what I’ve been told and this is what I choose to believe to avoid going crazy as I deal with all the steps that are required.
But it makes a lot of sense, as the system is designed around a set of digital keys, or certificates, that identify each essential component involved in the process: you, your app, and your device(s). These certificates and the processes that they plug into would make it extraordinarily difficult for someone to test or distribute your apps without your permission. Given how easy it is to copy digital files, we need to be thankful for this security.
On the other hand, the processes require either a certain amount of experimentation (and often debugging) to work properly, or some easy-to-use documentation. You probably don’t want to do any more of the former than you really have to, and documentation is found in abundance in the iOS Dev Center—but it’s not always filed under “easy” (in fact, it’s not always even up-to-date).
That’s where this chapter steps in.
Requesting and installing certificates
In order to run on an Apple mobile device (that is, on anything besides Simulator), an iOS app must be signed by a valid certificate that is obtained from the iOS Provisioning Portal. To run on your own device (or any that you have direct access to), you’ll need a development certificate. For customers to run it on their devices after obtaining it from the iTunes App Store, a distribution certificate is required.
The first step in this process is generating a Certificate Signing Request (CSR) in the Keychain Access application on your Mac. If you’re not familiar with this app, it is in Applications > Utilities.
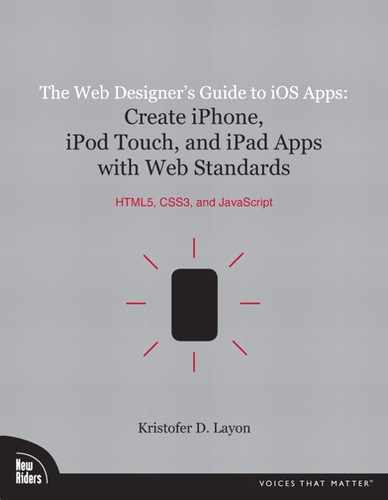
After you start Keychain Access, go to the main application menu and select Preferences. Click on the Certificates tab and be sure that the first two options are set to Off (Figure 12.1).
12.1 The Certificates Preferences in Keychain Access.
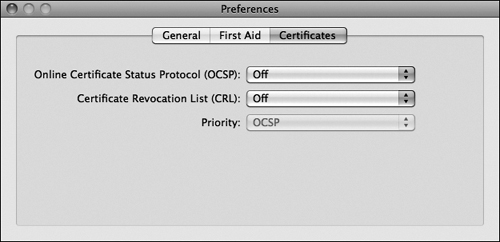
After you verify these preferences, go back to the main application menu and select Certificate Assistant and then choose Request a Certificate from a Certificate Authority (Figure 12.2).
12.2 Request a Certificate from a Certificate Authority.
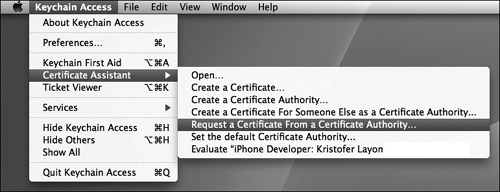
Although you need to have an email address entered in the top field, email address fields here are not actually used for this particular process. But you do want to be sure to use the exact same name you used when registering for your Apple Developer ID. You also want to select Saved to disk as well as Let me specify key pair information (Figure 12.3).
12.3 The Certificate Assistant.
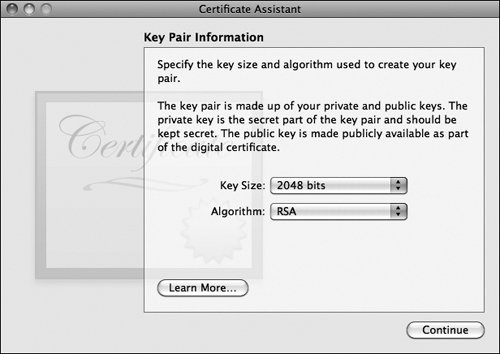
You will be prompted to save the Certificate Signing Request (pay attention to where you are saving it!), and then you’ll see the screen shown in Figure 12.4. Be sure it looks just like this, with Key Size equal to 2048 bits and Algorithm set to RSA. Click Continue.
12.4 Saving your CSR and reviewing Key Size and Algorithm settings.
Note
Do I have any idea what these settings mean? No, none at all—but you can read more about them in the Dev Center if you really want to.
After you save your file, you will be the proud owner of a unique item: the smallest file (4 KB) with the longest file extension (.certsigningrequest) you’re likely ever to have on your computer. Then you can log in to the iOS Provisioning Portal, go to Certificates and Development, and click Add Certificate.
Note: A note regarding the distribution certificate
To request and generate a distribution certificate, it’s almost the same process. Repeat these same steps but go to the Distribution tab under Certificates instead.
Once your development certificate is approved, you will see results like this (Figure 12.5) indicating that you may download the certificate.
12.5 Congratulations—you have a development certificate!

Once you download the file, just drag the certificate to your Keychain Access app icon to install.
After you’ve done this, you should be able to create and download app provisioning certificates (described in the next section). But you need to repeat the above process once you wish to request, download, and install a distribution certificate, which you will need to distribute your app to customers via the iTunes App Store. After you have both your provisioning and distribution certificates, your Keychain Access should look something like this (Figure 12.6 on the next page) when viewing your certificates.
12.6 Provisioning and development certificates in Keychain Access.

Note the presence of one other important item that you’ll need to download from the iOS Dev Center: the Apple Worldwide Developer Relations Certification Authority certificate (referred to in some documentation as the WWDR intermediate certificate).
Finally, note that these certificates can occasionally be a pain to manage. For example, I ran into problems when my development certificate expired (they are valid for one year; this is tied to the regular Developer Program having an annual fee). It was easy enough to request a new one, download it, and install it. But much to my surprise, the old one was still in Keychain Access and interfered with the new one being recognized. I had to hunt around in Keychain Access, looking through Certificates and My Certificates until I found it and deleted it.
So beware: Deleting a certificate in one place does not always delete it completely from your system. Check both My Certificates and Certificates if you ever have to troubleshoot certificate issues.
Using the Development Provisioning Assistant
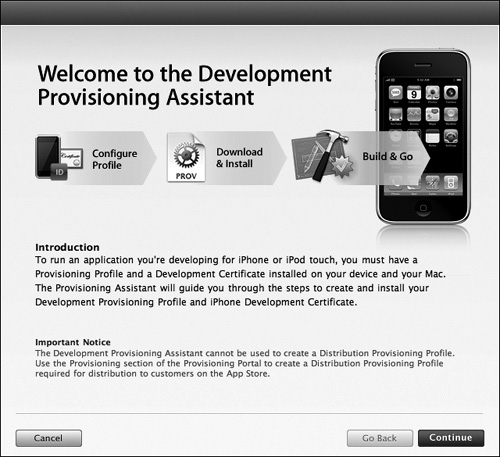
I have to take a moment to thank Apple for an improved process here, because the Development Provisioning Assistant (Figure 12.7) is a nice addition to the Dev Center. It does a much better job of helping you get from testing a new app in Simulator to testing on a device, and then eventually distributing via iTunes Connect.
12.7 The Development Provisioning Assistant.
This section explains how it works.
Creating an App ID
The initial view of the Assistant is rather nice and friendly (you’re welcomed to it, in fact!). As I noted above, the screen then explains how some digital certificates are needed to match the right developer with the right app, as well as the right device. We just covered the development certificate process, so next we can create an App ID. The App ID itself is not a certificate that you download, it is just a name and character string used by the Dev Center and, eventually, iTunes Connect and the iTunes App Store, to identify your app.
When prompted by the Assistant, select Create a New App ID and you will get the screen shown in Figure 12.8.
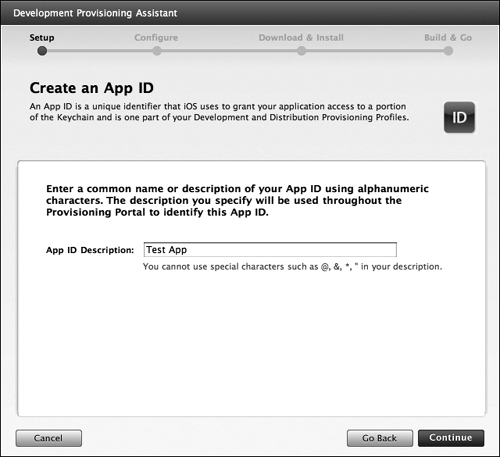
Be sure to just give this a concise ID for your own purposes—this name is not particularly important. For example, some of the apps I have developed have longer names, but I tend to give them an ID that is abbreviated; only alphanumeric characters and spaces are allowed.
Choosing an Apple device
After you create a new App ID, you have two of the three digital components required to form an app provisioning profile (the development certificate and an App ID). It’s kind of like an adventure story where you have to collect the missing objects that, once together, fuse into an orb that gives you magic powers.
And, as you’re noticing, this process is nearly as adventurous!
When prompted by the Assistant to choose a device, select Assign a New Apple Device and you’ll get the screen shown in Figure 12.9.
12.9 Creating a new device description.
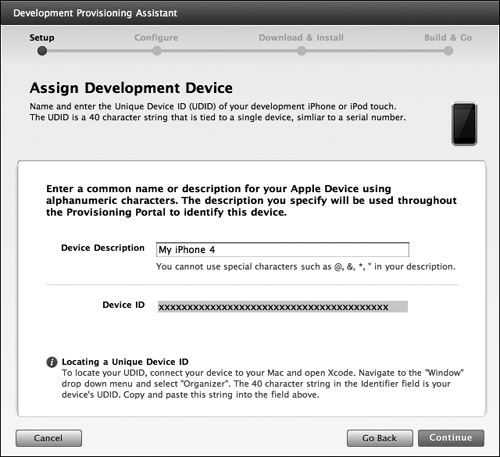
The description itself should just be a short and simple phrase (“My iPhone 4” works), and then you need to get your device ID and enter it into the form. There are two ways to find the ID:
1. Connect your device to iTunes and click on the serial number in the Summary screen. This will display the device ID, though here it is called the Identifier (UDID).
2. Connect your device to Xcode and look for the Identifier in the Organizer window under Devices > Summary. It’s actually a bit easier to get this way, as Xcode lets you select it to copy. (iTunes does not.)
After you finish assigning your device, the Assistant will verify the development certificate we created earlier.
Naming, generating, and downloading the provisioning profile
Now the Assistant displays the three magic items that, when fused, will give you magical superpowers—or, at least, the ability to install and test your app on a device (Figure 12.10).
12.10 Viewing your App ID, device, and certificate name.

It then should display a green check mark and verify that it has created the provisioning profile. Click Continue to download.
Next you’re presented with a screen where you have to give the profile a description. Again, be brief and descriptive as you will be referring to this in Xcode settings—over time, you may have several apps and devices to test them on. I always use a combination of things, such as “App1 iPhone dev.” This helps me distinguish my profiles according to app name, device, and whether the profile is for development or distribution.
After you give your profile a name, continue to follow the screens and prompts to download the profile and install into Xcode. (Dragging the downloaded file, which will end with the file extension .mobileprovision, to the Xcode icon is the easiest way to do this after you download it.)
Now you’re ready to install and test! That process is detailed in the Provisioning and testing on a device (debugging) section in Chapter 3.
Using iTunes Connect
After testing and fine-tuning your app on a device or two (the more, the merrier), and with all of your other ducks in a row (some of which we will cover in this section), you are probably eager to get your app out into the wider world.
Note: Distribution certificate
Remember that you can proceed with the following steps only if you have requested, downloaded, and installed your distribution certificate. If you haven’t, go back to the Requesting and Installing Certificates section at the beginning of this chapter.
This means you’re ready to distribute. You are also ready to start using iTunes Connect—almost.
Goodbye provisioning assistant, hello (again) Provisioning Portal
There is no distribution provisioning assistant like there is for app development, and I suspect it’s because most of the steps are already completed so it’s not really necessary. After all, you already have a development certificate and App ID, and distribution to iTunes does not involve a particular device ID like development testing does. So the last step is to generate a distribution provisioning profile.
To do this, go back to the iOS Dev Center and the iOS Provisioning Portal. Click on Provisioning and then click on the Distribution tab. Select New Profile and you will see a screen like what’s shown in Figure 12.11.
12.11 Creating an iPhone distribution provisioning profile for your app.
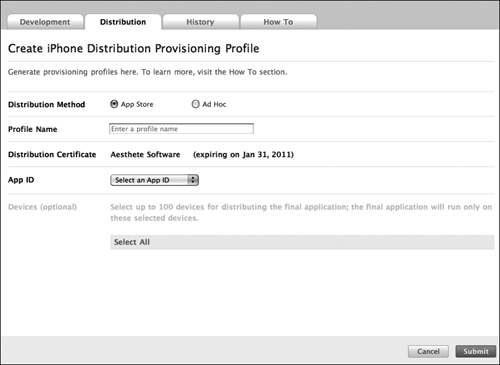
(Pardon Apple’s insistence in this corner of the web that you’re only working on iPhone projects—the distribution provisioning profile works for iPod touch and iPad apps, too!)
Select App Store for the distribution method; give the profile a name similar to your development profile for the app. Again, I use names that include “Dist” at the end to help me keep my profiles separate when I see them in the Xcode organizer. You see your distribution certificate listed under this row, then all you need to do is select the matching App ID that you created during development provisioning. After clicking submit, you will return to the home view of the Distribution Provisioning tab and see your new distribution provisioning profile listed.
The rightmost column for your new profile will be blank at first. But by the time you reload the page, there will be a download button. Click it to download the file, and once you drag your freshly minted distribution provisioning profile to Xcode it should show up in your Organizer and you’re ready to package and distribute your app binary.
This is detailed in the Building and submitting (distributing) section in Chapter 3.
Adding and managing applications
Now is the moment to break out the band: After you generate your app binary (as described in Chapter 3), it’s time to submit your app to Apple for review and placement into the iTunes App Store.
Yes, the moment has finally arrived!
To start this process, go to itunesconnect.apple.com and log in using your Apple Developer ID, the same ID you use for the iOS Dev Center. You will be presented with a screen that has several options including Sales and Trends (which will become your favorite place to visit when people start finding your app); Contracts, Tax, and Banking Information (there are several important items to complete here prior to submitting your first app); Financial Reports (if you decide to sell your app instead of distributing for free, this will be your other favorite place to visit, because it documents Apple’s payments to you), and some other categories for managing other users, in app purchases, and promotional codes.
After completing the steps in Contracts, Tax, and Banking Information, you begin the app submission process by clicking on Manage Your Applications. Then click on the blue Add New Application button in the upper-left corner of the screen.
The first screen you will see is the App Information screen (Figure 12.12).
12.12 Providing information about your app.
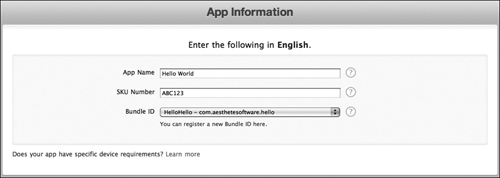
The first field, App Name, is the name that will be displayed in the iTunes App Store. This name does not need to be identical to your actual app binary, though it should be very close. For example, if your app name as installed is “Hello World” and your company name is da Vinci Design, Inc., you may want to capitalize on your ancestral relationship to Leonardo da Vinci and give your app the name “Hello World (da Vinci)” so that when it shows up in iTunes search results, the “da Vinci” grabs people’s attention.
But except for minor alterations like this, the App Name should, in fact, be your app’s name.
The next field, SKU Number, can be whatever you wish it to be. If you will be working on apps for others, and they have a particular system for their company’s SKU numbers, you will want this number to fit into their merchandising system. But aside from these customer-side requirements, Apple has no particular guidelines for this field.
The last item in App Information is the Bundle ID. Use the dropdown to select the bundle ID that you created when first using the Development Provisioning Assistant to create your app’s provisioning profile. And note that this ID should look familiar already because it matches the bundle ID field in your app’s Info.plist file. (If it does not, iTunes Connect will not accept your binary.)
After you click Continue, the next screen presents you with the Rights and Pricing screen shown in Figure 12.13.
12.13 Determining rights and pricing for your app.
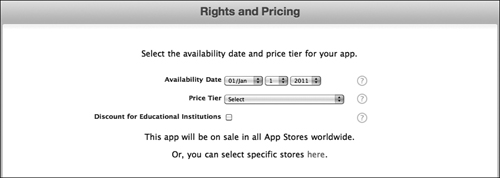
App approval time varies a lot (for me it has taken as little as two days and as much as three weeks). The important thing to know here is that Availability Date can be left as it is preset (to today’s date), which means that your app will go on sale as soon as it is approved because that date will obviously be after this availability date of today. Or, if you know that there are a bunch of corporate marketing and PR reasons for launching a client’s app on a particular date in the future, you can set the date accordingly.
Price Tier is labeled a bit strangely because Tier 1 is really just $1 (or, technically, $0.99). The tiers in the dropdown list go to Tier 85, and I hope that if you are submitting an app to sell for $84.99 and it actually moves at this price point, you will be sending me a small cut of the proceeds for getting you there.
And what if you have an app to sell for more than that? (Yes, they are out there.) Apparently you need to give Apple a call for some special treatment—I don’t know how to submit an app for a price tier higher than what is in the dropdown menu.
The Discount for Educational Institutions checkbox enables schools, colleges, and universities to purchase your app in bulk at a 50 percent discount. If you’re interested in this opportunity, read more about it on Apple’s website and check this box when submitting your app.
Upon completion of this screen, click Continue and the Version Information screen appears (Figure 12.14 on the next page).
12.14 Providing version information for your app.
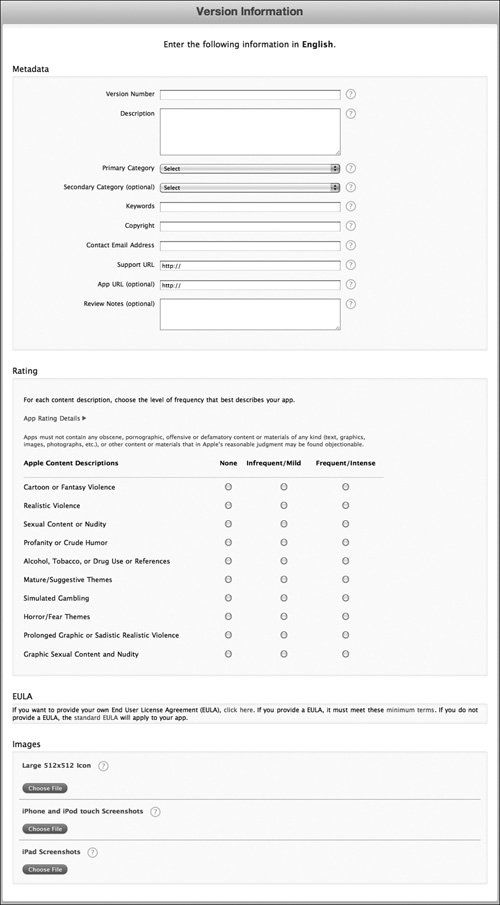
This screen has a lot of information that you’ll need to answer very thoroughly. Some items like version number, copyright, email address, and support URL should be quite straightforward for you to answer. Similarly, the ratings section in the middle is also fairly objective.
But some of these items are of paramount importance to the positioning and marketing of your app in the iTunes App Store. Consider the description: How can you engage your prospective customers with a few paragraphs that are both attention-getting yet concise? What are the key features to describe, and if your app has competition, how can you distinguish your app from the others that are similar?
Note: Version information—now editable
An important detail to note, however, is that you can edit the description and other items later. This is a new feature; before the current version of iTunes Connect, the only opportunity you had to change an app description was when you submitted an updated version for approval!
Equally important as the description, and perhaps even more so, are the categories and keywords. After all, people searching for your app by these broader terms will not even find it if you don’t select these carefully.
The available categories are shown in Figure 12.15.
12.15 Determining the categories for your app.
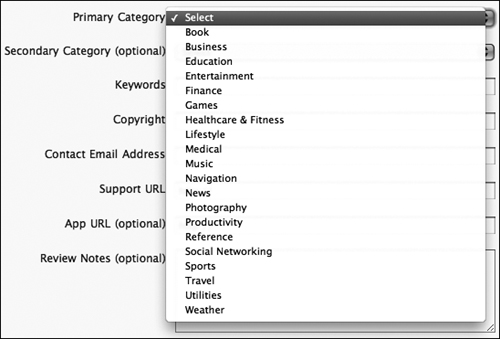
Note that there is a primary category as well as an optional secondary category (the options are the same under both). I recommend using the secondary category, in particular, when your app does not comfortably fit into just one—at least when using it, you can broaden your reach with a second category!
Keywords are similarly important, and here is another key thing to note: App descriptions are apparently not used by iTunes search (at least, this is what Apple engineering staff said at the 2010 Worldwide Developer Conference). So this means that even if important keywords are used in your description, they also need to be entered into the keywords field so they are searchable by iTunes App Store shoppers.
Note: Version information—some is editable, some is not
An important detail to note, however, is that you can edit the description and latest update information later. However, you cannot edit categories or keywords later! Can. NOT. Choose these very carefully, as they are not editable until you submit a new version of the app for Apple’s approval.
After completing the categories and keywords, you are likely to accept the standard End User License Agreement (EULA) that is provided by Apple unless you wish to retain a lawyer and write your own (to each his or her own). I don’t want to suggest that Apple’s EULA is perfect and cannot be improved, but I’ve been using it as is for my own applications.
The final task to complete is uploading the iTunes App Store icon graphic and app screen shots. To keep things consistent, I recommend generating PNG images for these just as you did for the app icons themselves; but note that iTunes also accepts JPG and TIF formats as long as they are 72 dpi, RGBA, flattened, and without transparency. Also, their file names do not matter as they do for app icons. Table 12.1 shows the size specifications.
Table 12.1 Size specifications for iTunes app icon and screen shots
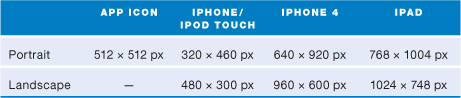
The screenshot sizes in Table 12.1 assume that you are cropping out the status bar, which is 20 pixels high on the iPhone, iPod touch, and iPad (40 pixels high on the iPhone 4’s Retina Display). I recommend this because I find the status bar to be distracting in screenshots: Nearly every app displays it, so it’s not a distinguishing feature. But I’ve also mistakenly uploaded screenshots with it included and that’s not the end of the world. Just realize that when you do this, the second dimension is larger than shown in Table 12.1 (e.g., iPhone portrait: 320 × 480 pixels).
Also, both portrait and landscape screenshots are displayed in the desktop version of the iTunes App Store on desktop and laptop Macs. To view them in the App Store on an iPhone or iPod touch, just rotate the device to landscape. In other words, they are not resized to display in portrait orientation on those devices.
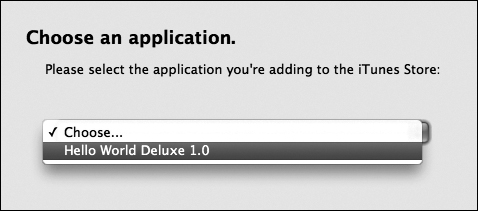
After submitting the version information, you get a summary screen of your information. At this point you can either leave and come back, or wait a bit and refresh the view to disclose a blue Ready to Load Binary button. After being asked to answer a few questions, you’ll be prompted to use the Application Loader. If you have downloaded iOS SDK 3.2 or later, you already have Application Loader stored on your Mac (in Developer > Applications > Utilities). When you run it, you will be prompted to Choose an Application (Figure 12.16).
12.16 Using Application Loader, a small helper application that is part of the iOS SDK on your Mac.
Then you are asked whether you tested and qualified this binary on iOS4 (if you’re using the current SDK and tested in the iPhone 4 Simulator and/or on an iPhone 4, answer “yes”). Once you select the app binary that you built in Xcode (it’s in the build > Distribution-iphoneos directory of your main app file directory, and should be compressed so that it’s in the format name.app.zip), Application Loader will submit it to iTunes Connect for you.
That’s it—you’re done! Now all you have to do is keep logging in to iTunes Connect (or check the iTunes App Store) to see when your app is approved and available.
Summary
Whew! This chapter basically gave you a master’s degree in Apple Developer security and app marketing. I hope this documentation fills in a lot of the gaps that I found when I learned these processes and read Apple’s documentation—if nothing else, I think it’s helpful to have it all in one place. And what you just learned is how to
• Generate Certificate Signing Requests (CSRs) using the Keychain Access and Certificate Assistant applications on your Mac.
• Pass along the CSRs to the iOS Provisioning Portal to create development and distribution certificates.
• Download and install these certificates, along with the Apple Worldwide Developer Relations Certification Authority certificate (WWDR intermediate), in Keychain Access.
• Create App IDs and choose Apple Devices for development provisioning.
• Submit app information, version information, and app icons, screenshots, and binary files to iTunes Connect.
You’ve made it! You have explored how to design native iOS apps with web standards and NimbleKit, plus you have learned about some helpful UI and UX recommendations, a generous helping of HTML5 and CSS3, and some NimbleKit alternatives for mobile design.
And before diving right into your own projects, read about content strategy, planning, and usability (Appendix A). These topics did not fit neatly into the flow of the other chapters, but are perfect to read now before you embark on your own app adventures.