Chapter 1
Structuring the Page with HTML
IN THIS CHAPTER
![]() Getting comfy with HTML
Getting comfy with HTML
![]() Figuring out HTML tags and attributes
Figuring out HTML tags and attributes
![]() Understanding the basic blueprint for all web pages
Understanding the basic blueprint for all web pages
![]() Adding text, images, and links to your page
Adding text, images, and links to your page
![]() Building bulleted and numbered lists
Building bulleted and numbered lists
I am always fascinated by the structure of things; why do things work this way and not that way.
— URSUS WEHRLI
When it comes to web development, it’s no exaggeration to say that the one indispensable thing, the sine qua non for those of you who studied Latin in school, is HTML. That’s because absolutely everything else you make as a web developer — your CSS rules, your JavaScript code, even your PHP scripts — can’t hang its hat anywhere but on some HTML. These other web development technologies don’t even make sense outside of an HTML context.
So, in a sense, this chapter is the most important for you as a web coder because all the rest of the book depends to a greater or lesser degree on the HTML know-how found in the following pages. If that sounds intimidating, not to worry: One of the great things about HTML is that it’s not a huge topic, so you can get up to full HTML speed without a massive investment of time and effort.
Because HTML is so important, you’ll be happy to know that I don’t rush things. You’ll get a thorough grounding in all things HTML, and when you’re done you’ll be more than ready to tackle the rest of your web development education.
Getting the Hang of HTML
Building a web page from scratch using your bare hands may seem like a daunting task. It doesn’t help that the codes you use to set up, configure, and format a web page are called the Hypertext Markup Language (HTML for short), a name that could only warm the cockles of a geek’s heart. I take a mercifully brief look at each term:
- Hypertext: In prehistoric times — that is, the 1980s — tall-forehead types referred to any text that, when selected, takes you to a different document, as hypertext. So this is just an oblique reference to the links that are the defining characteristic of web pages.
- Markup: Instructions that specify how the content of a web page should be displayed in the web browser.
- Language: The set of codes that comprise all the markup possibilities for a page.
But even though the name HTML is intimidating, the codes used by HTML aren’t even close to being hard to learn. There are only a few of them, and in many cases they even make sense!
At its most basic, HTML is nothing more than a collection of markup codes — called tags — that specify the structure of your web page. In HTML, “structure” is a rubbery concept that can refer to anything from the overall layout of the page all the way down to a single word or even just a character or two.
You can think of a tag as a kind of container. What types of things can it contain? Mostly text, although lots of tags contain things like chunks of the web page and even other tags.
Most tags use the following generic format:
<tag>content</tag>
What you have here are a couple codes that define a container. Most of these codes are one- or two-letter abbreviations, but sometimes they’re entire words. You always surround these codes with angle brackets <>; the brackets tell the web browser that it's dealing with a chunk of HTML and not just some random text.
The first of these codes — <tag> — is called the start tag and it marks the opening of the container; the second of the codes — </tag> — is called the end tag and it marks the closing of the container. (Note the extra slash (/) that appears in the end tag.)
In between you have the content, which refers to whatever is contained in the tag. For example, I start with a simple sentence that might appear in a web page:
Okay, listen up people because this is important!
Figure 1-1 shows how this might look in a web browser.

FIGURE 1-1: The sample sentence as it appears in a web browser.
Ho hum, right? Suppose you want to punch this up a bit by emphasizing “important.” In HTML, the tag for emphasis is <em>, so you'd modify your sentence like so:
Okay, listen up people because this is <em>important</em>!
See how I’ve surrounded the word important with <em> and </em>? The first <em> is the start tag and it says to the browser, “Yo, Browser Boy! You know the text that comes after this? Be a good fellow and treat it as emphasized text.” This continues until the browser reaches the end tag </em>, which lets the browser know it's supposed to stop what it’s doing. So the </em> tells the browser, “Okay, okay, that’s enough with the emphasis already!”
All web browsers display emphasized text in italics, so that’s how the word now appears, as you can eyeball in Figure 1-2.

FIGURE 1-2: The sentence revised to italicize the word important.
There are tags for lots of other structures, including important text, paragraphs, headings, page titles, links, and lists. HTML is just the sum total of all these tags.
 One of the most common mistakes rookie web weavers make is to forget the slash (/) that identifies an end tag. If your page looks wrong when you view it in a browser, look for a missing slash. Also look for a backslash () instead of a slash, which is another common error.
Understanding Tag Attributes
You'll often use tags straight up, but all tags are capable of being modified in various ways. This might be as simple as supplying a unique identifier to the tag for use in a script or a style, or it might be a way to change how the tag operates. Either way, you modify a tag by adding one or more attributes to the start tag. Most attributes use the following generic syntax:
<tag attribute="value">
Here, you replace attribute with the name of the attribute you want to apply to the tag, and you replace value with the value you want to assign the attribute.
For example, the <hr> tag adds a horizontal line across the web page (hr stands for horizontal rule). You use only the start tag in this case (as a simple line, it can't “contain” anything, so no end tag is needed), as demonstrated in the following example:
Okay, listen up people because this is <em>important</em>!
<hr>
As you can see in Figure 1-3, the web browser draws a line right across the page.

FIGURE 1-3: When you add the <hr> tag, a horizontal line appears across the page.
You can also add the width attribute to the <hr> tag and specify the width you prefer. For example, if you only want the line to traverse half the page width, set the width attribute to "50%", as shown here:
Okay, listen up people because this is <em>important</em>!
<hr width="50%">
As Figure 1-4 shows, the web browser obeys your command and draws a line that takes up only half the width of the page.

FIGURE 1-4: The <hr width="50%"> tag creates a horizontal line across half the page.
Learning the Fundamental Structure of an HTML5 Web Page
In this section, I show you the tags that serve as the basic blueprint you'll use for all your web pages.
Your HTML files will always lead off with the following tag:
<!DOCTYPE html>
This tag (it has no end tag) is the so-called Doctype declaration, and it lets the web browser know what type of document it’s about to process (an HTML document, in this case).
Next up you add the <html lang="en"> tag. This tag doesn’t do a whole lot except tell any web browser that tries to read the file that it’s dealing with a file that contains HTML doodads. It also uses the lang attribute to specify the document's language, which in this case is English.
Similarly, the last line in your document will always be the corresponding end tag: </html>. You can think of this tag as the HTML equivalent for “The End.” So, each of your web pages will include this on the second line:
<html lang="en">
and this on the last line:
</html>
The next items serve to divide the page into two sections: the head and the body. The head section is like an introduction to the page. Web browsers use the head to glean various types of information about the page. A number of items can appear in the head section, but the only one that makes any real sense at this early stage is the title of the page, which I talk about in the next section.
To define the head, add <head> and </head> tags immediately below the <html> tag you typed in earlier. So your web page should now look like this:
<!DOCTYPE html>
<html lang="en">
<head>
</head>
</html>
 Although technically it makes no difference if you enter your tag names in uppercase or lowercase letters, the HTML powers-that-be prefer to see HTML tags in lowercase letters, so that's the style I use in this book, and I encourage you to do the same.
While you’re in the head section, let’s add a head-scratcher:
<meta charset="utf-8">
You place this between the <head> and </head> tags (indented four spaces for easier reading). It tells the web browser that your web page uses the UTF-8 character set, which you can mostly ignore except to know that UTF-8 contains almost every character (domestic and foreign), punctuation mark, and symbol known to humankind.
The body section is where you enter the text and other fun stuff that the browser will actually display. To define the body, place <body> and </body> tags after the head section (that is, below the </head> tag):
<!DOCTYPE html>
<html lang="en">
<head>
<meta charset="utf-8">
</head>
<body>
</body>
</html>
A common page error is to include two or more copies of these basic tags, particularly the <body> tag. For best results, be sure you use each of these seven basic structural tags only one time on each page.
Giving your page a title
When you surf the web, you've probably noticed that your browser displays some text in the current tab. That tab text is the web page title, which is a short (or sometimes long) phrase that gives the page a name. You can give your own web page a name by adding the <title> tag to the page’s head section.
To define a title, surround the title text with the <title> and </title> tags. For example, if you want the title of your page to be “My Home Sweet Home Page,” enter it as follows:
<title>My Home Sweet Home Page</title>
Note that you always place the title inside the head section, so your basic HTML document now looks like this:
<!DOCTYPE html>
<html lang="en">
<head>
<meta charset="utf-8">
<title>My Home Sweet Home Page</title>
</head>
<body>
</body>
</html>
Figure 1-5 shows this HTML file loaded into a web browser. Notice how the title appears in the browser's tab bar.

FIGURE 1-5: The text you insert into the <title> tag shows up in the browser tab.
Here are a few things to keep in mind when thinking of a title for your page:
- Be sure your title describes what the page is all about.
- Don’t make your title too long. If you do, the browser might chop it off because there’s not enough room to display it in the tab. Fifty or 60 characters are usually the max.
- Use titles that make sense when someone views them out of context. For example, if someone really likes your page, that person might add it to his or her list of favorites or bookmarks. The browser displays the page title in the favorites list, so it’s important that the title makes sense when she looks at the bookmarks later on.
- Don’t use cryptic or vague titles. Titling a page “Link #42” or “My Web Page” might make sense to you, but your readers will almost certainly be scratching their heads.
Adding some text
Now it’s time to put some flesh on your web page’s bones by entering the text you want to appear in the body of the page. For the most part, you can type the text between the <body> and </body> tags, like this:
<!DOCTYPE html>
<html lang="en">
<head>
<meta charset="utf-8">
<title>My Home Sweet Home Page</title>
</head>
<body>
Hello HTML World!
</body>
</html>
Figure 1-6 shows how a web browser displays this HTML.

FIGURE 1-6: Text you add to the page body appears in the browser's content window.
Before you start typing willy-nilly, however, there are a few things you should know:
- You might think you can line things up and create some interesting effects by stringing together two or more spaces. Ha! Web browsers chew up all those extra spaces and spit them out into the nether regions of cyberspace. Why? Well, the philosophy of the web is that you can use only HTML tags to lay out a document. So a run of multiple spaces (or white space, as it’s called) is ignored.
- Tabs also fall under the rubric of white space. You can enter tabs all day long, but the browser ignores them completely.
- Browsers also like to ignore the carriage return. It might sound reasonable to the likes of you and me that pressing Enter (or Return on a Mac) starts a new paragraph, but that’s not so in the HTML world.
- If you want to separate two chunks of text, you have multiple ways to go, but here are the two easiest:
- If you want no space between the texts: Place a
<br>(for line break) tag between the two bits of text. - If you want some breathing room between the texts: Surround each chunk of text with the
<p>and</p>(for paragraph) tags.
- If you want no space between the texts: Place a
- If HTML documents are just plain text, does that mean you're out of luck if you need to use characters such as © and €? Luckily, no. For the most part, you can just add these characters to your file. However, HTML also has special codes for these kinds of characters. I talk about them a bit later in this chapter.
- If, for some reason, you’re using a word processor instead of a text editor, know that it won’t help to format your text using the program’s built-in commands. The browser cheerfully ignores even the most elaborate formatting jobs because browsers understand only HTML (and CSS and JavaScript). And besides, a document with formatting is, by definition, not a pure text file, so a browser might bite the dust trying to load it.
Some Notes on Structure versus Style
One of the key points of front-end web development is to separate the structure of the web page from its styling. This makes the page faster to build, easier to maintain, and more predictable across a range of browsers and operating systems. HTML provides the structure side, while CSS handles the styling.
That’s fine as far as it goes, but HTML performs its structural duties with a couple of quirks you need to understand:
- This isn’t your father’s idea of structure. That is, when you think of the structure of a document, you probably think of larger chunks such as articles, sections, and paragraphs. HTML does all that, but it also deals with structure at the level of sentences, words, and even characters.
- HTML’s structures often come with some styling attached. Or, I should say, all web browsers come with predefined styling that they use when they render some HTML tags. Yes, I know I just said that it’s best to separate structure and style, so this can be a tad confusing. Think of it this way: When you build a new deck using cedar, your completed deck has a natural “cedar” look to it, but you’re free to apply a coat of varnish or paint. HTML is the cedar, whereas CSS is the paint.
I mention these quirks because they can help to answer some questions that might arise as you work with HTML tags.
Another key to understanding why HTML does what it does, is that much of HTML — especially its most recent incarnation, HTML5 — has been set up so that a web page is “understandable” to an extent by software that analyzes the page. One important example is a screen reader used by some visually impaired surfers. If a screen reader can easily figure out the entire structure of the page from its HTML tags, then it can present the page properly to the user. Similarly, software that seeks to index, read, or otherwise analyze the page will only be able to do this successfully if the page’s HTML tags are a faithful representation of the page’s intended structure.
Applying the Basic Text Tags
HTML has a few tags that enable you to add structure to text. Many web developers use these tags only for the built-in browser formatting that comes with them, but you really should try and use the tags semantically, as the geeks say, which means to use them based on the meaning you want the text to convey.
Emphasizing text
One of the most common meanings you can attach to text is emphasis. By putting a little extra oomph on a word or phrase, you tell the reader to add stress to that text, which can subtly alter the meaning of your words. For example, consider the following sentence:
You'll never fit in there with that ridiculous thing on your head!
Now consider the same sentence with emphasis added to one word:
You'll never fit in there with that ridiculous thing on your head!
You emphasize text on a web page by surrounding that text with the <em> and </em> tags:
You'll <em>never</em> fit in there with that ridiculous thing on your head!
All web browsers render the emphasized text in italics, as shown in Figure 1-7.

FIGURE 1-7: The web browser renders emphasized text using italics.
I should also mention that HTML has a closely related tag: <i>. The <i> tag's job is to mark up alternative text, which refers to any text that you want treated with a different mood or role than regular text. Common examples include book titles, technical terms, foreign words, or a person’s thoughts. All web browsers render text between <i> and </i> in italics.
Marking important text
One common meaning that you'll often want your text to convey is importance. It might be some significant step in a procedure, a vital prerequisite or condition for something, or a crucial passage within a longer text block. In each case, you’re dealing with text that you don’t want your readers to miss, so it needs to stand out from the regular prose that surrounds it.
In HTML, you mark text as important by surrounding it with the <strong> and </strong> tags, as in this example:
Dear reader: Do you see the red button in the upper-right
corner of this page? <strong>Never click the red
button!</strong> You have been warned.
All web browsers render text marked up with the <strong> tag in bold, as shown in Figure 1-8.

FIGURE 1-8: The browser renders important text using bold.
Just to keep us all on our web development toes, HTML also offers a close cousin of the <strong> tag: the <b> tag. You use the <b> tag to mark up keywords in the text. A keyword is a term that you want to draw attention to because it plays a different role than the regular text. It could be a company name or a person's name (think of those famous “bold-faced names” that are the staple of celebrity gossip columns). The browser renders text between the <b> and </b> tags in a bold font.
Nesting tags
It's perfectly legal — and often necessary — to combine multiple tag types by nesting one inside the other. For example, check out this code:
Dear reader: Do you see the red button in the upper-right
corner of this page? <strong>Never, I repeat <em>never</em>,
click the red button!</strong> You have been warned.
See what I did there? In the text between the <strong> and </strong> tags, I marked up a word with the <em> and </em> tags. The result? You got it: bold, italic text, as shown in Figure 1-9.

FIGURE 1-9: The browser usually combines nested tags, such as the bold, italic text shown here.
Adding headings
Earlier you saw that you can give your web page a title using the aptly named <title> tag. However, that title only appears in the browser's title bar and tab. What if you want to add a title that appears in the body of the page? That’s almost easier done than said because HTML comes with a few tags that enable you to define headings, which are bits of text that appear in a separate paragraph and usually stick out from the surrounding text by being bigger, appearing in a bold typeface, and so on.
There are six heading tags in all, ranging from <h1>, which uses the largest type size, down to <h6>, which uses the smallest size. Here's some web page code that demonstrates the six heading tags, and Figure 1-10 shows how they look in a web browser:
<h1>This is Heading 1</h1>
<h2>This is Heading 2</h2>
<h3>This is Heading 3</h3>
<h4>This is Heading 4</h4>
<h5>This is Heading 5</h5>
<h6>This is Heading 6</h6>

FIGURE 1-10: The six HTML heading tags.
What’s up with all the different headings? The idea is that you use them to create a kind of outline for your web page. How you do this depends on the page, but here’s one possibility:
- Use
<h1>for the overall page title. - Use
<h2>for the page subtitle. - Use
<h3>for the titles of the main sections of your page. - Use
<h4>for the titles of the subsections of your page.
Adding quotations
You might have noticed that each chapter of this book begins with a short, apt quotation because, hey, who doesn't love a good quote, right? The readers of your web pages will be quote-appreciators, too, I’m sure, so why not sprinkle your text with a few words from the wise?
In HTML, you designate a passage of text as a quotation by using the <blockquote> tag. Here’s an example:
Here's what the great jurist Oliver Wendell Holmes, Sr. had to say about puns:
<blockquote>
A pun does not commonly justify a blow in return.
But if a blow were given for such cause, and death
ensued, the jury would be judges both of the facts
and of the pun, and might, if the latter were of an
aggravated character, return a verdict of justifiable
homicide.
</blockquote>
Clearly, the dude was not a pun fan.
The web browser renders the text between <blockquote> and </blockquote> in its own paragraph that it also indents slightly from the left margin, as shown in Figure 1-11.

FIGURE 1-11: The web browser renders <blockquote> text indented slighted from the left.
Creating Links
When all is said and done (actually, long before that), your website will consist of anywhere from 2 to 102 pages (or even more, if you've got lots to say). Here’s the thing, though: If you manage to cajole someone onto your home page, how do you get that person to your other pages? That really is what the web is all about, isn’t it, getting folks from one page to another? And of course, you already know the answer to the question. You get visitors from your home page to your other pages by creating links that take people from here to there. In this section, you learn how to build your own links and how to finally put the “hypertext” into HTML.
Linking basics
The HTML tags that do the link thing are <a> and </a>. Here's how the <a> tag works:
<a href="address">
Here, href stands for hypertext reference, which is just a fancy-schmancy way of saying “address” or “URL.” Your job is to replace address with the actual address of the web page you want to use for the link. And yes, you have to enclose the address in quotation marks. Here's an example:
<a href="http://webcodingplayground.io">
You’re not done yet, though, not by a long shot (insert groan of disappointment here). What are you missing? Right: You have to give the reader some descriptive link text to click. That’s pretty straightforward because all you do is insert the text between the <a> and </a> tags, like this:
<a href="address">Link text</a>
Need an example? You got it:
For web coding fun, check out the
<a href="http://webcodingplayground.io">
Web Coding Playground</a>!
Figure 1-12 shows how it looks in a web browser. Notice how the browser colors and underlines the link text, and when I point my mouse at the link, the address I specified in the <a> tag (albeit without the http:// prefix) appears in the browser's status area.
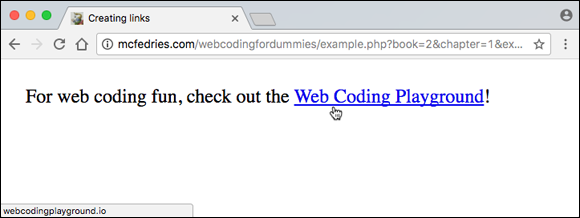
FIGURE 1-12: How the link appears in the web browser.
Anchors aweigh: Internal links
When a surfer clicks a standard link, the page loads and the browser displays the top part of the page. However, it’s possible to set up a special kind of link that will force the browser to initially display some other part of the page, such as a section in the middle of the page. For these special links, I use the term internal links, because they take the reader directly to some inner part of the page.
When would you ever use an internal link? Most of your HTML pages will probably be short and sweet, and the web surfers who drop by will have no trouble navigating their way around. But if, like me, you suffer from a bad case of terminal verbosity combined with bouts of extreme long windedness, you’ll end up with web pages that are lengthy, to say the least. Rather than force your readers to scroll through your tomelike creations, you can set up links to various sections of the document. You could then assemble these links at the top of the page to form a sort of “hypertable of contents,” as an example.
Internal links actually link to a specially marked section — called an anchor — that you’ve inserted somewhere in the same page. To understand how anchors work, think of how you might mark a spot in a book you’re reading. You might dog-ear the page, attach a note, or place something between the pages, such as a bookmark or your cat’s tail.
An anchor performs the same function: It “marks” a particular spot in a web page, and you can then use a regular <a> tag to link to that spot. Here’s the general format for an anchor tag:
<element id="name">
As you can see, an anchor tag looks a lot like a regular tag, except that it also includes the id attribute, which is set to the name you want to give the anchor. Here's an example:
<section id="section1">
You can use whatever you want for the name, but it must begin with a letter and it can include any combination of letters, numbers, underscores (_), and hyphens (-). Also, id values are case-sensitive, so the browser treats the id value section1 differently than the id value Section1.
To set up the anchor link, you create a regular <a> tag, but the href value becomes the name of the anchor, preceded by a hash symbol (#):
<a href="#name">
Here's an example that links to the anchor I showed earlier:
<a href="#section1">
Although you’ll mostly use anchors to link to sections of the same web page, there’s no law against using them to link to specific sections of other pages. What you do is add the appropriate anchor to the other page and then link to it by adding the anchor’s name (preceded, as usual, by #) to the end of the page’s filename. Here’s an example:
<a href="chapter57.html#section1">
Building Bulleted and Numbered Lists
For some reason, people love lists: Best (and Worst) Dressed lists, Top Ten lists, My All-Time Favorite X lists, where X is whatever you want it to be: movies, songs, books, I Love Lucy episodes — you name it. People like lists, for whatever reasons.
Okay, so let’s make some lists. Easy, right? Well, sure, any website jockey can just plop a Best Tootsie Roll Flavors Ever list on a page by typing each item, one after the other. Perhaps our list maker even gets a bit clever and inserts the <br> tag between each item, which displays them on separate lines. Ooooh.
Yes, you can make a list that way, and it works well enough, I suppose, but there's a better way. HTML has a few tags that are specially designed to give you much more control over your list-building chores. For example, you can create a bulleted list that actually has those little bullets out front of each item. Nice! Want a Top Ten list, instead? HTML has your back by offering special tags for numbered lists, too.
Making your point with bulleted lists
A no-frills, <br>-separated list isn’t very useful or readable because it doesn’t come with any type of eye candy that helps differentiate one item from the next. An official, HTML-approved bulleted list solves that problem by leading off each item with a bullet — a cute little black dot.
Bulleted lists use two types of tags:
- The entire list is surrounded by the
<ul>and</ul>tags. Why “ul”? Well, what the rest of the world calls a bulleted list, the HTML poohbahs call an unordered list. - Each item in the list is preceded by the
<li>(list item) tag and is closed with the</li>end tag.
The general setup looks like this:
<ul>
<li>Bullet text goes here</li>
<li>And here<li>
<li>And here</li>
<li>You get the idea…</li>
</ul>
Notice that I've indented the list items by four spaces, which makes it easier to see that they’re part of a <ul></ul> container. Here’s an example to chew on:
<h3>My All-Time Favorite Oxymorons</h3>
<ul>
<li>Pretty ugly</li>
<li>Military intelligence</li>
<li>Jumbo shrimp</li>
<li>Original copy</li>
<li>Random order</li>
<li>Act naturally</li>
<li>Tight slacks</li>
<li>Freezer burn</li>
<li>Sight unseen</li>
<li>Microsoft Works</li>
</ul>
Figure 1-13 shows how the web browser renders this code, cute little bullets and all.

FIGURE 1-13: A typical bulleted list.
Numbered lists: Easy as one, two, three
If you want to include a numbered list of items — it could be a Top Ten list, bowling league standings, steps to follow, or any kind of ranking — don’t bother adding in the numbers yourself. Instead, you can use a numbered list to make the web browser generate the numbers for you.
Like bulleted lists, numbered lists use two types of tags:
- The entire list is surrounded by the
<ol>and</ol>tags. The “ol” here is short for ordered list, because those HTML nerds just have to be different, don't they? - Each item in the list is surrounded by
<li>and</li>.
Here's the general structure to use:
<ol>
<li>First item</li>
<li>Second item</li>
<li>Third item</li>
<li>You got this…</li>
</ol>
I’ve indented the list items by four spaces to make it easier to see that they’re inside an <ol></ol> container. Here’s an example:
<h3>My Ten Favorite U.S. College Nicknames</h3>
<ol>
<li>U.C. Santa Cruz Banana Slugs</li>
<li>Delta State Fighting Okra</li>
<li>Kent State Golden Flashes</li>
<li>Evergreen State College Geoducks</li>
<li>New Mexico Tech Pygmies</li>
<li>South Carolina Fighting Gamecocks</li>
<li>Southern Illinois Salukis</li>
<li>Whittier Poets</li>
<li>Western Illinois Leathernecks</li>
<li>Delaware Fightin' Blue Hens</li>
</ol>
Notice that I didn’t include any numbers before each list item. However, when I display this document in a browser (see Figure 1-14), the numbers are automatically inserted. Pretty slick, huh?

FIGURE 1-14: When the web browser renders the ordered list, it’s kind enough to add the numbers for you automatically.
Inserting Special Characters
Earlier in this chapter, I talk briefly about a special <meta> tag that goes into the head section:
<meta charset="utf-8">
It might not look like it, but that tag adds a bit of magic to your web page. The voodoo is that now you can add special characters such as © and ™ directly to your web page text and the web browser will display them without complaint.
The trick is how you add these characters directly to your text, and that depends on your operating system. First, if you're using Windows, you have two choices:
- Hold down the Alt key and then press the character’s four-digit ASCII code using your keyboard’s numeric keypad. For example, you type an em dash (—) by pressing Alt+0151.
- Paste the character from the Character Map application that comes with Windows.
If you’re a Mac user, you also have two choices:
- Type the character’s special keyboard shortcut. For example, you type an em dash (—) by pressing Option+Shift+- (hyphen).
- Paste the character from the Symbols Viewer that comes with macOS.
Having said all of that, I should point out that there’s another way to add special characters to a page. The web wizards who created HTML came up with special codes called character entities (which is surely a name only a true geek would love) that represent these oddball symbols.
These codes come in two flavors: a character reference and an entity name. Character references are basically just numbers, and the entity names are friendlier symbols that describe the character you’re trying to display. For example, you can display the registered trademark symbol (™) by using either the ® character reference or the ® entity name, as shown here:
Print-On-Non-Demand®
or
Print-On-Non-Demand®
Note that both character references and entity names begin with an ampersand (&) and end with a semicolon (;). Don't forget either character when using special characters in your own pages.
One very common use of character references is for displaying HTML tags without the web browser rendering them as tags. To do this, replace the tag’s less-than sign (<) with < (or <) and the tag's greater-than sign (>) with > (or >).
Inserting Images
Whether you want to tell stories, give instructions, pontificate, or just plain rant about something, you can do all of that and more by adding text to your page. But to make it more interesting for your readers, add a bit of eye candy every now and then. To that end, there's an HTML tag you can use to add one or more images to your page.
However, before we get too far into this picture business, I should tell you that, unfortunately, you can’t use just any old image on a web page. Browsers are limited in the types of images they can display. There are, in fact, three main types of image formats you can use:
- GIF: The original web graphics format (it’s short for Graphics Interchange Format). GIF (it’s pronounced “giff” or “jiff”) is limited to 256 colors, so it’s best for simple images like line art, clip art, text, and so on. GIFs are also useful for creating simple animations.
- JPEG: Gets its name from the Joint Photographic Experts Group that invented it. JPEG (it’s pronounced “jay-peg”) supports complex images that have many millions of colors. The main advantage of JPEG files is that, given the same image, they’re smaller than GIFs, so they take less time to download. Careful, though: JPEG uses lossy compression, which means that it makes the image smaller by discarding redundant pixels. The greater the compression, the more pixels that are discarded, and the less sharp the image will appear. That said, if you have a photo or similarly complex image, JPEG is almost always the best choice because it gives the smallest file size.
- PNG: The Portable Network Graphics format supports millions of colors. PNG (and it’s pronounced “p-n-g” or “ping”) is a compressed format, but unlike JPEGs, PNGs use lossless compression. This means images retain sharpness, but the file sizes can get quite big. If you have an illustration or icon that uses solid colors, or a photo that contains large areas of near-solid color, PNG is a good choice. PNG also supports transparency.
Okay, enough of all that. Time to start squeezing some images onto your web page. As I mention earlier, there’s an HTML code that tells a browser to display an image. It’s the <img> tag, and here’s how it works:
<img src="filename" alt="description">
Here, src is short for source, filename is the name of the graphics file you want to display, and description is a short description of the image (which is read by screen readers and seen by browsers who aren't displaying images). Note that there’s no end tag to add here.
Look at an example. Suppose you have an image named logo.png. To add it to your page, you use the following line:
<img src="logo.png" alt="The Logophilia Ltd. company logo">
In effect, this tag says to the browser, “Excuse me? Would you be so kind as to go out and grab the image file named logo.png and insert it in the page right here where the <img> tag is?” Dutifully, the browser loads the image and displays it in the page.
For this simple example to work, bear in mind that your HTML file and your graphics file need to be sitting in the same directory. Many webmasters create a subdirectory just for images, which keeps things neat and tidy. If you plan on doing this, be sure you study my instructions for using directories and subdirectories in Book 1, Chapter 3.
Here's an example and Figure 1-15 shows how things appear in a web browser:
To see a World in a Grain of Sand<br>
And a Heaven in a Wild Flower
<img src="/images/macro-flower-and-ant.jpg" alt="Macro photo showing an ant exploring a flower">
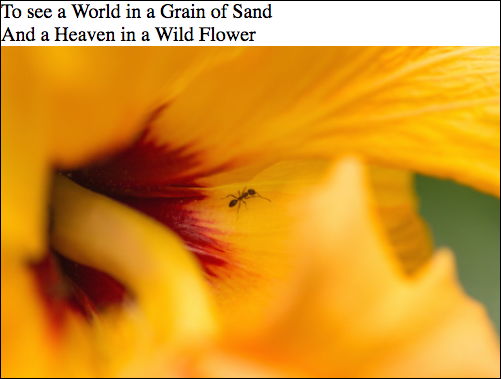
FIGURE 1-15: A web page with an image thrown in.
Carving Up the Page
Adding a bit of text, some links, and maybe a list or three to the body of the page is a good start, but any web page worth posting will require much more than that. For starters, all your web pages will require a high-level structure. Why? Well, think about the high-level structure of this book, which includes the front and back covers, the table of contents, an index, and eight mini-books, each of which contains several chapters, which, in turn consist of many sections and paragraphs within those sections. It’s all nice and neat and well-organized, if I do say so myself.
Now imagine, instead, that this entire book was just page after page of undifferentiated text: no mini-books, no chapters, no sections, no paragraphs, plus no table of contents or index. I’ve just described a book-reader’s worst nightmare, and I’m sure I couldn’t even pay you to read such a thing.
Your web pages will suffer from the same fate unless you add some structure to the body section, and for that you need to turn to HTML’s high-level structure tags.
The first thing to understand about these tags is that they’re designed to infuse meaning — that is, semantics — into your page structures. You’ll see what this means as I introduce each tag, but for now get a load of the abstract page shown in Figure 1-16.

FIGURE 1-16: An abstract view of HTML5’s semantic page structure tags.
I next discuss each of the tags shown in Figure 1-16.
The <header> tag
You use the <header> tag to create a page header, which is usually a strip across the top of the page that includes elements such as the site or page title and a logo. (Don’t confuse this with the page’s head section that appears between the <head> and </head> tags.)
Since the header almost always appears at the top of the page, the <header> tag is usually seen right after the <body> tag, as shown in the following example (and Figure 1-17):
<body>
<header>
<img src="iis-logo.png" alt="Isn't it Semantic? company logo">
<h1>Welcome to "Isn't it Semantic?"</h1>
<hr>
</header>
…
</body>
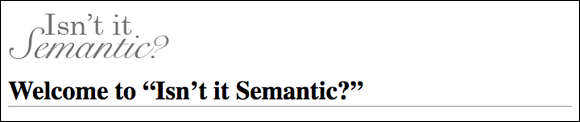
FIGURE 1-17: A page header with a logo, title, and horizontal rule.
The <nav> tag
The <nav> tag defines a page section that includes a few elements that help visitors navigate your site. These elements could be links to the main sections of the site, links to recently posted content, or a search feature. The <nav> section typically appears after the header, as shown here (and in Figure 1-18):
<body>
<header>
<img src="iis-logo.png" alt="Isn't it Semantic? company logo">
<h1>Welcome to "Isn't it Semantic?"</h1>
<hr>
</header>
<nav>
<a href="/">Home</a>
<a href="semantics.html">Semantics</a>
<a href="contact.html">Contact</a>
<a href="about.html">About</a>
</nav>
…
</body>
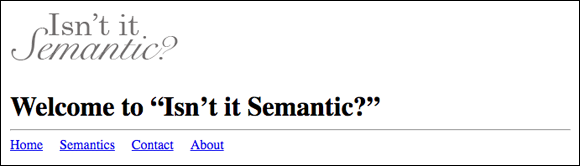
FIGURE 1-18: The <nav> section usually appears just after the <header> section.
The <main> tag
The <main> tag sets up a section to hold the content that is, in a sense, the point of the page. For example, if you're creating the page to tell everyone all that you know about Siamese Fighting Fish, then your Siamese Fighting Fish text, images, links, and so on would go into the <main> section.
The <main> section usually comes right after the <head> and <nav> sections:
<body>
<header>
…
</header>
<nav>
…
</nav>
<main>
Main content goes here
</main>
…
</body>
The <article> tag
You use the <article> tag to create a page section that contains a complete composition of some sort: a blog post, an essay, a poem, a review, a diatribe, or a jeremiad.
In most cases, you'll have a single <article> tag nested inside your page’s <main> section:
<body>
<header>
…
</header>
<nav>
…
</nav>
<main>
<article>
Article content goes here
</article>
</main>
…
</body>
However, it isn't a hard and fast rule that your page can have only one <article> tag. In fact, it isn’t a rule at all. If you want to have two compositions in your page — and thus two <article> sections within your <main> tag — be my guest.
The <section> tag
The <section> tag indicates a major part of page: usually a heading tag followed by some text. How do you know whether a chunk of the page is “major” or not? The easiest way is to imagine if your page had a table of contents. If you'd want a particular part of your page to be included in that table of contents, then it’s major enough to merit the <section> tag.
Most of the time, your <section> tags will appear within an <article> tag:
<main>
<article>
<section>
Section 1 heading goes here
Section 1 text goes here
</section>
<section>
Section 2 heading goes here
Section 2 text goes here
</section>
…
</article>
</main>
The <aside> tag
You use the <aside> tag to cordon off a bit of the page for content that, although important or relevant for the site as a whole, is at best tangentially related to the page's <main> content. The <aside> is often a sidebar that includes site news or links to recent content, but it might also include links to other site pages that are related to current page.
The <aside> element most often appears within the <main> area, but after the <article> content.
<body>
<header>
…
</header>
<nav>
…
</nav>
<main>
<article>
…
</article>
<aside>
…
</aside>
</main>
…
</body>
The <footer> tag
You use the <footer> tag to create a page footer, which is typically a strip across the bottom of the page that includes elements such as a copyright notice, contact info, and social media links.
Since the footer almost always appears at the bottom of the page, the <footer> tag is usually seen right before the </body> tag, as shown here:
<body>
<header>
…
</header>
<nav>
…
</nav>
<main>
<article>
…
</article>
<aside>
…
</aside>
</main>
<footer>
…
</footer>
</body>
Handling non-semantic content with <div>
The <header>, <nav>, <main>, <article>, <section>, <aside>, and <footer> elements create meaningful structures within your page, which is why HTML nerds call these semantic elements. Even the humble <p> tag that I introduced earlier in this chapter is semantic in that it represents a single paragraph, usually within a <section> element.
But what's a would-be web weaver to do when she wants to add a chunk of content that just doesn’t fit any of the standard semantic tags? That happens a lot, and the solution is to slap that content inside a <div> (for “division”) element. The <div> tag is a generic container that doesn't represent anything meaningful, so it’s the perfect place for any non-semantic stuff that needs a home:
<div>
Non-semantic content goes right here
</div>
Here’s an example:
<div>
Requisite social media links:
</div>
<div>
<a href="https://facebook.com/">Facebook</a>
<a href="https://twitter.com/">Twitter</a>
<a href="https://instagram.com/">Instagram</a>
<a href="http://www.hbo.com/silicon-valley">Hooli</a>
</div>
Notice in Figure 1-19 that the browser renders the two <div> elements on separate lines.

FIGURE 1-19: The browser renders each <div> section on a new line.
Handling words and characters with <span>
If you might want to do something with a small chunk of a larger piece of text, such as a phrase, a word, or even a character or three, then you need to turn to a so-called inline element, which creates a container that exists within some larger element and flows along with the rest of the content in that larger element.
The most common inline element to use is <span>, which creates a container around a bit of text:
<p>
Notice how an <span style="font-variant: small-caps">
inline element</span> flows right along with the
rest of the text.
</p>
What's happening here is that the <span> tag is applying a style called small caps to the text between <span> and </span> (inline element). As you can see in Figure 1-20, the <span> text flows along with the rest of the paragraph.

FIGURE 1-20: Using <span> makes the container flow with the surrounding text.