
Chapter 2
Building and Querying MySQL Databases
IN THIS CHAPTER
![]() Learning about MySQL and what it can do
Learning about MySQL and what it can do
![]() Building MySQL databases and tables
Building MySQL databases and tables
![]() Getting your head around SQL
Getting your head around SQL
![]() Selecting data with queries
Selecting data with queries
![]() Modifying data with queries
Modifying data with queries
MySQL is a fast and powerful, yet easy-to-use, database system that offers just about anything a website would need in order to find and serve up data to browsers.
— ROBIN NIXON
One of the central themes of this book is that today’s web is all about dynamic content. Sure, if you have (or your client has) just one or two web pages to show the world, then the standard front-end web development tools — HTML, CSS, and JavaScript — are more than enough to get the job done. However, it’s much more likely that a modern website will consist of dozens, perhaps even hundreds of pages, with new content getting added regularly. Believe me, as the developer and/or administrator of such a site, you don’t want to hand-code all those pages as static HTML and CSS. Life’s too short! Fortunately, you don’t have to hand-assemble all those pages if you get the back end of the web development world doing the hard work for you. The key is the database software that stores your site info on the server, and that’s what this chapter is all about. Here you discover the MySQL database program and learn all that it can do to help you build and maintain dynamic, robust, and fast websites of any size.
What Is MySQL?
In simplest terms, a database is a collection of information with some sort of underlying structure and organization. MySQL (pronounced “my ess-kew-ell,” or sometimes “my sequel”) is a database management system (DBMS) that runs on the server. This means that MySQL will not only store the data you want to use as the source for some (or perhaps even all) of the data you want to display on your web page, but it will also supply you with the means to manage this data (by sorting, searching, extracting, and so on).
The official description of MySQL is that it’s a relational database management system (RDBMS). The “relational” part means that you can set up relations between various parts of a database. For example, most businesses assign some sort of account number for each of their customers. So a database of customer information would include a column for this account number (as well as the name, address, credit limit, and so on). Similarly, you could also include the account number column in a collection of accounts receivable invoices (along with the invoice date, amount, and so on). This lets you relate each invoice to the appropriate customer information. (So, for example, you could easily look up phone numbers and call those deadbeat customers whose invoices are more than 90 days past due!)
MySQL is a massive piece of software that can do incredibly complicated things. Fortunately, as web developers we only need to use a small subset of MySQL’s features, and we don’t have to get into anything mind-blowingly complex. To get started on developing dynamic web pages, in fact, you only need to know about two pieces of the MySQL puzzle: tables and queries.
Tables: Containers for your data
In MySQL databases, you store your information in an object called a table. Tables are essentially a grid, where each vertical segment represents a column (a specific category of information) and each horizontal segment represents a row (a single record in the table).
Figure 2-1 shows a table of customer data. Notice how the table includes separate columns for each logical grouping of the data (company name, contact name, and so on).

FIGURE 2-1: In MySQL databases, tables store the raw data.
 In web development, you use MySQL tables to store the data that will appear in your pages. To get that data from the server to the web page requires five steps:
- On the web page, some JavaScript code launches a PHP script on the server.
- That PHP script asks a MySQL database for the data required by the web page.
- The PHP script configures the data into a format that JavaScript can understand.
- PHP sends the data back to the web page.
- The JavaScript code accepts the data and displays it on the page.
I go through these steps in glorious detail in Book 5, Chapter 3 and in Book 6, Chapter 1.
Queries: Asking questions of your data
By far the most common concern expressed by new database users (and many old-timers, as well) is how to extract the information they need from all that data. What if, for example, you have a database of accounts receivable invoices and your boss wants a web page that tells her how many invoices are more than 150 days past due? You can’t hand-code such a page because, for a large database, your page would be out of date before you were done. The better way would be to ask MySQL to do the work for you by creating another type of database object: a query. Queries are, literally, questions you ask of your data. In this case, you could ask MySQL to display a list of all invoices more than 150 days past due.
Queries let you extract from one or more tables a subset of the data. For example, in a table of customer names and addresses, what if I wanted to see a list of firms that are located in France? No problem. I’d just set up a query that asks, in effect, “Which rows have 'France' in the country column?” The answer to this question is shown in Figure 2-2.
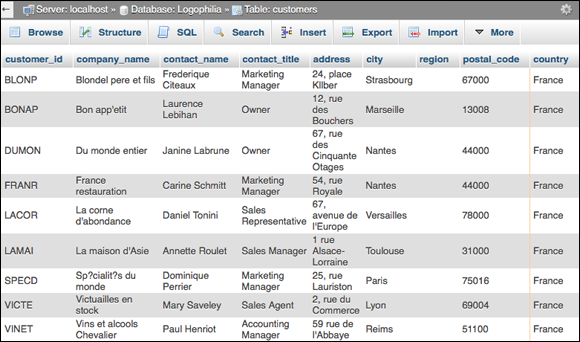
FIGURE 2-2: You use MySQL queries to extract a subset of the data from one or more tables.
The actual querying process is performed using a technology called Structured Query Language (or SQL, pronounced “ess-kew-ell”). In the five-step procedure I mention in the previous section, the SQL portion takes place in Step 2.
Introducing phpMyAdmin
To work with MySQL — whether it's creating a database, importing or exporting data, adding a table, inserting and editing data, or testing SQL statements to use in your PHP code — almost all web hosts offer a web application called phpMyAdmin. (It’s an odd name, I know: It means, more or less, “PHP-based MySQL Administration.”)
In the XAMPP web development environment that I discuss in Book 1, Chapter 2, you have two ways to get phpMyAdmin on the job (make sure you have the Apache web server running):
- Dashboard: From the XAMPP Dashboard page (
http://localhost/dashboard), click thephpMyAdminlink in the header. - Direct: Use a web browser to surf to
http://localhost/phpmyadmin.
Figure 2-3 shows the default phpMyAdmin page.

FIGURE 2-3: From the XAMPP Dashboard, click phpMyAdmin to open the phpMyAdmin web app.
The navigation pane on the left shows the default databases that come with phpMyAdmin (don't mess with these!), while the tabs across the top — Databases, SQL, and so on — take you to different parts of the application.
Importing data into MySQL
Before I talk about building a database from scratch, let me first go through the procedure for getting some existing data into MySQL. phpMyAdmin supports several import formats, but you’ll most likely want to use a comma-separated values (.csv) file, where the column data in each row is separated by commas. Another possibility is a SQL (.sql) file, which is a backup file for a MySQL database.
-
In phpMyAdmin, click the Import tab.
If you don't see the Import tab, click More, then click Import.
-
In the File to Import section, click Browse (Windows) or Choose File (Mac).
Your operating system’s file chooser dialog appears.
- Click the file that contains the data you want to import and then click Open (Windows) or Choose (Mac).
-
In the Format section, make sure the list shows the correct format for the file you chose.
If you’re importing a CSV file, the list should have CSV selected; if you’re importing a SQL backup file, the list should have SQL selected.
-
If you’re importing a CSV file, use the Format-Specific Options section to tell phpMyAdmin the structure of the file.
In particular, if the first line of your CSV file contains the column names of your data, then you need to select the check box labeled The First Line of the File Contains the Table Column Names.
-
Click Go.
phpMyAdmin imports the data.
If you imported a CSV file, you should see the message Import has been successfully finished and in the navigation pane you should see a new database named CSV_DB, as shown in Figure 2-4.

FIGURE 2-4: Importing a CSV file creates the CSV_DB database.
Here are the steps to follow to rename the database and the table that contains the imported data:
-
In the navigation pane, click CSV_DB.
phpMyAdmin opens the database. Notice that you now see a table named TBL_NAME. That’s the table that contains the imported CSV data. I show you how to rename it beginning with Step 6.
-
Click the Operations tab.
If you don’t see the Operations tab, click More, then click Operations.
- In the Rename Database To section, type the new database name in the text box provided.
-
Click Go.
phpMyAdmin asks you to confirm.
-
Click OK.
phpMyAdmin changes the database name.
- In the navigation pane, click TBL_NAME.
-
Click the Operations tab.
If you don’t see the Operations tab, click More, then click Operations.
- In the Table Options section, use the Rename Table To text box to type the new table.
-
Click Go.
phpMyAdmin changes the table name.
Backing up MySQL data
As you work with phpMyAdmin, you should run periodic backups to make sure your data is safe. Here are the steps to follow:
-
In phpMyAdmin, click the Export tab.
If you don’t see the Export tab, click More, then click Export.
- In the Format section, use the list to select SQL (although this is the default format).
-
Click Go.
phpMyAdmin exports the data, which your web browser then downloads to your computer.
Creating a MySQL Database and Its Tables
If you don’t import your data, then you need to create your own MySQL databases and populate them with the tables that will hold the actual data.
Creating a MySQL database
The first question you need to ask yourself is: Do I need just a single database or do I need multiple databases? As a web developer, you’ll almost always need multiple databases. Here’s why:
- You need a separate database for each website you build.
- You need a separate database for each web app you build.
- You need a separate database for each client you have.
If you’re just building a single website or app, and you have no clients, then one database is fine, but know that MySQL is ready and willing to accommodate almost any number of databases you care to throw at it.
Here are the steps to follow to create a database using phpMyAdmin:
- In the navigation pane, click New that appears at the top of the navigation tree.
- In the Create Database section, use the Database Name text box to type the name you want to use.
-
In the Collation list, select utf8_general_ci.
Collation refers to how MySQL compares characters (for example, when sorting data). In this case, you’re telling MySQL to use a standard, case-insensitive (for example,
aequalsA) collation on the UTF-8 character set. -
Click Create.
phpMyAdmin creates the database for you.
Designing your table
You need to plan your table design before you create it. By asking yourself a few questions in advance, you can save yourself the trouble of redesigning your table later. For simple tables, you need to ask yourself three basic questions:
- Does the table belong in the current database?
- What type of data should I store in each table?
- What columns should I use to store the data?
The next few sections examine these questions in more detail.
Does the table belong in the current database?
Each database you create should be set up for a specific purpose: a website, a web app, a client, and so on. Once you know the purpose of the database, you can then decide if the table you want to create fits in with the database theme.
For example, if the purpose of the database is to store a client's data, it would be inappropriate to include a table that stores your personal blog posts. Similarly, it wouldn’t make sense to include a table of a web app’s user accounts in a database that belongs to an entirely different website.
What type of data should I store in each table?
The most important step in creating a table is determining the information you want it to contain. In theory, MySQL tables can be quite large: up to 4,096 columns and many millions (even billions) of rows. In practice, however, you should strive to keep your tables as small as possible. This saves memory and makes managing the data easier. Ideally, you should aim to set up all your tables with only essential information.
Suppose you want to store user information in a database. You have to decide whether you want all your users in a single table, or whether it would be better to create separate tables for each type of user. For example, a table of customers would include detailed information such as each person’s first and last names, postal address, phone number, payment preference, and more. By contrast, a table of people who have opted-in to receive your newsletters might store each person’s email address, the newsletters she wants to receive, the subscription type (full or digest), and more. There’s not a lot of overlap between these two types of customers, so it probably makes sense to create two separate tables.
When you’ve decided on the tables you want to use, you then need to think about how much data you want to store in each table. In your customers table, for example, would you also want to include information on each person’s site customizations, account creation date, date of last visit, and product preferences? This might all be crucial information for you, but you need to remember that the more data you store, the longer it will take to query and sort the data.
What columns should I use to store the data?
Now you’re almost ready for action. The last thing you need to figure out is the specific columns to include in the database. For the most part, the columns are determined by the data itself. For example, a database of business contacts would certainly include columns for name, address, and phone number. But should you split the name into two columns — one for the first name and one for the last name? If you think you’ll need to sort the table by last name, then, yes, you probably should. What about the address? You’ll probably need individual columns for the city, state, and ZIP code.
Here are two general rules to follow when deciding how many columns to include in your tables:
- Ask yourself whether you really need the data for a particular column (or if you might need it in the near future). For example, if you think your table of contact names might someday be used to create form letters, a column to record titles (Ms., Mr., Dr., and so on) would come in handy. When in doubt, err on the side of too many columns rather than too few.
- Always split your data into the smallest columns that make sense. Splitting first and last names is common practice, but creating a separate column for, say, the phone number area code would probably be overkill.
Don’t sweat the design process too much. It’s easy to make changes down the road (by adding or deleting columns), so you’re never stuck with a bad design.
Deciding which column to use for a primary key
When you create a table, you need to decide which column to use as the primary key. The primary key is a column that uses a unique number or character sequence to identify each row in the table. Keys are used constantly in the real world. Your Social Security number is a key that identifies you in government records. Most machines and appliances have unique serial numbers. This book (like most books) has a 13-digit ISBN — International Standard Book Number (which you can see on the back cover).
Why are primary keys necessary? Well, for one thing, MySQL creates an index for the primary key column. You can perform searches on indexed data much more quickly than on regular data; therefore, many MySQL operations perform faster if a primary key is present. Keys also make it easy to find rows in a table because the key entries are unique (things such as last names and addresses can have multiple spellings, which makes them hard to find). Finally, once a table has a primary key, MySQL adds its data editing tools, which enable you to modify, copy, and delete table data.
You can configure the table so that MySQL sets and maintains the primary key for you, or you can do it yourself. Which one do you choose? Here are some guidelines:
- If your data contains a number or character sequence that uniquely defines each row, you can set the key yourself. For example, invoices usually have unique numbers that are perfect for a primary key. Other columns that can serve as primary keys are employee IDs, customer account numbers, and purchase order numbers.
- If your data has no such unique identifier, let MySQL create a key for you. This means that MySQL will set up an AUTO_INCREMENT column that will automatically assign a unique number to each row (the first row will be 1, the second 2, and so on).
Relating tables
MySQL is a relational database system, which means that you can establish relationships between multiple tables. As an example, suppose you have a database that contains (at least) two tables:
orders: This table holds data on orders placed by your customers, including the customer name, the date of the order, and so on. It also includes anorder_idcolumn as the primary key, as shown in Figure 2-5.order_details: This table holds data on the specific products that comprise each order: the product name, the unit price, the quantity ordered. It also includes anorder_idfield, as shown in Figure 2-6.
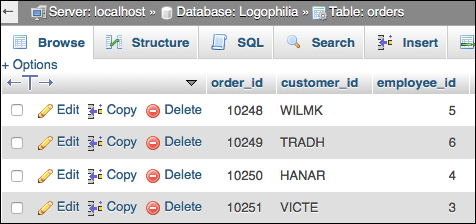
FIGURE 2-5: The orders table includes a column named order_id.

FIGURE 2-6: The order_details table also includes a column named order_id.
Why not lump both tables into a single table? Well, that would mean that, for each product ordered, you'd have to include the name of the customer, the order date, and so on. If the customer purchased ten different products, this information would be repeated ten times. To avoid such waste, the data is kept in separate tables, and the two tables are related on the common column called order_id.
For example, notice in Figure 2-5 that the first row in the orders table has an order_id value of 10248. Now check out Figure 2-6, where you see that the first three rows of the order_details table also have an order_id value of 10248. This means that when you join these tables on the related order_id field, MySQL combines the data, as shown in Figure 2-7. For example, notice that the first three rows still have an order_id value of 10248, but they now also include the customer_id column from the orders table.
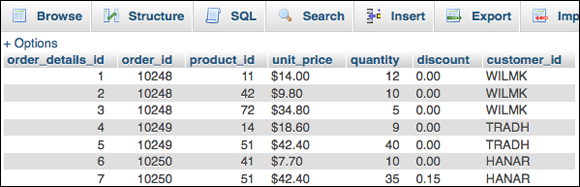
FIGURE 2-7: The order_details and orders tables joined on the common column named order_id.
Creating a MySQL table
Here are the steps to follow to create a table in a MySQL database:
- In the navigation pane, click the database in which you want to add the table.
-
In the Structure tab, use the Create Table section to type a name for the table, select the number of columns you want, and then click Go.
If you're not sure how many columns you need, just make your best guess for now. You can always add more later on.
- Type a name for the column.
-
In the Type list, select the data type you want to use for the data.
There’s a very long list of data types to wade through, but only a few make sense in most web projects:
INT: Stores an integer value between -2,147,483,648 and 2,147,483,648. For really small integer values, consider using eitherTINYINT(-128 to 127 or 0 to 255) orSMALLINT(-32,768 to 32,767 or 0 to 65,535).VARCHAR: Stores a variable-length string between 0 and 65,535 characters long. If you need to store super-long chunks of text, considerMEDIUMTEXT(up to 16,777,215 characters) instead.DATE: Stores a date and time value.
- If you selected
VARCHARin Step 4, you can use the Length/Values field to enter a maximum size for the column. -
Use the Default list to specify a default value that MySQL will enter automatically into the column when you create a new row.
If you want the current date and time in a
DATEcolumn, selectCURRENT_TIMESTAMP. Otherwise, selectAs Defined, then enter a value in the text box that appears. - In the Collation list, select
utf8_general_ci. -
To allow MySQL to enter no value into the column, select the Null check box.
If you leave Null deselected, then be sure you always specify a value for the column.
-
If you want MySQL to index the column, use the Index list to select the type of index you want.
In most cases you should choose the all-purpose
INDEXtype; if the column values are all different, select theUNIQUEtype; for a text-heavy field, select theFULLTEXTtype.Don't index every column. Instead, you only need to index those columns that you’ll be using for sorting and querying.
- Repeat Steps 3 through 9 until you’ve defined all your columns.
- Click Save.
Adding data to a table
Ideally, most of your table data will get inserted automatically, either by importing data or by having your page users fill in an HTML form (see Book 6, Chapters 2 and 3). If you do need to enter table data by hand, here’s how it’s done:
- In the navigation pane, click the table in which you want the data added.
-
Click the Insert tab.
phpMyAdmin displays empty text boxes for each column in the table. If you see two sets of text boxes, scroll down to the bottom of the Insert tab and change Continue Insertion with 2 Rows to Continue Insertion with 1 Row.
-
Use the Value fields to add a value for each column.
If a column accepts null values (that is, if the column’s Null check box is selected), then it’s okay to leave that column’s Value field blank.
- If you want to add multiple rows, use the two lists near the bottom of the page to select Insert as New Row and then Insert Another New Row.
- Click Go to insert the data.
Creating a primary key
When you import a table, MySQL doesn’t automatically create a primary key, so you need to follow these steps to create the primary key yourself:
- In the navigation pane, click the table you want to work with.
- Click the Structure tab.
-
Click the check box that appears to the left of the column you want to use as the primary key.
Make sure you select a column that contains only unique values.
-
Click Primary.
MySQL configures the column as the table’s primary key.
What happens if none of your table’s fields contain unique items? In that case, you need to create a column to use as the primary key. Here’s how:
- In the navigation pane, click the table you want to work with.
- Click the Structure tab.
- Leave the Add 1 Columns as is, but select At Beginning of Table in the list, then click Go.
-
Type a name for the primary key field.
If you’re not sure what name to use, something like
table_idwould work, wheretableis the name of the table. -
Select the A_I (AUTO_INCREMENT) check box.
MySQL displays the Add Index dialog.
- Leave the default settings as they are, and then click Go.
-
Click Save.
MySQL adds the field and automatically populates it with unique integer values.
Querying MySQL Data
It's all well and good having a bunch of data hunkered down in a MySQL database, but as a web developer, your real concern is getting that data from the server to the web page. That complete journey is the subject of both Book 5, Chapter 3 and Book 6, Chapter 1, but I’m going to tackle the first leg of the trip here and show you how to specify the data that will eventually get sent to the page. The technique I’m going to show you is called querying the data, and the tool of choice is Structured Query Language, or SQL.
What is SQL?
SQL is a collection of commands that interrogate or modify — query, in the SQL vernacular — MySQL data in some way. SQL is huge, but as a web developer you really only need to know about four query types:
- SELECT: Returns a subset of a table’s data
- INSERT: Adds a new row to a table
- UPDATE: Modifies a table’s existing data
- DELETE: Removes one or more rows from a table
In the case of the SELECT, UPDATE, and DELETE query types, you target the specific rows you want to work with by specifying criteria, which are extra parameters that define one or more conditions the rows must meet. For example, you might want to run a SELECT query that returns only those customers where the country column is equal to France. Similarly, you might want to run a DELETE query only on those items in the products table where the discontinued column has the value TRUE.
Creating a SELECT query
The most common type of query is the SELECT query that returns rows from one or more tables based on the columns you choose and the criteria you apply to those columns. It's called a SELECT query not only because you use it to select certain rows, but also because it's based on the SQL language's SELECT statement. SELECT is the SQL “verb” that you'll see and work with most often, and it’s used to create a subset based on the table, columns, criteria, and other clauses specified in the statement. Here’s a simplified syntax for the SELECT verb:
SELECT select_columns
FROM table_name
WHERE criteria
ORDER BY sort_columns [DESC]
SELECTselect_columns: Specifies the names of the columns you want in your subset. If you want all the columns, use*instead.FROMtable_name: The name of table that contains the data.WHEREcriteria: Filters the data to give you only those rows that match the specifiedcriteria.ORDER BYsort_columns: Sorts the results in ascending order based on the data in the columns specified bysort_columns(separated by commas, if you have more than one). Use the optionalDESCkeyword to sort the rows in descending order.
The most basic SELECT query is one that returns all the rows from a table. For example, the following SELECT statement returns all the rows from the customers table:
SELECT *
FROM customers
In the following example, only the company_name, city, and country columns are returned in the results:
SELECT company_name, city, country
FROM customers
Here's another example that sorts the rows based on the values in the company_name column:
SELECT *
FROM customers
ORDER BY company_name
Understanding query criteria
The heart of any query is its criteria. They are a set of expressions that determine the rows that are included in the query results. All query expressions have the same general structure. They contain one or more operands — which can be literal values (such as 123 or "USA" or 2018-08-23), identifiers (names of MySQL objects, such as tables), or functions — separated by one or more operators — the symbols that combine the operands in some way, such as the plus sign (+) and the greater than sign (>).
Most criteria expressions are logical formulas that, when applied to each row in the table, return TRUE or FALSE. The subset contains only those rows for which the expression returns TRUE.
Comparison operators
You use comparison operators to compare field values to a literal, a function result, or to a value in another field. Table 2-1 lists MySQL's comparison operators.
TABLE 2-1 Comparison Operators for Criteria Expressions
|
Operator |
General Form |
Matches Rows Where … |
|
|
|
The column value is equal to |
|
|
|
The column value is not equal to |
|
|
|
The column value is greater than |
|
|
|
The column value is greater than or equal to |
|
|
|
The column value is less than |
|
|
|
The column value is less than or equal to |
For example, suppose you have a products table with a units_in_stock column. If you want a SELECT query to return just those products that are out of stock, you'd use the following SQL statement:
SELECT *
FROM products
WHERE units_in_stock = 0
The LIKE operator
If you need to allow for multiple spellings in a text column, or if you’re not sure how to spell a word you want to use, the wildcard characters can help. There are two wildcards: the underscore (_) substitutes for a single character, and the percent sign (%) substitutes for a group of characters. You use them in combination with the LIKE operator, as shown in Table 2-3.
TABLE 2-3 The LIKE Operator for Criteria Expressions
|
Example |
Matches Rows Where … |
|
|
The column value is |
|
|
The column value is |
|
|
The column value begins with |
|
|
The column value contains the word |
|
|
The column value is any date in December 2017. |
The BETWEEN…AND operator
If you need to select rows where a column value lies between two other values, use the BETWEEN…AND operator. For example, suppose you want to see all the rows in the order_details table where the quantity value is between (and includes) 50 and 100. Here's a SELECT statement that does the job:
SELECT *
FROM order_details
WHERE quantity BETWEEN 50 AND 100
You can use this operator for numbers, dates, and even text.
The IN operator
You use the IN operator to match rows where the specified column value is one of a set of values. For example, suppose you want to return a subset of the customers table that contains only those rows where the region column equals NY, CA, TX, IN, or ME. Here's the SELECT statement to use:
SELECT *
FROM customers
WHERE region IN('NY','CA','TX','IN','ME')
The IS NULL operator
What do you do if you want to select rows where a certain column is empty? For example, a table of invoices might have a date_paid column where, if this column is empty, it means the invoice hasn't been paid yet. For these challenges, MySQL provides the IS NULL operator. Applying this operator to a column selects only those rows whereby the column is empty. Here’s an example:
SELECT *
FROM invoices
WHERE date_paid IS NULL
To select rows when a particular column is not empty, use the IS NOT NULL operator.
Compound criteria and the logical operators
For many criteria, a single expression just doesn't do the job. For more sophisticated needs, you can set up compound criteria where you enter either multiple expressions for the same column or multiple expressions for different columns. You use the logical operators to combine or modify expressions. Table 2-4 summarizes MySQL’s logical operators.
TABLE 2-4 Logical Operators for Criteria Expressions
|
Operator |
General Form |
Matches Rows When … |
|
|
|
Both |
|
|
|
At least one of |
|
|
|
|
|
|
|
Only one of |
The AND and OR operators let you create compound criteria using a single expression. For example, suppose you want to match all the rows in your products table where the units_in_stock column is either 0 or greater than or equal to 100. The following SELECT statement does the job:
SELECT *
FROM products
WHERE units_in_stock = 0 OR units_in_stock >= 100
The NOT operator looks for rows that don't match a particular logical expression. In a table of customer data, for example, if you want to find all non-North American customers, you filter out the customers using the country column, like so:
SELECT *
FROM customers
WHERE NOT country = 'USA' AND
NOT country = 'Canada' AND
NOT country 'Mexico'
Querying multiple tables
Although most of your MySQL queries will use just a single table, some of the most useful and powerful queries involve two (or more) tables. The type of multiple-table query you’ll see and use most often is called an inner join because it joins two tables based on a common column.
To create an inner join on two tables, use the following version of the FROM clause:
FROM table1
INNER JOIN table2
ON table1.column = table2.column
Here, table1 and table2 are the names of the two tables you want to join, and table1.column and table2.column are the common columns in each table. Note that the column names don't have to be the same.
For example, suppose you have two tables: orders and order_details, and they each have a column named order_id that stores a value that is unique for each order. The following SELECT statement sets up an inner join on these tables:
SELECT *
FROM orders
INNER JOIN order_details
ON orders.order_id = order_details.order_id
If you only want certain columns from both tables in the results, specify the column names after the SELECT command using the table.column syntax, as in this example:
SELECT orders.order_id, orders.customer_id, order_details.quantity
FROM orders
INNER JOIN order_details
ON orders.order_id = order_details.order_id
Adding table data with an INSERT query
An INSERT query adds a new row to an existing table. In MySQL, you build an INSERT query using the INSERT verb:
INSERT
INTO table (columns)
VALUES (values)
table: The name of the table into which you want the row appended.columns: A comma-separated list of column names fromtable. The values you specify will be added to these columns.values: A comma-separated list of values that you want to add. The order of these values must correspond with the order of the column names in thecolumnsparameter.
For example, suppose we have a table named categories that includes three fields: category_id, category_name, and description. First, assume that category_id is the table's primary key and its value is generated automatically by an AUTO_INCREMENT function, which means you can ignore it when building your INSERT query. Therefore, you can use the following SQL statement to add a new row:
INSERT
INTO categories (category_name, description)
VALUES ('Breads', 'Multi-grain, rye, and other deliciousness')
Modifying table data with an UPDATE query
An UPDATE query modifies the values in one or more columns and optionally restricts the scope of the updating to those rows that satisfy some criteria. In MySQL, you build an UPDATE query by using the UPDATE verb to construct a statement with the following syntax:
UPDATE table
SET column1=value1,column2=value2,…
WHERE criteria
table: The table that contains the data you want to updatecolumn1=value1,column2=value2, etc.: The new values you want to assign to the specified columnscriteria: The criteria that define which rows will be updated
For example, suppose you have products table and want to increase the values in the unit_price column by 5 percent for the Beverages category (category_id = 1). This is the same as multiplying the current unit_price values by 1.05, so the UPDATE statement looks like this:
UPDATE products
SET unit_price = unit_price*1.05
WHERE CategoryID = 1
Removing table data with a DELETE query
A DELETE query removes rows from a table and optionally restricts the scope of the deletion to those rows that satisfy some criteria. If you don't include criteria, MySQL deletes every row in the specified table.
In MySQL, you build a delete query by using the DELETE verb to construct a statement with the following syntax:
DELETE
FROM table
WHERE criteria
table: The table that contains the rows you want to deletecriteria: The criteria that defines which rows will be deleted
For example, if you want to delete those rows in the products table where the supplier_id value is 1, you use the following SQL statement:
DELETE
FROM products
WHERE supplier_id = 1