Chapter 7
Working with Arrays
IN THIS CHAPTER
![]() Learning what arrays can do for you
Learning what arrays can do for you
![]() Declaring an array variable
Declaring an array variable
![]() Populating an array with data
Populating an array with data
![]() Trying out multidimensional arrays
Trying out multidimensional arrays
![]() Working with JavaScript’s Array object
Working with JavaScript’s Array object
I choose a lazy person to do a hard job. Because a lazy person will find an easy way to do it.
— BILL GATES
In this chapter, you discover one of JavaScript’s most important concepts: the array. Arrays are important not only because they’re extremely powerful, but because once you know how to use them, you’ll think of a thousand and one uses for them. To make sure you’re ready for your new array-filled life, this chapter explains what they are and why they’re so darn useful, and then explores all the fantastic ways that arrays can make your coding life easier.
What Is an Array?
I talk quite a bit about efficient programming in this book because I believe (okay, I know) that efficient scripts run faster and take less time to program and debug. As I’ve said, efficiency in programming really means eliminating unnecessary repetition, whether it’s consolidating statements into a loop that can be repeated as often as required, or moving code into a function that can be called as often as you need.
Another source of unnecessary repetition involves variables. For example, consider the following declarations:
var dog1 = "dog-1";
var dog2 = "dog-2";
var dog3 = "dog-3";
var dog4 = "dog-4";
var dog5 = "dog-5";
These are string variables and they store the names of some dog photos. Now suppose you want to write a script that asks the user for a dog number and then displays the corresponding photo as the page background. The following code shows such a script:
var dog1 = "dog-1";
var dog2 = "dog-2";
var dog3 = "dog-3";
var dog4 = "dog-4";
var dog5 = "dog-5";
var promptNum = prompt("Enter the dog you want to see (1-5):", "");
if (promptNum !== "" && promptNum !== null) {
var promptDog = "dog-" + promptNum;
if (promptDog === dog1) {
document.body.style.backgroundImage = "url('/images/" + dog1 + ".png')";
} else if (promptDog === dog2) {
document.body.style.backgroundImage = "url('/images/" + dog2 + ".png')";
} else if (promptDog === dog3) {
document.body.style.backgroundImage = "url('/images/" + dog3 + ".png')";
} else if (promptDog === dog4) {
document.body.style.backgroundImage = "url('/images/" + dog4 + ".png')";
} else if (promptDog === dog5) {
document.body.style.backgroundImage = "url('/images/" + dog5 + ".png')";
}
}
After declaring and initializing the variables, the script uses prompt() to get a number between 1 and 5, which is stored in the promptNum variable. An if() test ensures that promptNum isn't the empty string (no value entered) or null (Cancel was clicked). The code then adds the number to the string dog-, which is then stored in the promptDog variable.
Now the code runs through five separate if() tests, each of which checks to see if promptDog is equal to one of the variables. If a match is found, the document.body.style.backgroundImage property is set to the URL of the image.
This might not seem outrageously inefficient, but what if instead of five images you actually had to take 10 or 20 or even 100 images into account? I'm sure the idea of typing 100 if() tests isn’t your idea of a good time.
To understand the solution to this problem, first understand that the variables dog1 through dog5 all contain related values. That is, each variable holds part of the filename of a dog photo, which in turn is part of the full URL for that image. In JavaScript (or, indeed, in just about any programming language), whenever you have a collection of variables with related data, it's possible to group them together into a single variable called an array. You can enter as many values as you want into the array, and JavaScript tracks each value by the use of an index number. For example, the first value you add is given the index 0. (For obscure reasons, programmers since time immemorial have started numerical lists with 0 instead of 1.) The second value you put into the array is given the index 1, the third value gets 2, and so on. You can then access any value in the array by specifying the index number you want.
The next couple of sections flesh out this theory with the specifics of creating and populating an array, and then you’ll see how to rewrite a much more efficient version of the above code using arrays.
Declaring an Array
Because an array is a type of variable, you need to declare it before using it. In fact, unlike regular numeric, string, or Boolean variables that don’t really need to be declared (but always should be), JavaScript insists that you declare an array in advance. You use the var statement again, but this time with a slightly different syntax. Actually, there are four syntaxes you can use. Let’s start with the simplest:
var arrayName = new Array();
Here, arrayName is the name you want to use for the array variable.
In JavaScript, an array is actually an object, so what the new keyword is doing here is creating a new Array object. The Array() part of the statement is called a constructor because its job is to construct the object in memory. For example, to create a new array named dogPhotos, you'd use the following statement:
var dogPhotos = new Array();
The second syntax is useful if you know in advance the number of values (or elements) you’ll be putting into the array:
var arrayName = new Array(num);
arrayName: The name you want to use for the array variablenum: The number of values you'll be placing into the array
For example, here’s a statement that declares a new dogPhotos array with 5 elements:
var dogPhotos = new Array(5);
If you’re not sure how many elements you need, don’t worry about it because JavaScript is happy to let you add elements to and delete elements from the array as needed, and it will grow or shrink the array to compensate. I talk about the other two array declaration syntaxes in the next section.
Populating an Array with Data
Once your array is declared, you can start populating it with the data values you want to store. Here’s the general syntax for doing this:
arrayName[index] = value;
arrayName: The name of the array variableindex: The array index number where you want the value storedvalue: The value you're storing in the array
JavaScript is willing to put just about any type of data inside an array, including numbers, strings, Boolean values, and even other arrays! You can even mix multiple data types within a single array.
As an example, here are a few statements that declare a new array named dogPhotos and then enter five string values into the array:
var dogPhotos = new Array(5);
dogPhotos[0] = "dog-1";
dogPhotos[1] = "dog-2";
dogPhotos[2] = "dog-3";
dogPhotos[3] = "dog-4";
dogPhotos[4] = "dog-5";
To reference an array value (say, to use it within an expression), you specify the appropriate index:
strURL + dogPhotos[3]
The following code offers a complete example:
HTML:
<div id="output">
</div>
JavaScript:
// Declare the array
var dogPhotos = new Array(5);
// Initialize the array values
dogPhotos[0] = "dog-1";
dogPhotos[1] = "dog-2";
dogPhotos[2] = "dog-3";
dogPhotos[3] = "dog-4";
dogPhotos[4] = "dog-5";
// Display an example
document.getElementById('output').innerHTML = '/images/' + dogPhotos[0] + '.png';
Declaring and populating an array at the same time
Earlier I mention that JavaScript has two other syntaxes for declaring an array. Both enable you to declare an array and populate it with values by using just a single statement.
The first method uses the Array() constructor in the following general format:
var arrayName = new Array(value1, value2, …);
arrayName: The name you want to use for the array variablevalue1,value2, …: The initial values with which you want to populate the array
Here's an example:
var dogPhotos = new Array("dog-1", "dog-2", "dog-3", "dog-4", "dog-5");
JavaScript also supports the creation of array literals, which are similar to string, numeric, and Boolean literals. In the same way that you create, say, a string literal by enclosing a value in quotation marks, you create an array literal by enclosing one or more values in square brackets. Here’s the general format:
var arrayName = [value1, value2, …];
arrayName: The name you want to use for the array variablevalue1,value2, …: The initial values with which you want to populate the array
An example:
var dogPhotos= ["dog-1", "dog-2", "dog-3", "dog-4", "dog-5"];
Using a loop to populate an array
So far, you probably don't think arrays are all that much more efficient than using separate variables. That’s because you haven’t yet learned about the single most powerful aspect of working with arrays: using a loop and some kind of counter variable to access an array’s index number programmatically.
For example, here’s a for() loop that replaces the six statements I used earlier to declare and initialize the dogPhotos array:
var dogPhotos = new Array(5);
for (var counter = 0; counter < 5; counter++) {
dogPhotos[counter] = "dog-" + (counter + 1);
}
The statement inside the for() loop uses the variable counter as the array's index. For example, when counter is 0, the statement looks like this:
dogPhotos[0] = "dog-" + (0 + 1);
In this case, the expression to the right of the equals sign evaluates to "dog-1", which is the correct value. The following code shows this loop technique at work:
HTML:
<div id="output">
</div>
JavaScript:
// Declare the array
var dogPhotos = new Array(5);
// Initialize the array values using a loop
for (var counter = 0; counter < 5; counter++) {
dogPhotos[counter] = "dog-" + (counter + 1);
}
// Display an example
document.getElementById('output').innerHTML = '/images/' + dogPhotos[0] + '.png';
Using a loop to insert data into an array works best in two situations:
- When the array values can be generated using an expression that changes with each pass through the loop
- When you need to assign the same value to each element of the array
 If you declare your array with a specific number of elements, JavaScript doesn't mind at all if you end up populating the array with more than that number.
Using a loop to work with array data
The real problem with using a large number of similar variables isn’t so much declaring them, but working with them in your code. In this chapter’s original code example, the script had to use five separate if() tests to check the input value against all five variables.
Arrays can really help make your code more efficient by enabling you to reduce these kinds of long-winded checking procedures to a much shorter routine that fits inside a loop. As with populating the array, you use the loop counter or some other expression to generate new array values to work with.
For example, here’s a for() loop that replaces all those if() tests from the earlier script:
for (var counter = 0; counter < 5; counter++) {
if (promptDog === dogPhotos[counter]) {
document.body.style.backgroundImage = "url('/images/" + dogPhotos[counter] + ".png')";
break;
}
}
Each time through the loop, a new array value is generated by dogPhotos[counter], and this value is compared with promptDog. If a match is found, dogPhotos[counter] is used in an expression to generate the new backgroundImage property, and then break takes the code out of the loop.
Putting it all together, the following code presents the full and very efficient replacement for the earlier script:
// Declare the array
var dogPhotos = new Array(5);
// Initialize the array values using a loop
for (var counter = 0; counter < 5; counter++) {
dogPhotos[counter] = "dog-" + (counter + 1);
}
// Get the photo number
var promptNum = prompt("Enter the dog you want to see (1-5):", "");
if (promptNum !== "" && promptNum !== null) {
// Construct the primary part of the filename
var promptDog = "dog-" + promptNum;
// Work with the array values using a loop
for (counter = 0; counter < 5; counter++) {
if (promptDog === dogPhotos[counter] {
document.body.style.backgroundImage = "url('/images/" + dogPhotos[counter] + ".png')";
break;
}
}
}
Creating Multidimensional Arrays
A multidimensional array is one where two or more values are stored within each array element. For example, if you wanted to create an array to store user data, you might need each element to store a first name, a last name, a user name, a password, and more. The bad news is that JavaScript doesn't support multidimensional arrays. The good news is that it’s possible to use a trick to simulate a multidimensional array.
The trick is to populate your array in such a way that each element is itself an array. To see how such an odd idea might work, first recall the general syntax for an array literal:
[value1, value2, …]
Now recall the general syntax for assigning a value to an array element:
arrayName[index] = value;
In a one-dimensional array, the value is usually a string, number, or Boolean. Now imagine, instead, that value is an array literal. For a two-dimensional array, the general syntax for assigning an array literal to an array element looks like this:
arrayName[index] = [value1, value2];
As an example, say you want to store an array of background and foreground colors. Here's how you might declare and populate such an array:
var colorArray = new Array(3);
colorArray[0] = ['white', 'black'];
colorArray[1] = ['aliceblue', 'midnightblue'];
colorArray[2] = ['honeydew', 'darkgreen'];
Alternatively, you can declare and populate the array using only the array literal notation:
var colorArray = [['white', 'black'], ['aliceblue', 'midnightblue'], ['honeydew', 'darkgreen']];
Either way, you can then refer to individual elements using double square brackets, as in these examples:
colorArray[0][0]; // Returns 'white'
colorArray[0][1]; // Returns 'black'
colorArray[1][0]; // Returns 'aliceblue'
colorArray[1][1]; // Returns 'midnightblue'
colorArray[2][0]; // Returns 'honeydew'
colorArray[2][1]; // Returns 'darkgreen'
The number in the left set of square brackets is the index of the overall array, and the number in the right set of square brackets is the index of the element array.
Using the Array Object
In JavaScript, an array is actually an object. That’s what the Array() constructor does: It creates a new object based on the arguments (if any) that you supply within the parentheses. So, like any good object, Array comes with a collection of properties and methods that you can work with and manipulate. The rest of this chapter takes a look at these properties and methods.
The length property
The Array object has just a couple of properties, but the only one of these that you'll use frequently is the length property:
array.length
The length property returns the number of elements that are currently in the specified array. This is very useful when looping through an array because it means you don't have to specify a literal as the maximum value of the loop counter. For example, consider the following for() statement:
for (var counter = 0; counter < 5; counter++) {
dogPhotos[counter] = "dog-" + (counter + 1);
}
This statement assumes the dogPhotos array has five elements, which might not be the case. To enable the loop to work with any number of elements, replace 5 with dogPhotos.length:
for (var counter = 0; counter < dogPhotos.length; counter++)
dogPhotos[counter] = "dog-" + (counter + 1);
}
Note, too, that the loop runs while the counter variable is less than dogPhotos.length. That's because array indexes run from 0 to the array’s length value minus 1. In other words, the previous for() loop example is equivalent to the following:
for (var counter = 0; counter <= dogPhotos.length - 1; counter++)
Concatenating to create a new array: concat()
The concat() method takes the elements of an existing array and concatenates one or more specified values onto the end to create a new array:
array.concat(value1, value2, …)
array: The name of the array you want to work with.value1,value2, …: The values you want to concatenate toarray. This can also be another array.
Note that the original array remains unchanged. The following code demonstrates using concat() to concatenate two arrays into a third array, each element of which is printed to the page, as shown in Figure 7-1.

FIGURE 7-1: Concatenating array1 and array2 produces array3 with the values shown here.
HTML:
<div id="output">
</div>
JavaScript:
var array1 = new Array("One", "Two", "Three");
var array2 = new Array("A", "B", "C");
var array3 = array1.concat(array2);
var str = "";
for (var counter = 0; counter < array3.length; counter++) {
str += array3[counter] + "<br>";
}
document.getElementById("output").innerHTML = str;
Creating a string from an array's elements: join()
The join() method enables you to take the existing values in an array and concatenate them together to form a string. Check out the syntax:
array.join(separator)
array: The name of the array you want to work with.separator: An optional character or string to insert between each array element when forming the string. If you omit this argument, a comma is inserted between each element.
In the following code, three arrays are created and then join() is applied to each one using a space as a separator, then the null string (""), and then no separator. Figure 7-2 shows the resulting page output.

FIGURE 7-2: Joining the arrays with a space, null string (""), and default comma.
HTML:
<div id="output">
</div>
JavaScript:
var array1 = new Array("Make", "this", "a", "sentence.");
var array2 = new Array("antid", "isest", "ablis", "hment", "arian", "ism");
var array3 = new Array("John", "Paul", "George", "Ringo");
var string1 = array1.join(" ");
var string2 = array2.join("");
var string3 = array3.join();
document.getElementById('output').innerHTML = string1 + '<br>' + string2 + '<br>' + string3;
The Array object's toString() method performs a similar function to the join() method. Using array.toString() takes the values in array, converts them all to strings, and then concatenates them into a single, comma-separated string. In other words, array.toString() is identical to array.join(","), or just array.join().
Removing an array's last element: pop()
The pop() method removes the last element from an array and returns the value of that element. Here’s the syntax:
array.pop()
For example, consider the following statements:
var myArray = new Array("First", "Second", "Third");
var myString = myArray.pop();
The last element of myArray is "Third", so myArray.pop() removes that value from the array and stores it in the myString variable.
After you run the pop() method, JavaScript reduces the value of the array's length property by one.
Adding elements to the end of an array: push()
The push() method is the opposite of pop(): It adds one or more elements to the end of an array. Here's the syntax to use:
array.push(value1, value2, …)
array: The name of the array you want to work with.value1,value2, …: The values you want to add to the end ofarray. This can also be another array.
push() differs from the concat() method in that it doesn't return a new array. Instead, it changes the existing array by adding the new values to the end of the array. For example, consider the following statements:
var myArray = new Array("First", "Second", "Third");
var pushArray = new Array("Fourth", "Fifth", "Sixth");
for (var i = 0; i < pushArray.length; i++) {
myArray.push(pushArray[i]);
}
After these statements, myArray contains six values: "First", "Second", "Third", "Fourth", "Fifth", and "Sixth". Why didn't I just add the entire pushArray in one fell swoop? That is, like so:
myArray.push(pushArray);
That’s perfectly legal, but it would mean myArray would contain the following four elements: "First", "Second", "Third", and pushArray, which means you've created a kind of hybrid multidimensional array, which is probably not what you want in this situation.
After you run the push() method, JavaScript increases the value of the array’s length property by the number of new elements added.
Reversing the order of an array's elements: reverse()
The reverse() method takes the existing elements in an array and reverses their order: The first moves to the last, the last moves to the first, and so on. The syntax takes just a second to show:
array.reverse()
The following code puts the reverse() method to work, and Figure 7-3 shows what happens.
var myArray = new Array("Show", "Place", "Win");
myArray.reverse();
var str = "";
for (var counter = 0; counter < myArray.length; counter++) {
str += myArray[counter] + "<br>";
}
document.getElementById("output").innerHTML = str;

FIGURE 7-3: Use the reverse() method to reverse the order of elements in an array.
Removing an array's first element: shift()
The shift() method removes the first element from an array and returns the value of that element:
array.shift()
For example, consider the following statements:
var myArray = new Array("First", "Second", "Third");
var myString = myArray.shift();
The first element of myArray is "First", so myArray.shift() removes that value from the array and stores it in the myString variable.
After you run the shift() method, JavaScript reduces the value of the array's length property by one.
Returning a subset of an array: slice()
The slice() method returns a new array that contains a subset of the elements in an existing array. Take a look at the syntax:
array.slice(start, end);
array: The name of the array you want to work with.start: A number that specifies the index of the first element inarraythat you want to include in the subset. If this number is negative, the subset starting point is counted from the end ofarray(for example, -1 is the last element of the array).end: An optional number that specifies the index of the element inarraybefore which you want the subset to end. If you leave out this value, the subset includes all the elements inarrayfromstartto the last element. This value can be negative.
 If you use a negative number for the
 start value, the end value must also be negative, but it must be larger than start. For example, if you use -4 for start, then end can only be -1, -2, or -3.
The following code defines an array and then tries out various values for the slice() arguments. The results are shown in Figure 7-4.
var myArray = new Array("A", "B", "C", "D", "E", "F");
var array1 = myArray.slice(0, 4);
var array2 = myArray.slice(3);
var array3 = myArray.slice(-3, -1);
var str = "array1: " + array1 + "<br>";
str += "array2: " + array2 + "<br>";
str += "array3: " + array3;
document.getElementById('output').innerHTML = str;

FIGURE 7-4: The slice() method creates a new array from a subset of another array.
Ordering array elements: sort()
The sort() method is an easy way to handle a common programming problem: rearranging an array's elements to put them in alphabetical, numerical, or some other order. Here’s the syntax:
array.sort(function)
array: The name of the array you want to work with.function: An optional name of a function that specifies the sort order. If you leave out this argument, the elements ofarrayare sorted alphabetically.
Using sort() without an argument gives you a straightforward alphabetical sort:
myArray.sort();
If you want to sort the array based on some other criterion, then you need to create a function to define the sort order. Your function must be set up as follows:
- The function must accept two arguments. For the purposes of this list, I'll call these arguments
aandb. - Using these arguments, the function must define an expression that returns a numeric value.
- For those cases where you want
asorted beforeb, the function must return a negative value. - For those cases where you want
asorted afterb, the function must return a positive value. - For those cases where you want
aandbto be treated equally, the function must return zero.
The following code shows a function named numericSort that you can use if you want a numeric sort from lowest to highest. Figure 7-5 displays the original array and then the sorted array.
// This function sorts numbers from lowest to highest
function numericSort(a, b) {
return (a - b);
}
var myArray = [3, 5, 1, 6, 2, 4];
// Write the array before sorting it
var str = "myArray (before sorting): " + myArray + "<br>";
// Sort the array
myArray.sort(numericSort);
// Write the array after sorting it
str+= "myArray (after sorting): " + myArray;
document.getElementById('output').innerHTML = str;

FIGURE 7-5: Using sort() and a function to sort items numerically from lowest to highest.
 To get a numeric sort from highest to lowest, use the following
 return expression, instead:
return (b - a);
What if you want a reverse alphabetical sort? Here's a function that will do it:
function reverseAlphaSort(a, b) {
if (a > b) {
return -1
}
else if (a < b) {
return 1
}
else {
return 0
}
}
Removing, replacing, and inserting elements: splice()
The splice() method is a complex function that comes in handy in all kinds of situations. First, here’s the syntax:
array.splice(start, elementsToDelete, value1, value2, …)
array: The name of the array you want to work with.start: A number that specifies the index of the element where the splice takes place.elementsToDelete: An optional number that specifies how many elements to delete fromarraybeginning at thestartposition. If you don't include this argument, elements are deleted fromstartto the end of the array.value1,value2, …: Optional values to insert intoarraybeginning at thestartposition.
With splice() at your side, you can perform one or more of the following tasks:
- Deletion: If
elementsToDeleteis greater than zero or unspecified and no insertion values are included,splice()deletes elements beginning at the indexstart. The deleted elements are returned in a separate array. - Replacement: If
elementsToDeleteis greater than zero or unspecified and one or more insertion values are included,splice()first deletes elements beginning at the indexstart. It then inserts the specified values before the element with indexstart. - Insertion: If
elementsToDeleteis0,splice()inserts the specified values before the element with indexstart.
The following code demonstrates all three tasks, and the results are shown in Figure 7-6.
var array1 = new Array("A", "B", "C", "D", "E", "F");
var array2 = new Array("A", "B", "C", "D", "E", "F");
var array3 = new Array("A", "B", "C", "D", "E", "F");
// DELETION
// In array1, start at index 2 and delete to the end
// Return the deleted elements to the delete1 array
var delete1 = array1.splice(2);
// Write array1
var str = "array1: " + array1 + "<br>";
// Write delete1
str += "delete1: " + delete1 + "<br>";
// REPLACEMENT
// In array2, start at index 3 and delete 2 elements
// Insert 2 elements to replace them
// Return the deleted elements to the delete2 array
var delete2 = array2.splice(3, 2, "d", "e");
// Write array2
str += "array2: " + array2 + "<br>";
// Write delete2
str += "delete2: " + delete2 + "<br>";
// INSERTION
// In array3, start at index 1 and insert 3 elements
array3.splice(1, 0, "1", "2", "3")
// Write array3
str += "array3: " + array3;
document.getElementById('output').innerHTML = str;
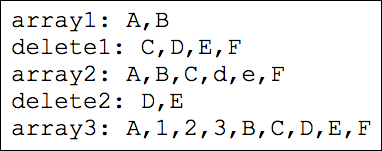
FIGURE 7-6: The splice() method can delete, replace, and insert array elements.
Inserting elements at the beginning of an array: unshift()
The unshift() method is the opposite of the shift() method: It inserts one or more values at the beginning of an array. When it's done, unshift() returns the new length of the array. Here's the syntax:
array.unshift(value1, value2, …)
array: The name of the array you want to work withvalue1,value2, …: The values you want to add to the beginning ofarray
For example, consider the following statements:
var myArray = new Array("First", "Second", "Third");
var newLength = myArray.unshift("Fourth", "Fifth", "Sixth");
After these statements, myArray contains six values — "Fourth", "Fifth", and "Sixth", "First", "Second", and "Third" — and the value of newLength is 6.