Chapter 2
Building and Processing Web Forms
IN THIS CHAPTER
![]() Understanding web form basics
Understanding web form basics
![]() Coding text boxes, checkboxes, and radio buttons
Coding text boxes, checkboxes, and radio buttons
![]() Programming lists, labels, and buttons
Programming lists, labels, and buttons
![]() Monitoring and triggering form events
Monitoring and triggering form events
![]() Getting the form data to the server
Getting the form data to the server
From humble beginnings, forms in HTML5 are now tremendously flexible and powerful, providing natively much of the functionality that we as developers have been adding in with JavaScript over the years.
— PETER GASSTON
A dynamic web page is one that interacts with the user and responds in some way to that interaction. However, when I use the word “interaction” here, I don’t mean (or I don’t just mean) users scrolling through your content and clicking a link here and there. A dynamic web page solicits feedback from the user and then responds to that feedback in an appropriate way (whatever “appropriate” might mean in that context). Sure, you can pester your page visitors for info by tossing them a confirm or prompt box or two, but these are mere toys in the land of web interactivity. The real tools for soliciting feedback and then acting on it — that is, for making your pages truly dynamic — are web forms.
In this chapter, you explore all that web forms have to offer. After mastering the basics, you investigate the amazing new features offered by HTML5 web forms, unearth the power of form events, and learn how to dress up your form data and send it off to the web server. It's a veritable forms smorgasbord, so belly up!
What Is a Web Form?
Most modern programs toss a dialog box in your face if they need to extract some information from you. For example, selecting a program’s Print command most likely results in some kind of Print dialog box showing up. The purpose of this dialog box is to ask for info such as the number of copies you want, the pages you want to print, the printer you want to use, and so on.
A form is essentially the web page equivalent of a dialog box. It’s a page section populated with text boxes, lists, checkboxes, command buttons, and other controls to get information from the user. For example, Figure 2-1 shows a form from my website. This is a form that people can use to send me a message. The form includes a text box for the person’s name, another for her email address, a larger text area for the message, and a command button to send the data to my server.

FIGURE 2-1: A typical web form.
Contact forms are very common, but there are lots of other uses for forms:
- If you put out a newsletter, you can use a form to sign up subscribers.
- If your website includes pages with restricted access, you can use a form to get a person’s username and password for verification.
- If you have information in a database, you can use a form to have people specify what information they want to access.
- If your site has a search feature, you can use a form to get the search text and offer options for filtering and sorting the search results.
Understanding How Web Forms Work
A web form is a little data-gathering machine. What kinds of data can it gather? You name it:
- Text, from a single word up to a long post
- Numbers, dates, and times
- Which item is (or items are) selected in a list
- Whether a checkbox is selected
- Which one of a group of radio buttons is selected
What happens to that data after you’ve gathered it? There are two roads the data can travel: Server Street and Local Lane.
The Server Street route means that your web server gets in on the action. Here are the basic steps that occur:
- The user clicks a button to submit the form.
- Your JavaScript/jQuery code gathers and readies the form data for sending.
- The code uses an Ajax call to send the form data to a PHP script on the server.
- The PHP script extracts the form data.
- PHP uses some or all of the form data to build and execute a MySQL query.
- PHP outputs either the requested data or some kind of code that indicates the result of the operation.
- Your JavaScript/jQuery code processes the data returned by the server and updates the web page accordingly.
The Local Lane route doesn’t get the web server involved at all:
- The user changes the form data in some way.
- Your JavaScript/jQuery code detects the changed data.
- The event handler for the changed form field updates the web page based on the changed data.
In this chapter, I show you how to build a form and then how to handle form events, which will enable you to stroll down Local Lane as much as you want. I also cover submitting data at the end of the chapter, which gives you everything you need to know for getting to Server Street.
Building an HTML5 Web Form
You build web forms with your bare hands using special HTML tags. The latest version of HTML — HTML5 — includes many new form goodies, most of which now have great browser support, so I show you both the oldie-but-goodie and the latest-and-greatest in the form world over the next few sections.
Setting up the form
To get your form started, you wrap everything inside the <form> tag:
<form>
</form>
In this book, you create forms that either update the page locally or submit data to the server via Ajax. All that front-end interaction is controlled by JavaScript and jQuery code, so you don’t need any special attributes in the <form> tag.
However, I'd be remiss if I didn’t mention the version of the <form> tag you need to use if you want your form data submitted directly to a script on the server:
<form action="script" method="method">
script: The URL of the server script you want to use to process the form data.method: The method you want to use to send the data:getorpost. (I talk about the difference between these two methods in Book 6, Chapter 1.)
Here's an example:
<form
action="http://mcfedries.com/webcodingfordummies/php/get-supplier-contacts.php"
method="post">
 If you’re just using the form to add local interaction to the web page and you won’t be submitting any form data to the server, then technically you don’t need the
 <form> tag at all. However, you should use one anyway most of the time because including the <form> tag enables the user to submit the form by pressing Enter or Return, and it also gets you a submit button (such as Go) in mobile browsers.
Adding a form button
Most forms include a button that the user clicks when he's completed the form and wants to initiate the form’s underlying action. This is known as submitting the form, and that term has traditionally meant sending the form data to a server-side script for processing. These days, however, and certainly in this book, “submitting” the form can also mean:
- Updating something on the web page without sending anything to the server. For example, clicking a button might set the page’s background color.
- Running a function that gathers the form data and uses an Ajax call to send the data to the server and process what the server sends back. For example, if the form asks for the person’s username and password, clicking the form button would launch the login process.
The old style of submitting a form is to use an <input> where the type attribute is set to submit:
<input type="submit" value="buttonText">
buttonText: The text that appears on the button face
For example:
<input type="submit" value="Submit Me!">
This style is rarely used in modern web development because it's a bit tricky to style such a button. For that reason, most web developers use the <button> tag, instead:
<button type="submit">buttonText</button>
buttonText: The text that appears on the button face
For example:
<button type="submit">Ship It</button>
 For better-looking buttons, use CSS to style the following:
- Rounded corners: To control the roundness of the button corners, use the
border-radiusproperty set to either a measurement (in, say, pixels) or a percentage. For example:button {border-radius: 15px;} - Drop shadow: To add a drop shadow to a button, apply the
box-shadowxyblurcolorproperty, wherexis the horizontal offset of the shadow,yis the vertical offset of the shadow,bluris amount the shadow is blurred, andcoloris the shadow color. For example:button {box-shadow: 3px 3px 5px gray;}
Working with text fields
Text-based fields are the most commonly used form elements, and most of them use the <input> tag:
<input type="textType" name="textName" value="textValue" placeholder="textPrompt">
textType: The kind of text field you want to use in your form.textName: The name you assign to the field. If you'll be submitting the form data via Ajax, you must include anamevalue for each field.textValue: The initial value of the field, if any.textPrompt: Text that appears temporarily in the field when the page first loads and is used to prompt the user about the required input. The placeholder text disappears as soon as the user starts typing in the field.
Here's a list of the available text-based types you can use for the type attribute:
text: Displays a text box into which the user types a line of text. Add thesizeattribute to specify the width of the field, in characters (the default is20). Here's an example:<input type="text" name="company" size="50">number: Displays a text box into which the user types a numeric value. Most browsers add a spin box that enables the user to increment or decrement the number by clicking the up or down arrow, respectively. Check out this example:<input type="number" name="points" value="100">I should also mention the
rangetype, which displays a slider control that enables the user to click and drag to choose a numeric value between a specified minimum and maximum:<input type="range" name="transparency" min="0" max="100" value="100">email: Displays a text box into which the user types an email address. Add themultipleattribute to allow the user to type two or more addresses, separated by commas. Add thesizeattribute to specify the width of the field, in characters. An example for you:<input type="email" name="user-email" placeholder="[email protected]">url: Displays a text box into which the user types a URL. Add thesizeattribute to specify the width of the field, in characters. Here's a for instance:<input type="url" name="homepage" placeholder="e.g., http://domain.com/">tel: Displays a text box into which the user types a telephone number. Use thesizeattribute to specify the width of the field, in characters. Here's an example:<input type="tel" name="mobile" placeholder="(xxx)xxx-xxxx">time: Displays a text box into which the user types a time, usually hours and minutes. For example:<input type="time" name="start-time">password: Displays a text box into which the user types a password. The typed characters appear as dots (•). Add theautocompleteattribute to specify whether the user's browser or password management software can automatically enter the password. Set the attribute tocurrent-passwordto allow password autocompletion, or tooffto disallow autocompletion. Need an example? Done:<input type="password" name="userpassword" autocomplete="current-password">search: Displays a text box into which the user types a search term. Add thesizeattribute to specify the width of the field, in characters. Why, yes, I do have an example:<input type="search" name="q" placeholder="Type a search term">hidden: Adds an input field to the form, but doesn't display the field to the user. That sounds weird, I know, but it’s a handy way to store a value that you want to include in the submit, but you don’t want the user to see or modify. Here’s an example:<input id="userSession" name="user-session" type="hidden" value="jwr274">
 Some older browsers don’t get special text fields such as
 email and time, but you can still use them in your pages because those clueless browsers will ignore the type attribute and just display a standard text field.
That was a lot of text-related fields, but we're not done yet! There are two others you need to know about:
<textarea>: This tag displays a text box into which the user can type multiple lines .of text. Add therowsattribute to specify how many lines of text are displayed. If you want default text to appear in the text box, add the text between the<textarea>and</textarea>tags. Here's an example:<textarea name="message" rows="5">Default text goes here.</textarea>-
<label>: Associates a label with a form field. There are two ways to use a label:Method #1 — Surround the form field with
<label>and</label>tags, and insert the label text before or after the field, like so:<label>Email:<input type="email" name="user-email" placeholder="[email protected]"></label>Method #2 — Add an
idvalue to the field tag, set the<label>tag'sforattribute to the same value, and insert the label text between the<label>and</label>tags, as I've done here:<label for="useremail">Email:</label><input id="useremail" type="email" name="user-email" placeholder="[email protected]">
Figure 2-2 demonstrates each of these text fields.
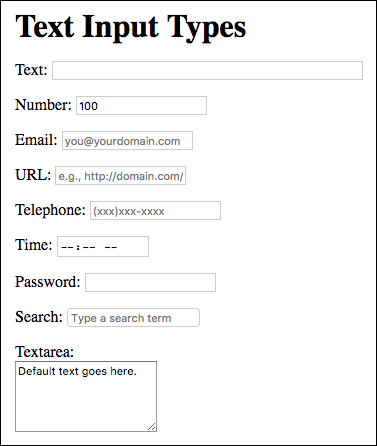
FIGURE 2-2: The various text input types you can use in your forms.
Referencing text fields by field type
One common form-scripting technique is to run an operation on every field of the same type. For example, you might want to apply a style to all the URL fields. Here’s the jQuery selector to use to select all input elements of a given type:
$('input[type=fieldType]')
fieldType: The type attribute value you want to select, such astextorurl
For example, the following selector returns the set of all input elements that use the type url:
$('input[type=url]')
Getting a text field value
Your script can get the current value of any text field by using jQuery's val() method:
$(field).val()
field: A selector that specifies the form field you want to work with
Here's an example:
HTML:
<label>
Search the site:
<input id="search-field" name="q" type="search">
</label>
jQuery:
var searchString = $('#search-field').val();
Setting a text field value
To set a text field value, use jQuery’s val() method, but with a value:
$(field).val(value)
field: A selector that specifies the form field you want to work withvalue: The value you want to assign to the text field
Here's an example:
HTML:
<label>
Type your homepage address:
<input id="homepage-field" name="homepage" type="url">
</label>
JavaScript/jQuery:
var homepageURL = $('#homepage-field').val();
$('#homepage-field').val(homepageURL.toLowerCase());
This code grabs a URL, converts it to all lowercase characters, then returns it to the same url field.
Coding checkboxes
You use a checkbox in a web form to toggle a setting on (that is, the checkbox is selected) and off (the checkbox is deselected). You create a checkbox by including in your form the following version of the <input> tag:
<input type="checkbox" name="checkName" value="checkValue" [checked]>
checkName: The name you want to assign to the checkbox. If you'll be submitting the form data via Ajax, you must include both anameand avaluefor the checkbox.checkValue: The value you want to assign to the checkbox. Note that this is a hidden value sent to the server when the form is submitted; the user never sees it.checked: When this optional attribute is present, the checkbox is initially selected.
Here's an example:
<fieldset>
<legend>
What's your phobia? (Please check all that apply):
</legend>
<div>
<label>
<input type="checkbox" name="phobia" value="Ants">Myrmecophobia (Fear of ants)
</label>
</div>
<div>
<label>
<input type="checkbox" name="phobia" value="Bald">Peladophobia (Fear of becoming bald)
</label>
</div>
<div>
<label>
<input type="checkbox" name="phobia" value="Beards" checked>Pogonophobia (Fear of beards)
</label>
</div>
<div>
<label>
<input type="checkbox" name="phobia" value="Bed">Clinophobia (Fear of going to bed)
</label>
</div>
<div>
<label>
<input type="checkbox" name="phobia" value="Chins" checked>Geniophobia (Fear of chins)
</label>
</div>
<div>
<label>
<input type="checkbox" name="phobia" value="Flowers">Anthophobia (Fear of flowers)
</label>
</div>
<div>
<label>
<input type="checkbox" name="phobia" value="Flying">Aviatophobia (Fear of flying)
</label>
</div>
<div>
<label>
<input type="checkbox" name="phobia" value="Purple">Porphyrophobia (Fear of purple)
</label>
</div>
<div>
<label>
<input type="checkbox" name="phobia" value="Teeth" checked>Odontophobia (Fear of teeth)
</label>
</div>
<div>
<label>
<input type="checkbox" name="phobia" value="Thinking">Phronemophobia (Fear of thinking)
</label>
</div>
<div>
<label>
<input type="checkbox" name="phobia" value="Vegetables">Lachanophobia (Fear of vegetables)
</label>
</div>
<div>
<label>
<input type="checkbox" name="phobia" value="Fear" checked>Phobophobia (Fear of fear)
</label>
</div>
<div>
<label>
<input type="checkbox" name="phobia" value="Everything">Pantophobia (Fear of everything)
</label>
</div>
</fieldset>
Some notes about this code:
- You use the
<fieldset>tag to group a collection of form fields together. - You use the
<legend>tag to create a caption for the parentfieldsetelement. Figure 2-3 shows how this looks in the browser. - Because the
<input>tags are wrapped in their respective<label>tags, it means the user can select or deselect each checkbox by clicking the checkbox itself or by clicking its label.

FIGURE 2-3: Some checkbox form fields, wrapped in a fieldset group with a legend element.
One strange thing about a checkbox field is that it's only included in the form submission if it’s selected. If the checkbox is deselected, it’s not sent to the server.
Referencing checkboxes
If your code needs to reference all the checkboxes in a page, use the following jQuery selector:
$('input[type=checkbox]')
If you just want the checkboxes from a particular form, use a descendent or child selector on the form’s id value:
$('#formid input[type=checkbox]')
Getting the checkbox state
You have to be a bit careful when discussing the “value” of a checkbox. If it’s the value attribute you want to work with, then getting this is no different than getting the value property of a text field by using jQuery's val() method.
However, what you’re more likely to be interested in is whether a checkbox is selected or deselected. This is called the checkbox state. In that case, you need to examine the checked attribute, instead:
$(checkbox).prop('checked')
checkbox: A selector that specifies the checkbox you want to work with
The checked attribute returns true if the checkbox is selected, or false if the checkbox is deselected.
As an example, consider this code:
<label>
<input id="autosave" type="checkbox" name="autosave">
Autosave this project?
</label>
The following statement stores the checkbox state in a variable named autosaveState:
var autosaveState = $('#autosave').prop('checked');
Setting the checkbox state
To set a checkbox field to either the selected or deselected state, assign a Boolean expression to the checked attribute:
$(checkbox).prop('checked', Boolean)
checkbox: A selector that specifies the checkbox you want to modify.Boolean: The Boolean value or expression you want to assign to the checkbox. Usetrueto select the checkbox; usefalseto deselect the checkbox.
For example, take a look back at the long list of phobia checkboxes (that is, the code demonstrated in Figure 2-3). Suppose you want to set up that form so that the user can select at most three checkboxes. Here's some code that does the job:
$('form').click(function(e) {
// Get the checkbox that was clicked
var clickedCheckbox = e.target.value;
// Get the total number of selected checkboxes
var totalSelected = $('input[type=checkbox]:checked').length;
// Do we now have more than three selected checkboxes?
if (totalSelected > 3) {
// If so, deselect the checkbox that was just clicked
$('input[value=' + clickedCheckbox + ']').prop('checked', false);
}
});
This event handler runs when anything inside the form element is clicked. The code first saves the value of the clicked checkbox. Then the code uses jQuery's :checked selector to return the set of all checkbox elements that have the checked attribute, and the length property tells you how many are in the set. An if() test checks to see if more than three are now selected. If that's true, the code deselects the checkbox that was just clicked.
Working with radio buttons
If you want to offer your users a collection of related options, only one of which can be selected at a time, then radio buttons are the way to go. Form radio buttons congregate in groups of two or more where only one button in the group can be selected at any time. If the user clicks another button in that group, it becomes selected and the previously selected button becomes deselected.
You create a radio button using the following variation of the <input> tag:
<input type="radio" name="radioGroup" value="radioValue" [checked]>
radioGroup: The name you want to assign to the group of radio buttons. All the radio buttons that use the samenamevalue belong to that group.radioValue: The value you want to assign to the radio button. If this radio button is selected when the form is submitted, then this is the value sent to the server.checked: When this optional attribute is present, the radio button is initially selected.
Here's an example, and Figure 2-4 shows what happens:
<fieldset>
<legend>
Select a delivery method
</legend>
<div>
<input type="radio" id="carrier-pigeon" name="delivery" value="pigeon" checked>
<label for="carrier-pigeon">Carrier pigeon</label>
</div>
<div>
<input type="radio" id="pony-express" name="delivery" value="pony">
<label for="pony-express">Pony express</label>
</div>
<div>
<input type="radio" id="snail-mail" name="delivery" value="postal">
<label for="snail-mail">Snail mail</label>
</div>
<div>
<input type="radio" id="some-punk" name="delivery" value="bikecourier">
<label for="some-punk">Some punk on a bike</label>
</div>
</fieldset>

FIGURE 2-4: Some radio button form fields.
Referencing radio buttons
If your code needs to work with all the radio buttons in a page, use this jQuery selector:
$('input[type=radio]')
If you want the radio buttons from a particular form, use a descendent or child selector on the form’s id value:
$('#formid input[type=radio]')
If you require just the radio buttons from a particular group, use the following jQuery selector, where radioGroup is the common name of the group:
$('input[name=radioGroup]')
Getting a radio button state
If your code needs to know whether a particular radio button is selected or deselected, you need to determine the radio button state. You do that by examining the radio button's checked attribute, like so:
$(radio).prop('checked')
radio: A jQuery selector that specifies the radio button field you want to work with
The checked attribute returns true if the radio button is selected, or false if the button is deselected.
For example, given the radio buttons shown earlier, the following statement stores the state of the radio button with the id value of pony-express:
var ponySelected = $('#pony-express').prop('checked');
However, it's more likely that your code will want to know which radio button in a group is selected. You can do that by applying jQuery’s :checked selector to the group:
var deliveryMethod = $('input[name=delivery]:checked');
To get the text of the label associated with a radio button, you can take advantage of a selector called the sibling selector, which uses the tilde (~) symbol. The sibling selector returns elements that have the same parent element. In the radio button code I show earlier, the <input> and <label> tags are siblings, so you can use the following expression to return the selected radio button's label text:
$('input[name=delivery]:checked ~ label').text();
Setting the radio button state
To set a radio button field to either the selected or deselected state, assign a Boolean expression to the checked attribute:
$(radio).prop('checked', Boolean)
radio: A jQuery selector that specifies the radio button you want to change.Boolean: The Boolean value or expression you want to assign to the radio button. Usetrueto select the radio button; usefalseto deselect the radio button.
For example, if the initial state of the form group had the first radio button selected, you can reset the group by selecting that button. The easiest way to do this is to use jQuery's .first() method, which returns the first item in a set:
$('input[name=delivery]').first().prop('checked', true);
Adding selection lists
Selection lists are common sights in HTML forms because they enable the web developer to display a relatively large number of choices in a compact control that most users know how to operate. When deciding between a checkbox, radio button group, or a selection list, here are some rough guidelines to follow:
- If an option or setting has only two values that can be represented by on and off, use a checkbox.
- If the option or setting has three or four values, use a group of three or four radio buttons.
- If the option or setting has five or more values, use a selection list.
This section shows you how to create and program selection lists. As you work through this part, it’ll help to remember that a selection list is really an amalgam of two types of fields: the list container and the options within that container. The former is a select element and the latter is a collection of option elements.
To create the list container, you use the <select> tag:
<select name="selectName" size="selectSize" [multiple]>
selectName: The name you want to assign to the selection list.selectSize: The optional number of rows in the selection list box that are visible. If you omit this value, the browser displays the list as a drop-down box.multiple: When this optional attribute is present, the user is allowed to select multiple options in the list.
For each item in the list, you add an <option> tag between the <select> and </select> tags:
<option value="optionValue" [selected]>
optionValue: The value you want to assign to the list option.selected: When this optional attribute is present, the list option is initially selected.
Here are some examples:
<form>
<div>
<label for="hair-color">Select your hair color:</label><br>
<select id="hair-color" name="hair-color">
<option value="black">Black</option>
<option value="blonde">Blonde</option>
<option value="brunette" selected>Brunette</option>
<option value="red">Red</option>
<option value="neon">Something neon</option>
<option value="none">None</option>
</select>
</div>
<div>
<label for="hair-style">Select your hair style:</label><br>
<select id="hair-style" name="hair-style" size="4">
<option value="bouffant">Bouffant</option>
<option value="mohawk">Mohawk</option>
<option value="page-boy">Page Boy</option>
<option value="permed">Permed</option>
<option value="shag">Shag</option>
<option value="straight" selected>Straight</option>
<option value="none">Style? What style?</option>
</select>
</div>
<div>
<label for="hair-products">Hair products used in the last year:</label><br>
<select id="hair-products" name="hair-products" size="5" multiple>
<option value="gel">Gel</option>
<option value="grecian-formula">Grecian Formula</option>
<option value="mousse">Mousse</option>
<option value="peroxide">Peroxide</option>
<option value="shoe-black">Shoe black</option>
</select>
</div>
</form>
There are three lists here (see Figure 2-5):
hair-color: This list doesn't specify a size, so the browser displays it as a drop-down list.hair-style: This list uses asizevalue of4, so there are four options visible in the list.hair-products: This list uses asizevalue of5, so there are five options visible in the list. Also, themultipleattribute is set, so you can select multiple options in the list.

FIGURE 2-5: Some examples of selection lists.
Referencing selection lists
If your code needs to work with all the options in a selection list, use this jQuery selector, where listid is the id value of the select element:
$('#listid > option')
To work with a particular option within a list, use jQuery's nth-child(n) selector, where n specifies the option's position in the list (1 is the first option, 2 is the second option, and so on):
$('#listid > option:nth-child(2)')
If you want a reference to the first option in the list, you can use :first-child instead of :nth-child(1).
To get the option's text (that is, the text that the user sees in the list), run the text() method:
$('#listid > option:nth-child(2)').text();
Getting the selected list option
If your code needs to know whether a particular option in a selection list is selected or deselected, examine the option’s selected attribute, like so:
$(option).prop('selected')
option: A jQuery selector that specifies theoptionelement you want to work with
The selected attribute returns true if the option is selected, or false if the option is deselected.
For example, given the selection lists shown earlier, the following statement stores the state of the first item in the selection list with the id value of hair-color:
var black = $('#hair-color > option:first-child').prop('selected');
However, it's more likely that your code will want to know which option in the selection list is selected. You do that by applying jQuery’s :selected selector to the list’s option elements:
var hairColor = $('#hair-color > option:selected').text();
If the list includes the multiple attribute, then :selected returns a set that contains all the selected elements.
Changing the selected option
To set a selection list option to either the selected or deselected state, assign a Boolean expression to the selected attribute:
$(option).prop('selected', Boolean)
option: A jQuery selector that specifies theoptionelement you want to modify.Boolean: The Boolean value or expression you want to assign to the option. Usetrueto select the option; usefalseto deselect the option.
For example, if the initial state of a multiple-selection list had no items selected, you might want to reset the list by deselecting all the options. You can do that by returning the set of all the selected options in the list, and then applying the selected attribute as false:
$('#hair-products > option:selected').prop('selected', false);
Programming pickers
HTML also offers a number of other <input> tag types that fall under a category I call “pickers,” meaning that in each case the field displays a button that, when clicked, opens a control that enables the user to pick a value. Here's a quick look at the available pickers:
color: Opens a color picker dialog that enables the user to choose a color. The color picker varies depending on the browser and operating system; Figure 2-6 shows the Microsoft Edge version. Set thevalueattribute in the#rrggbbformat to specify an initial color (the default is black:#000000). Here's an example:<input type="color" name="bg-color" value="#ff6347">date: Opens a date picker dialog so that the user can choose a date. Figure 2-7 shows the Chrome version. Set thevalueattribute in theyyyy-mm-ddformat to specify an initial date. Note that the date the user sees might use a different format (such asmm/dd/yyyy, as seen in Figure 2-7), but the value returned by the element is always in theyyyy-mm-ddformat. Here's an example:<input type="date" name="appt-date" value="2018-08-23">file: Opens the user’s operating system’s file picker dialog so that the user can select a file. You can add themultipleattribute to enable the user to select more than one file. Here's an example:<input type="file" name="user-photo">month: Opens a month picker dialog to enable the user to choose a month and year. Set thevalueattribute in theyyyy-mmformat to specify an initial month and year. The value the user sees might be in a different format (such asAugust 2018), but the value returned by the element is always in theyyyy-mmformat. Here's an example:<input type="month" name="birthday-month" value="2018-08">week: Opens a week picker dialog for the user to select a week and year. To specify an initial year and month, set thevalueattribute in theyyyy-Wnnformat, wherennis the two-digit week number. The value shown to the user might be in another format (such asWeek 34, 2018), but the value returned by the element is always in theyyyy-Wnnformat. Here's an example:<input type="week" name="vacation-week" value="2018-W34">

FIGURE 2-6: The color picker that appears in Microsoft Edge.

FIGURE 2-7: The date picker that appears in Google Chrome for Mac.
Handling and Triggering Form Events
With all the clicking, typing, tabbing, and dragging that goes on, web forms are veritable event factories. Fortunately, you can let most of these events pass you by, but there are a few that come in handy, both in running code when the event occurs, and in triggering the events yourself.
Most form events are clicks, so you can handle them by setting click event handlers using jQuery’s .click() method (which I cover in Book 4, Chapter 2). Here's an example:
HTML:
<form>
<div>
<label for="user">Username:</label>
<input id="user" type="text" name="username">
</div>
<div>
<label for="pwd">Password:</label>
<input id="pwd" type="password" name="password">
</div>
</form>
jQuery:
$('form').click(function() {
console.log('Thanks for clicking the form!');
});
This example listens for clicks on the entire form element, but you can also create click event handlers for buttons, input elements, checkboxes, radio buttons, and more.
Setting the focus
One simple feature that can improve the user experience on your form pages is to set the focus on the first form field when your page loads. This saves the user from having to make that annoying click inside the first field.
To get this done, run jQuery's focus() method on the element you want to have the focus at startup:
$(field).focus();
field: A selector that specifies the form field you want to have the focus
Here's an example that sets the focus on the text field with id equal to user at startup:
HTML:
<form>
<div>
<label for="user">Username:</label>
<input id="user" type="text" name="username">
</div>
<div>
<label for="pwd">Password:</label>
<input id="pwd" type="password" name="password">
</div>
</form>
jQuery:
$(document).ready(function() {
$('#user').focus();
});
Monitoring the focus event
Rather than setting the focus, you might want to monitor when a particular field gets the focus (for example, by the user clicking or tabbing into the field). You can do that by setting up a focus() event handler on the field:
$(field).focus(function() {
Focus code goes here
});
field: A selector that specifies the form field you want to monitor for thefocusevent
Here's an example:
$('#user').focus(function() {
console.log('The username field has the focus!');
});
Blurring an element
One of the more annoying browser interface quirks is the focus ring that appears around certain elements — especially buttons — when you click them. This focus ring is not only ugly, but also slightly dangerous because it means the user can “click” the button again just by pressing the spacebar. You can work around this by applying jQuery’s blur() method on the element, which causes it to lose focus:
$(field).blur();
field: A selector that specifies the form field you no longer want to have the focus
Here's an example that uses a button element’s click event handler to blur the button (in the handler, the expression $(this) refers to the element that was clicked, in this case the button):
HTML:
<button id="reset-products" type="button">
Reset Products
</button>
jQuery:
$('#reset-products').click(function() {
// Deselect everything
$('#hair-products > option:selected').prop('selected', false);
// Blur the button
$(this).blur();
});
Monitoring the blur event
Rather than blurring an element, you might want to run some code when a particular element is blurred (for example, by the user clicking or tabbing out of the field). You can do that by setting up a blur() event handler:
$(field).blur(function() {
Blur code goes here
});
field: A selector that specifies the form field you want to monitor for theblurevent.
Here's an example:
$('#user').blur(function() {
console.log('The username field no longer has the focus!');
});
Listening for element changes
One of the most useful form events is the change event, which fires when the value or state of a field is modified in some way. When this event fires depends on the element type:
- For a
textareaelement and the various text-relatedinputelements, thechangeevent fires when the element loses the focus. - For checkboxes, radio buttons, selection lists, and pickers, the
changeevent fires as soon as the user clicks the element to modify the selection or value.
You listen for a field's change events by setting up a change() event handler:
$(field).change(function() {
Change code goes here
});
field: A selector that specifies the form field you want to monitor for thechangeevent
Here's an example:
HTML:
<div>
<label for="bgcolor">Select a background color</label>
<input id="bgcolor" type="color" name="bg-color" value="#ffffff">
</div>
jQuery:
$('#bgcolor').change(function() {
var bgColor = $(this).val();
$('body').css('background-color', bgColor);
});
The HTML code sets up a color picker. The jQuery code applies the change event handler to the color picker. When the change event fires on the picker, the code stores the new color value in the bgColor variable, then applies that color to the body element's background-color property.
Submitting the Form
There’s one form event that I didn’t cover in the previous section, and it’s a biggie: the submit event, which fires when the form data is to be sent to the server. Here's the general syntax:
$(form).submit(function(e) {
Submit code goes here
});
form: A selector that specifies the form you want to monitor for thesubmitevent.e: This argument represents theeventobject.
You'll rarely, if ever, allow the submit event to occur directly. Instead, you’ll want to intercept the submit so that you can gather the data and then send it to the server yourself using an Ajax call. Handling the submit event yourself gives you much more control over both what gets sent to the server and how what gets sent back from the server gets processed.
Triggering the submit event
Here's a list of the various ways that the submit event gets triggered:
- When the user clicks a
buttonorinputelement that resides within a<form>tag and has itstypeattribute set tosubmit - When the user clicks a
buttonelement that resides within a<form>tag and has notypeattribute - When the user presses Enter or Return while a form element has the focus, and either a
buttonorinputelement resides within the<form>tag and has itstypeattribute set tosubmit, or abuttonelement resides within the<form>tag and has notypeattribute - When your code runs jQuery's
.submit()method:$(form).submit();form: A selector that specifies the form you want to submit
Preventing the default form submission
You control the form submission yourself by sending the data to the server with an Ajax call. The submit event doesn't know that, however, and it will try to submit the form data anyway. That’s a no-no, so you need to prevent the default form submission by using the event object’s preventDefault() method:
$('form').submit(function(e) {
e.preventDefault();
});
Preparing the data for submission
Before you can submit your form data, you need to convert it to a format that your server's PHP script can work with. The format depends on the Ajax request method you want to use:
- GET: This format requires a string of name=value pairs, separated by ampersands (
&). To convert your form data to this format, use jQuery’sserialize()function:$(form).serialize();form: A selector that specifies the form you want to work with
- POST: This format requires an array of key: value pairs, separated by commas (
,). To convert your form data to this format, use jQuery'sserializeArray()function:$(form).serializeArray();form: A selector that specifies the form you want to work with
For example:
var formData = $('form').serialize();
Most commonly, your code stores the result of the serialize() or serializeArray() function in a variable, and that variable gets submitted to the server.
Submitting the form data
Now you're almost ready to submit the data. As an example, here’s some HTML code for a form and div that I’ll use to output the form results:
<form>
<div>
<label for="first">First name:</label>
<input id="first" type="text" name="first-name">
</div>
<div>
<label for="last">Last name:</label>
<input id="last" type="text" name="last-name">
</div>
<div>
<label for="nick">Nickname:</label>
<input id="nick" type="text" name="nickname">
</div>
<button type="submit">Submit</button>
</form>
<div class="output">
</div>
Now here’s the JavaScript/jQuery code that submits the form (using .get() in this case) and processes the result (which just echoes back the form data, as shown in Figure 2-8):
$('form').submit(function(e) {
// Prevent the default form submission
e.preventDefault();
// Convert the data to GET format
var formData = $(this).serialize();
// Submit the data using an Ajax GET request
$.get('php/echo-form-fields-get.php', formData, function(data) {
// Show the data returned by the server
$('.output').html(data);
});
});

FIGURE 2-8: An example form submission.
We’re missing one very important stop on our road to dynamic web pages: We haven’t validated the form data! Form validation is so important, in fact, that I devote an entire chapter to it: Book 6, Chapter 3. Don’t miss it!