Chapter 1
Learning PHP Coding Basics
IN THIS CHAPTER
![]() Getting comfy with PHP
Getting comfy with PHP
![]() Building PHP expressions
Building PHP expressions
![]() Controlling PHP code
Controlling PHP code
![]() Figuring out functions and objects
Figuring out functions and objects
![]() Debugging PHP
Debugging PHP
In the end, what I think set PHP apart in the early days, and still does today, is that it always tries to find the shortest path to solving the Web problem … When you need something up and working by Friday so you don’t have to spend all weekend leafing through 800-page manuals, PHP starts to look pretty good.
— RASMUS LERDORF, CREATOR OF PHP
You code the front end of a web project using tools such as HTML and CSS (see Book 2), JavaScript (see Book 3), and jQuery (see Book 4). You can build really awesome web pages using just those front-end tools, but if you want to build pages that are dynamic and applike, then you need to bring in the back end and use it to harness the power of the web server. For web projects, the back end most often means storing data in a MySQL database and accessing that data using the PHP programming language. I cover all that in Chapters 2 and 3 of this minibook. For now, you need some background in PHP coding. In this chapter, you explore PHP from a web developer’s perspective, and by the time you’re done you’ll know everything you need to know about PHP variables, expressions, arrays, loops, functions, and objects. In short, you’ll be ready to join the web coding big leagues by bringing together the front end and the back end to create truly spectacular and useful web pages and apps.
Understanding How PHP Scripts Work
PHP is a server-side programming language, which means that PHP code executes only on the web server, not in the web browser. Most web servers today come with a piece of software called a PHP processor, and it’s the job of the PHP processor to run any PHP code that’s sent its way. That PHP code can come in two different packages:
- A pure PHP file: This is a file on the web server, usually one with a filename that uses the
.phpextension. When I call this a “pure” PHP file, I mean that the file contains nothing but PHP code. Such files are rarely loaded directly into the web browser. Instead, pure PHP files are usually called by JavaScript or jQuery code, most often either to process form input or to ask for data from a MySQL database. - As part of an HTML file: This is a regular HTML file, but with one or more chunks of PHP code embedded in the file. On most web servers, this file requires the
.phpextension to enable the server to execute the PHP statements.
Whatever the package, the PHP code is processed as follows:
- A web browser requests the PHP or HTML file.
- When the web server sees that the file contains PHP code, it passes that code along to the PHP processor.
- The PHP processor parses and executes the PHP code.
- If the PHP code contains any statements that output text and/or HTML tags, the PHP processor returns that output to the web server.
- The web server sends the output from Step 4 to the web browser.
 It's important to understand that in the end no PHP code is ever sent to the web browser. All the browser gets is the output of the PHP code. Yes, it’s possible to run PHP scripts that don’t output anything, but in web development the main job of most of your PHP code will be to return some data to the browser.
Learning the Basic Syntax of PHP Scripts
You tell the web server that you want to run some PHP code by surrounding that code with the PHP tags:
<?php
Your PHP statements go here
?>
For example, PHP’s basic output mechanism is the echo output command, where output is a string containing text and/or HTML tags:
<?php
echo "<h1>Hello PHP World!</h1>";
?>
Notice that the echo statement ends with a semicolon. All PHP statements require a semicolon at the end.
If you place just the above code in a .php file and load that file into a web browser, you see the output shown in Figure 1-1.

FIGURE 1-1: The output of PHP's echo command.
Alternatively, you can embed the PHP code in an HTML file, as shown in the following example:
<!DOCTYPE html>
<html lang="en">
<head>
<meta charset="UTF-8">
<title>Book 5, Chapter 1, Example 2</title>
</head>
<body>
<p>
Here's the output of the PHP script:
</p>
<?php
echo "<h1>Hello PHP World!</h1>";
?>
</body>
</html>
Figure 1-2 shows the result.

FIGURE 1-2: You can also embed PHP output within an HTML file.
Declaring PHP Variables
As with JavaScript (see Book 3, Chapter 2), PHP uses variables for storing data to use in expressions and functions, and PHP supports the standard literal data types: integers (such as 5 or -17), floating-point numbers (such as 2.4 or 3.14159), strings (such as "Hello" or 'World'), and Booleans (TRUE or FALSE).
PHP variable names must begin with a dollar sign ($), followed by a letter or underscore, then any combination of letters, numbers, or underscores. Note that PHP variable names are case-sensitive, so $str isn't the same variable as $STR.
You don’t need any special keyword (such as JavaScript’s var) to declare a variable. Instead, you declare a variable in PHP by assigning the variable a value:
$str = "Hello World!";
$interest_rate = 0.03;
$app_loaded = FALSE;
Building PHP Expressions
When you build a PHP expression — that is, a collection of symbols, words, and numbers that performs a calculation and produces a result — you can use mostly the same operators as in JavaScript (see Book 3, Chapter 3):
- Arithmetic: Addition (
+), Subtraction (-), Multiplication (*), Division (/), Modulus (%), and Exponentiation (**). - Incrementing and decrementing: Post-increment (
$var++), Pre-increment (++$var), Post-decrement ($var--), and Pre-decrement (--$var). - Comparison: Equal (
=), Not Equal (!=), Greater Than (>), Less Than (<), Greater Than or Equal (>=), Less Than or Equal (<=), Identity (===), and Non-Identity (!==). In PHP you can also use<>as the Not Equal operator. - Logical: And (
&&), Or (||), and Not (!). In PHP you can also useandas the And operator andoras the Or operator.
Where PHP differs from JavaScript is with the string concatenation operator, which in PHP is the dot (.) symbol rather than JavaScript's plus (+) symbol. Here’s an example, and Figure 1-3 shows the result.
<?php
$str1 = "<h2>Concatenate ";
$str2 = "Me!</h2>";
echo $str1 . $str2;
?>

FIGURE 1-3: In PHP, you use the dot (.) operator to concatenate two strings.
Outputting Text and Tags
Your back-end PHP scripts pass data to your web app's front end (HTML and JavaScript) not by using some complex communications link, but simply by outputting the data. I talk about this in more detail in Book 5, Chapter 3, but for now let’s look at the mechanisms PHP offers for outputting data.
PHP’s simplest output tool is the print command:
print output;
output: A string — which could be a string literal, string variable, string property value, or the string result of a function — that you want to output. You can include HTML tags in the output string.<?phpprint "<h1>Hello World!</h1>";?>
To output more than one item, you need to use PHP's echo command:
echo output;
output: One or more strings — which could be string literals, string variables, string property values, or the string results of a function — that you want to output. If you include two or more output items, separate each one with a comma. You can include HTML tags in any of the output strings.<?php$str1 = "<h2>Concatenate ";$str2 = "Me!</h2>";echo $str1, $str2;?>
Adding line breaks
If you use PHP to generate quite a lot of HTML and text for your page, you need to be a bit careful how you structure the output. To see what I mean, first check out the following PHP code:
<?php
$str1 = "<div>What does PHP stand for?</div>";
$str2 = "<div>It's a <i>recursive acronym</i>:</div>";
$str3 = "<div>PHP: Hypertext Preprocessor</div>";
echo $str1, $str2, $str3;
?>
This code declares three strings — all div elements with text — and uses echo to output them. Figure 1-4 shows two browser windows. In the upper window, you can see that the output from the preceding code looks fine. However, the lower window shows the source code for the page and, as you can see, all the output text and tags appear on a single line.

FIGURE 1-4: When you output tags and text using PHP, the strings run together in a single line in the web page source code.
To make the source code text easier to read, you should add line breaks to your PHP output strings. You insert a line break using the newline character
(which doesn't appear on the web page). Here’s the revised code (with
added to the end of the $str1 and $str2 variables), and Figure 1-5 shows that the source code now appears on multiple lines:
<?php
    $str1 = "<div>What does PHP stand for?</div>
";
    $str2 = "<div>It's a <i>recursive acronym</i>:</div>
";
$str3 = "<div>PHP: Hypertext Preprocessor</div>";
echo $str1, $str2, $str3;
?>
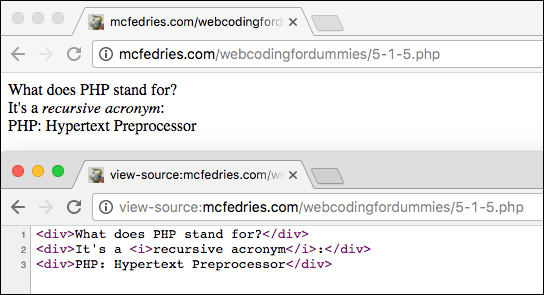
FIGURE 1-5: With newlines added to the output strings, the web page source code now appears on separate lines, making it much easier to read.
 The
The
newline code only works in a string that uses double quotation marks. If you use single quotation marks, PHP outputs the characters
instead of creating a newline. For example:
echo 'Ready
Set
Go!';
The output of this statement is
Ready
Set
Go!
Mixing and escaping quotation marks
You can enclose PHP string literals in either double quotation marks or single quotation marks, but not both:
$order = "Double espresso"; // This is legal
$book = 'A Singular Man'; // So's this
$weather = 'Mixed precipitation"; // This is not legal
However, mixing quotation mark types is sometimes necessary. Consider this:
$tag = "<a href="https://wordspy.com">";
That statement will cough up an error because PHP thinks the string ends after the second double quotation mark, so it doesn't know what to do with the rest of the statement. To solve this problem, swap the outer double quotation marks for singles:
$tag = '<a href="https://wordspy.com/">';
That works fine. However, what if you want to add some line breaks, as I describe in the previous section:
$tag = '<a href="https://wordspy.com/">
Word Spy
</a>';
Nice try, but newlines (
) only work when they’re enclosed by double quotation marks. The statement above will not include any line breaks and will show the link text as
Word Spy
. Sigh.
All is not lost, however, because you can convince the PHP processor to treat a quotation mark as a string literal (instead of a string delimiter), by preceding the quotation mark with a backslash (). This is known in the trade as escaping the quotation mark. For example, you can fix the previous example by enclosing the entire string in double quotation marks (to get the newlines to work) and escaping the double quotation marks used for the <a> tag's href value:
$tag = "<a href="https://wordspy.com/">
Word Spy
</a>";
Outputting variables in strings
One very useful feature of PHP strings is that you can insert a variable name into a string and the PHP processor will handily replace the variable name with its current value. Here’s an example:
<?php
$title = "Inflatable Dartboard Landing Page";
$tag = "<title>$title</title>";
echo $tag;
?>
The output of this code is
<title>Inflatable Dartboard Landing Page</title>
Some folks call this interpolating the variable, but we’ll have none of that here.
Alas, variable value substitution only works with strings enclosed by double quotation marks. If you use single quotation marks, PHP outputs the variable name instead of its value. For example, this
<?php
$title = "Inflatable Dartboard Landing Page";
$tag = '<title>$title</title>';
echo $tag;
?>
outputs this:
<title>$title</title>
Outputting long strings
If you have a long string to output, one way to do it would be to break up the string into multiple variables, add newlines at the end of each, if needed, and output each variable.
That works, but PHP offers a shortcut method where you output everything as a single string, but span the string across multiple lines. For example, I can take the final code from the “Adding line breaks” section and achieve the same result by rewriting it as follows:
<?php
$str1 = "<div>What does PHP stand for?</div>
<div>It's a <i>recursive acronym</i>:</div>
<div>PHP: Hypertext Preprocessor</div>";
echo $str1;
?>
The implied newlines at the end of the second and third lines are written to the page, so the page source code will look exactly the same as it does in Figure 1-5.
Outputting really long strings
For a super-long string, you can use PHP’s here document (or heredoc) syntax:
<<<terminator
Super-long string goes here
terminator;
terminator: This is a label that marks the beginning and end of the string. The label at the end must appear on a line by itself (except for the closing semicolon), with no whitespace before or after the label.
This syntax also supports variable names, so if you include a variable in the string, PHP will substitute the current value of that variable when it outputs the string.
Here's an example:
<?php
$author = "Rasmus Lerdorf";
$str = <<<END_OF_STRING
<blockquote>
In the end, what I think set PHP apart in the early
days, and still does today, is that it always tries
to find the shortest path to solving the Web
problem. It does not try to be a general-purpose
scripting language and anybody who's looking to
solve a Web problem will usually find a very direct
solution through PHP. Many of the alternatives that
claim to solve the Web problem are just too complex.
When you need something up and working by Friday so
you don't have to spend all weekend leafing through
800-page manuals, PHP starts to look pretty good.
—$author
</blockquote>
END_OF_STRING;
echo $str;
?>
Notice that I declared a variable named $author, and then I included that variable name in the string (it’s on the second-last line of the string). PHP treats a heredoc string as though it was enclosed by double quotation marks, so it substitutes the variable value in the output. Figure 1-6 shows the result.

FIGURE 1-6: The really long string output to the web browser. Note that the value of the $author variable — Rasmus Lerdorf — appears instead of the variable name.
Working with PHP Arrays
Let's take a quick look at arrays in PHP. I’m going to skip lightly over arrays here because I already talk about them in detail in Book 3, Chapter 7.
Declaring arrays
PHP gives you a bunch of ways to declare and populate arrays. Probably the most straightforward method is to assign values to explicit index numbers:
$array_name[index] = value;
$array_name: The name of the array variableindex: The optional array index number you want to work withvalue: The value you want to assign to the array index number
For example, the following statements assign string values to the first three elements (that is, the elements at array indexes 0, 1, and 2) of an array named $team_nicknames:
$team_nicknames[0] = 'Banana Slugs';
$team_nicknames[1] = 'Fighting Okra';
$team_nicknames[2] = 'Golden Flashes';
Notice in the syntax that I said the index parameter was optional. If you leave it out, PHP assigns the index numbers automatically. So, as long as the variable $team_nicknames doesn't already contain any elements, the following code is equivalent to the preceding code:
$team_nicknames[] = 'Banana Slugs';
$team_nicknames[] = 'Fighting Okra';
$team_nicknames[] = 'Golden Flashes';
To add multiple array values in a single statement, you can use PHP’s array keyword:
$array_name = array(value1, value1, etc.);
$array_name: The name of the array variablevalue1,value2, etc.: The values you want to assign to the array
Here's an example:
<?php
$team_nicknames = array('Banana Slugs', 'Fighting Okra', 'Golden Flashes');
echo $team_nicknames[0];
?>
The output of this code is
Banana Slugs
Giving associative arrays a look
Most PHP arrays use numeric index values, but in web development work it’s often handy to work with string index values, which are called keys. An array that uses keys instead of a numeric index is called an associative array, because you’re associating each key with a value to create an array of key/value pairs.
Here’s an example:
<?php
$team_nicknames['Santa Cruz'] = 'Banana Slugs';
$team_nicknames['Delta State'] = 'Fighting Okra';
$team_nicknames['Kent State'] = 'Golden Flashes';
echo $team_nicknames['Delta State'];
?>
The output of this code is
Fighting Okra
To create an associative array using the array keyword, you assign each key/value pair using the => operator, as in this example:
<?php
$team_nicknames = array('Santa Cruz' => 'Banana Slugs', 'Delta State' => 'Fighting Okra', 'Kent State' => 'Golden Flashes');
echo $team_nicknames['Kent State'];
?>
The output of this code is
Golden Flashes
Outputting array values
You can use the echo or print keyword to output individual array values. However, what if you want to see all the values stored in an array? Rather than, say, looping through the array, PHP offers the print_r() function, which outputs the current value of a variable:
print_r($variable);
$variable: The name of the variable you want to output
If you use an array as the print_r() parameter, PHP outputs the contents of the array as key/value pairs. For example, the following code
<pre>
<?php
$team_nicknames = array('Banana Slugs', 'Fighting Okra', 'Golden Flashes');
print_r($team_nicknames);
?>
</pre>
outputs the following:
Array
(
[0] => Banana Slugs
[1] => Fighting Okra
[2] => Golden Flashes
)
 Note that I surrounded the PHP code with the
 <pre> tag to get the output on multiple lines rather than a single hard-to-read line.
Sorting arrays
If you need your array values sorted alphanumerically, PHP offers a handful of functions that will get the job done. The function you use depends on the type of sort you want (ascending or descending) and whether your array uses numeric indexes or string keys (that is, an associative array).
For numeric indexes, you can use the sort() function to sort the values in ascending order (0 to 9, then A to Z, then a to z), or the rsort() function to sort the values in descending order (z to a, then Z to A, then 9 to 0):
sort($array);
rsort($array);
$array: The name of the array you want to sort
Here's an example:
<pre>
<?php
$oxymorons = array('Pretty ugly', 'Jumbo shrimp', 'Act naturally', 'Original copy');
sort($oxymorons);
print_r($oxymorons);
?>
</pre>
Here’s the output:
Array
(
[0] => Act naturally
[1] => Jumbo shrimp
[2] => Original copy
[3] => Pretty ugly
)
For associative arrays, you can use the asort() function to sort the values in ascending order (0 to 9, then A to Z, then a to z), or the arsort() function to sort the values in descending order (z to a, then Z to A, then 9 to 0):
asort($array);
arsort($array);
$array: The name of the associative array you want to sort
Here's an example:
<pre>
<?php
$team_nicknames = array('Santa Cruz' => 'Banana Slugs', 'Delta State' => 'Fighting Okra', 'Kent State' => 'Golden Flashes');
arsort($team_nicknames);
print_r($team_nicknames);
?>
</pre>
Here’s the output:
Array
(
[Kent State] => Golden Flashes
[Delta State] => Fighting Okra
[Santa Cruz] => Banana Slugs
)
Looping through array values
PHP offers a special loop called foreach() that you can use to loop through an array’s values. Here’s the syntax:
foreach($array as $key => $value) {
Loop statements go here
}
$array: The name of the array you want to loop through$key: An optional variable name that PHP uses to store the key of the current array item$value: A variable name that PHP uses to store the value of the current array item
Here's an example:
<?php
$team_nicknames = array('Santa Cruz' => 'Banana Slugs', 'Delta State' => 'Fighting Okra', 'Kent State' => 'Golden Flashes');
foreach($team_nicknames as $school => $nickname) {
echo "The team nickname for $school is $nickname.<br>";
}
?>
Here’s the output:
The team nickname for Santa Cruz is Banana Slugs.
The team nickname for Delta State is Fighting Okra.
The team nickname for Kent State is Golden Flashes.
Creating multidimensional arrays
A multidimensional array is one where two or more values are stored within each array element. In a one-dimensional array, the value is usually a string, number, or Boolean. Now imagine, instead, that value is an array literal. For a two-dimensional array, the general syntax for assigning an array to an array element looks like this:
arrayName[index] = Array(value1, value2);
As an example, say you want to store an array of background and foreground colors. Here's how you might declare and populate such an array:
<?php
$colorArray[0] = Array('white', 'black');
$colorArray[1] = Array('aliceblue', 'midnightblue');
$colorArray[2] = Array('honeydew', 'darkgreen');
echo $colorArray[1][1];
?>
Here’s the output:
midnightblue
Alternatively, you can declare and populate an associative array:
<?php
$colorArray['scheme1'] = Array('foreground' => 'white', 'background' => 'black');
$colorArray['scheme2'] = Array('foreground' => 'aliceblue', 'background' => 'midnightblue');
$colorArray['scheme3'] = Array('foreground' => 'honeydew', 'background' => 'darkgreen');
echo $colorArray['scheme2']['foreground'];
?>
Here’s the output:
aliceblue
Controlling the Flow of Your PHP Code
I go through a detailed discussion of controlling code with decisions and loops in Book 3, Chapter 4. That chapter focuses on JavaScript code, but the structures for making decisions and looping are identical in both JavaScript and PHP. Therefore, I just quickly summarize the available statements here, and refer you to Book 3, Chapter 4 to fill in the details.
Making decisions with if()
You make simple true/false decisions in PHP using the if() statement:
if (expression) {
statements-if-true
}
expression: A comparison or logical expression that returnstrueorfalse.statements-if-true: The statement or statements to run ifexpressionreturnstrue. Ifexpressionreturnsfalse, PHP skips over the statements.
Here's an example:
if ($original_amount !== 0) {
$percent_increase = 100 * (($new_amount - $original_amount) / $original_amount);
}
To run one group of statements if the condition returns true and a different group if the result is false, use an if()…else statement:
if (expression) {
statements-if-true
} else {
statements-if-false
}
expression: A comparison or logical expression that returnstrueorfalsestatements-if-true: The block of statements you want PHP to run ifexpressionreturnstruestatements-if-false: The block of statements you want executed ifexpressionreturnsfalse
Here's an example:
<?php
if ($currentHour < 12) {
$greeting = "Good morning!";
} else {
$greeting = "Good day!";
}
echo $greeting;
?>
There is a third syntax for the if()…else statement that lets you string together as many logical tests as you need:
if (expression1) {
statements-if-expression1-true
} elseif (expression2) {
statements-if-expression2-true
}
etc.
else {
statements-if-false
}
This syntax represents a rare instance where PHP and JavaScript control structures are different (however slightly): You use the keywords else if in JavaScript, but the single keyword elseif in PHP.
The following code shows a script that uses a nested if() statement.
<?php
if ($currentHour < 12) {
$greeting = "Good morning!";
} elseif ($currentHour < 18) {
$greeting = "Good afternoon!";
} else {
$greeting = "Good evening!";
}
echo $greeting;
?>
Making decisions with switch()
For situations where you need to make a whole bunch of tests (say, four or more), PHP offers the switch() statement. Here's the syntax:
switch(expression) {
case case1:
case1 statements
break;
case case2:
case2 statements
break;
etc.
default:
default statements
}
The expression is evaluated at the beginning of the structure. It must return a value (numeric, string, or Boolean). case1, case2, and so on are possible values for expression. PHP examines each case value to see whether one matches the result of expression and, if it does, executes the block associated with that case; the break statement tells PHP to stop processing the rest of the switch() statement.
Here's an example:
switch($season) {
case 'winter':
$footwear = 'snowshoes';
break;
case 'spring':
$footwear = 'galoshes';
break;
case 'summer':
$footwear = 'flip-flops';
break;
case 'fall':
$footwear = 'hiking boots';
break;
}
Looping with while()
PHP’s while() loop uses the following syntax:
while (expression) {
statements
}
Here, expression is a comparison or logical expression that determines how many times the loop gets executed, and statements represents a block of statements to execute each time through the loop.
Here's an example:
<?php
$counter = 1;
while ($counter <= 12) {
// Generate a random number between 1 and 100
$randoms[$counter - 1] = rand(1, 100);
$counter++;
}
print_r($randoms);
?>
Looping with for()
The structure of a PHP for() loop looks like this:
for ($counter = start; expression; $counter++) {
statements
}
$counter: A numeric variable used as a loop counterstart: The initial value of$counterexpression: A comparison or logical expression that determines the number of times through the loop$counter++: The increment operator applied to the$countervariablestatements: The statements to execute each time through the loop
Here's an example:
<?php
for ($counter = 0; $counter < 12; $counter++) {
// Generate a random number between 1 and 100
$randoms[$counter] = rand(1, 100);
}
print_r($randoms);
?>
Looping with do…while()
PHP’s do…while() loop uses the following syntax:
do {
statements
}
while (expression);
Here, statements represents a block of statements to execute each time through the loop, and expression is a comparison or logical expression that determines how many times PHP runs through the loop.
Here's an example:
<?php
$counter = 0;
do {
// Generate a random number between 1 and 100
$randoms[$counter] = rand(1, 100);
$counter++;
}
while ($counter < 12);
print_r($randoms);
?>
Working with PHP Functions
I talk about functions until I’m blue in the face in Book 3, Chapter 5. PHP and JavaScript handle functions in the same way, so here I just give you a quick overview from the PHP side of things.
The basic structure of a function looks like this:
function function_name(arguments) {
statements
}
Here’s a summary of the various parts of a function:
function: Identifies the block of code that follows it as a functionfunction_name: A unique name for the functionarguments: One or more optional values that are passed to the function and that act as variables within the functionstatements: The code that performs the function's tasks or calculations
Here’s an example:
function display_header() {
    echo "<header>
";
    echo "<img src="/images/notw.png" alt="News of the Word logo">
";
    echo "<h1>News of the Word</h1>
";
    echo "<h3>Language news you won't find anywhere else (for good reason!)</h3>
";
echo "</header>";
}
To call the function, include in your script a statement consisting of the function name, followed by parentheses:
display_header();
Passing values to functions
An argument is a value that is “sent” — or passed, in programming terms — to the function. The argument acts just like a variable, and it automatically stores whatever value is sent. Here’s an example:
display_header('notw.png');
function display_header($img_file) {
    echo "<header>
";
    echo "<img src="/images/$img_file" alt="News of the Word logo">
";
    echo "<h1>News of the Word</h1>
";
    echo "<h3>Language news you won't find anywhere else (for good reason!)</h3>
";
echo "</header>";
}
Returning a value from a function
If your function calculates a result, you can send that result back to the statement that called the function by using a return statement:
return result;
As an example, I'll construct a function that calculates and then returns the tip on a restaurant bill:
$preTipTotal = 100.00;
$tipPercentage = 0.15;
function calculate_tip($preTip, $tipPercent) {
$tipResult = $preTip * $tipPercent;
return $tipResult;
}
$tipCost = calculate_tip($preTipTotal, $tipPercentage);
$totalBill = $preTipTotal + $tipCost;
echo "Your total bill is $$totalBill";
Working with PHP Objects
I discuss objects from a JavaScript point of view in Book 3, Chapter 6, so here I just recall that an object is a programmable element that has two key characteristics:
- You can make changes to the object’s properties.
- You can make the object perform a task by activating a method associated with the object.
I use objects extensively in Book 5, Chapter 3 when I talk about using PHP to access a MySQL database, so the next few sections provide some necessary background.
Rolling your own objects
Let’s take a quick look at creating custom objects in PHP. In the object-oriented world, a class acts as a sort of object “template.” A cookie cutter provides a good analogy. The cookie cutter isn’t a cookie, but, when you use it, the cookie cutter creates an actual cookie that has a predefined shape. A class is the same way. It’s not an object, but using it (or instancing it, to use the vernacular) creates an object that uses the class characteristics. These characteristics are governed by the members of the class, which are its properties and methods.
Creating a custom class
You define a custom class by using the class keyword:
class Name {
Class properties and methods go here
}
Name: The name you want to assign to your class. Class names traditionally begin with an uppercase letter.
Here's an example:
class Invoice {
}
I’ll use this class to create customer invoice objects.
Adding properties to the class
The next step is to define the class properties, which are PHP variables preceded by the keyword public, which makes them available to code outside the class. Let’s add a few properties to the Invoice class:
class Invoice {
public $customer_id;
public $subtotal;
public $tax_rate;
}
A bit later I show you how to create an object from a class. In most cases you want to initialize some or all of the properties when you create the object, and to do that you must add a special __construct() function to the class definition. Here's the general syntax:
public function __construct($Arg1, $Arg2, …) {
$this->prop1 = $Arg1;
$this->prop2 = $Arg2;
etc.
}
$Arg1,$Arg2, etc.: The initial values of the object properties.$this->: Refers to the object in which the code is running; the->character pair is called the object operator and you use it to access an object's properties and methods.prop1,prop2, etc.: References to the class properties, minus the$.
To extend the example:
class Invoice {
public $customer_id;
public $subtotal;
public $tax_rate;
public function __construct($Customer_ID, $Subtotal, $Tax_Rate) {
$this->customer_id = $Customer_ID;
$this->subtotal = $Subtotal;
$this->tax_rate = $Tax_Rate;
}
}
Adding methods to the class
The last step in creating your custom class is to add one or more functions that will be used as the class methods. Here's the general syntax:
public function method() {
Method code goes here
}
method: The name of the method
To complete our example class, add a method that calculates the invoice total and rounds it to two decimal places:
class Invoice {
public $customer_id;
public $subtotal;
public $tax_rate;
public function __construct($Customer_ID, $Subtotal, $Tax_Rate) {
$this->customer_id = $Customer_ID;
$this->subtotal = $Subtotal;
$this->tax_rate = $Tax_Rate;
}
public function calculate_total() {
$total = $this->subtotal * (1 + $this->tax_rate);
return round($total, 2);
}
}
Creating an object
Given a class — whether it’s a built-in PHP class or a class that you’ve created yourself — you can create an object from the class, which is known as an instance of the class. Here’s the general format to use:
$object = new Class(value1, value2, …);
$object: The variable name of the objectClass: The name of the class on which to base the objectvalue1,value2, etc.: The optional initial values you want to assign to the object's properties
Here’s a statement that creates an instance of the Invoice class from the previous section:
$inv = new Invoice('BONAP', 59.85, .07);
Working with object properties
You refer to an object property by using the object operator (->):
object->property
object: The object that has the propertyproperty: The name of the property you want to work with
Here's an example that creates an object instance and then references the object’s customer_id property:
$inv = new Invoice('BONAP', 59.85, .07);
$current_customer = $inv->customer_id;
To change the value of a property, use the following generic syntax:
object->property = value;
object: The object that has the propertyproperty: The name of the property you want to changevalue: A literal value (such as a string or number) or an expression that returns the value to which you want to set the property
Here's an example:
$inv->subtotal = 99.95;
Working with object methods
To run a method, you use the following syntax:
object->method(arg1, arg2, …)
object: The object that has the method you want to work withmethod: The name of the method you want to executearg1,arg2, etc.: The arguments required by the method, if any
Here's an example:
$inv = new Invoice('BONAP', 59.85, .07);
$invoice_total = $inv->calculate_total();
Debugging PHP
JavaScript code runs inside the browser, so debugging that code is straightforward because, in a sense, the code runs right before your eyes. This lets you set up breakpoints, watches, and the other debugging tools that I talk about in Book 3, Chapter 9. PHP code, however, runs on the server, which means that by the time it gets to you (that is, to the browser), the code is done and all you see is the output. That makes PHP code harder to debug, but, thankfully, not impossible to debug. The next few sections take you through a few PHP debugging techniques.
Configuring php.ini for debugging
Your first step in setting up PHP for debugging is the php.ini file, which is the PHP configuration file. In the XAMPP web development environment that I discuss in Book 1, Chapter 2, here are the default locations of php.ini:
- Windows:
C:xamppphpphp.ini - Mac:
/Applications/XAMPP/xamppfiles/etc/php.ini
If you can't locate the file, make sure your Apache web server is running, open the XAMPP Dashboard (http://localhost/dashboard), and click PHPInfo. Look for the Loaded Configuration File setting, as shown in Figure 1-7.

FIGURE 1-7: Examine the Loaded Configuration File setting to determine the location of php.i.
Open php.ini in your favorite text editor, then modify the following settings (php.ini is a long document, so you should search for each setting to save time):
display_errors: Determines whether PHP outputs its error messages to the web browser. In a production environment, you wantdisplay_errorsset toOffbecause you don't want site visitors seeing ugly PHP error messages. However, in a development environment, you definitely wantdisplay_errorsset toOnso you can see where your code went wrong:display_errors=Onerror_reporting: Specifies which types of errors PHP flags. The constantE_ALLflags all errors, and the constantE_STRICTflags code that doesn't meet recommended PHP standards. You don’t needE_STRICTin a production environment, but it’s useful in a development environment:error_reporting=E_ALL | E_STRICT
With display_errors set to On, you'll now see error messages in the browser window. For example, take a look at the following statement:
display_header('notw.png';
Can you spot the error? Yep: the display_header function call is missing its closing parenthesis. Figure 1-8 shows how PHP flags this error. Notice that the message includes not only the error, but also the location of the file and, crucially, the line number of the statement that generated the error.

FIGURE 1-8: A typical PHP error message, showing the error, file path and name, and line number.
Accessing the PHP error log
Setting display_errors to On is very useful in your development environment, but the PHP default is to set display_errors to Off in a production environment. This prevents your visitors from seeing error messages, and it also boosts security because you don't want those visitors seeing sensitive information such as the location of your PHP script.
So what happens when PHP generates an error with display_errors set to Off? It depends on the error, but in most cases you either see a blank web page, or a server error message such as 500 - Internal server error. Neither is particularly helpful, but all is not lost because PHP still records the error message to the PHP error log.
That's nice, but where is this error log stored on the server? That depends on the server, but you can find out by running the following script:
<?php
phpinfo();
?>
This displays the PHP configuration data, which includes an error_log setting that tells you where the PHP error log is stored.
In some cases, you see just the name of a file — usually error_log — and that means the server generates the error log in the same directory as the PHP file that caused the error. So, if you store all your PHP scripts in a php subdirectory, your error log will appear in that subdirectory.
Error messages appear in the error log with the oldest messages at the top, so to see the most recent error, you need to scroll to the bottom of the file.
Debugging with echo statements
You can't set up watch expressions on PHP code, but you can do the next best thing by strategically adding echo (or print) statements that output the current value of whatever variable or function result you want to watch.
For example, here's a loop that generates a dozen random numbers between 1 and 100. To watch the random values as they’re generated, I included an echo statement within the loop:
<?php
for ($i = 0; $i < 12; $i++) {
$randoms[$i] = rand(1, 100);
echo $randoms[$i] . '<br>';
}
?>
Alternatively, you could wait until the loop completes and then run print_r($random) to output the entire array.
Another good use of echo statements for debugging is when your PHP code fails, but you don't get an error message. Now you have no idea where the problem lies, so what’s a web developer to do? You can gradually narrow down where the error occurs by adding an echo statement to your code that outputs a message like Made it this far!. If you see that message, then you move the echo statement a little farther down the code, repeating this procedure until you don't see the message, meaning the code failed before getting to the echo statement.
Alternatively, you can sprinkle several echo statements throughout your code. You can either give each one a different output message, or you can take advantage of one of PHP's so-called magic constants: __LINE__. This constant tells you the current line of the code that’s being executed, so you could add the following echo statement throughout your code:
echo 'Made it to line #' . __LINE__;
Debugging with var_dump() statements
PHP features such as echo and print_r make it easy to see values associated with variables and arrays, but sometimes your debugging efforts require a bit more information. For example, you might want to know the data type of a variable. You can get both the data type and the current value of a variable or expression by using PHP's var_dump() function:
var_dump(expression(s));
expression(s): One or more variable names or expressions
Here's an update to the random number generator that dumps the value of the $randoms array after the loop:
<?php
for ($i = 0; $i < 12; $i++) {
$randoms[$i] = rand(1, 100);
}
var_dump($randoms);
?>
Here’s an example of the output:
array(12) { [0]=> int(44) [1]=> int(92) [2]=> int(61) [3]=> int(61) [4]=> int(12) [5]=> int(60) [6]=> int(14) [7]=> int(46) [8]=> int(73) [9]=> int(29) [10]=> int(8) [11]=> int(71) }