Chapter 1
Melding PHP and JavaScript with Ajax and JSON
IN THIS CHAPTER
![]() Making sense of Ajax
Making sense of Ajax
![]() Loading server data into a page element
Loading server data into a page element
![]() Sending data to and receiving data from the server
Sending data to and receiving data from the server
![]() Getting to know JSON
Getting to know JSON
![]() Using JSON to work with complex data from the server
Using JSON to work with complex data from the server
Basically, what “Ajax” means is “JavaScript now works.” And that in turn means that web-based applications can now be made to work much more like desktop ones.
— PAUL GRAHAM
When coding web pages, it feels like there’s a great divide between the browser front end and the server back end. When you’re working on the front end, you can use HTML tags, CSS properties, and JavaScript code to build, style, and animate your pages. When you’re working on the back end, you can use MySQL and PHP code to define, access, and manipulate data. That all works, but front-end code without back-end data produces a lifeless page, whereas back-end data without front-end code produces useless information. To create a truly dynamic web page, you need to cross this divide. You need to give your web page a mechanism to interact with the server to ask for and receive server data, and you need to give the server a mechanism to return that data in a format the page can understand and manipulate.
In this chapter, you investigate two such mechanisms: Ajax for sending data back and forth between the web page and the server, and JSON for putting that data into a format that’s easily read by your web page code.
What Is Ajax?
Back in the early days of the web, the only way to see new data in a web page was to reload the entire page from the server. It didn’t matter if just a single word or a single color had been changed, you still needed to grab everything from the server and refresh the entire page. This was back in the days when broadband Internet access wasn’t as widespread as it is now (at least in some places), so that page reload could take quite a long time, depending on the size of your Internet tubes.
The sheer inefficiency of this process led some very smart people to wonder if there was a better way. Would it be possible, they asked, to somehow get the web browser to set up a communications channel with the web server that would enable the browser to request new data from the server without requiring a complete page reload?
Thankfully for modern web developers such as you and I, the answer to that question was a resounding “Yes!” The result was a new technology with the decidedly unlovely name of Asynchronous JavaScript and XML, which nowadays we shorten, with gratitude in our hearts, to Ajax.
 Ajax is a mind-bogglingly complicated technology under the hood, but we won’t be opening that hood even a tiny bit. Instead, I only go so far as to say that what Ajax does is insert a layer — called the Ajax engine — between the web page and the web server. With that idea in mind, let me give you a quickie explanation of what the Ajax name means:
- Asynchronous: The web page doesn’t have to wait for the server to resend the entire page when the page changes. Instead, requests are handled by the Ajax engine, which uses an object called
XMLHttpRequest(XHR, for short) to ask the server for the data while also keeping the page displayed so the user can still interact with it. - JavaScript: The language used by the Ajax engine and also the language used to send requests to the server and to handle the response. A pure JavaScript approach is quite complicated, however, so in this book I use jQuery to greatly simplify the interaction.
- XML: The eXtensible Markup Language, which is the data format that the Ajax engine uses to send data to the server and to receive data from the server. Fortunately, you don't have to worry about this because jQuery makes it easy to send the data, and JSON (discussed later) makes it easy to process the received data.
Making Ajax Calls with jQuery
In Book 4, I talk a lot about how jQuery makes many everyday JavaScript coding tasks easier and faster. That’s certainly the case with Ajax, because the jQuery programmers put a lot of effort into making Ajax calls as painless as possible. As I hope to show in this section, I believe they succeeded admirably.
To begin, understand that jQuery’s Ajax support isn’t limited to a single technique; far from it. There are actually quite a few Ajax-related features in the jQuery library, but for this book I’m going to focus on just the four easiest ones:
.load(): Enables you to load the data returned by the server into a specified web page element.get(): Sends a GET request to the server, which is suitable for sending a relatively small amount of data.post(): Sends a POST request to the server, which is suitable for sending a relatively large amount of data.getJSON(): Sends a GET request to the server, and accepts data from the server in the JSON format
The rest of this section covers .load(), .get(), and .post() in more detail. I tackle .getJSON() a bit later when I talk about JSON stuff.
Learning more about GET and POST requests
 When you're working with Ajax calls to the server, one of the decisions you have to make is what request method to use: GET or POST. How on Earth are you supposed to do that? Fortunately, it really only comes down to one thing: the length of the data. GET requests are meant to be used when the data you send to the server is relatively short. The actual limit depends on the web server, but the most common ceiling is 2,048 characters. Anything longer than that and the server might cough up a
 414 Request URI Too Long error. If you’re sending long data (such as a blog entry), use a POST request.
Some folks will tell you that POST is more secure than GET, but is that true? From an Ajax perspective, no, there’s not much difference. Normal GET requests operate by adding a query string to the end of the URL, which is easily seen by the user. In an Ajax GET call, the page URL doesn’t change, but the URL used for the Ajax request does change to include the query string. This URL is easily seen by opening the browser’s web development tools. In Chrome, for example, select the Network tab, as shown in Figure 1-1. If that query string contains sensitive data, a savvy user can find it without too much trouble.
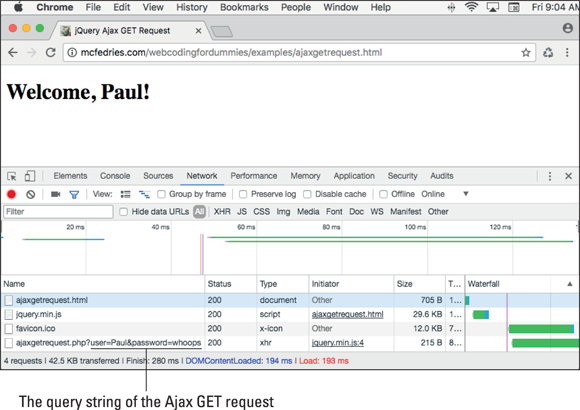
FIGURE 1-1: The Ajax GET request query string is easily visible in the browser’s development tools.
Alas, POST request data is also readily seen by a sophisticated user. In Chrome’s dev tools, for example, click the Network tab, click the Ajax request (it’s the one that shows xhr, short for the XMLHttpRequest object used by Ajax) in the Type column, click the Headers tab, then scroll down to the Form Data section, as shown in Figure 1-2.

FIGURE 1-2: The Ajax POST request data is only slightly harder to find in the browser's development tools.
 If you only ever send relatively small amounts of data to the server, you can certainly stick with using just GET requests. However, some developers use both, even when sending small amounts of data, as a way of making their code more readable:
- Use a GET request when you want to retrieve data from the server without modifying the server data in any way.
- Use a POST request when you want to modify — that is, add, update, or delete — server data.
Handling POST requests in PHP
I cover handling GET requests in PHP code in Book 5, Chapter 3. Handling POST requests is very similar, so here I just take a quick look at how you handle them in PHP.
POST requests can be sent in two ways. The first method is as a query string consisting of a series of name-value pairs that use the following general form:
name1=value1&name2=value2&…
Here’s an example:
book=4&chapter=1&example=2
The second method sends the POST data as an object literal consisting of a series of key-value pairs with the following syntax:
{key1: value1,key2: value2,…}
Here’s an example:
{book: 4,chapter: 1,example: 2}
Either way, you access the data by using PHP’s $_POST variable, which is an associative array created from either the query string’s name-value pairs or the object’s key-value pairs. The preceding examples create the following $_POST array:
$_POST['book'] => 4
$_POST['chapter'] => 1
$_POST['example'] => 2
As with the $_GET array, your code should check that each of the expected elements of the $_POST array exist by using PHP's isset() function, which returns true if a variable exists and has a value other than null. Here's an example:
if (isset($_POST['book'])) {
$book_num = $_POST['book'];
} else {
echo 'The "book" parameter is missing!<br>';
echo 'We are done here, sorry.';
exit(0);
}
Using .load() to update an element with server data
One of the most common and most useful Ajax techniques is to update just a single element on the page with data from the server. All the other elements on the page stay the same, so the user’s experience isn’t disrupted by a jarring and annoying page reload.
jQuery makes this technique very straightforward by offering the .load() method. How you use this method depends on what you want to load, whether you want to send data to the server, and whether you want to run some code when the load is done. The next few sections take you through the possibilities.
Loading an HTML file
The most common use of .load() is to populate a page element with the contents of an HTML file. Here's the general syntax to use:
$(element).load(HTMLFile);
element: A jQuery selector that specifies the element into which the HTML will be loaded.HTMLFile: The name of the file that contains the HTML code you want loaded intoelement. If the file resides in a directory that's different than the current file’s directory, you need to include the path info, as well.
For example, here’s an <h1> tag that represents the entire contents of a file named helloajaxworld.html:
<h1>Hello Ajax World!</h1>
Now consider the following HTML code:
<script>
$(document).ready(function() {
$('#target').load('helloajaxworld.html');
});
</script>
<body>
<div id="target">
</div>
</body>
The <body> tag includes a div element that uses an id value of target. When the page is loaded (that is, when the document object's ready event fires), the script runs the following statement:
$('#target').load('helloajaxworld.html');
This statement tells the browser to use an Ajax call to grab the contents of helloajaxworld.html from the server and then insert that content into the element that uses the id value of target (that is, the page's <div> tag). Figure 1-3 shows the result.

FIGURE 1-3: Using jQuery’s .load() method to load the contents of an HTML file into a page element.
 There's a built-in browser security restriction called the same-origin policy, which only allows a script to access data from another file if both files have the same origin, meaning the following must be the same for both:
- Protocol: This usually means both files must use
httpor both must usehttps. If one file useshttpand the other useshttps, the Ajax call will fail. - Host name: The two files can't be on different subdomains. If one file uses
mydomain.comand the other useswww.mydomain.com, the Ajax call will fail. - Port number: The two files must use the same port number. The standard HTTP port is 80, but if you call the script with, say, port 88 (that is,
http://mydomain.com:88/), the Ajax call will fail.
Therefore, make sure that the HTML file you request has the same origin as the file that contains the .load() statement.
Loading a common header and footer
Why not just put the HTML file's content into the page by hand? You should definitely do that if you’ll only be using that content once. However, it’s very common in web development to have content that is repeated over multiple pages. For example, a particular web project might use the same header and the same footer on every page. Adding the header and footer code by hand is easy as pie if the project consists of just one or two pages. But what if it contains a dozen pages, or two dozen? Yep, you can copy and paste the code no problem, but if you have to change anything in the header or footer, then have fun updating a couple of dozen files.
Forget all that. Instead, put your header code in a separate file (called, say, header.html), your footer code in another file (called, you guessed it, footer.html), and then store them in a separate directory (called, say, includes). Then use .load() to insert that content. That is, all your pages would include code similar to the following:
<script>
$(document).ready(function() {
$('header').load('includes/header.html');
$('footer').load('includes/footer.html');
});
</script>
<body>
<header></header>
The rest of the page stuff goes here
<footer></footer>
</body>
Loading output from a PHP script
If you have a PHP script that uses echo or print to output HTML tags and text, you can use .load() to insert that output into a page element. The general syntax is nearly identical to the one for loading an HTML file:
$(element).load(PHPFile);
element: A jQuery selector that specifies the element into which the PHP output will be loaded.PHPFile: The name of the file that contains the PHP code. If the PHP file sits in a directory other than the current file's directory, include the path info.
For example, here’s a PHP file named get-server-time.php:
<?php
$current_time = date('H:m:s');
echo "The time on the server is $current_time.";
?>
The script gets the current time on the server and then outputs a message displaying the time. Now consider the following HTML code:
<script>
$(document).ready(function() {
$('#target').load('get-server-time.php');
});
</script>
<body>
<h2 id="target">
</h2>
</body>
When the page is ready, the .load() method calls get-server-time.php and loads the output into the <h2> tag, as shown in Figure 1-4.

FIGURE 1-4: Using jQuery's .load() method to load the output of a PHP script into a page element.
The same-origin policy that I mention earlier for HTML files is also in effect for PHP files. That is, the PHP script you request must have the same origin as the file that contains the .load() statement.
Loading a page fragment
Most of the time you'll use .load() to insert the entire contents of an HTML file or PHP output into a page element. However, jQuery also offers a mechanism to insert just a fragment of the page or output. Here’s the syntax:
$(element).load(file fragment);
element: A jQuery selector that specifies the element into which the HTML tags and text will be loadedfile: The name of the file (plus its directory path, if needed) that contains either the HTML code or PHP output you want loaded intoelementfragment: A jQuery selector that specifies the portion offilethat gets loaded intoelement
For example, suppose you want to set up a summary page that lists the titles and first paragraphs from a collection of longer posts. Here's the partial code from one of those posts:
<header>
<h1>It's Official: Teen Instant Messages Nothing But Gibberish</h1>
</header>
<main>
<article>
<section class="first-paragraph">
In a scathing report released today, communications experts have declared that the instant messages teenagers exchange with each other are in reality nothing but gibberish. U.S. Chatmaster General Todd Dood, with technical help from the National Security Agency, examined thousands of instant messages.
</section>
The rest of the post's sections go here
</article>
</main>
Notice two things in this code:
- The title of the post is inside an
<h1>tag. - The first paragraph of the post is assigned the class
first-paragraph.
Given these two tidbits, and assuming this page is located in posts/post1.html, you can use a couple of .load() statements to add the title and first paragraph to the summary page (see Figure 1-5 for the results):
<script>
$(document).ready(function() {
$('#title1').load('posts/post1.html h1');
$('#intro1').load('posts/post1.html .first-paragraph');
});
</script>
<body>
<header id="title1">
</header>
<article id="intro1">
</article>
<div>
<a href="posts/post1.html">Read the rest of the post…</a>
</div>
</body>

FIGURE 1-5: Using jQuery's .load() method to load the title and first paragraph from another page.
Sending data to the server
If you want to load the output from a PHP script, sometimes you might want to pass along to the script some parameters that specify or limit the data sent back by the script. For example, you might ask for the data from a particular user account, the customers from a specified region, or the ten most recent blog posts.
Here’s the variation of the .load() syntax that enables you to send data to the server:
$(element).load(PHPfile, data);
element: A jQuery selector that specifies the element into which the PHP output will be loaded.PHPfile: The name of the PHP file (plus its directory path, if needed) that creates the PHP output you want loaded intoelement.data: The data to send to the server. This can be string or object literal:- String: A query string that specifies a set of name-value pairs using the following format:
'name1=value1&name2=value2,…'jQuery sends the query string as a GET request.
- Object: An object literal that specifies a set of key-value pairs using the following format:
{key1: value1, key2: value2,…}jQuery sends the object as a POST request.
- String: A query string that specifies a set of name-value pairs using the following format:
For example, suppose you have a PHP file named get-category.php that uses $_POST to look for a category number in an object literal and then returns data about that category. Here's how you’d load the PHP script’s output into a page element with id value of category-output:
$('#category-output').load('get-category.php', {category: 1});
Running a function after the load
Most of the time you'll be content just to load some text and tags into an element and then be done with it. Sometimes, however, it’s useful to run some code post-load. You can do that by adding a callback function to the .load() method:
$(element).load(file, data, function() {
Code to run after the load finishes goes here
});
For example, you might want to search the loaded data for a particular value. Similarly, you might want to adjust the data’s CSS based on some criteria.
As an example of the latter, suppose you have a <nav> tag and you use .load() to populate the element with your site's main navigation links. In most cases, you’d put that code in an external JavaScript file and then include the file in each page so that all your pages load the same navigation links. That’s fine, but it’s useful for site visitors if you mark up each of the main navigation links in some way when a visitor is viewing one of those pages. For example, if you have a “What’s New” page, your What’s New link should appear different from the other navigation links when someone is viewing that page.
You can do that by adding a callback function that examines the filename of the current page. If it matches the filename of a navigation link, it applies a class to that link. Here’s some code that does this:
CSS:
.current-nav-link {
background-color: black;
color: white;
}
HTML (nav.html):
<a href="/index.html" id="home">Home</a>
<a href="/whatsnew.html" id="whatsnew">What's New</a>
<a href="/pages/whatsold.html" id="whatsold">What's Old</a>
<a href="/whatswhat.html" id="whatswhat">What's What</a>
jQuery:
$('nav').load('nav.html', function() {
var current_page = window.location.pathname.split('/').pop();
switch (current_page) {
case 'whatsnew.html':
$('#whatsnew').addClass('current-nav-link');
break;
case 'whatsold.html':
$('#whatsold').addClass('current-nav-link');
break;
case 'whatswhat.html':
$('#whatswhat').addClass('current-nav-link');
break;
default:
$('#home').addClass('current-nav-link');
}
});
The CSS defines a class named current-nav-link that switches the background to black and the text color to white. The HTML shows nav.html, the file that holds the navigation links. The jQuery code uses .load() to load nav.html into the <nav> tag (not shown in the code), and then a callback function does two things:
- It determines the filename of the current page by taking the URL's path (given by
window.location.pathname), splitting it into an array with the backslash (/) as the separator, and then running thepop()method to get the last item in the array (that is, the filename). - It uses a
switch()statement to check whether the current filename is equal to the filename used by one of the main navigation links. If so, then the code uses jQuery'saddClass()method to add thecurrent-nav-linkclass to the link element.
Figure 1-6 shows an example of this code at work.
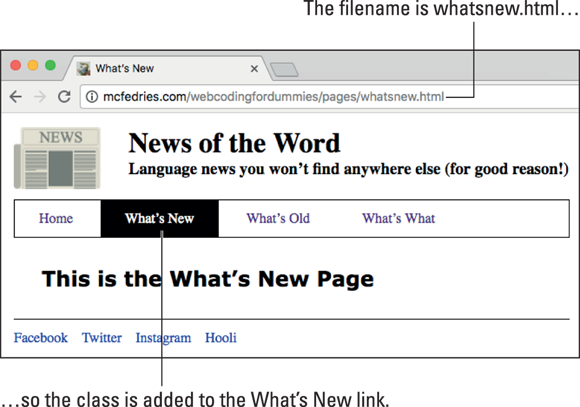
FIGURE 1-6: The .load() callback function determines the current page's filename. If that filename is the same as the filename of a navigation link, the code adds a class to that link.
Using .get() or .post() to communicate with the server
If you want to communicate with the server via Ajax without that communication being tied to a specific page element, use the .get() or .post() functions, which send GET and POST requests, respectively. These functions use the same general syntax:
$.get(script, data-to-send, function(returned-data) {
Code to run if the operation is successful
});
$.post(script, data-to-send, function(returned-data) {
Code to run if the operation is successful
});
script: The name of the PHP file (plus its directory path, if needed) that you want to run.data-to-send: Specifies the data to send to the server. This can be string or object literal:- String: A query string that specifies a set of name-value pairs using the following format:
'name1=value1&name2=value2,…' - Object: An object literal that specifies a set of key-value pairs using the following format:
{key1: value1, key2: value2,…}
- String: A query string that specifies a set of name-value pairs using the following format:
function(returned-data): A function that jQuery runs if the GET or POST operation was success. The data returned by the server is stored in thereturned-dataparameter.
Note, first, that the syntax is slightly unusual in that you don't specify an element after the $() method.
These are extremely versatile functions that you can use in a number of different ways:
- Run a script: If all you want to do is execute a server script, run either method with just the
scriptparameter. For example:$.get('php/update-rss-feeds.php'); - Run a script with data: If you want to run a server script and also supply that script with some data, run either method with both the
scriptanddata-to-sendparameters. For example:$.get('php/update-rss-feeds.php', 'feedID=2'); - Retrieve data: If you want to run a server script and process the data that the script sends back, run either method with the
scriptparameter and thefunction(returned-data)callback function. For example:$.post('total-inventory.php', function(data) {console.log('Total inventory: ' + data);}); - Send and retrieve data: If you want to run a server script, supply that script with some data, and process the data that the script sends back, run either method with all the parameters. For example:
$.post('total-inventory.php', 'category=1', function(data) {console.log('Total Beverage inventory: ' + data);});
For example, suppose you want to know the total value of the inventory (that is, the units in stock multiplied by the price of each unit) for a particular category. Here's a partial PHP script named total-inventory.php that does the job:
// Parse the query string
$category_num = $_POST['category'];
// Create and run a SELECT query
$sql = "SELECT unit_price, units_in_stock
FROM products
WHERE category_id = $category_num";
$result = $mysqli->query($sql);
// Get the query rows as an associative array
$rows = $result->fetch_all(MYSQLI_ASSOC);
$inventory_total = 0;
// Loop through the rows
foreach($rows as $row) {
$inventory_total += $row['unit_price'] * $row['units_in_stock'];
}
echo $inventory_total;
This script (which has many parts not shown, such as the MySQL connection statements), takes a category value via POST and runs a SELECT query that returns the unit_price and units_in_stock for that category. The code then loops through the returned rows, adding to the inventory_total variable each time by multiplying unit_price and units_in_stock. The script finishes by echoing the final value of inventory_total.
Now consider the front-end code:
CSS:
div {
color: green;
font-size: 1.25rem;
}
.warning {
color: red;
font-weight: bold;
}
HTML:
<h1>Inventory Report</h1>
<div></div>
JavaScript/jQuery:
$(document).ready(function() {
$.post('total-inventory.php', 'category=1', function(data) {
var msg = 'The total inventory is $' + data;
if (data >= 10000) {
msg = 'WARNING! Total inventory is $' + data;
$('div').addClass('warning');
}
$('div').html(msg);
});
});
The jQuery .post() function calls total-inventory.php and sends category=1 as the data. The callback function stores the PHP output (that is, the $inventory_total value) in the data parameter, sets up a default message, and checks to see if data is over 10000. If it is, the code changes the message and adds the warning class to the div element. Finally, the code displays the message in the div. Figure 1-7 shows an example result.

FIGURE 1-7: A warning message displayed by the .post() callback function.
Introducing JSON
As I show over and over in this chapter, when the PHP script is ready to send data back to the front end, it uses one or more echo (or print) statements to output the data. That process works fine if all your web page needs from the server is some relatively simple output, such as HTML tags, text, or a single value (such as a number or string).
However, with a web app, it's common to require more sophisticated data, usually some subset of a table or a join of two or more tables. You can’t send pure MySQL data back to the web browser because there are no front-end tools that can work with data in that format. Instead, what you need to do is convert the server data into a special format called JavaScript Object Notation, or JSON (pronounced like the name Jason), for short.
Learning the JSON syntax
I talk about JavaScript object literals in several places in this book, and if you know about object literals, then JSON objects will look very familiar. Here’s the general syntax:
{
"property1": value1,
"property2": value2,
…
"propertyN": valueN
}
JSON data looks like an object, but it’s really just text that consists of one or more property-value pairs with the following characteristics:
- Each property name is surrounded by double quotation marks (
"). - Each value can be one of the following:
- A number
- A string (in which case the value must be surrounded by double quotation marks)
- A Boolean (
trueorfalse) null(that is, no value)- A JavaScript array literal (comma-separated values surrounded by square brackets —
[and]) - A JavaScript object literal (comma-separated property: value pairs surrounded by braces —
{and})
- The property-value pairs are separated by commas.
- The block of property-value pairs is surrounded by braces (
{and}).
Here's an example:
{
"account": 853,
"name": "Alfreds Futterkiste",
"supplier": false,
"recentOrders": [28394,29539,30014],
"contact": {
"name": "Maria Anders",
"phone": "030-0074321",
"email": "[email protected]"
}
}
Declaring and using JSON variables
In the next section, I talk about how useful JSON is for getting complex data — especially database records — from the server to your web page. However, you can also use JSON data in your non-Ajax code. You begin by declaring a JSON variable:
var customer = {
"account": 853,
"name": "Alfreds Futterkiste",
"supplier": false,
"recentOrders": [28394,29539,30014],
"contact": {
"name": "Maria Anders",
"phone": "030-0074321",
"email": "[email protected]"
}
}
You can then refer to any property in the JSON data by using the variable.property syntax. Here are some examples:
customer.account // Returns 853
customer.name // Returns "Alfreds Futterkiste"
customer.recentOrders[1] // Returns 29539
customer.contact.email // Returns "[email protected]"
The JSON syntax can be a bit tricky, so it’s a good idea to check that your data is valid before using it in your code. The easiest way to do that is to use the JSONLint (https://jsonlint.com) validation tool. Copy your JSON code, paste it into the JSONLint text area, then click Validate JSON.
Returning Ajax Data as JSON Text
The real power of JSON becomes clear during Ajax calls when you want to return a complex set of data to the web page. This usually means an array of database records. Sure, you can use your PHP code to loop through the array and output the data along with some HTML tags and text. However, most web apps don’t want to merely display the data; they want to process the data in some way, and that means handling the data using a callback function. That still leaves the rather large problem of getting the server data to the web page, but that’s where JSON comes in. Because JSON data is just text, it’s easy to transfer that data between the server and the web page.
Converting server data to the JSON format
You might be shaking in your boots imagining the complexity of the code required to convert an array of database records into the JSON format. Shake no more, because, amazingly, it takes but a single line of PHP code to do the job! That’s because PHP comes with a handy and powerful function called json_encode() that can take any value and automagically turn it into a JSON object. Here's the syntax:
json_encode(value, options)
value: The value you want to convert to JSON. For most of your Ajax calls, this will be an array of MySQL table rows returned by thefetch_all()method.options: An optional series of constants, separated by the OR operator (|). These constants determine how the function encodes special characters such as quotation marks. Here are four you'll use most often:JSON_HEX_TAG: Encodes less than (<) and greater than (>) as u003C and u003E, respectivelyJSON_HEX_AMP: Encodes ampersands (&) as u0026JSON_HEX_APOS: Encodes single quotation marks (') as u0027JSON_HEX_QUOT: Encodes double quotation marks (") as u0022
The usual procedure is to store the output of json_encode() in a variable, then echo or print that variable. Here's an example (where it’s assumed that the variable $rows contains an array of MySQL rows):
$JSON_data = json_encode($rows, JSON_HEX_APOS | JSON_HEX_QUOT);
echo $JSON_data;
Here’s a longer example that assumes you’ve already used PHP to connect to a MySQL database, and the resulting MySQLi object is stored in the $mysqli variable:
// Create and run a SELECT query
$sql = "SELECT company_name, contact_name, contact_title, contact_email
FROM suppliers";
$result = $mysqli->query($sql);
// Get the query rows as an associative array
$rows = $result->fetch_all(MYSQLI_ASSOC);
// Convert the array to JSON, then output it
$JSON_data = json_encode($rows, JSON_HEX_APOS | JSON_HEX_QUOT);
echo $JSON_data;
Here's a partial listing of what gets stored in $JSON_data:
[{
"company_name": "Exotic Liquids",
"contact_name": "Charlotte Cooper",
"contact_title": "Purchasing Manager",
"contact_email": "[email protected]"
}, {
"company_name": "New Orleans Cajun Delights",
"contact_name": "Shelley Burke",
"contact_title": "Order Administrator",
"contact_email": "[email protected]"
}, {
"company_name": "Grandma Kellyu0027s Homestead",
"contact_name": "Regina Murphy",
"contact_title": "Sales Representative",
"contact_email": "[email protected]"
},
etc.
]
Notice that this is an array of JSON strings, each of which represents a row from the data returned by the MySQL SELECT query. Note, too, that I’ve formatted this with newlines and spaces to make it easier to read. That actual data stored in the variable contains no whitespace.
Handling JSON data returned by the server
By far the easiest way to process JSON data returned by a PHP script is to use jQuery’s .getJSON() function to initiate the Ajax call. Here's the syntax:
$.getJSON(script, data-to-send, function(JSON-array) {
Code to run if the operation is successful
});
script: The name of the PHP file (plus its directory path, if needed) that you want to run.data-to-send: The data to send to the server, which can be a string or an object literal.function(JSON-array): A function that jQuery runs if the operation was successful. The data returned by the server is stored in theJSON-arrayparameter.
Because the PHP script returns an array of JSON strings, the .getJSON() callback function will usually use a .each() loop to run through the array:
$.each(JSON-array, function(index, JSON-string) {
Code to handle each JSON string goes here
});
JSON-array: The JSON array returned by the serverindex: The current index value of the arrayJSON-string: The current array item, which is a JSON string
Here's some code that processes the PHP output from the previous section:
HTML:
<h1>Supplier Contacts</h1>
<main></main>
JavaScript/jQuery:
$.getJSON('php/get-supplier-contacts.php',function(data) {
$.each(data, function(index, contact) {
$('main').append('<section id="contact' + index + '"/>');
$('#contact' + index).append('<div>Company: ' + contact.company_name + '</div>');
$('#contact' + index).append('<div>Contact: ' + contact.contact_name + '</div>');
$('#contact' + index).append('<div>Title: ' + contact.contact_title + '</div>');
$('#contact' + index).append('<div>Email: ' + contact.contact_email + '</div>');
});
});
The code uses .each() to loop through the array of supplier contacts:
- A new
<section>with anidset to"contact"+indexis appended tomain. - A
<div>tag for each of the four pieces of contact data (company_name,contact_name,contact_title, andcontact_email) is appended to the new<section>tag.
Figure 1-8 shows part of the resulting page.

FIGURE 1-8: The callback loops through the JSON array, appending each object to the <main> tag.
The .getJSON() function sends the data to the server using a GET request. What if you want to use a POST request, instead? Alas, jQuery doesn't offer a function such as .postJSON(). Instead, you use the .post() function, but when you get the JSON data back from the server, you turn it into a JavaScript object by using the JSON.parse() function:
JSON.parse(data)
data: The JSON data returned by the server
Here’s an example:
$.post('php/get-supplier-contacts.php',function(data) {
// Convert the JSON text to a JavaScript object
var obj = JSON.parse(data);
$.each(obj, function(index, contact) {
$('main').append('<section id="contact' + index + '"/>');
$('#contact' + index).append('<div>Company: ' + contact.company_name + '</div>');
$('#contact' + index).append('<div>Contact: ' + contact.contact_name + '</div>');
$('#contact' + index).append('<div>Title: ' + contact.contact_title + '</div>');
$('#contact' + index).append('<div>Email: ' + contact.contact_email + '</div>');
});
});