Chapter 5
Configuring WordPress for Optimum Security
IN THIS CHAPTER
![]() Introducing web security
Introducing web security
![]() Understanding today’s web threats
Understanding today’s web threats
![]() Reducing the risk of attack
Reducing the risk of attack
![]() Using sources you can trust
Using sources you can trust
![]() Cleaning up to avoid a soup-kitchen server
Cleaning up to avoid a soup-kitchen server
![]() Hardening WordPress
Hardening WordPress
In this chapter, you deal with web security and how it pertains to WordPress. There are a lot of scary threats on the Internet, but with this chapter — and WordPress, of course — you’ll have no problem keeping your website safe and secure.
 Always have a reliable backup system in place so if something goes wrong with your website, you can reset it to the last version that you know worked. Book 2, Chapter 7 shows you how to back up your website.
Understanding the Basics of Web Security
Information security is the act of protecting information and information systems from unwanted or unauthorized use, access, modification, and disruption. Information security is built on principles of protecting confidentiality, integrity, and availability of information. The ultimate goal is managing your risk.
 No silver bullet can ensure that you’re never compromised. Consider your desktop: The idea of running an operating system (whether it be Windows or Mac OS X) without antivirus software is highly impractical. The same principle applies to your website. You can never reduce the percentage of risk to zero, but you can implement controls to minimize impact and to take a proactive approach to threat preparedness.
You need to be familiar with six distinct types of risk (or threats):
- Defacements: The motivation behind most defacements is to change the appearance of a website. Defacements are often very basic and make some kind of social stance, such as supporting a cause or bringing attention to your poor security posture. If you visit your website, and it doesn’t look anything like you expect it to, contact your host to find out whether it has been defaced, and if so, ask for assistance in restoring it.
- Search engine optimization (SEO) spam: This kind of attack sets out to ruin your search engine results; search engines can warn viewers away from your website. The most popular one is the Pharma hack, which injects code into your website and search engine links to redirect your traffic to pharmaceutical companies and their products. If you find that your website listing disappears from major search engines, such as Google, you should be concerned that your website has been a victim of SEO spam and contact your hosting provider for assistance.
- Malicious redirects: Malicious-redirect attacks direct your traffic somewhere else, most likely to another website. If your domain is
http://domain.com, for example, a malicious redirect might redirect it tohttp://adifferentdomain.com. Malicious redirects are often integrated with other attacks (SEO spam being one). If you visit your website and discover that your domain redirects to a different domain that you don't recognize, your website has been a victim of a malicious-redirect attack, and you should contact your hosting provider for assistance. - iFrame injections: This kind of attack embeds a hidden iFrame in your website that loads another website onto your visitor’s browser (like a pop-up ad). These embedded websites or ads can lead to malicious websites that carry a multitude of infections.
Phishing scams: Phishing scams used to belong only to the world of email: You get an email from your bank asking you to confirm your login information, but if you follow the instructions, your information actually goes to the attacker’s servers rather than the legitimate site.
WordPress websites are sometimes used for the distribution of these attacks. Attackers develop malicious files and code that look like plugins and themes and then exploit credentials on a server or WordPress site, or the attackers use a known vulnerability to infect the plugins and themes. Then they use the bait-and-hook approach through ads or emails to redirect traffic to these fake pages stored on legitimate websites. Keep an eye out for abnormal behavior on your website, such as the display of ads that you didn’t insert yourself or the redirect to domains you’re not familiar with. If at any time you suspect that your website and underlying files have been tampered with, contact your web hosting provider for assistance.
- Backdoor shells: With a backdoor shell, an attacker uploads a piece of PHP code to your website, which allows him to take control of it, download your files, and upload his own. This kind of attack is more difficult to discover because it doesn’t always change the appearance of your site or your experience with it. You typically discover this kind of attack by noticing new files in your file system or notice a marked increase in your bandwidth use.
The rest of this chapter shows you how you can prevent any of these nasty attacks against your WordPress website so that you can keep yourself and your visitors safe.
Part of being a website owner is keeping your website and subscribers safe from hackers.
Preventing Attacks
You can’t ever be 100 percent secure. But with a WordPress website, you’re in good hands. The WordPress developers understand the importance of security, and they built a highly effective system to address any vulnerabilities you’ll run across.
Updating WordPress
The first way to prevent hackers is to keep your WordPress website up to date. The quick-and-easy way to do so is through the automatic update feature. Book 2, Chapter 6 takes you through the process of updating WordPress step by step.
The beauty of applying updates is that they often introduce new streamlined features, improve overall usability, and work to patch and close identified or known vulnerabilities.
As technology and concepts evolve, so do attackers and their methods for finding new vulnerabilities. The farther behind you get, the harder it is to update later and the more your risk increases, which in turn affects how vulnerable you are to attacks.
Installing patches
All WordPress updates are not created equal, but you should pay special attention to a few updates of the WordPress core software.
Updates include major releases, which contain feature additions, user interface (UI) changes, bug fixes, and security updates. You can always tell what major release you’re on by the first two numbers in the version number (as in 5.0). See Book 1, Chapter 3 for more information about the difference between major and minor releases.
Then you have point releases, which are minor releases that can be identified by the third number in the version number (as in 5.0.1). These releases contain bug fixes and security patches but don’t introduce new features.
When you see a point release, apply it. Point releases rarely cause issues with your site, and they help close off vulnerabilities in a lot of cases.
Using a firewall
A firewall builds a wall between your website and the much larger Internet; a good firewall thwarts a lot of attacks.
Your web server should also have a good firewall protecting it. Every day, countless visits, good and bad, are made to every website. Some visits are by real visitors, but many are by automated bots. A web application firewall (WAF) helps protect your WordPress installation from those bad visitors.
WAFs don’t offer 100 percent protection, but they’re good deterrents for everyday attacks.
 If you plan to manage and administer your own server, install and configure a tool such as ModSecurity (
www.modsecurity.org), an open-source, WAF-like solution that lives at the web server level as an Apache module.
If you’re using a managed hosting solution, you’re probably in luck, because most of these solutions offer built-in WAF-like features.
As a user, you can also install a WordPress plugin called Cloudflare, which you can find in the official WordPress Plugin list at https://wordpress.org/plugins/cloudflare. Cloudflare (see Figure 5-1) provides the best available WAF-like features for your WordPress website on a managed hosting solution. If you’d like to use the Cloudflare plugin on your WordPress website, you need to have a Cloudflare account at https://www.cloudflare.com. You can open a free account or upgrade to a paid account that includes more features. After you’ve installed the plugin on your website, follow the instructions on the Cloudflare configuration page to connect your WordPress blog to your Cloudflare account.

FIGURE 5-1: The Cloudflare plugin for WordPress.
Using Trusted Sources
One of the simplest things you can do to keep your website secure is vet all the people who work on your website: website administrators, website designers, developers, and web hosts. Also be sure to use trusted plugins, themes, and applications. If you’re running a self-hosted WordPress website, this could be quite a few people.
If you’re using themes or plugins, use the WordPress.org Theme and Plugin directories (https://wordpress.org/themes and https://wordpress.org/plugins, respectively). Each plugin and theme you find in those directories has gone through a documented review process, which reduces the risk of your downloading dangerous code.
Engage the WordPress user community. The WordPress forums (https://wordpress.org/support/forums) are great places to start. Ask for community references, and identify the support mechanisms in place to support the theme or plugin over the long term.
Managing Users
The concept of least privilege has been in practice for ages: Give someone the required privileges for as long as he needs it to perform his job or a task. When the task is complete, reduce the privileges.
Apply these safeguards not just to your WordPress Dashboard, but also to your website host’s control panels and server transfer protocols. (See Book 2, Chapter 2 for information on Secure File Transfer Protocol.)
Generating passwords
Password management is perhaps the simplest of tasks, yet it’s the Achilles’ heel of all applications, including desktop and web-based apps. You can keep your files and data on your web server safe and secure through these simple password-management techniques:
- Length: Create passwords that are more than 16 characters long to make it more difficult for harmful users to guess your password.
- Uniqueness: Don’t use the same passwords across all services. If someone does discover the password for one of your applications or services, she won’t be able to use it to log in to another application or service that you manage.
- Complexity: A strong password contains a minimum of 8 characters and is made up of upper- and lowercase letters, numbers, and symbols, making it hard to guess.
Use password managers and generators. Two of the most popular products right now are LastPass (https://www.lastpass.com) and 1Password (https://1password.com).
Limiting built-in user roles
Not all users of your website need administrator privileges. WordPress gives you five user roles to choose among, and those roles provide sufficient flexibility for your websites.
You can find detailed information on each of the roles in Book 3, Chapter 3. You can also discover more information on users and roles in the WordPress.org Codex at https://codex.wordpress.org/Roles_and_Capabilities.
Create a separate account with a lower role (such as Author) and use that account for everyday posting. Reserve the Administrator account purely for administration of your website.
Establishing user accountability
The use of generic accounts should be the last thing you ever consider because the more generic accounts you have, the greater your risk of being compromised. If a compromise does happen, you want to have full accountability for all users and be able to quickly answer questions like these:
- Who was logged in?
- Who made what changes?
- What did the users do while logged in?
Generic accounts preclude you from doing appropriate incident handling in the event of a compromise. In Book 3, Chapter 3, you find all the information and step-by-step details on how to create new users in your WordPress Dashboard. Keep the principles of least privilege and user accountability in mind as you’re creating users.
Staying Clear of Soup-Kitchen Servers
Among the regular issues plaguing website owners are soup-kitchen servers. A soup-kitchen server is one that has never been maintained properly and has a combination of websites, old software, archives, unneeded files, folders, email, and so on living on its hard drive.
The real problem comes into play with the “out of sight, out of mind” phenomenon. A server owner can forget about software installations on a server that may be outdated or insecure. Over time, this forgetfulness introduces new vulnerabilities to the environment:
- Disabled installations or websites that live on the server are as accessible and susceptible to external attacks as live sites.
- When a forgotten installation or website is infected, it leads to cross-site contamination — a wormlike effect in which the infection can jump and replicate itself across the server.
- In many instances, these forgotten installations or websites house the backdoor and engine of the infection. This means that as you try to rigorously clean your live website, you continuously get reinfected.
Figure 5-2 demonstrates what a soup-kitchen server looks like. $wp_version indicates the version of WordPress that is currently installed in the directory. The many listings for $wp_version = 2.9 (at this writing, the most recent version of WordPress is 5.0) show how many out-of-date installations of WordPress this particular soup-kitchen server has.

FIGURE 5-2: A file-server listing from a typical soup-kitchen server.
If you have more than one installation of WordPress on your current hosting account, try the following techniques to reduce your risk of running a soup-kitchen server:
- Isolate each installation with its own user. This action minimizes internal attacks that come from cross-site contamination.
- Keep your installations up to date, and remove them when you no longer need them. This action lessens the risk of attacks that result from outdated software on your server.
Hardening WordPress
When you harden (or, secure) your WordPress installation, you reduce your risk of being hacked by malicious attackers.
Hardening your website involves following these five steps:
- Enable multifactor authentication.
- Limit login attempts.
- Disable theme and plugin editors.
- Filter by IP (Internet Protocol) address.
- Kill PHP execution.
I cover each of these steps in the following sections.
Hardening your website doesn't guarantee your protection, but it definitely reduces your risk.
Enabling multifactor authentication
Authentication, in this case, refers to confirming the identity of the person who is attempting to log in and obtain access to your WordPress installation — just like when you log in to your WordPress website by using a username and password. The idea of multifactor authentication stems from the idea that one password alone isn’t enough to secure access to any environment. Multifactor authentication (also called strong authentication) requires more than one user-authentication method. By default, WordPress requires only one: a username with password. Multifactor authentication adds layers of authentication measures for extra security of user logins.
To enable multifactor authentication, you can use a free plugin called Google Authenticator for WordPress, which provides two-factor user authentication through an application on your mobile or tablet device (iPhone, iPad, Android, and so on). For this plugin to work, you need the following:
- Google Authenticator app: Find it at the App Store for iOS devices or the Google Play Store for Android devices.
- Google Authenticator plugin: You can find this plugin in the Plugin list at
https://wordpress.org/plugins/miniorange-2-factor-authentication. See Book 7, Chapters 1 and 2 for details on finding, installing, and activating plugins.
Configuring Google Authenticator
When you have both of those tasks accomplished, you can configure the plugin for use on your website. Follow these steps to configure the plugin for each user on your site:
Click the 2FAS link on the Settings menu on your Dashboard.
The 2FAS — Two Factor Authentication Service page opens.
Download the authenticator app to your smartphone (Android or iPhone).
The authenticator app on your phone is required to complete the two factor authentication. I’ve chosen the Google Authenticator app, downloaded to my iPhone.
Click the Show QR Code button.
This button displays on the 2FAS page in your WordPress Dashboard (see step 1) and when you click the button, the QR code displays.
Scan the QR code in the Google Authenticator application on your phone.
Point your device camera at your computer screen, and line up the QR code within the camera brackets of your mobile device. The application automatically reads the QR code as soon as it’s aligned correctly and displays a six-digit code identifying your blog. The six-digit code refreshes on a time-based interval. After you scan the QR code is scanned, you receive a message on your mobile device that contains a unique numeric code.
- Enter the six-digit code generated by the Google Authenticator app in the Token field.
Click the Add Device button.
You see a notice at the top of the 2FAS page that the tokens are configured.
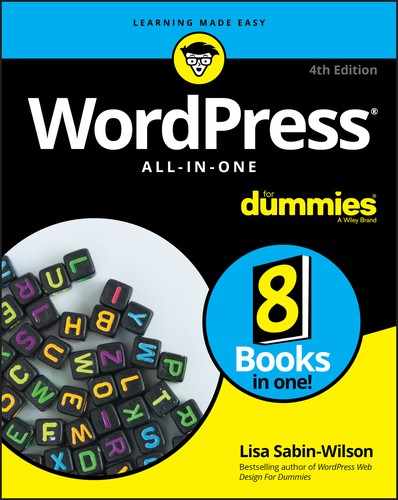
(Optional) Click the Add Another App/Device button.
Perform this step if you want to add more than one smartphone device for authentication. (See Figure 5-3.)
FIGURE 5-3: Two-Factor Authenticator settings.
Now, with the Google Authenticator plugin in place, whenever anyone tries to log in to your WordPress Dashboard, she has to fill in his username and password, as usual, but with multifactor authentication in place, she also needs to enter the authentication code that was sent to her mobile device. Without this unique code, the user can’t log in to the WordPress Dashboard.
 The Google Authenticator application verification code is time-based, which is why it’s very important that your mobile phone and your WordPress site are set to the same time zone. If you get the message that the Google Authentication verification code you’re using is invalid or expired, you need to delete the plugin and then go to your WordPress Dashboard to make sure that the time zone is set to the same time zone that your mobile or tablet device uses. See Book 3, Chapter 2 for information on time settings for your WordPress site.
Activating multifactor authentication
The following steps show you how the multifactor authentication is implemented on your site:
Log out of your WordPress Dashboard.
The WordPress login form displays in your browser window.
- Type your username in the Username or Email field.
- Type your password in the Password field.
Click the Log In button.
A new page loads with a form that asks you to enter your token, as shown in Figure 5-4.
Open the Google Authenticator application on your mobile or tablet device, and locate the six-digit code assigned to your blog.
This six-digit code refreshes every 60 seconds. If you have more than one blog that uses the application, find the code that corresponds with your site.
- Type the six-digit code in the Token field.
Click the Log In button.
You’re successfully logged in to your WordPress Dashboard via a two-factor authentication method.

FIGURE 5-4: The WordPress login form with Google Authenticator.
If you don’t have access to a mobile device, WordPress has a couple of plugins you can use, including these two:
Limiting login attempts
Limiting the number of times a user can attempt to log in to your WordPress site helps reduce the risk of brute-force attack. A brute-force attack happens when an attacker tries to gain access by guessing your username and password through the process of cycling through combinations.
To help protect against brute-force attacks, you want to limit the number of times any user can try to log in to your website. You can accomplish this task in WordPress easily enough by using the Limit Login Attempts plugin. You can find this plugin in the WordPress Plugin list: https://wordpress.org/plugins/wp-limit-login-attempts/. See Book 7, Chapters 1 and 2 for information on finding, installing, and activating it.
When you have the Limit Login Attempts plugin installed, follow these steps to configure the settings:
Click the WP Limit Login link on the Settings menu of your Dashboard.
The Limit Login Attempts Settings page opens in your Dashboard, as shown in Figure 5-5.
Select a configuration option.
You can change the value of any of the following four options if you upgrade to the premium version (at a cost of $19 per year). The defaults should be sufficient for you, however.
- Number of Login Attempts: This setting is the maximum number of times users are allowed to retry failed logins. Default is 5.
- Lockdown Time in Minutes: This setting is the amount of time a user is prevented from retrying a login after she reaches the maximum allowed number. Default is 10.
- Number of Attempts for Captcha: This option sets the number of time a user can attempt to enter the captcha. Default is 3.
- Enable Captcha: Captcha is enabled by default.

FIGURE 5-5: WP Limit Login Attempts Setting screen.
If you’re managing your own server, monitor your login attempts to see whether a malicious attacker is making repeated attempts to obtain passwords and usernames. Keep track of those IP addresses from your logs, and if an address repeatedly attempts to log in, add it to your server firewall to prevent it from burdening your server access points.
Disabling theme and plugin editors
By default, when you log in to the WordPress Dashboard, you can edit any theme and plugin file by using the Theme Editor (click the Appearance link on the Editor menu) and the Plugin Editor (click the Plugins link on the Editor menu). The idea makes a lot of sense; it gives you the ability to do everything within your Admin panel without having to worry about logging in to your server via SFTP to edit files.
Unfortunately, having the theme and plugin editors available also gives any attacker who gains access to the Dashboard full rights to modify any theme or plugin file, which is very dangerous, because even one line of malware code embedded within any file can grant an attacker remote access to your environment without ever having to touch your Dashboard.
You can prevent this situation by disabling the Theme Editor and Plugin Editor. To do so, add a WordPress constant (or rule) to the WordPress configuration file (wp-config.php), which is in the installation folder on your web server. Download the wp-config.php via SFTP (see Book 2, Chapter 2), and open the file in a text editor, such as Notepad (PC) or TextEdit (Mac). Look for the following line of code:
define( 'DB_COLLAT', '' );
Add the following constant (rule) on the line directly below the preceding line:
define( 'DISALLOW_FILE_EDIT',true );
Although adding this constant won't prevent an attack, it helps reduce the impact of a compromise. You can find information about other constants you can add to the wp-config.php file at https://codex.wordpress.org/Editing_wp-config.php.
You can also disable the automatic updates in WordPress (the feature in place that automatically updates WordPress core and WordPress plugins) to include the administrator. If you do, you’d have to do everything manually, via SFTP. To do disable automatic updates, use the following constant in your wp-config.php file:
define( 'DISALLOW_FILE_MODS',true );
Filtering by IP address
Another option is to limit access to the Dashboard to specific IP addresses. This method is also referred to as whitelisting (allowing) access, which complements blacklisting (disallowing) solutions.
Everything that touches the Internet — such as your computer, a website, or a server network — has an IP address. An IP is like your home address; it uniquely identifies you so that the Internet knows where your computer is located. An example of an IP is 12.345.67.89 — a series of numbers that uniquely identifies the physical location of a computer or network.
You can edit the .htaccess file on your web server so that only IPs that you approve can access your Admin Dashboard, thereby blocking everyone else from having Dashboard access.
The lines of code that define the access rules get added to the .htaccess file located on your web server where WordPress is installed, in a folder called /wp-admin. Download that file to your computer via SFTP; open it with a text editor, such as Notepad (PC) or TextEdit (Mac); and add the following lines to it:
order allow,deny
deny from all
allow from 12.345.67.89
In this example, the order defines what comes first. An IP that follows the allow rules is given access; any IP that doesn't follow the allow rules is denied access. In this example, only the IP 12.345.67.89 can access the Admin Dashboard; all other IPs are denied.
If the /wp-admin folder in your WordPress installation doesn't contain a file called .htaccess, you can easily create one using your SFTP program. Open the /wp-admin folder, right-click with your mouse in the SFTP program window to open a shortcut menu, and choose New File. Give that new file the name .htaccess, and make sure to add the new rules from “Disabling theme and plugin editors” earlier in this chapter.
Limiting access via IP carries the following potential negatives:
- This technique works only with static IP addresses. A dynamic IP changes constantly. You have ways to make this technique work with dynamic IPs, but those methods are beyond the scope of this chapter.
- The ability to use
.htaccessis highly dependent on a web server that's running Apache. This technique won’t do you any good if your web server is Windows-based or IIS, or if you’re using the latest NGINX web server. - Your Apache web server needs to be configured to allow directives to be defined by
.htaccessfiles. Ask your web host about configuration.
Killing PHP execution
For most backdoor intrusion attempts to function, a PHP file has to be executed. The term backdoor describes ways of obtaining access to a web server through means that bypass regular authentication methods, such as file injections through programming languages such as PHP and JavaScript. Disabling PHP execution prevents an attack or compromise from taking place because PHP can’t executed at all.
To disable PHP execution, add four lines of code to the .htaccess file on your web server:
<Files *.php>
Order allow,deny
Deny from all
</Files>
By default, you have an .htaccess file in the WordPress directory on your web server. You can also create an .htaccess file in other folders — particularly the folders in which you want to disable PHP execution.
To disable PHP execution for maximum security, create an .htaccess file with those four lines of code in the following folders in your WordPress installation:
/wp-includes/wp-content/uploads/wp-content
This WordPress installation directory (the directory WordPress is installed in) is important because it’s the only directory that has to be writeable for WordPress to work. If an image is uploaded with a modified header, or if a PHP file is uploaded and PHP execution is allowed, an attacker could exploit this weakness to create havoc in your environment. When PHP execution is disabled, however, an attacker is unable to create any havoc.