Chapter 3
Managing Users and Multiple Authors
IN THIS CHAPTER
![]() Deciding what roles to assign users
Deciding what roles to assign users
![]() Allowing new users to register
Allowing new users to register
![]() Adding a new user
Adding a new user
![]() Making changes to user profiles
Making changes to user profiles
![]() Using tools to manage multiauthor sites
Using tools to manage multiauthor sites
A multiauthor site involves inviting others to coauthor, or contribute articles, posts, pages, or other content to your site. You can expand the offerings on your website by using multiauthor publishing because you can have several people writing on different topics or offering different perspectives on the same topic. Many people use this type of site to create a collaborative writing space on the web, and WordPress doesn’t limit the number of authors you can add to your site.
Additionally, you can invite other people to register as subscribers, who don’t contribute content but are registered members of the site, which can have benefits too. (You could make some content available to registered users only, for example.)
This chapter takes you through the process of adding users to your site, takes the mystery out of the different user roles and capabilities, and gives you some tools for managing a multiauthor website.
Understanding User Roles and Capabilities
Before you start adding new users to your site, you need to understand the differences among the user roles, because each user role is assigned a different level of access and grouping of capabilities to your site, as follows:
- Subscriber: Subscriber is the default role. Maintain this role as the one assigned to new users, particularly if you don’t know who’s registering. Subscribers get access to the Dashboard page, and they can view and change the options in their profiles on the Profile screen. (They don’t have access to your account settings, however — only to their own.) Each user can change her username, email address, password, bio, and other descriptors in her user profile. The WordPress database stores subscribers’ profile information, and your site remembers them each time they visit, so they don’t have to complete the profile information each time they leave comments on your site.
- Contributor: In addition to the access subscribers have, contributors can upload files and write, edit, and delete their own posts. Contributors can write posts, but they can’t publish the posts; the administrator reviews all contributor posts and decides whether to publish them. This setting is a nice way to moderate content written by new authors.
- Author: In addition to the access contributors have, authors can publish and edit their own posts.
- Editor: In addition to the access authors have, editors can moderate comments, manage categories, manage links, edit pages, and edit other authors’ posts.
- Administrator: Administrators can edit all the options and settings in the WordPress blog.
- Super Admin: This role exists only when you have the multisite feature activated in WordPress. See Book 8 for more about the multisite feature.
Table 3-1 gives you an at-a-glance reference for the basic differences in roles and capabilities for WordPress users.
TABLE 3-1 WordPress User Roles and Capabilities
Super Admin |
Administrator |
Editor |
Author |
Contributor |
Subscriber |
|
Manage multisite features |
Yes |
No |
No |
No |
No |
No |
Add/edit users |
Yes |
Yes |
No |
No |
No |
No |
Add/edit/install plugins |
Yes |
Yes |
No |
No |
No |
No |
Add/edit/install themes |
Yes |
Yes |
No |
No |
No |
No |
Manage comments |
Yes |
Yes |
Yes |
No |
No |
No |
Manage categories, tags, and links |
Yes |
Yes |
Yes |
No |
No |
No |
Publish posts |
Yes |
Yes |
Yes |
Yes |
No (moderated) |
No |
Edit published posts |
Yes |
Yes |
Yes |
No |
No |
No |
Edit others' posts |
Yes |
Yes |
Yes |
No |
No |
No |
Edit own posts |
Yes |
Yes |
Yes |
Yes |
Yes |
No |
Publish pages |
Yes |
Yes |
Yes |
No |
No |
No |
Read |
Yes |
Yes |
Yes |
Yes |
Yes |
Yes |
 Table 3-1 doesn’t offer exhaustive information by any means, but it covers the basic user roles and capabilities for WordPress or the most common capabilities for each user role. For a full list of user roles and capabilities, check out the WordPress Codex at
 https://codex.wordpress.org/Roles_and_Capabilities.
Allowing New User Registration
As you can see in Table 3-1, each user level has a different set of capabilities. Book 3, Chapter 2 discusses the General Settings of the WordPress Dashboard, in which you set the default role for users who register on your website. Keep the default role set to Subscriber because when you open registration to the public, you don’t always know who’s registering until after they register — and you don’t want to arbitrarily hand out higher levels of access to the settings of your website unless you know and trust the user.
When users register on your website, you, as the administrator, get an email notification (sent to the email address you set on the General Settings screen) so you always know when a new user registers; then you can go to your Dashboard and edit the user to set his role any way you see fit.
 New users can register on your site only after you enable the Anyone Can Register option on the General Settings screen within your Dashboard (Book 3, Chapter 2). If you don’t have this option enabled, users see a message on the Registration page telling them that registration isn’t allowed, as shown in Figure 3-1.

FIGURE 3-1: The message to users that registration isn’t allowed.
By the way, the direct URL for registration on a blog that has registration enabled is https://yourdomain.com/wp-login.php?action=register. With registration enabled (in General Settings), a user sees a form inviting her to input her desired username and email address. After she does, she gets a confirmation notice in her inbox including an authorization link that she must click to authenticate her registration.
After a user has registered, you, as the site administrator, can manage her user account and assign a user role. (Refer to Table 3-1.)
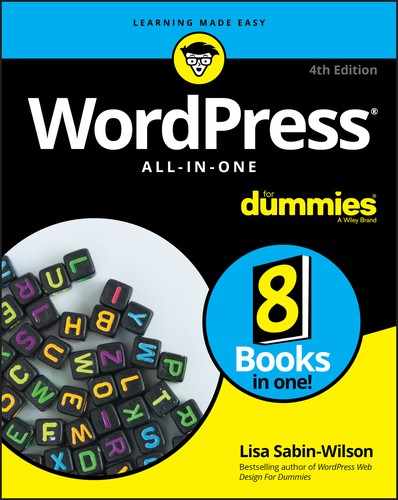
Adding New Users Manually
Allowing new users to register by using the WordPress registration interface is only one way to add users to your site. As the site administrator, you have the ability to add new users manually by following these steps:
- Log in to your WordPress Dashboard by inputting your username and password in the form at
https://yourdomain.com/wp-login.php. Click the Add New link in the Users submenu of the Dashboard.
The Add New User screen loads, as shown in Figure 3-2.
Enter the username in the Username text box.
You can’t skip this text box. The new user types this username when he’s prompted to log in to your site.
Enter the user’s email address in the Email text box.
You can’t skip this text box, either. The user receives notifications from you and your site at this email address.
- Enter the user’s first name in the First Name text box.
- Enter the user’s last name in the Last Name text box.
- Enter the URL of the user’s website in the Website text box.
Click the Show Password button.
WordPress provides a random, strong password for you, or you can type your own password in the text field. WordPress provides a strength indicator that gives you an idea of how strong (secure) your chosen password is. You want secure passwords so that no one can easily guess them, so make the password at least seven characters long, and use a combination of letters, numbers, and symbols (such as @, #, $, and ^).
- If you want the user to receive his password by email, select the Send the New User an Email about Their Account check box.
- From the Role drop-down menu, choose Subscriber, Contributor, Author, Editor, or Administrator.
Click the Add New User button.
The Add New User screen loads, and the email notification is sent to the user you just added. When the screen loads, all the fields are cleared, allowing you to add another new user if you want.
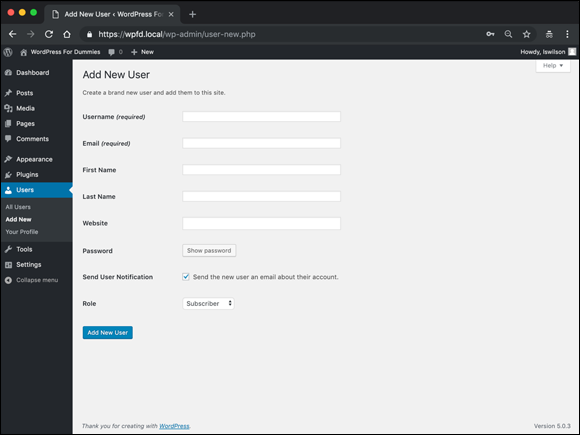
FIGURE 3-2: The Add New User screen of the WordPress Dashboard.
Editing User Details
After users register and settle into their accounts on your site, you, as the site administrator, have the ability to edit their accounts. You may never have to edit user accounts at all, but you have the option to do so if you need to. Most often, users can access the details of their own accounts and change their email addresses, names, passwords, and so on. Following are some circumstances under which you may need to edit user accounts:
- Edit user roles. When a user registers, you may want to increase her role, or level of access, on your site; promote an existing user to administrator; or demote an existing administrator or editor a notch or two.
- Edit user emails. If a user loses access to the email account that she registered with, she may ask you to change her account email address so that she can access her account notifications again.
- Edit user passwords. If a user loses access to the email account with which she registered, she can’t use WordPress’s Lost Password feature, which allows users to gain access to their account password through email recovery. In that case, a user may ask you to reset her password for her so that she can log in and access her account again.
In any of these circumstances, you can make the necessary changes by clicking the Users link on the Users menu of your WordPress Dashboard, which loads the Users screen, shown in Figure 3-3.
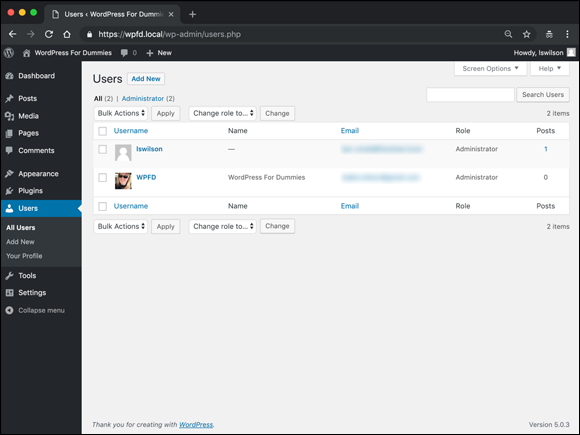
FIGURE 3-3: The Users screen lets you manage all the users on your site.
Figure 3-3 shows the Users screen for a site that has multiple users with different levels of access, or roles. When you hover your mouse over the name of a user, an Edit link appears below the user listing. Click that Edit link to access the Edit User screen, where you can edit different pieces of information for that user, including
- Personal Options: These options include Visual Editor, Color Scheme, Keyboard Shortcuts, and Toolbar preferences.
- Name: Specify a user’s role, first and last names, nickname, and display name.
- Contact Info: These options include the user’s email address and website.
- Biographical Info: This section provides a few lines of biographical info for the user (optional, but some WordPress themes display authors’ biographies). This section also displays the user’s profile picture.
- New Password: Here, you can change the password for the user.
The Edit User screen looks the same, and has the same features, as the Profile screen that you deal with in Book 3, Chapter 2. Feel free to visit that chapter to get the lowdown on the options and settings on this screen.
Managing a Multiauthor Site
You may love running a multiauthor site, but the job has its challenges. The minute you become the owner of a multiauthor site, you immediately assume the role of manager for the authors you invited into your space. At times, those authors look to you for support and guidance, not only on their content management, but also for tips and advice about how to use the WordPress interface. It’s a good thing you have this book at the ready so that you can offer up the gems of information you’re finding within these pages!
You can find many tools to assist you in managing a multiauthor site, as well as making your site more interactive by adding some features, which can make it a more rewarding and satisfying experience not only for you and your readers, but for your authors as well.
The tools listed in the following sections come by way of plugins, which are add-ons that extend the scope of WordPress by adding different functionality and features. You can find information on the use and installation of plugins in Book 7.
Tools that help authors communicate
When you’re running a multiauthor site, communication is crucial for sharing information, giving and receiving inspiration, and making certain that no two authors are writing the same article (or similar articles) on your site. Use the following tools to manage the flow of communication among everyone involved:
Post Status Notifications: In “Understanding User Roles and Capabilities” earlier in this chapter, I mention that the role of contributor can write and save posts to your site, but those posts don’t get published to the site until an administrator approves them. This plugin notifies the administrator, via email, when a new post is submitted for review. Additionally, the contributing author gets an email notification when an administrator has published the post to the site.
https://wordpress.org/plugins/wpsite-post-status-notificationsEditorial Calendar: This plugin gives you an overview of scheduled posts, post authors, and the dates when you scheduled the posts to publish to your site. This plugin can help you prevent multiple author posts from publishing too close together or, in some cases, right on top of one another; you simply reschedule posts by using a drag-and-drop interface.
Email Users: This plugin allows you to send emails to all registered users of your site, and users can send emails to one another by using the plugin interface of the Dashboard. This tool enables the authors and users on your multiauthor site to keep in touch and communicate with one another.
User Notes: When you run a website that has multiple authors, you may find it helpful to leave notes on an user profile that are visible to site administrators only. These notes can be helpful and can serve as a tool for reminders.
Tools to promote author profiles
One way to operate a successful multiauthor site involves taking every opportunity to promote your authors and their information. Authors often get involved in posting content on websites in addition to yours, for exposure. The plugins in this list give you tools to promote authors bios, links, social network feeds, and more:
Authors Widget: This plugin gives you a widget you can place on your site that displays a list of authors along with the number of posts they’ve published, a link to the RSS feeds for their posts, and their names and photos (see Figure 3-4).
Author Avatars List: This plugin gives you a widget to display a list of authors on your website. This plugin enables the display of author avatars, names, and short bios of the author.
Author Spotlight: This plugin provides a widget that you can place on your sidebar, displaying the profile of the author of the post being viewed. The author information automatically appears on a single post page and displays the profile of the author of the post.
Author Recent Posts: This plugin gives you a widget that allows an author to display a listing of her recent posts in the sidebar of posts she’s published on your site.
FIGURE 3-4: The Authors Widget options.
Tools to manage multiauthor blog posts
The plugins listed in this section can help you, the site administrator, manage your group of authors and registered users by giving you some tools to track users’ activity, list their posts, and stay up to date and notified when your authors publish new content:
Co-Authors Plus: This plugin allows you to assign multiple authors to one post, which you may find especially helpful when you have several authors collaborating on one article, allowing those authors to share the byline and credit.
Authors Posts Widget: This plugin provides a very easy way to show a list of authors on a site with a count of the number of posts each author has published.
Audit Trail: This plugin records the actions of the registered users on your site, such as when they log in or log out, when they publish posts and pages, and when they visit pages within your site. As the site administrator, you can keep track of the actions your authors and users take on your website.