Chapter 3
Uploading and Displaying Photos and Galleries
IN THIS CHAPTER
![]() Using the built-in image-upload feature
Using the built-in image-upload feature
![]() Inserting a photo into your post
Inserting a photo into your post
![]() Add multiple images displayed side by side
Add multiple images displayed side by side
![]() Add a cover photo to your post
Add a cover photo to your post
![]() Creating photo galleries in WordPress
Creating photo galleries in WordPress
Adding images and photos to your posts can really dress up the content. By using images and photos, you give your content a dimension that you can’t express in plain text. Through visual imagery, you can call attention to your post and add depth to it. With WordPress, you can insert single images or photographs, or you can use a few nifty plugins to turn some of the pages in your site into a full-fledged photo gallery.
In this chapter, you discover how to add some special touches to your site posts by adding images and photo galleries, all by using the built-in image-upload feature and image editor in WordPress.
Inserting a Single Image into a Post
Adding an image to a post is easy with the WordPress image uploader. Jump right in and give it a go. From the Dashboard, click the Add New link on the Posts menu, and the Edit Post screen loads in your browser. On the Edit Post screen, you see three icons that are shortcuts allowing you to add one of three commonly used blocks in the WordPress Block Editor (see Book 4, Chapter 1). Click the Image icon to add and open an Image block, shown in Figure 3-1.
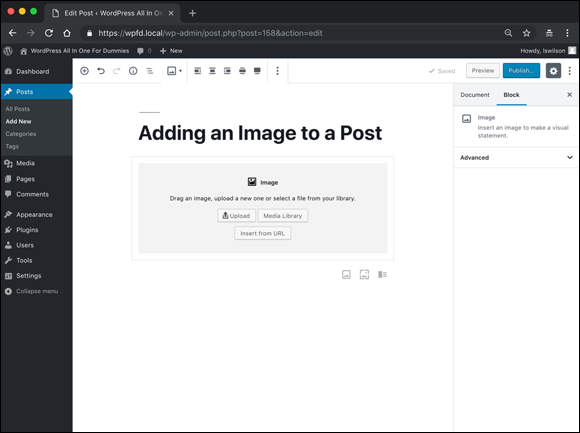
FIGURE 3-1: An Image block in the WordPress block Editor.
The Image block gives you four ways to add an image to your post, all described in detail in the following sections of this chapter.
- Upload: Select an image from your computer, and upload it to your site.
- Media Library: Select an image from the WordPress Media Library.
- Insert from URL: Use an image from a different source by adding an image URL.
- Drag an Image: Drag an image from your computer to your WordPress site.
Uploading an image from your computer
After you’ve added the Image block to your post, you can add an image from your computer’s hard drive by following these steps:
Click the Upload button in the Image block.
A dialog box opens, allowing you to select an image (or multiple images) from your computer’s hard drive. (See Figure 3-2.)
Select your image(s) from your hard drive and then click the Open button.
The image is uploaded from your computer to your website, and the Edit Post screen displays your uploaded image ready for editing, if needed.
Edit the details for the image in the Image Settings section of the settings panel on the right side of the Edit Post screen (see Figure 3-3).
The Image Settings section provides several image options, all covered in Book 4, Chapter 1:
- Alt Text
- Image Size
- Image Dimensions
- Link To
 WordPress automatically creates small and medium-size versions of the original images you upload through the built-in image uploader. A thumbnail is a smaller version of the original file. You can edit the size of the thumbnail by clicking the Settings link and then clicking the Media menu link. In the Image Sizes section of the Media Settings page, designate the desired height and width of the small and medium thumbnail images generated by WordPress.
Use the Image block toolbar to set the display options for the image.
Figure 3-4 shows the toolbar for the Image block. Book 4, Chapter 1 covers how to work with the toolbar options for the Image block at length. If you want to edit the image you’ve uploaded, continue to the next step in this list for image-editing steps; if you don’t need to edit your image, skip to step 12.
Click the Edit Image icon in the Image block toolbar to edit the appearance of the image or change the image.
The Select or Upload Media screen opens with the image selected (see Figure 3-5). You can select a different image to use in this screen or proceed to steps 6–11 to edit the image you’ve chosen.
Click the Edit Image link in the Attachment Details section of the Select or Upload Media screen.
The Edit Media screen opens, as shown in Figure 3-6.
Use the Image Edit toolbar above the image you uploaded (refer to Figure 3-6) to make changes to the image.
Click the icons in the menu to edit your image, and be sure to click the Save button underneath the image to save your changes. From left to right, the icons are
- Crop: Cut the image to a smaller size. Click inside the image, drag your mouse to make your crop selection (see Figure 3-7), and then click the Crop icon to apply your selection.
- Rotate Counterclockwise: Rotate the image to the left.
- Rotate Clockwise: Rotate the image to the right.
- Flip Vertically: Flip the image upside down and back again.
- Flip Horizontally: Flip the image from right to left and back again.
- Undo: Undo any changes you’ve made.
- Redo: Redo image edits that you’ve undone.
Set image dimensions in the Scale Image section on the right side of the Edit Media screen.
The Scale Image section displays the actual dimensions of your image. Change the width and height by typing numbers in the corresponding text boxes to define new dimensions for your image; then click the Scale button to save your settings.
Crop your image in the Image Crop section on the right side of the Edit Media screen by defining the Aspect Ratio and Crop Selection.
The aspect ratio is the relationship between the width and height of the image. Use the two text boxes to specify the aspect ratio, such as 1:1 (square), 4:3, or 16:9. After you’ve made your crop selection (step 7), you can refine and adjust it by entering the size in pixels. The minimum selection size is the thumbnail size set in the Media settings (choose Dashboard ⇒ Settings ⇒ Media).
Select options to apply the image-edit changes to all image sizes, only the Thumbnail size, or all image sizes except Thumbnail.
These options are in the Thumbnail Settings section on the right side of the Edit Media screen.
Click the Update button when you’re done editing the image.
The Edit Media screen reloads and displays the message
Media file updated.- Continue adding content to your post, or publish it.

FIGURE 3-2: Uploading an image from your computer.

FIGURE 3-3: You can set several options for your image after you add it to your post.
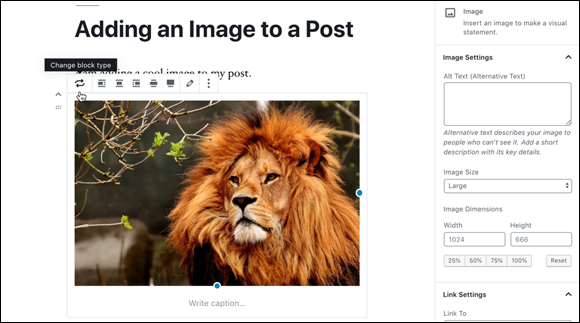
FIGURE 3-4: When you click the Image block, the toolbar appears at the top of the Edit Post screen.

FIGURE 3-5: The Select or Upload Media screen.
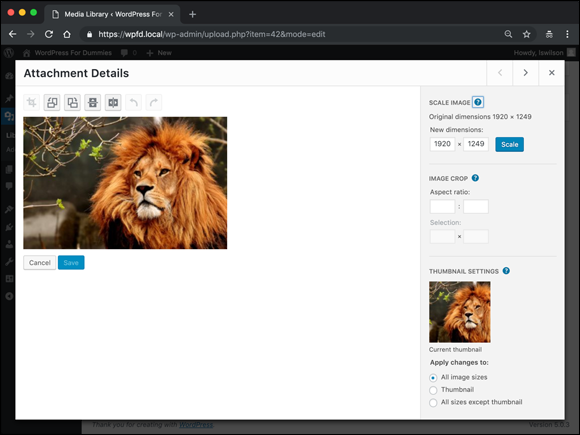
FIGURE 3-6: The Edit Media screen.

FIGURE 3-7: The Edit Media Screen displaying the crop selection for an image.
Inserting an image from the Media Library
The WordPress Media Library (see Book 3, Chapter 2) contains all the images you've ever uploaded to your website, making those images available for use in any post or page you create on your site. After you’ve added an Image block to your post, you can add an image from the Media Library by following these steps:
Click the Media Library button in the Image block (refer to Figure 3-1).
The Select or Upload Media screen opens with the Media Library section displayed (refer to Figure 3-5).
- Select the image you want to use by clicking it.
Click the Select button.
The Select or Upload Media screen closes, and the Edit Post screen reappears. WordPress inserts the image you’ve chosen into the post you’re creating.
Set the options for the image.
Complete steps 3 and 4 of “Uploading an image from your computer” earlier in this chapter.
- Continue adding content to your post, or publish it.
You can insert an image into your post by using a URL or by dragging an image from your computer to your WordPress website, as well. These techniques are covered in Book 4, Chapter 1.
Using the Columns block to Insert Multiple Images in a Row
The Layout Elements section of the WordPress Block Editor has a block called Columns. You can use this block to add a row of columns to your post and then insert images into those columns to create a row of multiple images for display in your post. Figure 3-8 displays a post with a grid of images created by using a variety of columns and images. I used the standard Image block for the first image you see; then I used a Columns block to create the two side-by-side images on the page.

FIGURE 3-8: A grid of images in a blog post using the Columns and Image blocks.
To add and configure a Columns block with images in your post, follow these steps:
Add the Columns block in your post on the Edit Post screen.
You can find the methods for adding blocks to your post in Book 4, Chapter 1. Figure 3-9 shows the Cover Image block inserted into a post. By default, adding the Columns block to your post adds two columns side by side.
Click the Add Block icon to add an Image block in the left column.
When you hover your mouse in the first (left) column, a small plus icon appears. When you click that icon, the WordPress block-selector window appears, and you can select the Image block, as shown in Figure 3-10.
Add your image to the left column, using the Image block options.
Follow the steps in “Inserting a Single Image into a Post” earlier in this chapter.
- Repeat steps 2 and 3 for the column on the right side of the Columns block to insert an image into the right column.
Continue adding content to your post, or publish it.
When you’re done, your Edit Post screen looks like Figure 3-11, with your two selected images displayed next to each other. (If you want to create a grid like the one in Figure 3-8 earlier in this chapter, add an Image block above the Columns block in the Edit Post screen to add a single image, for a grid of three images.)

FIGURE 3-9: The Columns block in the WordPress Block Editor.
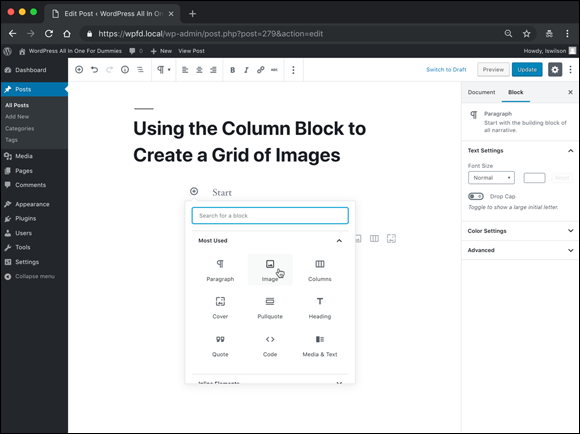
FIGURE 3-10: Adding the Image block to one of the columns in the Columns block.
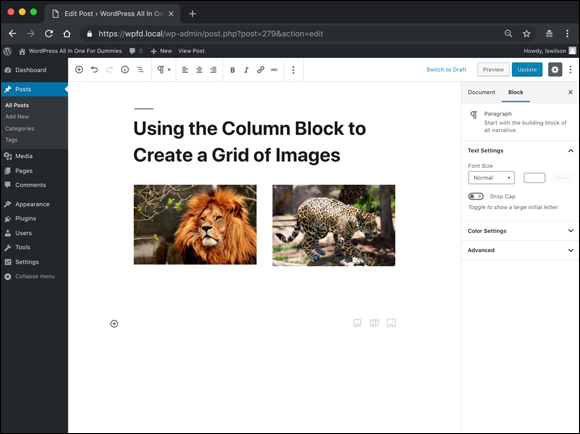
FIGURE 3-11: The Columns block on the Edit Post screen.
You can add more than two columns by using the Columns block. In the settings panel for the Columns block (on the right side of the Edit Post screen), you can define how many columns you want the Columns block to have. You could can have three or four images displayed in a row, for example. You could get creative, creating grids of images by stacking multiple Columns blocks on top of one another, each with differing numbers of columns. You might have four rows of images in which the first row has two columns, the second row has four columns, the third row has two columns, and the fourth row has one column. That arrangement would create an interesting image grid.
Inserting a Cover Image into a Post
The WordPress Block Editor has a Cover block, which you can use in place of a heading to add additional emphasis to a section of your site. The Cover block allows you to display a short line of text on top of an image of your choice. Figure 3-12 displays a post I created on my site about tigers. You can see the cover image displayed below the title of the post (Beautiful Jungle Cat).

FIGURE 3-12: An example of the Cover block in use on my site.
Using the Cover block is a nice way to separate different sections of your post content. You can use it in place of a regular heading to add more visual emphasis and appeal to your content, for example.
To add and configure a Cover block in your post, follow these steps:
Add the Cover block in your post on the Edit Post screen.
You can find the methods for adding blocks to your post in Book 4, Chapter 1. Figure 3-13 shows the Cover block inserted into a post.
Click the Upload button to select an image from your computer or the Media Library button to select an image from the Media Library.
The steps for these two methods are listed in “Uploading an image from your computer” and “Inserting an image from the Media Library,” earlier in this chapter. When you’re done, the image appears in your content on the Edit Post screen.
Add your desired text in the Cover block.
Click the text
Write titlein the Cover block and type your own text over it. In Figure 3-14, I added text that displays on top of the image I added in the Cover block.(Optional) Edit the display of the text you added in step 3.
Figure 3-14 shows the text added to the Cover block. You also see a small toolbar above the text with four icons you can use to adjust the format of the text added to the image:
- Bold: Click this icon to make the text bold (darker). Example: bold text.
- Italic: Click this icon to make the text italic (slanted). Example: italic text.
- Link: Click this icon to create a hyperlink by adding a URL to the text.
- Strikethrough: Click this icon to apply a line through the text. Example:
strikethrough text.
(Optional) Adjust text alignment by using the Cover block toolbar.
Click one of these three icons to align the text in the Cover block: Align Text Left, Align Text Center, or Align Text Right. By default, text is center-aligned.
Use the Cover block toolbar to set the display options for the image.
Figure 3-15 shows the toolbar for the Cover block. The options include (from left to right)
- Change Block Type: Click this option to change the type of block you're currently using. If you want to change from a Cover block to a Heading block, for example, click the Change Block Type icon and then select the Heading block to swap it. The only block types you can change to from a Cover block are Image and Heading.
- Align Left: This block-formatting option positions the image within the Cover block against the left margin of the page.
- Align Center: This block-formatting option positions the image within the Cover block in the center of the page.
- Align Right: This block-formatting option positions the image within the Cover block against the right margin of the page.
- Wide Width: Click this option to set the width of the image to the width of the content on the page.
- Full Width: Click this option to increase the width of the image to the width of the screen you’re viewing the content on. In Figure 3-7 earlier in this chapter, you see a post I created with a Full Width cover image. Notice that the left and right edges of the image extend all the way to the left and right sides of the viewing screen.
- Edit Image: Click this option if you want to edit the image. Follow step 7 of “Uploading an image from your computer” earlier in this chapter.
- More Options: The settings here are the same as the ones discussed in Book 4, Chapter 1.
(Optional) Set the Cover block settings to a fixed background.
In the settings panel on the right of the Edit Post screen, you see settings for the Cover block. In the Cover Settings section is a toggle setting called Fixed Background. By default, this setting is set to off. Click the toggle button to set the background image to fixed. A fixed background means that the image is locked in place and doesn’t move as your visitors scroll down the page of your website. It’s a neat effect; give it a try! If you don’t like the effect, you set the Fixed Background option to off.
(Optional) Set a color overlay for the image in the Cover block.
In the settings panel, you see a section called Overlay, with these options:
- Overlay Color: You can set the color for the background of the image as one of the five predefined colors in the settings panel, or click the custom color picker icon to set a specific image. The color you choose is overlaid on the image.
Background Opacity: When you’ve set the overlay color, you can set the opacity of that color as well. Opacity refers to the transparency of the color. Suppose that the image you’re using is hanging on a wall in your house, and you want to hang a curtain in front of it. If that curtain is solid black, you could say that the curtain has 100 percent opacity (or zero transparency) because you can’t see the image on the wall through the curtain.
The same concept applies to the background opacity on the image in the Cover block. Set the opacity to 0 to achieve full transparency; set it to 50 to achieve half transparency or 100 to no transparency. You can use the slider in the settings panel to set the opacity to any point between 0 and 100. Figure 3-16 shows a Cover block on my website with the overlay color set to light gray and 80 percent opacity.
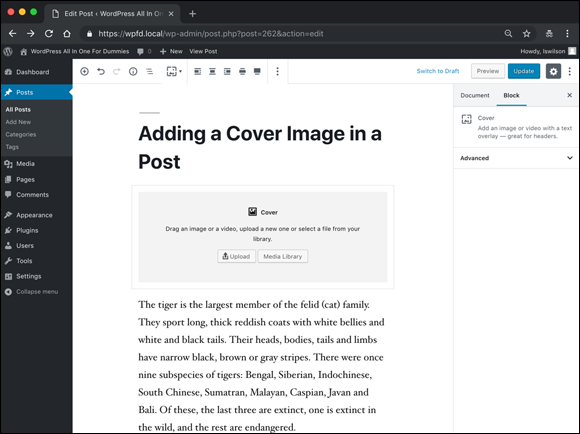
FIGURE 3-13: The Cover block in the WordPress Block Editor.

FIGURE 3-14: Adding text in the Cover block.

FIGURE 3-15: The Cover block toolbar.

FIGURE 3-16: The Cover block used on a site with an image that has a light gray overlay color set to 80 percent opacity.
Inserting a Photo Gallery
You can also use the WordPress Block Editor to insert a full photo gallery into your posts. Upload all your images; then, instead adding an Image block, use the Gallery block.
Follow these steps to insert a photo gallery into a blog post:
Add the Gallery block to your post on the Edit Post screen.
You can find the methods for adding blocks to your post in Book 4, Chapter 1. Figure 3-17 shows the Gallery block inserted into a post.
Click the Upload button to select an image from your computer or the Media Library button to select an image from the Media Library.
The Create Gallery screen opens. The steps for these two methods appear in “Uploading an image from your computer” and “Inserting an image from the Media Library” earlier in this chapter. The only difference is that you can select multiple images to include in the Gallery block; when selected, the selected images appear at the bottom of the Create Gallery screen.
Click the Create a New Gallery button.
The Edit Gallery screen opens, displaying all the images you selected in step 2.
- (Optional) Add a caption for each image by clicking the Caption This Image area and typing a caption or short description for the image.
(Optional) Set the order in which the images appear in the gallery by using the drag-and-drop option on the Edit Gallery page.
Drag and drop images to change their order.
Click the Insert Gallery button.
WordPress inserts the selected images into your post in the Gallery block (see Figure 3-18).
Use the Gallery block toolbar to set the display options for the gallery.
Figure 3-19 shows the toolbar for the Gallery block. The options include (from left to right)
- Change Block Type: Click this option to change the type of block you’re currently using. If you want to change from a Gallery block to an Image block, for example, click the Change Block Type icon and then select the Image block to swap it. The only block type you can change to from a Gallery block is an Image block.
- Align Left: This block-formatting option positions the image within the Gallery block against the left margin of the page.
- Align Center: This block-formatting option positions the image within the Gallery block in the center of the page.
- Align Right: This block-formatting option positions the image within the Gallery block against the right margin of the page.
- Wide Width: Click this option to set the width of the image to the width of the content on the page.
- Full Width: Click this option to increase the width of the Gallery to the full width of the screen you’re viewing the content on. In Figure 3-20, you see a post I created with a full-width gallery. Notice that the left and right edges of the image extend all the way to the left and right sides of the viewing screen.
- Edit Gallery: Click this option if you want to edit the gallery to choose different images or arrange the order in which the images in appear.
- More Options: These settings are the same ones discussed in Book 4, Chapter 1.
- Use the Gallery block options in the setting panel on the right side of the Edit Post page to configure options for your gallery.
- Columns: Select how many columns of images you want to appear in your gallery.
- Crop Images: By default, this option creates image thumbnails that are cropped to the same size so that they align evenly. You can turn this setting off if you prefer different-size thumbnails in your gallery.
- Link To: Select Attachment Page, Media File, or None to tell WordPress what you’d like the images in the gallery to link to.
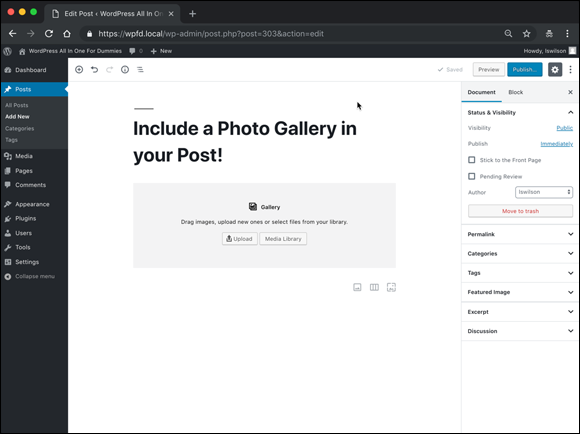
FIGURE 3-17: The Gallery block in the WordPress Block Editor.
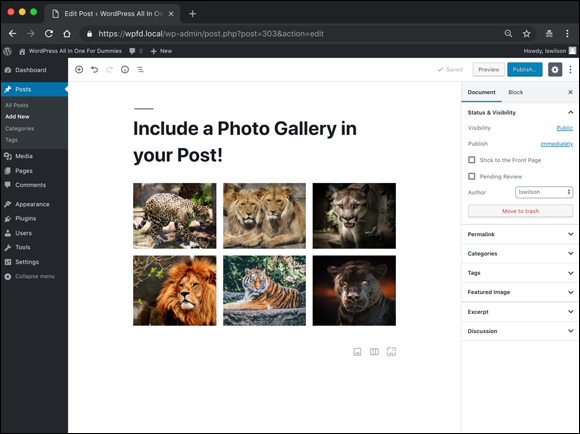
FIGURE 3-18: The Gallery block populated with selected images.

FIGURE 3-19: The Gallery block toolbar.
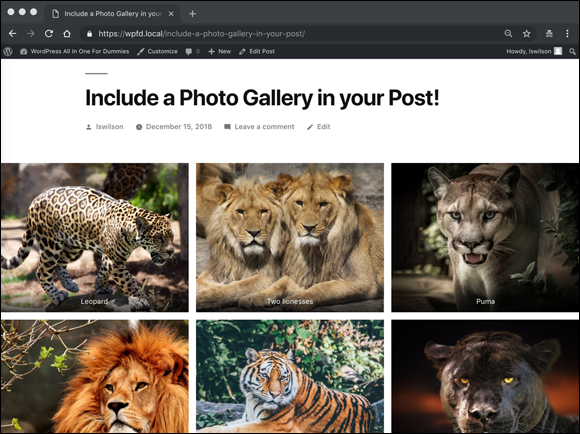
FIGURE 3-20: A photo gallery on my website using the Gallery block.
Check out the “WordPress image and gallery plugins” sidebar for a few interesting and helpful plugins that can help you create beautiful image galleries and photo albums on your website.
Matt Mullenweg, co-founder of the WordPress software, created a blog on his site that uses only photos and images in a grid format that creates an interesting photo blog. Check out his photo blog (https://matt.blog) in Figure 3-21.

FIGURE 3-21: Matt Mullenweg’s photo blog.