Chapter 4
Management of Users and Access Control
IN THIS CHAPTER
![]() Understanding default user management
Understanding default user management
![]() Changing default user behavior
Changing default user behavior
![]() Exploring user access to site features
Exploring user access to site features
In Book 8, Chapter 3, I discuss the Network Admin menu of your Dashboard, which allows you to manage aspects of your network. In this chapter, I explain how to manage users across the network, including changing some of the default management options to suit your needs.
One of the hardest things for new network admins to understand is that although each site is managed separately, users are global. That is, after a user logs in, he’s logged in across the entire network and has the ability to comment on any site that has commenting enabled. (See Book 3, Chapter 2.) The user can visit the Dashboard of the main site in the install to manage his profile information and can access the Dashboard’s My Sites menu to reach sites that he administers. The user also registers at the main site — not at individual sites in the network.
Setting Default User Permissions
When you enable the Multisite feature, new site and new user registrations are turned off by default. But you can add new sites and users from the Network Admin Dashboard. To let users sign up for your network, follow these steps:
Log in to the Network Admin Dashboard and then click the Settings menu link.
The Network Settings screen loads in your browser window.
 The Network Admin Dashboard is different from the Site Admin Dashboard. For reference, you can find your Network Admin Dashboard at this URL:
 https://yourdomain.com/wp-admin/network/settings.php. (Replaceyourdomain.comwith your actual domain name.)In the Registration Settings section, select the User Accounts May Be Registered option (shown in Figure 4-1).
This setting allows users to register on your network. It also assigns them to the main site as Subscribers but doesn't allow them to create new sites.
- Click the Save Changes button at the bottom of the page.
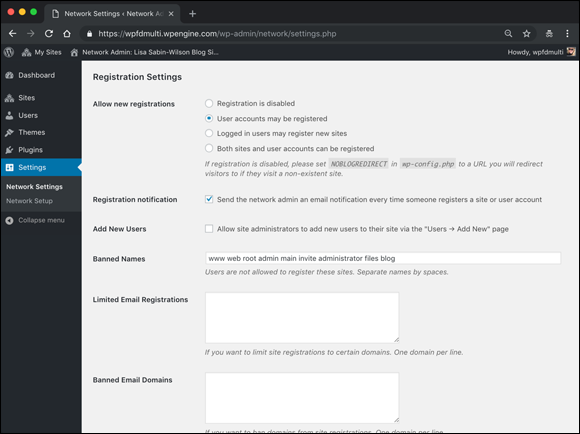
FIGURE 4-1: User registration options.
 If you select the Both Sites and User Accounts May Be Registered option on the Network Admin Settings screen, you not only allow users to register a new account, but also give them the option to create a new site on your network.
Registering users
When signing up, the user is directed to the main site of the installation and then added to one of the child sites. This site may be her site (if she chose to have a site when registering) or an existing site. If it’s any existing site other than the main site, you, as the network admin, must add the user to that site manually. The user who owns the site can manually add users as well if you enabled the option in Network Admin Settings that allows site admins to add users to their sites.
The registration page (see Figure 4-2) is located at http://yourdomain.com/wp-signup.php. This sign-up page bypasses the regular WordPress registration page. (See Book 3, Chapter 3.)

FIGURE 4-2: The network sign-up page.
After filling out the form, the user receives an email with a link to activate her account. When she does so, she can immediately log in and manage her details; she's directed to her primary site, which is the main site if she has no site to administer.
You also can add users to existing sites in the network. You can always assign users to specific sites on a per-case basis. When you set up a network and enable the option titled Allow Site Administrators to Add New Users to Their Site via the “Users⇒ Add New” Page (shown in Figure 4-3), you allow site admins to add other users in the network to their sites. Although the Add New Users setting is turned off by default, you can enable it by selecting the Allow Site Administrators option on the Settings page of the Network Admin Dashboard.

FIGURE 4-3: Allowing users to add other users to their sites.
Controlling access to sites
By default, you have a list of all the sites on the network that other users don’t have access to unless they’re network admins. (See Book 8, Chapter 3.) Unless you, the network admin, add such ability via plugins, a user can’t navigate from one child site to the next. The only list provided to a user is on the My Sites screen, shown in Figure 4-4. You can access this screen by clicking the My Sites link on the admin toolbar menu at the top of your site.

FIGURE 4-4: The My Sites screen shows sites that the user manages.
The My Sites screen lists only sites of which the user is the administrator, not sites on which the user has a lesser role. Additionally, the My Sites screen has a link that allows the user to create more sites (if the network admin allows that access via the Settings menu of the Network Admin Dashboard).
If you’re running (or planning to run) a network of sites and want to display a public-facing list of sites in your network, a plugin called Multisite Site Index gives you access to a widget, or a shortcode, that you can use to display a list of sites within your network on a page of your own website. Users and visitors can click through that list to discover sites within your network easily. You can find the Multisite Site Index plugin on the WordPress site at https://wordpress.org/plugins/multisite-site-index.
Importing users
You may have an existing pool of users you want to add to the network if (for example) you had a website before your network existed and collected registrations or sign-ups. (Even newsletter programs give you a downloadable list of users that you can import into your network.) You can use the Import Export WordPress Users plugin, available at https://wordpress.org/plugins/users-customers-import-export-for-wp-woocommerce, to import a large group of users at the same time, rather than manually and one at a time. Currently, no default method is available to import users into WordPress without plugins.
You need to do two things to bulk-import users, and the first is to install the plugin. (See Book 7 for information on plugin installation.) Figure 4-5 displays the User Import Export screen that appears after the plugin is successfully installed.

FIGURE 4-5: User Import Export screen.
After you have the plugin successfully installed, you need to get your list of users in CSV (comma-separated value) format. Figure 4-6 shows the CSV file that I created to run a test import of users. Using Microsoft Excel, I created a spreadsheet with the following columns:
- ID
- user_login
- user_pass
- roles
- user_email
- first_name
- last_name
- display_name
- user_url

FIGURE 4-6: CSV file containing user data ready to import.
After I created these columns, I populated the rows with user data (in Figure 4-6, my data is dummy data used to test the functionality of the plugin) and then saved the file on my computer as a .csv file.
Click the User/Customer Import tab on the User Import Export screen (refer to Figure 4-5) and then click the Upload File and Import button. Figure 4-7 shows the Users screen of the WordPress Dashboard with successfully created user accounts after you perform the import by using the Import Export WordPress Users plugin.

FIGURE 4-7: Users screen displaying successfully imported users.
Changing Defaults
Depending on your needs, you may want to change the way that users are added to sites as Subscribers within your network. By default, users can't add themselves to a random network site without making a request to the network admin or the administrator of the site they want to be added to. If they do register on your site, by default they’re added as users only on the main site. This setup may work fine for most sites, but if you want your users to be able to register with existing sites within your network, read on, because these sections are for you.
Site-specific sign-up
For many people, signing up on the main site and then asking to be added to a subsite by a network admin can be a confusing experience. Plugins, however, can make the process easier and less confusing for everyone.
If you want existing users to be able to add themselves to existing sites on the network, the Network Subsite User Registration plugin, available on the WordPress website at https://wordpress.org/plugins/network-subsite-user-registration, allows users to sign up on any site within your network. Install this plugin as a regular plugin, as I outline in Book 7, chapters 1 and 2.
After the plugin is installed, choose Users⇒ Registration on any site within the network to enable public registration on that site. (See Figure 4-8.)
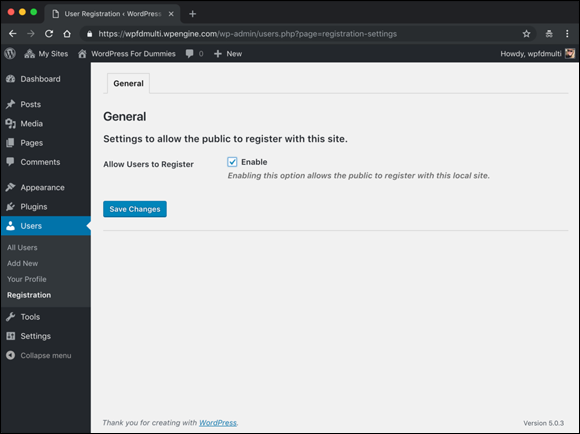
FIGURE 4-8: Enabling public registration on a network site.
User role management
When he is added to a network or a site, a user is assigned the role of Subscriber by default. You may want to assign a different role to the user and automatically add her to your other sites in the network. (Book 3, Chapter 3 explains roles and permissions.)
When a user signs up for her own site, for example, you may want to assign her a nonadministrator role. You may want to set her role to Editor, for example, to restrict the menus she can access on the Dashboard and to prevent her from using some of the functionality of WordPress. You may want to have new site owners sign up as Editors of the sites to give them fewer permissions on their Dashboards.
The Multisite User Role Manager plugin (https://wordpress.org/plugins/multisite-user-role-manager) allows you to manage the roles of all the users in your network from one screen, rather than on individual sites’ Dashboards. This plugin saves you a lot of time in managing user roles and access in your network.
Exploring Default Site Settings
Default settings can control user access to things such as menus, themes, and the Dashboard. The next chapter in this book, Chapter 5 discusses the network settings in detail.
Because users can’t add or edit plugins, the Plugins menu is disabled by default. You can still access the Plugins page via the Network Admin Dashboard Plugins menu link, but other site administrators can’t.
To enable the Plugins menu for site administrators, follow these steps:
On the Network Admin Dashboard, click the Settings menu link.
The Network Settings screen opens.
Scroll down to the Menu Settings section.
The Plugins check box next to Enable Administration Menus is deselected, which means that users can’t see the menu regardless of their user role.
- Select the Plugins check box to make the Plugins menu available to site administrators, as shown in Figure 4-9.
- Save your selection by clicking the Save Changes button.

FIGURE 4-9: Enabling the Plugins menu for site administrators.
Similarly, you must enable any themes installed on the network before a site administrator can choose the theme from the Appearance menu. I explain how to do so in Book 8, Chapter 3.