Chapter 1
Writing Your First Post
IN THIS CHAPTER
![]() Navigating the Edit Post screen
Navigating the Edit Post screen
![]() Discovering the block editor
Discovering the block editor
![]() Inserting new and editing existing blocks
Inserting new and editing existing blocks
![]() Publishing your post
Publishing your post
![]() Creating a unique work space for writing
Creating a unique work space for writing
It’s time to write your first post on your new WordPress site! I leave it to you to decide on the topic you write about and the writing techniques you use to get your message across; I have my hands full writing this book! I can tell you, however, all about the techniques you’ll use to write the wonderful passages that can bring you fame. Ready?
This chapter covers everything you need to know about the basics of publishing a post on your site, from writing a post to formatting, categorizing, tagging, and publishing it to your site.
Composing Your Post
Composing a post is a lot like typing an email: You give it a title, you write the message, and you click a button to send your words into the world. By using the different options that WordPress provides — content blocks, discussion options, categories, and tags, for example — you can configure each post however you like. This section, however, covers the minimal steps you take to compose and publish a post on your site.
Follow these steps to write a basic post:
Click the Add New link on the Posts menu of the Dashboard.
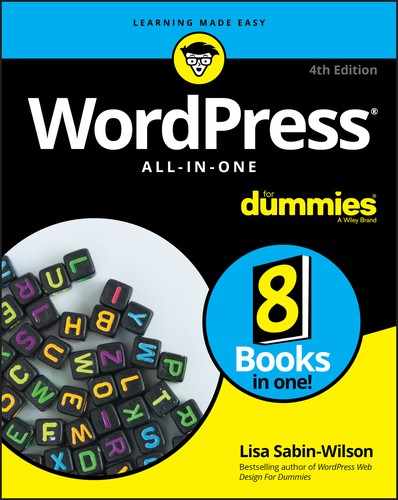
The Edit Post screen opens, as shown in Figure 1-1.
- Type the title of your post in the Add Title text field at the top of the Edit Post screen.
Type the content of your post in the area below the Add Title field.
The first time you visit the Edit Post screen, this area displays a message that says
Start writing or type to choose a new block. I cover blocks in “Using the block editor” later in this chapter. For the purposes of this section, you'll type the text of your new post in this area.Click the Save Draft link, located in the top-right corner of the Edit Post screen.
The Save Draft link changes to a message that says
Saved.WordPress has a built-in autosave feature to make sure that your content is saved and protected from being lost. Imagine spending an hour writing a long post and then the power goes out due to a storm in your area! You don’t need to worry about all your work being lost because WordPress thoughtfully saved it for you. The default interval is 10 seconds, so if you don’t click the Save Draft link, WordPress saves your post for you automatically. When the storm is over, you’ll find a draft of the post you were working on before lightning struck.
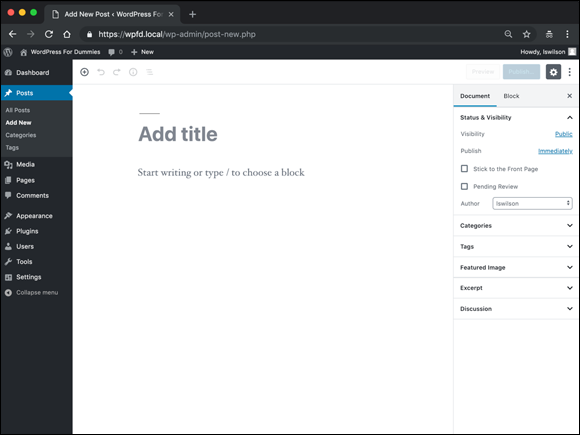
FIGURE 1-1: Give your post a title, and write your post body.
At this point, you can skip to “Publishing Your Post” later in this chapter for information on publishing your post to your site, or you can continue with the following sections to discover how to refine the options for your post.
Using the Block Editor
In 2018, WordPress introduced a brand-new way of writing and editing content with version 5.0 of the software. The purpose of this new editing experience is to put more publishing control and formatting options in the hands of the users in a way that doesn’t require any specialized knowledge or training in the technology that makes it happen, such as PHP, JavaScript, HTML, or CSS. Now editors can create and format posts and pages more easily than ever before. You can insert images, change font sizes and color, and create tables and columns in ways that you weren’t able to before the 5.0 version of WordPress, released in December 2018.
The idea behind the block editor is to give users a variety of blocks with which to create posts and pages on their WordPress sites. Compare WordPress blocks to the blocks you played with as a child; you were able to take one block and stack it on top of the next block and the next to build a tower of blocks to the moon. Each block within the WordPress editor gets filled with content (text, images, video, and so on) and is stacked atop another block with more content, and so on, until you have a full page of content created with blocks that you can configure with options to control formatting and display and move around on the page to create the experience you want for your readers.
This section of the chapter takes you through the new block editor in WordPress.
 WordPress named the new block editor Gutenberg after Johannes Gutenberg, the inventor of the printing press. Generically, everyone refers to it as the block editor, but if you hear or see the term Gutenberg tossed around in the WordPress support forums or at a WordPress meetup or WordCamp, you’ll know that people are talking about the editor in WordPress.
Discovering available blocks
By default, when you first load the Edit Post screen in your Dashboard (refer to Figure 1-1), the area where you type the text of your post consists of standard paragraph blocks. Hover over this area with your mouse, and you see that the block is outlined, as shown in Figure 1-2.
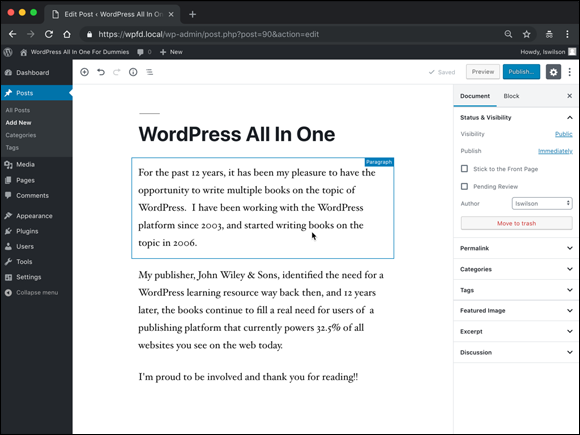
FIGURE 1-2: Default paragraph block in the WordPress block editor.
You can use the standard paragraph blocks to write your posts and leave it at that. But the block editor has many features that give you a variety of options for formatting your content by using a variety of blocks.
You can discover the different types of blocks available by clicking the small plus sign in the top-left corner of the Edit Post (or Edit Post) screen. Clicking that icon displays a drop-down menu of blocks, as shown in Figure 1-3.

FIGURE 1-3: Menu of available blocks in the WordPress block editor.
Each block you find in the block editor has settings that give you display options such as color settings, font size and color, and width. In this section, you discover what blocks are available for you to use. In “Configuring block settings” later in this chapter, you see how to configure the block settings.
In a new installation of WordPress, the following blocks are available for you to use:
- Most Used: When you first install WordPress, the blocks listed in the Most Used section are the same as the ones listed in the Common Blocks section (see the next bullet point). As you use WordPress more and more, the software learns your habits and lists the blocks that you use most when writing and editing posts. Click the Most Used heading to display a drop-down list of available blocks in this section.
- Common Blocks: The blocks included in this section are common, which means that most users use these blocks when writing and editing posts. Click the Common Blocks heading to display a drop-down list of available blocks in this section:
- Paragraph: Clicking this option inserts a block that allows you to create a standard paragraph of text.
- Image: Clicking this option inserts a block that allows you to insert an image into your post or page.
- Heading: Clicking this option inserts a block that allows you to insert header text with H1, H2, H3, H4, H5, and H6 tags to help your visitors (and search engines) understand the structure of your content. (See Book 5, Chapter 4 for search engine optimization tips.)
- Gallery: Clicking this option inserts a block that allows you to upload and display multiple images in your post or page. (I discuss the use of the Gallery block in detail in Book 4, Chapter 3.)
- List: Clicking this option inserts a block that allows you to create a bulleted or numbered list.
- Quote: Clicking this option inserts a block that allows you to enter a quote with a citation that’s stylized for visual emphasis.
- Audio: Clicking this option inserts a block that allows you to upload an audio file and embed it in an audio player in your post or page. (I discuss the use of the Audio block in detail in Book 4, Chapter 4.)
- Cover: Clicking this option inserts a block that allows you to upload an image and add it to your post or page with text overlaid on it. (I discuss the use of the Cover block in detail in Book 4, Chapter 3.)
- File: Clicking this option inserts a block that allows you to upload a file (such as .doc or .pdf) and add it to your post or page for your visitors to download.
- Video: Clicking this block inserts a block that allows you to upload a video file and embed it in a video player in your post or page. (I discuss the use of the Video block in detail in Book 4, Chapter 4.)
- Formatting: The blocks in this section are for special formatting needs such as code, HTML, and quotes. Not everyone is going to use these formatting blocks, but for those who do (such as programmers), these blocks are extremely helpful for formatting specialized text. Click the Formatting heading to display a drop-down list of available blocks in this section:
- Code: Clicking this option inserts a block that allows you to insert and display code snippets that respect standard code-formatting rules and prevents the application from executing the code you’ve written.
- Classic: Clicking this option inserts a block that users of earlier WordPress versions are used to and may be more comfortable with.
- Custom HTML: Clicking this option inserts a block with an HTML editor that allows you to write HTML code and preview it as you type and edit.
- Preformatted: Clicking this option inserts a block that allows you to add text that gets displayed exactly as is intended in code or HTML format. The text is typically displayed in a monospace font (such as Courier), and the Preformatted editor respects your spacing and tabs, keeping them in place. (Preformatted text is helpful for people who include code samples within their posts or pages. Also, this option prevents the application from executing the code.)
- Pullquote: Clicking this option inserts a block that allows you to enter a quote, with citation, that gives special visual emphasis to the text. The
Code is Poetry. – WordPressexample in Figure 1-4 is a Pullquote. - Table: Clicking this option inserts a table editor that allows you to include a table of rows and columns, much as you'd do in a standard word processing program such as Microsoft Word.
- Verse: Clicking this option inserts a verse editor that allows you to enter a verse of poetry or song lyrics or to quote a small number of lyrics or lines of poetry. The text gets special formatting and spacing to give it visual emphasis. Figure 1-5 shows example song lyrics from a popular sports song.
- Layout Elements: The blocks in this section allow you to create different layouts for your content on every post or page. The layouts include tables, columns, and buttons. These elements enable you to create pages and posts that look different or the same, allowing you to be as creative as you want to be. Click the Layout Elements option to display a drop-down menu of available blocks in this section:
- Button: Clicking this option inserts a clickable button within your page or post. People usually use a button to link to a section of their site that they feel is important, such as a contact form or an online shop.
- Columns: Clicking this option inserts a column editor that allows you to create a section of text in side-by-side columns. Figure 1-6 shows the use of the Columns block to create three columns of text with headers in a post. The options for this block allow you to define the number of columns as well as the colors of the columns and text. (I discuss the use of the Columns block for adding images in a post in Book 4, Chapter 3.)
- Media & Text: Clicking this option inserts a two-column block that allows you to display media (image or video) and text side by side. The options for this block allow you to align the media to the right or the left of the text block. You also can define the width of the block, making it the width of the reader’s computer screen or the width of the rest of the content on your page. Figure 1-7 displays the Media & Text block in use on a web page on which the media is displayed to the left of the text.
- More: Clicking this option inserts a block that serves as a marker point for your post or page excerpt. The content that appears above this block is shown as the excerpt on pages such as an archive or search results page.
- Page Break: Clicking this option inserts a block that serves as a marker point for a page break, allowing you to create a post or a page that has a multipage experience. The content that appears above this block is displayed on the page with navigation links, prompting the reader to navigate to page 2 of your post or page to read the rest. Figure 1-7 shows a post that uses the Page Break block to create a post that spans two pages.
- Separator: Clicking this option inserts a block that creates a break between sections of content by using a horizontal separator or line. Options for this block allow you to determine the style of the separator line: Short Line, Wide Line, or Dots.
- Spacer: Clicking this option inserts a block that creates white space within your post or page. This block doesn’t get filled with any kind of content; rather, it exists to allow you to create a space between content blocks at a height that you can define in the block options.
- Widgets: I cover the use of WordPress widgets on your website in Book 6, Chapter 1, so see that chapter to find out what widgets are and what they do. Some widgets in WordPress are available in the block editor to allow you to insert blocks with predefined content. Click the Widgets option to display a drop-down list of available blocks in this section:
- Shortcode: Clicking this option inserts a block with a text field that allows you to include a shortcode for adding custom elements to your WordPress page or post. I cover what shortcodes are and how they’re used in Book 7, Chapter 3.
- Archives: Clicking this option inserts the Archives widget, which displays a list of monthly archives of your posts.
- Categories: Clicking this option inserts the Category widget, which displays a list of categories on your site.
- Latest Comments: Clicking this option inserts the Latest Comments widget into your post or page. This widget displays a list of the most recent comments left on your site. Options for this block allow you to define the number of comments you want to display and to toggle the display of the comment avatar, date, and excerpt.
- Latest Posts: Clicking this option inserts the Recent Posts widget into your post or page. This widget displays a list of the most recent posts you’ve published to your site. Options for this block allow you to sort the post list by newest to oldest, oldest to newest, and ascending or descending in alphabetical order.
- Embeds: This block allows you to embed content from various services on the web, such as a video from YouTube, a specific tweet from Twitter, or a photo from Instagram. Currently, the WordPress block editor allows you to embed content from 34 services. The services in this embed list are likely to change over time, with new ones being added and old ones removed, as services on the web continue to evolve. Click the Embeds option to display a drop-down menu of available blocks in this section.

FIGURE 1-4: A Pullquote block in the WordPress block editor.

FIGURE 1-5: An example of the Verse block in the WordPress block editor.
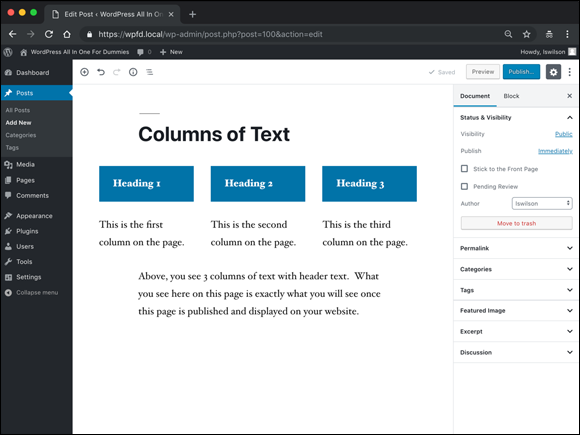
FIGURE 1-6: An example of the Columns block in the WordPress block editor.

FIGURE 1-7: An example of the Media & Text and Page Break blocks on a website.
Inserting new blocks
WordPress gives you a variety of ways to add a new block to your post or page. As you work with the block editor more and more, you’ll develop a favorite method of adding new blocks based on your preferences and writing style.
In a brand-new post, the Edit Post screen gives you the title field to type your page title in and a Paragraph block to write the content of your page. From there, you can add new blocks to add different types of content to your page. You can insert a new block into your page by using any of the following methods:
- Use the Top Block Inserter. This method is covered in “Discovering available blocks” earlier in this chapter and illustrated in Figure 1-3.
- Use the Editor Block Inserter. When you’ve added a block, put content in it, and are ready to add a new block, hover your mouse over the existing block. You see an icon that looks like a plus sign. Click that icon to display a list of available blocks that you can add to your page (refer to Figure 1-8). Choosing a block from that list inserts the block directly below the existing one.
- Use More Options. Every block has a small toolbar of styling options for that block (discussed in “Configuring block settings” later in this chapter). The item on the right side of the toolbar menu is labeled More Options; click that item to display a drop-down list of additional settings (see Figure 1-9). Two of those options are labeled Insert Before and Insert After. Click either option to insert a standard Paragraph block above or below the block you’re currently working in. Then you can configure the block type by using the Editor Block Inserter (refer to Figure 1-8).
- Use shortcut icons. On the Edit Post screen, three icons allow you to add three commonly used blocks: Image, Code, and Quote (see Figure 1-10). Click one of those icons to add the corresponding block to your page.
- Press Enter (or Return on a Mac). Press the Enter key on your keyboard when you’re in a standard Paragraph block to insert a new Paragraph block into your page. Then you can continue using the Paragraph block or use the Editor Block Inserter (refer to Figure 1-8) to change the block type.
Use slash commands. When you click inside a standard Paragraph block and press the slash (/) key on your keyboard, a list of blocks appears. This list enables you to add a block without moving your hands away from the keyboard.
Figure 1-11 shows the blocks that are available when you press the slash key. You can navigate to the block you need by pressing the down-arrow key and then pressing Enter to select it, or you can finish typing the name of the block and then press the Enter key to insert it into your page. This editing experience is intended to be mouseless; you can keep typing away and adding blocks from your keyboard.

FIGURE 1-8: Add a new block to your page by using the Top Block Inserter.

FIGURE 1-9: More Options menu in the block editor.

FIGURE 1-10: The block editor has three shortcuts for adding Image, Code, and Quote blocks.

FIGURE 1-11: Slash commands give you a mouseless experience when adding blocks.
Configuring block settings
Each block on the block editor menus has options so you can configure display settings for your content, such as font size, font color, background color, and block width and/or height. Each block has its own set of options.
In this section, you discover how to configure the settings and options for four of the most commonly used blocks:
- Paragraph
- Image
- Media & Text
- Pullquote
You configure options for the block you’re using in two areas of the Edit Post screen: the block itself and the settings panel on the right side of the screen.
The settings panel does not appear as an official label in the Dashboard, but it is the terminology being used currently by the WordPress dev team and refers to the panel that appears on the right side of the Add Post page, as seen in most of the figures in this chapter. The settings panel has two sections: Document and Block. The Document section contains the global settings that I cover in “Refining Your Post Options” later in this chapter. The Block section of the settings panel contains additional settings that you can configure for each block. Notice that as you switch to editing a different kind of block, the Block section of the settings panel changes to display the unique settings for the block you’re currently using. You can click the gear icon in the top-right corner of the Edit Post screen to remove the panel from the screen, which is nice if you temporarily want a larger writing space. You can easily restore the settings panel by clicking the gear icon again.
Paragraph block settings
You use the Paragraph Block to create a basic block of text. Add the block to your post or page and then add the text inside the box provided. When you’re working within this block, a small toolbar of options appears at the top of the block, as shown in Figure 1-12.

FIGURE 1-12: Options toolbar in a Paragraph block.
This toolbar provides a variety of options, including the following (from left to right):
- Change Block Type: Clicking this option allows you to change the type of block you’re using. If you want to change from a Paragraph to a Quote block, for example, click the Change Block Type icon and then choose the Quote block to swap it. The block types you can change to from a Paragraph block include Quote, Verse, Heading, List, and Preformatted.
- Align Text Left: This block-formatting option positions the text within a Paragraph block to the left side of the page.
- Align Text Center: This block-formatting option positions the text within a Paragraph block to the center of the page.
- Align Text Right: This block-formatting option positions the text within a Paragraph block to the right side of the page.
- Bold: This text-formatting option changes the selected text within a Paragraph block to a bold (darker) font. Select the text you want to format and then click the Bold icon. Example: bold text.
- Italic: This text-formatting option changes the selected text within a Paragraph block to an italic (slanted) font. Select the text you want to format and then click the Italic icon. Example: italic text.
- Link: This text-formatting option changes the selected text within a Paragraph block to a hyperlink (text that readers can click to visit a new web pages or website, in their browser). Select the text you want to format and then click the Link icon.
- Strikethrough: This text-formatting option changes the selected text within a Paragraph block to display with a line through it. Select the text you want to format and then click the Strikethrough icon. Example:
strikethrough text. - More Options: Clicking this icon reveals a drop-down menu of options for the entire block, not just the content within the block. (This option exists on every block toolbar, so I’ll cover it here and you can refer to this list for other blocks later in this section.) Click the More Options icon on the block toolbar to reveal a drop-down list of options:
- Hide Block Settings: Clicking this option removes the settings panel on the right side of the Edit Post screen, giving you a larger space in which to create your content.
- Duplicate: Clicking this option duplicates the block you’re currently using and inserts it below the current block.
- Insert Before: Clicking this option inserts a blank default block directly above the block you’re currently using.
- Insert After: Clicking this option inserts a blank default block directly below the block you’re currently using.
- Edit As HTML: Clicking this option changes the block editor to an HTML editor so you can view and create content in HTML code.
Add to Reusable Blocks: Click this option to save the block you’re currently using to a library of blocks that you can reuse in other places on your site. This feature is helpful when you create blocks on one page and want to use the same blocks on other pages. Saving a block as a Reusable block makes it available for use on other pages, exactly as it appeared when you saved it. Editing the block applies those changes everywhere the block is used on your site.
When you create a Reusable block, it’s stored on the Blocks menu (refer to Figure 1-3) in a new section labeled Reusable.- Remove Block: Clicking this option removes the block from the Edit Post screen. Use this feature carefully, because when you remove a block, it’s gone (unless you’ve saved it as a Reusable block).
Additional options for the Paragraph block are available in the settings panel on the right side of the Edit Post screen, as shown in Figure 1-13.

FIGURE 1-13: Options in the settings panel for the Paragraph block.
Those options include
- Font Size: You have two ways to define the size of the font you’re using in the block that you’re editing. In the Text Settings section of the settings panel, you can choose Small, Normal, Large, or Huge from the Font Size drop-down menu to adjust the text sizes that are predefined by WordPress. Alternatively, you can enter a specific number in the text box to the right of the Font Size menu if you want to use a specific-size font. When you adjust the Text Settings in the settings panel, the changes immediately occur in the block you’re editing.
- Drop Cap: A drop cap can be applied to a paragraph of text to make the first letter of the paragraph much larger and bolder than the rest of the text within the block. You often see this method used in magazine and newspaper articles; it can have a dramatic effect on articles that appear on the web. Figure 1-14 shows an example of several paragraphs that use the Drop Cap method. To enable it, click the Drop Cap toggle button.
- Background Color: Within the Color Settings section of the settings panel, you can select a background color for the Paragraph block you’re currently using. Choose one of five preselected colors or click the custom color picker icon to select another color (see Figure 1-15).
- Text Color: In the Color Settings section of the block settings panel, you can change the color of the text used in the Paragraph block you’re currently using. Choose one of five preselected colors or click the custom color picker icon to select another color. Figure 1-16 shows a Paragraph block with a blue background and white text.
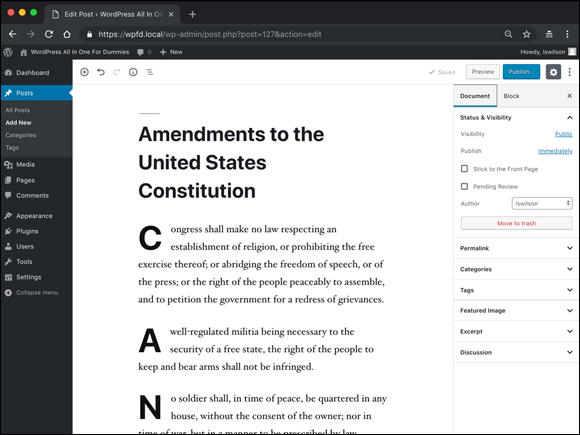
FIGURE 1-14: Use of the Drop Cap option.

FIGURE 1-15: The custom color picker tool in the settings panel.

FIGURE 1-16: A Paragraph block with a blue background and white text.
Image block settings
You use the Image block to add a single image to your post. Add the block to your post or page and then use one of these options:
- Upload: Click the Upload button to select an image from your computer. This action uploads the image from your computer to your website and inserts the image into your post via an Image block. WordPress also adds this image to your Media Library so you can reuse this image in the future.
- Media Library: Click the Media Library button to choose an image from the WordPress Media Library (see Figure 1-17). When the Select or Upload Media screen opens, select an image in the Media Library section and then click the Select button to add the image to your post.
- Insert from URL: Click the Insert from URL button to display a small text box where you can paste or type the URL (or link) for the image you want to use. Press the Enter key on your keyboard or click the Apply button to insert the image into the Image block you’re using.
- Drag an Image: This cool option allows you to select an image from your computer and drag it into the WordPress block editor to add it to a block. The dragged image also gets added to the Media Library for future use. In Figure 1-18, I clicked an image titled
lion.jpgand dragged it from my computer to the WordPress block editor to add it to the Image block I was using. - Write Caption: When you've have added an image to an Image block, you see an optional field directly below it labeled Write Caption. This field is optional; if you do nothing with it, nothing displays on your site. If you type words in this field, however, those words appear below the image as a caption.

FIGURE 1-17: Clicking the Media Library button in an Image block opens the Select or Upload Media screen and displays images in the WordPress Media Library.

FIGURE 1-18: Dragging an image from your computer to the Image block adds the image to the block and to the WordPress Media Library.
When you’re working within this block, notice the small toolbar of options that appears at the top of the block, as shown in Figure 1-19. This toolbar provides a variety of options for the Image block, including the following (from left to right):
- Change Block Type: Click this option to change the type of block you’re using. If you want to change from an Image block to a Cover block, for example, click the Change Block Type icon and then select the Cover block to swap it. The block types you can change from an Image block include Media & Text, Gallery, Cover, and File.
- Align Left: This block-formatting option positions the image within the Image block against the left margin of the page.
- Align Center: This block-formatting option positions the image within the Image block in the center of the page.
- Align Right: This block-formatting option positions the image within the Image block against the right margin of the page.
- Wide Width: Click this option to set the width of the image to the width of the content on the page.
Full Width: Click this option to increase the width of the image to the width of the screen you’re viewing the content on. In Figure 1-20, you see a post that I created with a full-width image. Notice that the left and right edges of the image extend all the way to the left and right sides of the viewing screen.
If you don’t select Wide Width or Full Width on the Image block toolbar, you can set the desired width of the image in the Image block settings panel, as covered in the next section.- Edit Image: Click this option to open the Select or Upload Media screen (refer to Figure 1-17) and change the image you’re currently using in the Image block.
- More Options: The settings here are the same as the ones discussed in “Paragraph block settings” earlier in this chapter.

FIGURE 1-19: Options toolbar in the Image block.
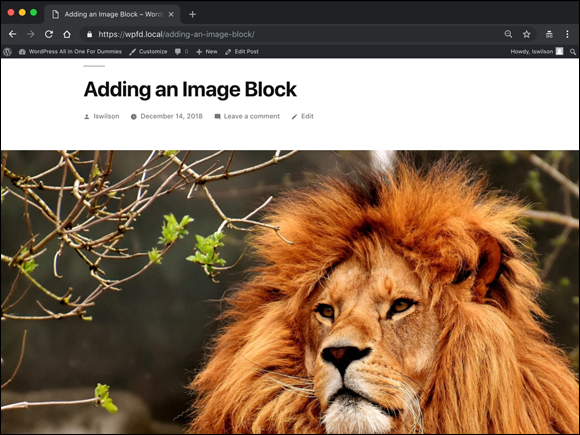
FIGURE 1-20: Example of an Image block with the Full Width setting.
Additional options are available for the Image block in the settings panel on the right side of the Edit Post screen, as shown in Figure 1-21.

FIGURE 1-21: Options in the settings panel for the Image block.
The options include
- Alt Text: Enter descriptive text in the Alt Text field to describe the image you’re using in the Image block. Also referred to as Alternative Text, this description helps people who can’t see the image on your site; when the image doesn’t load on your site, the Alt Text is displayed, providing context for the missing image. This option is also an accessibility feature that helps those who use screen readers to browse the web. (Screen readers allow visually impaired users to understand the text that’s displayed on the website with a speech synthesizer or Braille display.) Additionally, Alt Text descriptions assist in search engine optimization (SEO), which I cover in Book 4, Chapter 3, and Book 5, Chapter 4.
- Image Size: To set the size of the image used in the Image block, choose a predefined size from the Image Size drop-down menu in the Image block settings panel. The available options are Thumbnail, Medium, Large, and Full Size. The dimensions for these options are defined in the WordPress settings on your Dashboard (see Book 3, Chapter 2); to see them, choose Settings ⇒ Media.
- Image Dimensions: To set a specific width and height for the image used in the Image block, enter numbers in the Width and Height fields in the Image Dimensions section of the Image block settings panel.
- Link To: Attach a hyperlink to an image so that when a visitor to your website clicks the image, he visits a new page in his browser. To define the link, make a choice from the Link To drop-down menu in the Link Settings section of the Image block settings panel. None makes the image nonclickable, Media File directs readers to the image itself, Attachment Page directs readers to a page on your website that displays the image by itself, and Custom URL allows you to enter whatever URL you want.
Media & Text block settings
You use the Media & Text block to insert a two-column block that displays media (image or video) and text side by side. When you add the block to your post, it adds a block with the image settings on the left and text settings on the right, as shown in Figure 1-22.
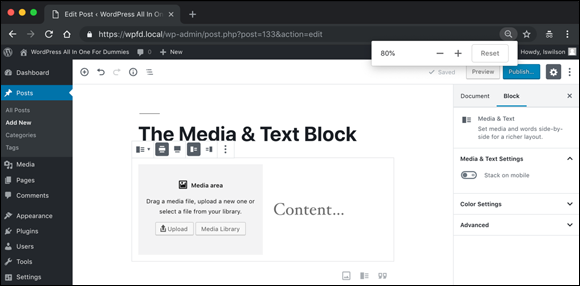
FIGURE 1-22: The Media & Text block.
In this block, you add the media in the Media Area section on the left, using the method covered in “Image block settings” earlier in this chapter and adding your text in the Content section on the right, as shown in Figure 1-23.

FIGURE 1-23: Media on the left with text on the right, using the Media & Text block.
When you enter text in the Content section on the right side, a toolbar of text-formatting options appears. This toolbar has the same options that I cover in “Paragraph block settings” earlier in this chapter.
- Wide Width: Click this option to set the width of the Media & Text block to the width of the content on the page.
- Full Width: Click this option to increase the width of the image to the width of the screen you’re viewing the content on. The left and right edges of the block extend all the way to the left and right sides of the viewing screen.
- Show Media on Left: Click this option to set the media on the left and the text on the right (refer to Figure 1-23). This option is the default setting.
- Show Media on Right: Click this option to set the text on the left and the media on the right.
- Edit Image: Click this option to open the Select or Upload Media screen (refer to Figure 1-17) and change the image you’re currently using in the Image block.
- More Options: The settings here are the same as the ones I discuss in “Paragraph block settings” earlier in this chapter.
When you’re working within this block, a small toolbar of options appears at the top of the block, as shown in Figure 1-24. This toolbar provides a variety of options for the paragraph block, including the following (from left to right):

FIGURE 1-24: Options in the settings panel for the Media & Text block.
Additional options for the Media & Text block are available in the settings panel on the right side of the Edit Post screen (refer to Figure 1-24). Those options include
- Stack on Mobile: Click this option to define the display of the Media & Text block on mobile devices. If you leave this option deselected, the block spans the width of the mobile screen, and depending on the image and text you’ve included in the block, the block could be difficult to read. Select the Stack on Mobile option to display the content within Media & Text blocks stacked on top of one another. If you have the media set to display on the left with the text on the right, for example, on mobile devices, the media displays above the text. Compare Figure 1-23 (desktop view) with Figure 1-25 (mobile phone view) to see what I’m describing.
- Alt Text: Enter descriptive text in the Alt Text field to describe the image you’re using in the Image block. Also referred to as Alternative Text, this description helps people who can’t see the image on your site; when the image doesn’t load on your site, the Alt Text is displayed, providing context for the missing image. This option is also an accessibility feature that helps those who use screen readers to browse the web. (Screen readers allow visually impaired users to understand the text that’s displayed on the website with a speech synthesizer or Braille display.) Additionally, Alt Text descriptions assist in SEO, which I cover in Book 4, Chapter 3, and Book 5, Chapter 4.
- Background Color: Within the Color Settings section of the settings panel, you can select a background color for the Media & Text block you’re currently using. Choose one of five preselected colors or click the custom color picker icon to select another color.

FIGURE 1-25: The Media & Text block displayed on a mobile device with the option to Stack on Mobile set to On.
When you’re creating content inside of any block on a page, and you find that you’ve made a mistake, the Undo button at the top of the Edit Post screen undoes the last action you took on the screen. Alternatively, a Redo button allows you to redo the last undone action.
Pullquote block settings
You use the Pullquote block to insert a quotation with a citation and give it special design emphasis to set it apart from the rest of the text on your site. Figure 1-4 earlier in this chapter shows what a Pullquote block looks like.
When you’re working within this block, a small toolbar of options appears at the top of the Pullquote block, as shown in Figure 1-26. This toolbar provides a variety of options for the block, including the following (from left to right):
Change Block Type: Clicking this option allows you to change the style or type of block you’re currently using. You can change the style by choosing Regular or Solid Color from the drop-down menu. By default, Pullquote style is Regular.
You also can change the block type. If you want to change from a Pullquote block to a Quote block, for example, click the Change Block Type icon and then select the Quote block to swap it. The only block type you can switch to from a Pullquote block is a Quote block.
- Align Left: This block-formatting option positions the text within the Pullquote block against the left margin of the page.
- Align Right: This block-formatting option positions the text within the Pullquote block against the right margin of the page.
- Wide Width: This block-formatting option positions the image within the Image block against the left margin of the page.
- Full Width: This block-formatting option positions the image within the Image block in the center of the page.
- Bold: This text-formatting option changes the selected text within the Pullquote block to a bold (darker) font. Select the text you want to format and then click the Bold icon. Example: bold text.
- Italic: This text-formatting option changes the selected text within the Pullquote block to an italic (slanted) font. Select the text you want to format and then click the Italic icon. Example: italic text.
- Link: This text-formatting option changes the selected text within the Pullquote block to a hyperlink (text that your readers can click to visit a new web page or websites in their browser). Select the text you want to format and then click the Link icon.
- Strikethrough: This text-formatting option changes the selected text within the Pullquote block to display with a line through it. Select the text you want to format and then click the Strikethrough icon. Example:
strikethrough text. - More Options: The settings here are the same as the ones discussed in “Paragraph block settings” earlier in this chapter.

FIGURE 1-26: Options in the settings panel for the Pullquote block.
Additional options are available for the Pullquote block in the settings panel on the right side of the Edit Post screen, as shown in Figure 1-27.
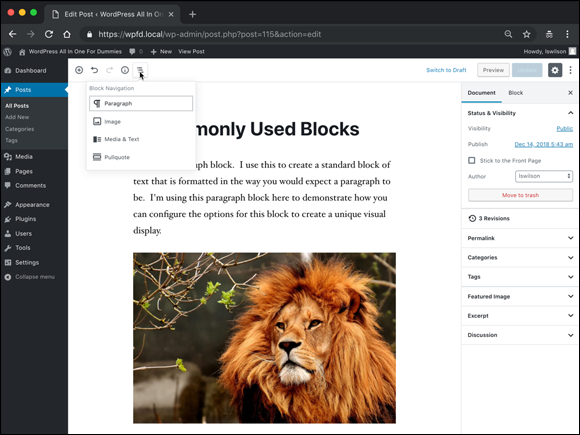
FIGURE 1-27: The Block Navigation menu makes it easy to navigate to a specific block to edit it.
The options include
- Regular: This setting is the default option for the Pullquote block, displaying the block as black text on a white background.
- Solid Color: Select this option to change the style to white text on a blue background.
- Main Color: Within the Color Settings section of the settings panel, you can choose one of five predefined colors or click the custom color picker icon to select another color. When you’re using Regular style, the Main Color setting changes the color of the border. When you’re using the Solid Color style, the Main Color setting changes the color of the background of the block.
- Text Color: Within the Color Settings section of the settings panel, you can choose one of five predefined colors to change the color of the text within the Pullquote block. You also can click the rainbow-colored icon to select a custom color of your choice.
When you’re working on a post or page that has several blocks in use, scrolling up and down the page to find the block you want to edit can be cumbersome. At the top of the Edit Post screen is a row of icons, and the last icon on the right is labeled Block Navigation. Click that icon to open the Block Navigation drop-down menu, which displays all the blocks in use in the post you’re editing (refer to Figure 1-27). You can use the Block Navigation menu to navigate to the block you want to edit.
If you’re ever curious about the structure of the content on a page you’re creating, see the small icon at the top of the Edit Post screen that looks like a lowercase i with a circle around it. (It’s the fourth icon from the left.) When you hover over this icon, you see the label Content Structure. Click the Content Structure icon to open a small window with some details about the post or page you’re editing. Figure 1-28 shows that the content structure of a post has 72 Words, 0 Headings, 2 Paragraphs, and 5 Blocks.
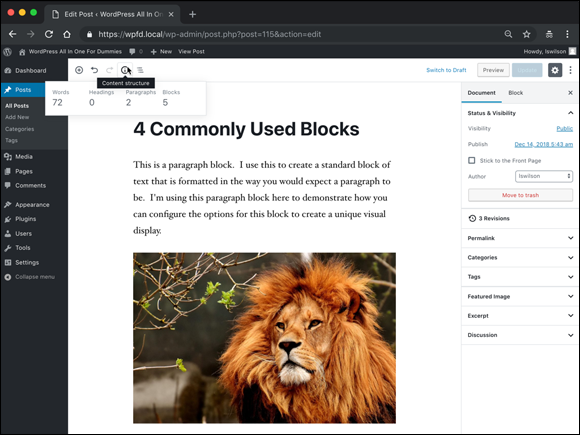
FIGURE 1-28: The Content Structure window gives you some details about the page you’re creating.
If you’re a total geek like me and like to work with code, or if you’re curious to see the underlying HTML code for the blocks you’re creating, WordPress provides a way to do that. In the top-right corner of the Edit Post screen is an icon that looks like three dots stacked on top of one another. Hover your mouse over this icon, and you see the label Show More Tools & Options. Click the icon to open a menu of options. To view the code versions of the blocks you’ve created on your site, choose the Code Editor option on the Editor section of the menu. This action changes the display of your post content to code rather than the default visual editor. Figure 1-29 shows a post in code.

FIGURE 1-29: Using the Code Editor on a post.
Refining Your Post Options
After you write the post, you can choose a few extra options before you publish it for the entire world to see. On the right side of the Edit Post screen is the settings panel, which you should be familiar with from earlier sections of this chapter. Click the Document link at the top to view the options you can set for the post globally (See Figure 1-30.). Unlike settings for individual blocks, the Document settings pertain to the entire post.
You’ll see a lot of options and settings on the screens where you add new and edit existing posts and pages. Should you find all those options, links, and menus distracting, WordPress allows you to write in distraction-free mode. In the top-right corner of the Edit Post screen is an icon that looks like three dots stacked on top of one another. Hover your mouse over this icon, and you see the label Show More Tools & Options. Click this icon to open a menu of options. Choose the Full Screen Mode option in the View section of the settings panel to change the screen view to full screen, which removes all the distractions of those pesky links, menus, and settings. You can restore the screen to normal by performing the same action and deselecting Full Screen Mode.

FIGURE 1-30: The Document section of the settings panel.
The Document settings include the following:
- Status and Visibility: By default, the visibility status of your post is set to Public. You can select three status options by clicking the Public link in the Status and Visibility panel:
- Public: Select this option to make the post viewable by everyone who visits your site.
- Private: Select this option to make the post viewable only by site administrators and editors. Saving a post with this status prevents anyone else from viewing the post on your site.
- Password Protected: Select this option to create a password for your post. By assigning a password to a post, you can publish a post that only you can see. You also can share the post password with a friend who can see the content of the post after she enters the password. But why would anyone want to password-protect a post? Suppose that you just ate dinner at your mother-in-law’s house, and she made the worst pot roast you’ve ever eaten. You can write all about it! Protect it with a password and give the password to your trusted friends so that they can read about it without offending your mother-in-law.
- Publish: By default, WordPress assigns the publish date and time as the exact date and time when you originally published the post to your site. If you want to future-publish this post, you can set the time and date for any time in the future. If you have a vacation planned and don’t want your site to go without updates while you’re gone, for example, you can write a few posts and set the date for a time in the future. Those posts are published to your site while you’re somewhere tropical, diving with the fish. Click the date and time displayed, and a date and time picker appears. Use this picker to set the date and time when you’d like this post to publish to your site.
- Stick to the Front Page: Select this check box to have WordPress publish the post to your site and keep it at the top of all posts until you change this setting; this type of post is known as a sticky post. Typically, posts are displayed in chronological order on your site, with the most recent post at the top. If you make a post sticky, it remains at the top no matter how many other posts you make after it. When you want to unstick the post, deselect the Front Page check box.
- Pending Review: Select this check box to save the post as a draft with the status of Pending Review. This option alerts the administrator of the site that a contributor created a post that’s waiting for administrator review and approval. (This feature is helpful for sites that have multiple authors.) Generally, only contributors use the Pending Review option. Note that this option is available only for new posts. You won’t see it in the settings panel of posts that have already been published.
- Author: If you’re running a multiauthor blog, you can choose the name of the author you want to assign to the post you’re editing. By default, your own author name is selected in the Author drop-down list.
- Move to Trash: Click this button to delete the post you’ve been working on. This action doesn’t permanently delete the post, however. You can find and restore that post by visiting the Posts screen in your Dashboard (choose Posts ⇒ All Posts) and clicking the Trash link.
- Revisions: In “Composing Your Post” earlier in this chapter, I talk about the autosave feature. Its function is to automatically save the work you’ve done on posts you’re creating so that you don’t lose any of it. Each time you edit a post, WordPress automatically saves the old version of your post and stores it as a revision, making it available for you to access later. This section gives you an indication of how many revisions a post has. When you click the Revisions link, you see the Compare Revisions screen, where you can review and restore revisions of your post.
- Permalink: A permalink is the direct link, or URL, to the post you’re about to publish (see Book 5, Chapter 4). Although you can’t change the domain portion of this URL (
https://domain.com), you can adjust the part of the URL that appears in the link after the final slash at the end of your domain. For a post titled “WordPress Tips,” WordPress automatically creates a URL from that title likehttp://domain.com/wordpress-tips. Use the URL field in the Permalink section of the settings panel to set different words for your post (or page) from the ones that WordPress automatically creates for you. You could shorten the slug for the post title WordPress Tips to wordpress so that the URL for the post ishttp://domain.com/wordpress. Categories: You can file your posts in different categories to organize them by subject. (See more about organizing your posts by category in Book 3, Chapter 5.) Select the check box to the left of the category you want to use.
Don't see the category you need in the Category section? Click the Add New Category link and add a new category right there on the page you’re using to create or edit your post.- Tags: Type your desired tags in the Add New Tag text box. Be sure to separate tags with commas so that WordPress knows where each tag begins and ends. Cats, Kittens, Feline represents three different tags, for example, but without the commas, WordPress would consider those three words to be one tag. See Book 3, Chapter 5 for more information on tags and how to use them.
- Featured Image: Some WordPress themes are configured to use an image (photo) to represent each post on your site. The image can appear on the home/front page, blog page, archives page, search results page, or anywhere within the content displayed on your website. If you’re using a theme that has this option, you can easily define it by clicking Set Featured Image in the Featured Image section of the settings panel. This action opens a window that allows you to upload a new image or select an existing image from the Media Library. You can find more information about using featured images in Book 6, Chapter 6.
- Excerpt: Excerpts are short summaries of your posts. Many authors use snippets to show teasers of their posts on their website, thereby encouraging readers to click the Read More links to read the posts in their entirety. By default, WordPress automatically creates an excerpt based on the text contained in the first paragraph of your post. But if you want to control what text is displayed for the excerpt of your post, type your desired text in the Write an Excerpt box, which is displayed when you click the Excerpt section in the setting panel. Excerpts can be any length in terms of words, but the point is to keep them short and sweet to tease your readers into clicking the Read More link.
- Discussion: Decide whether to let readers submit comments through the comment system by selecting Allow Comments in the Discussion section of the settings panel. Additionally, you can enable pingbacks and trackbacks by clicking the check box in the Discussion section labeled Allow Pingbacks & Trackbacks. By default, both options are selected for posts you create on your site. For more on trackbacks, see Book 3, Chapter 4.
Publishing Your Post
You’ve given your new post a title and written the content of the post by assembling all the content blocks you need to create the post you desire. Maybe you’ve even added an image or other type of media file to the post (see Book 4, chapters 3 and 4), and you’ve configured the tags, categories, and other options in the settings panel. Now the question is this: To publish or not to publish (yet)?
WordPress gives you three options for saving or publishing your post when you’re done writing it. These options are located in the top-right corner of the Add New (or Edit) Post screen. Figure 1-31 shows the available options: Save Draft, Preview, and Publish.
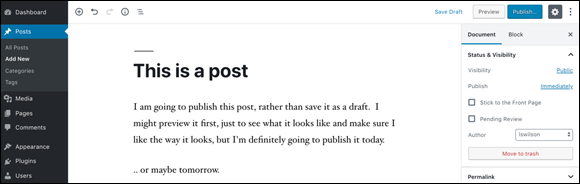
FIGURE 1-31: The publish options for your posts and pages.
The options for saving or publishing your post include
- Save Draft: Click this link to save your post as a draft. The Save Draft link refreshes with a message that says
Saved, indicating that your post has been successfully saved as a draft. The action of saving as a draft also saves all the post options you’ve set for the post, including blocks, categories, tags, and featured images. You can continue editing now, tomorrow, the next day, or next year; the post is saved as a draft until you decide to publish it or delete it. Posts saved as drafts can’t be seen by visitors to your site. To access your draft posts in your Dashboard, visit the Posts screen (choose Posts ⇒ All Posts), and click the Drafts link on the top menu. - Preview: Click the Preview button to view your post in a new window, as it would appear on your live site if you’d published it. Previewing the post doesn’t publish it to your site yet. Previewing simply gives you the opportunity to view the post on your site and check it for any formatting or content changes you want to make.
- Publish: Click the Publish button when you’re ready to publish your post or page to your website and allow your visitors to view it when they visit. WordPress puts a small fail-safe feature in place to make sure that you want to publish the post live; when you click the Publish button, the settings panel changes to a panel with the heading
Do you really want to publish?This panel even provides the option to double-check some of your settings, such as visibility and date. Click the Publish button at the top a second time to publish the post to your website.
Being Your Own Editor
While I write this book, I have copy editors, technical editors, and proofreaders looking over my shoulder, making recommendations, correcting typos and grammatical errors, and telling me when I get too long-winded. You, on the other hand, probably aren’t so lucky! You are your own editor and have full control of what you write, when you write it, and how you write it.
You always can go back to edit previous posts to correct typos, grammatical errors, and other mistakes by following these steps:
Find the post that you want to edit by clicking the All Posts link on the Posts menu of the Dashboard.
The Posts screen opens, listing the 20 most recent posts you’ve created.
To filter that listing of posts by date, choose a date from the All Dates drop-down menu at the top of the Posts screen (choose Dashboard ⇒ Posts). If you choose January 2019, the Posts page reloads, displaying only those posts that were published in January 2019.You also can filter the post listing by category. Choose your desired category from the All Categories drop-down list.
When you find the post you need, click its title.
Alternatively, you can click the Edit link that appears below the post title when you hover your mouse over it.
The Edit Post screen opens. In this screen, you can edit the post and/or any of its options.
If you need to edit only the post options, click the Quick Edit link that appears below the post title when you hover your mouse over it. A Quick Edit menu appears, displaying the post options that you can configure, such as title, status, password, categories, tags, comments, and time stamp. Click the Update button to save your changes.Edit your post; then click the Update Post button.
The Edit Post screen displays a message that the post has been updated.
Congratulations on publishing your first post on your site! This chapter took you through the mechanics of working with the WordPress block editor, creating content, and setting your post options to get you familiar with the tools WordPress provides for publishing content. The next chapters in this book help you discover specific content management options such as categories, tags, and image galleries.