Chapter 4
Exploring Podcasting and Video Blogging
IN THIS CHAPTER
![]() Uploading and embedding videos in posts
Uploading and embedding videos in posts
![]() Adding audio files to posts
Adding audio files to posts
![]() Exploring podcasting and vlogging
Exploring podcasting and vlogging
![]() Using the Media Library
Using the Media Library
Many website owners want to go beyond offering written content for the consumption of their visitors by offering different types of media, including audio and video files. WordPress makes it easy to include these different types of media files in your posts and pages by using the built-in file-upload feature.
The audio files you add to your site can include music or voice in formats such as .mp3, .midi, or .wav (to name a few). Some website owners produce their audio files in regular episodes, called podcasts, to create Internet radio shows. Often, you can find these audio files available for syndication on a variety of streaming services, such as iTunes and Spotify.
You can include videos in posts or pages by embedding code offered by popular third-party video providers such as YouTube (https://www.youtube.com) and Vimeo (https://vimeo.com). Website owners also can produce and upload video shows they've created — an activity known as vlogging (video blogging).
This chapter takes you through the steps required to upload and embed audio and video files within your content. It also provides some tools that can help you embed those files without having to use elaborate coding techniques.
 When dealing with video and audio files on your site, remember to upload and use only media that you own or have permission to use. Copyright violation is a very serious offense, especially on the Internet, and using media that you don’t have permission to use can have serious consequences, such as having your website taken down, facing heavy fines, and even going to jail. I’d really hate to see that happen to you. So play it safe, and use only those media files that you have permission to use.
Inserting Video Files into Your Content
Whether you’re producing your own videos for publication or embedding other people’s videos, placing a video file in a post or page has never been easier with WordPress.
Several video services on the web allow you to add videos to your website by embedding them in your posts and pages. Google’s YouTube service (https://www.youtube.com) is a good example of a third-party video service that allows you to share its videos.
Adding a link to a video on the web
Adding a video from the web adds a hyperlink to the video. Follow these steps if all you want to do is provide a text link to a page that has the video on it, rather than embed the video in your post or page (covered in “Adding video with the Embed block” later in this chapter).
To add a link to a video from the web, follow these steps:
- Add a Paragraph block to your post, and type your content in it.
- Select the text you want to link.
Click the Link icon on the Paragraph block toolbar.
A small text box opens.
Type the URL (Internet address) of the video in the text box.
Type the full URL, including the
http://andwww.portions of the address. Video providers such as YouTube usually list the direct links for the video files on their sites; you can copy and paste one of those links in the text box, as shown in Figure 4-1Press Enter.
A link to the video is inserted into your post, as shown in Figure 4-2. WordPress doesn't embed the actual video in the post; it inserts only a link to the video. Your site visitors click the link to load another page on which the video plays.

FIGURE 4-1: Add a video by linking to a URL.

FIGURE 4-2: A link to a video in my blog post.
 I’m using the Link icon in the Paragraph block to illustrate how you can link to a web page or service that contains a video for the purposes of this chapter. But you can use the Link icon in the Paragraph block to link to any URL on the web, not just videos. In future posts or pages, keep this method in mind when you want to insert a hyperlink into your post content.
Adding video from your computer
To upload and post to your site a video from your computer, follow these steps:
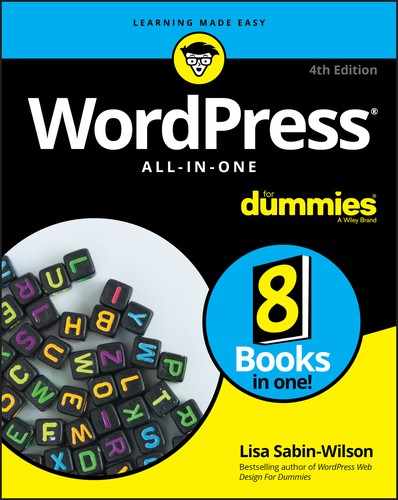
Click the Add Block icon in the top-left corner of the Edit Post screen, and select the Video block in the Common Blocks section. (See Figure 4-3.)
WordPress adds a Video block to your post in the Edit Post screen.
Click the Upload button in the Video block.
A window opens, displaying the files that exist on your computer.
Select the video file you want to upload from your computer and then click Open.
The video is uploaded from your computer to your web server and gets inserted into the Video block on the Edit Post screen.
- (Optional) Add a caption in the text field below the video player.
Use the Video block toolbar to set display options for the video.
At the top of the block, you see the toolbar for the Video block with the following options:
- Change Block Type: Clicking this option allows you to change the type of block you’re currently using. If you want to change from a Video block to a Cover block, for example, click the Change Block Type icon and then select the Cover block to swap it. The block types you can change to from a Video block are Cover, Media & Text, and File.
- Align Text Left: This block-formatting option positions the video within the Video block to the left side of the page.
- Align Text Center: This block-formatting option positions the video within the Video block to the center of the page.
- Align Text Right: This block-formatting option positions the video within the Video block to the right side of the page.
- Wide Width: Click this option to set the width of the video to the width of the content on the page.
- Full Width: Click this option to increase the width of the video to the full width of the screen you’re viewing the content on. The left and right edges of the video extend all the way to the left and right sides of the viewing screen.
- Edit Video: Click this option if you want to change the video by uploading a new one or selecting a different video from the Media Library.
- More Options: The settings here are exactly the same as the ones discussed in Book 4, Chapter 1.
In the settings panel on the right side of the Edit Post screen, configure the options for the video you uploaded in step 3:
- Autoplay: By default, this option is set to off. Turn it on to set the video to start playing automatically when your visitors load this post in their browsers.
- Loop: By default, this option is set to off. Turn it on to set the video to play, on repeat, when your visitors load this post in their browsers.
- Muted: By default, this option is set to off. Turn it on to automatically mute the sound of the video when it plays, requiring your visitors to toggle the sound on when they play your video.
- Playback Controls: This option is set to on by default. Toggle it off to remove playback controls (Play button, Pause button, and so on) from your video. This option seems like an odd thing to enable; after all, why put a video on your page if no one can click the Play button to view it? Well, if you use this option in conjunction with the Autoplay option, you can set a video to play automatically for your visitors without giving them a way to pause or mute the video. Please don’t do this; it’s a horrible experience for visitors to your site. Always give visitors the ability to pause, play, and mute the videos you offer on your website. The people of the internet will thank you.
- Preload: Preload is an HTML5 attribute that tells the web browser how much of the video data it should fetch and cache (or store) when a web page with a video is visited. Preload can reduce the amount of lag time it could take to load a video, especially if the video file is large. This attribute is used when a video is being served from the same web server as the website it’s on, meaning that it’s not an attribute used to embed third-party videos from YouTube, for example. The options are Auto (fetches the entire video), Metadata (fetches only the metadata, such as video dimensions and length), and None (fetches none of the video data). The default attribute is Metadata; you can change it by making a different choice from the Preload drop-down menu.
- Poster Image: When you embed a video in a post, by default, the first thing your visitor sees is the first frame of that video. Figure 4-4 shows a video of a lion that I uploaded to my post. The video displays the first frame of that video as the first thing my visitors see before they click the Play button. Using the Poster Image option, I uploaded an image of a lion that replaces the first frame and makes for a nicer appearance of the video when the visitor first sees it. Figure 4-5 shows the video on my site after I applied the Poster Image to the video. Click the Select Poster Image button to upload an image, or select an image from the Media Library, to use as the video poster image on your site.
The default format for web video is .mp4or.webm. Trying to load a different format like.movor.aviis not going to work on your website.- Save and publish your post, or continue to add more content and publish it later.
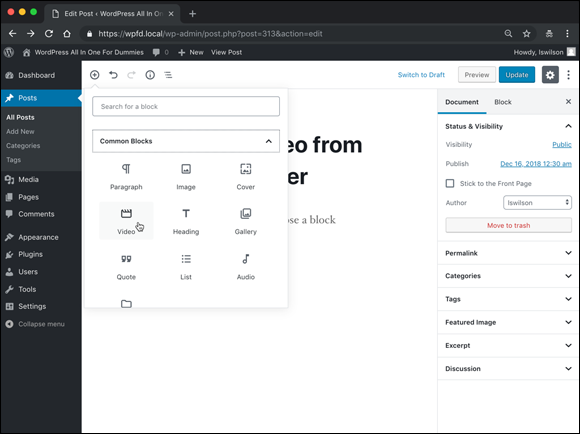
FIGURE 4-3: Adding a Video block to a post on the Edit Post screen.

FIGURE 4-4: A video displayed without a poster image defined.

FIGURE 4-5: A video displayed with a poster image defined.
I don't recommend uploading your own videos directly to your WordPress site, if you can help it. Many video service providers, such as YouTube and Vimeo, give you free storage for your videos. Embedding videos in a WordPress page or post from one of those services is easy, and by using those services, you’re not using your own storage space or dealing with bandwidth limitations to provide these videos on your site. Additionally, if you have a lot of people visiting your site viewing your video(s) at the same time, loading it from a third-party site like YouTube will make the experience much faster for all of them.
Adding video with the Embed block
The preceding steps enable you to insert a video from your computer that’s hosted on your own web server. If you use the Embed block in the WordPress Block Editor, WordPress automatically embeds the video(s) in a video player within your posts and pages.
With this feature, WordPress automatically detects that a URL you include in the Embed block is a video (from YouTube, for example) and wraps the correct HTML embed code around that URL to make sure that the video player appears in your post.
In “Adding a link to a video on the web” earlier in this chapter, you discovered the steps to insert a link to a video into your post. The video I used in my post was a trailer from a movie I really want to see. I’m using the same video as an example here, but instead of using a link, I’m going to embed the video in my post so that readers can click the Play button to view the video on my page rather than on the YouTube website. Follow these steps to embed a video from a third-party service with the Embed block:
Click the Add Block icon in the top-left corner of the Edit Post screen, and select the YouTube block in the Embed section. (See Figure 4-6.)
WordPress adds the YouTube block to your post in the Edit Post screen.
- Enter the desired YouTube URL in the text field labeled Enter URL to Embed Here; then press Enter to embed the video (see Figure 4-7).
- Add a caption in the text field below the video player, if desired.
Use the YouTube block toolbar to set display options for the video.
At the top of the block, you see the toolbar for the YouTube block with the following options:
- Align Left: This block-formatting option positions the video within the YouTube block to the left side of the page.
- Align Center: This block-formatting option positions the video within the YouTube block to the center of the page.
- Align Right: This block-formatting option positions the video within the YouTube block to the right side of the page.
- Wide Width: Click this option to set the width of the video to the width of the content on the page.
- Full Width: Click this option to increase the width of the video to the full width of the screen you’re viewing the content on. The left and right edges of the video extend all the way to the left and right sides of the viewing screen.
- Edit Video: Click this option if you want to change the YouTube URL you’re using.
- More Options: The settings here are the same ones discussed in Book 4, Chapter 1.
In the settings panel on the right side of the Edit Post screen, configure the Media Settings for the YouTube video you embedded in step 3.
The option to resize for smaller devices is toggled on by default. The video will shrink on smaller devices, but its aspect ratio will be preserved. Preserving the aspect ratio means that the height and width of the video remain in proportion — something that’s especially important on small devices like mobile phones. I recommend keeping this setting toggled on.
Publish your post, or continue editing content and publish it later.
Figure 4-8 shows what the post looks like with the embedded YouTube video.
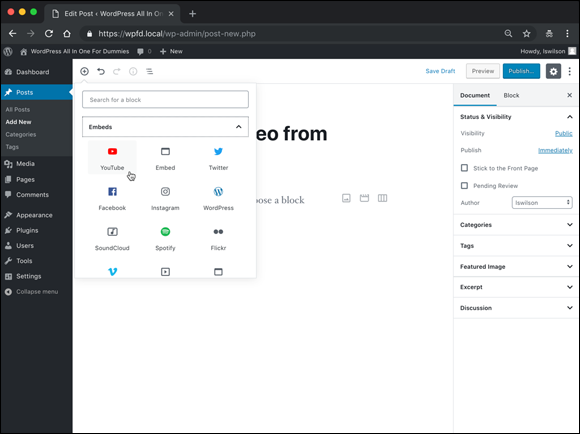
FIGURE 4-6: Adding a YouTube block to your post on the Edit Post screen.

FIGURE 4-7: A YouTube video embedded in a post on the Edit Post screen.
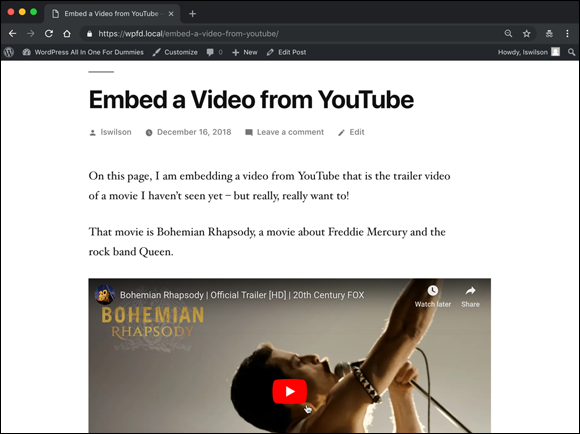
FIGURE 4-8: A YouTube video embedded in a post on my website.
 I’m using the Embed block in this example to illustrate how you can embed a video from YouTube. Several Embed blocks are available to embed all kinds of date from different services on the web. Book 4, Chapter 1 covers the Embed block in greater detail.
Inserting Audio Files into Your Blog Posts
Audio files can be music files or voice recordings, such as recordings of you speaking to your readers. These files add a nice personal touch to your site. You can easily share audio files on your blog by using the Audio block in the WordPress Block Editor. After you insert an audio file into a post, your readers can listen to it on their computers or download it to an MP3 player and listen to it while driving to work, if they want.
To insert an audio file into your site, follow these steps:
Click the Add Block icon in the top-left corner of the Edit Post screen, and select the Audio block in the Common Blocks section. (See Figure 4-9.)
WordPress adds the Audio block to your post in the Edit Post screen.
Click the Upload button in the Audio block.
A window opens, displaying the audio files that exist on your computer.
Select the audio file you want to upload from your computer and then click Open.
The audio is uploaded from your computer to your web server and gets inserted into the Audio block on the Edit Post screen. Note that the standard format for audio on the web are
.mp3or.wavaudio file types.- Add a caption in the text field below the audio player, if desired.
Use the Audio block toolbar to set display options for the audio file.
At the top of the block, you see the toolbar for the Video block with the following options:
- Change Block Type: Clicking this option allows you to change the type of block you're currently using. If you want to change from an Audio block to a File block, for example, click the Change Block Type icon and then select the File block to swap it. The only block type you can change to from an Audio block is File.
- Align Left: This block-formatting option positions the audio player within the Audio block to the left side of the page.
- Align Center: This block-formatting option positions the audio player within the Audio block to the center of the page.
- Align Right: This block-formatting option positions the audio player within the Audio block to the right side of the page.
- Wide Width: Click this option to set the width of the audio player to the width of the content on the page.
- Full Width: Click this option to increase the width of the audio player to the full width of the screen you’re viewing the content on. The left and right edges of the audio player extend all the way to the left and right sides of the viewing screen.
- Edit Audio: Click this option if you want to change the audio file by uploading a new one or selecting a different one from the Media Library.
- More Options: The settings here are the same ones discussed in Book 4, Chapter 1.
- In the settings panel on the right side of the Edit Post screen, configure the options for the audio file you uploaded in step 3:
- Autoplay: By default, this option is set to off. Turn it on to set the audio to start playing automatically when your visitors load this post in their browsers.
- Loop: By default, this option is set to off. Turn it on to set the audio to play, on repeat, when your visitors load this post in their browsers.
- Preload: Set this option to Auto (fetches the entire video), Metadata (fetches only the metadata, such as video dimensions and length), or None (fetches none of the video data). The default attribute is to None; you can change it by making a different choice from the Preload drop-down menu. I describe the Preload attribute in detail in “Adding video from your computer” earlier in this chapter.
Save and publish your post, or continue to add more content and publish it later.
Figure 4-10 shows a post with an embedded audio player and an uploaded audio file.

FIGURE 4-9: Adding an Audio block to a post in the Edit Post screen.

FIGURE 4-10: An audio player embedded in a post.
Inserting Audio with the Embed Block
In this chapter, and in Book 4, Chapter 1, I mention various services that you can embed by using the Embed block in the WordPress Block Editor. Some of those services allow you to embed audio files from sources such as Spotify, Soundcloud, Mixcloud, and ReverbNation, to name a few. To embed audio from any of these sources, follow the steps in the previous section for embedding video. All you need is the direct URL from the service for the audio you want to embed. Figure 4-11 shows a post with an embedded audio file from Spotify.
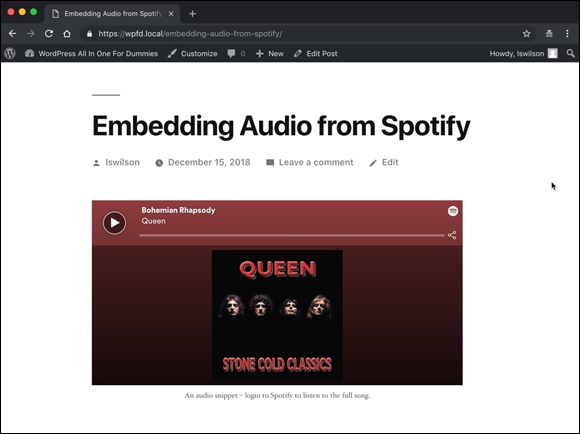
FIGURE 4-11: An audio player from Spotify embedded in a post.
When you embed songs and audio files from third-party services such as Spotify in your site, they’re subject to the copyright licensing of the service. Embedding an audio file from Spotify embeds only a random 25- to 30-second sample of the song with a message that tells your readers to log in to their own Spotify accounts, where they can listen to the full version. If you’re wondering why the entire song isn’t available to your readers when you embed it from Spotify, now you know!
Podcasting with WordPress
When you provide regular episodes of an audio show that visitors can download to a computer and listen to on an audio player, you’re podcasting. Think of a podcast as a weekly radio show that you tune in to, except that it’s hosted on the Internet rather than on a radio station.
In this chapter, you find a few plugins that allow you to easily insert audio files in your WordPress posts and pages. The plugins that are dedicated to podcasting provide features that go beyond embedding audio files in a website. Some of the most important of these features include
- Archives: You can create an archive of your audio podcast files so that your listeners can catch up on your show by listening to past episodes.
- RSS Feed: An RSS feed of your podcast show gives visitors the opportunity to subscribe to your syndicated content so that they can be notified when you publish future episodes.
- Promotion: A podcast isn’t successful without listeners, right? You can upload your podcast to services like Apple Podcasts (
https://www.apple.com/itunes/podcasts) so that when people search iTunes for podcasts by subject, they find your podcast.
These plugins go beyond audio-file management. They’re dedicated to podcasting and all the features you need:
- Simple Podcasting (
https://wordpress.org/plugins/simple-podcasting): Simple Podcasting includes full Apple Podcasts support and allows you to upload audio files by using the usual WordPress methods (Audio blocks. It also includes a specific Podcast block in the new WordPress Block Editor for easy publishing of podcasts on your website. - Seriously Simple Podcasting (
https://wordpress.org/plugins/seriously-simple-podcasting): This plugin uses the native WordPress interface with minimal settings to make it as easy as possible to podcast with WordPress. You can run multiple podcasts; obtain stats on who’s listening; do both audio- and videocasting; and publish to popular services such as iTunes, Google Play, and Stitcher.
I discuss web hosting requirements in Book 2. If you’re a podcaster who intends to store audio files in your web hosting account, you may need to increase the storage and bandwidth for your account so that you don’t run out of space or incur higher fees from your web hosting provider. Discuss these issues with your web hosting provider to find out up front what you have to pay for increased disk space and bandwidth needs.
Keeping Media Files Organized
If you’ve been running your website for any length of time, you can easily forget what files you’ve uploaded by to your WordPress site over time. The WordPress Media Library allows you to conveniently and easily discover which files are in your Uploads folder.
To find an image, a video, or an audio file you’ve already uploaded, follow these steps:
Click the Library link on the Media menu in the Dashboard.
The Media Library screen opens and displays all the files you’ve ever uploaded to your site (see Figure 4-12).
Filter your file search by using the drop-down menus at the top of the Media Library screen.
You can filter files on the Media Library screen by using several methods:
- Filter media files by date. If you want to view all media files that were uploaded in January 2019, click the drop-down menu labeled All Dates (refer to Figure 4-12) and choose January 2019. All the files you uploaded in January 2019 appear on the Media Library screen, making it easier for you to find a specific file.
- Filter media files by keyword. If you want to search your Media Library for all files that reference kittens, type the word kittens in the Search box in the top-right corner of the Media Library screen (refer to Figure 4-12). As you type, the Media Library screen displays any files associated with the keyword you entered.
- Filter media files by type. If you want to view only audio files that you’ve uploaded to your site, click the drop-down menu labeled All Media Items (refer to Figure 4-12), and choose Audio. The Media Library screen displays all audio files you’ve uploaded. The same concept applies if you want to view only videos or images.

FIGURE 4-12: The Media Library shows all the files you’ve ever uploaded to your site.