Chapter 4
Dealing with Comments and Spam
IN THIS CHAPTER
![]() Making the decision to allow comments
Making the decision to allow comments
![]() Using comments to interact with readers
Using comments to interact with readers
![]() Working with comments and trackbacks
Working with comments and trackbacks
![]() Using Akismet to help combat spam
Using Akismet to help combat spam
One of the most exciting aspects of publishing with WordPress is getting feedback from your readers on articles you publish to your site. Feedback, also known as comments, is akin to having a guestbook on your site.
People leave notes for you that are published to your site, and through these notes, you can respond to and engage your readers in conversation about the topic. Having this function on your site allows you to expand the thoughts and ideas you present in your posts by giving readers the opportunity to add their two cents’ worth.
In this chapter, you can decide whether to allow comments on your site, figure out how to manage those comments, use trackbacks, and discover the negative aspects of allowing comments (such as spam).
Deciding to Allow Comments on Your Site
Some publishers say that a blog without comments isn’t a blog at all because the point of having a blog on your website, in some minds, is to foster communication and interaction between the site authors and the readers. This belief is common in the publishing community because experiencing visitor feedback via comments is part of what’s made Internet publishing so popular. Allowing comments is a personal choice, however, and you don’t have to allow them if you don’t want to.
Positive aspects of allowing comments
Allowing comments on your site lets audience members actively involve themselves in your site by creating a discussion and dialogue about your content. Mostly, readers find commenting to be a satisfying experience when they visit sites because comments make them part of the discussion.
Depending on the topic you write about, allowing comments sends the message that you, as the author/owner of the site, are open to the views and opinions of your readers. Having a comment form on your site that readers can use to leave their feedback on your articles (such as the one shown in Figure 4-1) is like having a great big Welcome to My Home sign on your site; it invites users in to share thoughts and participate in discussions.

FIGURE 4-1: Readers use the Have a Comment? form to share their comments.
If you want to build a community of people who come back to your site frequently, respond to as many comments that your readers leave on your posts as possible. When people take the time to leave you a comment on your content, they like to know that you’re reading it, and they appreciate hearing your feedback to them. Also, open comments keep discussions lively and active on your site. Figure 4-2 illustrates what comments look like after they’re published to your site. (Note: The actual design and layout of the comments on sites varies from theme to theme; you can find information on theme design in Book 6.)

FIGURE 4-2: Visitors comment on a post.
Reasons to disallow comments
Under certain circumstances, you may not want to allow readers to leave comments freely on your site. If you wrote a post on a topic that’s considered to be very controversial, for example, you may not want to invite comments, because the topic may incite flame wars or comments that are insulting to you or your readers. If you’re not interested in the point of view or feedback of readers on your site, or if your content doesn’t really lend itself to reader feedback, you may decide to disallow comments.
 In making the decision to have comments, you have to be prepared for the fact that not everyone is going to agree with what you write — especially if you’re writing on a topic that invites a wide array of opinions, such as politics or religion. As a site owner, you make the decision ahead of time about whether you want readers dropping in and leaving their own views, or even disagreeing with you about yours (sometimes vehemently!).
If you’re on the fence about whether to allow comments, the WordPress platform allows you to toggle that decision on a per-post basis. Therefore, each time you publish a post or article on your website, you can indicate in Post Options (on the Add New Post screen of your Dashboard) whether this particular post should allow discussion. You may choose to disallow all comments on your site (a setting that you can configure in Discussion Settings) or disallow them for only certain posts (a setting that you can configure on the Edit Post page, which I talk about in Book 4, Chapter 1).
Interacting with Readers through Comments
People can leave notes for you that are published to your site, and you can respond to and engage your readers in conversation about the topic at hand. (Refer to Figure 4-1 and Figure 4-2.) Having this function on your site creates the opportunity to expand the thoughts and ideas that you present in your post by giving your readers the opportunity to share their own thoughts.
The WordPress Dashboard gives you full administrative control of who can and can’t leave comments. In addition, if someone leaves a comment that has questionable content, you can edit the comment or delete it. You’re also free to disallow comments on your blog. The Discussion Settings screen of your Dashboard contains all the settings for allowing or disallowing comments on your site. See Book 3, Chapter 2 to dig into those settings, what they mean, and how you can use them to configure the exact interactive environment that you want for your site.
Tracking back
The best way to understand trackbacks is to think of them as comments except for one thing: Trackbacks are comments left on your blog by other blogs, not by actual people. Although this process may sound mysterious, it’s actually perfectly reasonable.
A trackback happens when you make a post on your site and, within that post, you provide a link to a post made by another author on a different site. When you publish that post, your site sends a sort of electronic memo to the site you linked to. That site receives the memo and posts an acknowledgment of receipt in a comment within the post that you linked to on that site. Trackbacks work between most publishing platforms — between WordPress and Blogger, for example, as well as between WordPress and Typepad.
That memo is sent via a network ping (a tool used to test, or verify, whether a link is reachable across the Internet) from your site to the site you link to. This process works as long as both sites support trackback protocol. Trackbacks can also come to your site by way of a pingback — which really is the same thing as a trackback, but the terminology varies from platform to platform.
Sending a trackback to a site is a nice way of telling the author that you like the information she presented in her post. Every author appreciates the receipt of trackbacks to her posts from other authors.
Enabling comment and trackback display
Almost every single WordPress theme displays comments at the bottom of each post published in WordPress. You can do custom styling of the comments so that they match the design of your site by using several items:
- WordPress template tags: Template tags are related to the display of comments and trackbacks. For more on these tags, see Book 6, Chapter 3.
- Basic HTML: Using HTML markup helps you provide unique styles to display content. For information about the use of basic HTML, check out Book 6.
- CSS: Every WordPress theme has a Cascading Style Sheets (CSS) template called
style.css. Within this CSS template, you define the styles and CSS markup that creates a custom look and feel for the comment and trackback display on your site. You can find more information about using CSS in Book 6. - Graphics: Using graphics to enhance and define your branding, style, and visual design is an integral part of web design. Because a single chapter isn't sufficient to fully cover graphic design, you may want to check out WordPress Web Design For Dummies, 3rd Edition (John Wiley & Sons, Inc.), which I wrote, for great information on graphic and website design with WordPress.
- WordPress widgets: WordPress has a built-in widget to display the most recent comments published to your site by your visitors. You also can find several plugins that display comments in different ways, including top comments, most popular posts based on the number of comments, and comments that display the author’s photo. For information about widgets and plugins for these purposes, flip to Book 6, Chapter 1 and Book 7, chapters 1 and 2, respectively.
Managing Comments and Trackbacks
When you invite readers to comment on your site, you, as the site administrator, have full access to manage and edit those comments through the Comments page, which you can access in your WordPress Dashboard.
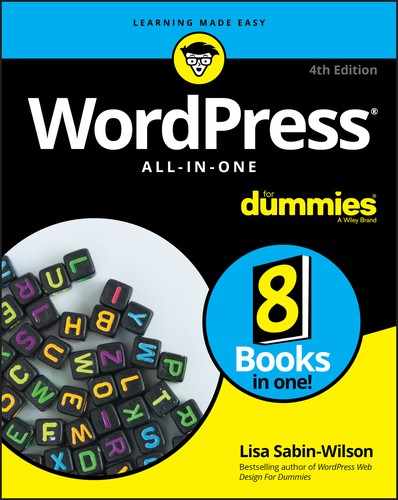
To find your comments, click the Comments link on the Dashboard navigation menu; the Comments screen opens. (See Figure 4-3.)
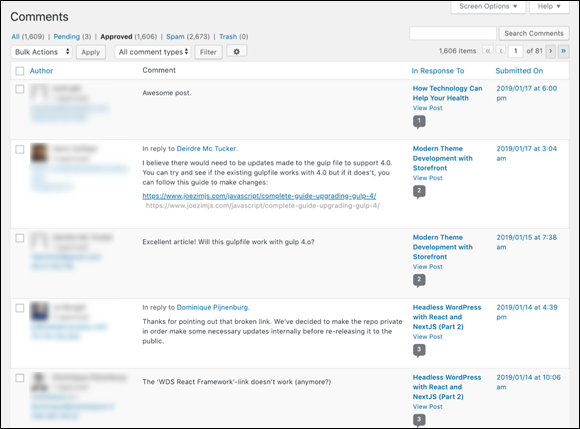
FIGURE 4-3: The Comments screen contains all the comments and trackbacks on your site.
When you hover your mouse pointer over a comment, several links appear that give you the opportunity to manage the comment:
- Unapprove: This link appears only if you have comment moderation turned on. Also, it appears only on approved comments. The comment is placed in the moderation queue, which you can get to by clicking the Pending link that appears below the Comments page header. The moderation queue is kind of a holding area for comments that haven’t yet been published to your site.
- Reply: This link makes a text box visible. In the text box, you can type and submit your reply to this person. This feature eliminates the need to load your live site to reply to a comment.
- Quick Edit: This link opens the comment options inline without leaving the Comments page. You can configure options such as name, email address, URL, and comment content. Click the Save button to save your changes.
- Edit: This link opens the Edit Comment screen, where you can edit the different fields, such as name, email address, URL, and comment content. (See Figure 4-4.)
- History: This link opens the Edit Comment screen and scrolls down to the Comment History section of that screen, which displays the history of that comment, such as when it was approved and when the Akismet plugin cleared the comment as not spam (if you have the Akismet plugin installed; see “Tackling Spam with Akismet” later in this chapter for information on this antispam plugin.)
- Spam: This link marks the comment as spam and marks it as spam in the database, where it will never be heard from again! (Actually, it’s stored in the database as spam; you just don’t see it in your comments list unless you click the Spam link at the top of the Comments screen.)
- Trash: This link does exactly what it says: sends the comment to the trash and deletes it from your blog. You can access comments that have been sent to the trash to permanently delete them from your blog or to restore them.
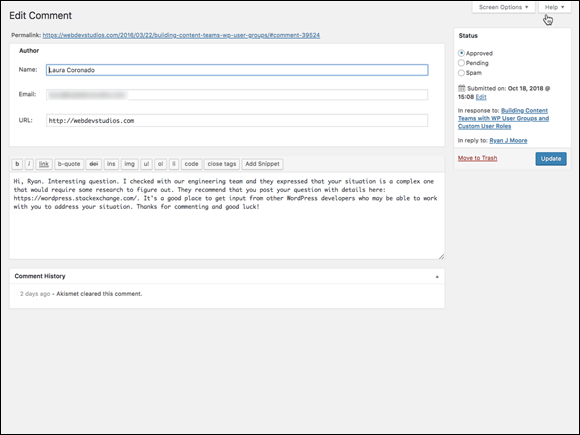
FIGURE 4-4: Edit a user’s comment on the Edit Comment screen.
 If you have a lot of comments listed in the Comments screen and want to edit them in bulk, select the check boxes to the left of all the comments you want to manage. Then choose one of the following from the Bulk Actions drop-down menu in the top-left corner of the page: Unapprove, Approve, Mark As Spam, or Move to Trash.
If you have your options set so that comments aren’t published to your site until you approve them, you can approve comments from the Comments screen as well. Just click the Pending link to list the comments that are pending moderation. If you have comments and/or trackbacks awaiting moderation, they appear on this page, and you can approve them, mark them as spam, or delete them.
WordPress immediately notifies you of any comments sitting in the moderation queue, awaiting your action. This notification, which appears on every single page, is a small circle, or bubble, on the left navigation menu, to the right of Comments. Figure 4-5 shows that I have three comments pending moderation. In Figure 4-5, you also see that the main Dashboard displays the comment as [Pending] below the Recent Comments heading.

FIGURE 4-5: A small circle tells me that I have three comments pending moderation.
Tackling Spam with Akismet
No one likes spam. In fact, services such as WordPress have spent untold hours in the name of stopping spammers in their tracks, and for the most part, the services have been successful. Occasionally, however, spammers sneak through. Many spammers are offensive, and all of them are frustrating because they don’t contribute to the ongoing conversations that occur in blogs. (A spammer’s only goal is to generate traffic to his website.)
All WordPress installations have one significant thing in common: Akismet, a WordPress plugin. It’s my humble opinion that Akismet is the mother of all plugins and that no WordPress site is complete without a fully activated version of Akismet running on it.
Apparently, WordPress agrees, because the plugin has been packaged in every WordPress software release beginning way back in version 2.0. Akismet was created by the folks at Automattic, the same folks who brought you the WordPress.com hosted version.
Akismet is the answer to combating comment and trackback spam. The Akismet website (https://akismet.com) explains this plugin quite well: “Used by millions of websites, Akismet filters out hundreds of millions of spam comments from the Web every day. Add Akismet to your site so you don't have to worry about spam again.”
I started blogging in 2002 with the Movable Type platform and moved to WordPress in 2003. As blogging became more and more popular, comment and trackback spam became more and more of a nuisance. One morning in 2004, I found that 2,300 pieces of disgusting comment spam had been published to my blog. Something had to be done!
The folks at Automattic did a fine thing with Akismet. Since the emergence of Akismet, I’ve barely had to think about comment or trackback spam except for the few times a month I check my Akismet spam queue.
This chapter wouldn’t be complete if I didn’t show you how to activate and use the Akismet plugin on your site. Book 7 covers the use, installation, and management of other plugins for your WordPress site.
Activating Akismet
Akismet is already included in every WordPress installation; you don’t have to worry about downloading and installing it, because it’s already there. Follow these steps to activate and begin using Akismet:
- Click the Plugins link on the left navigation menu of the Dashboard to load the Plugins screen.
Click the Activate link below the Akismet plugin name and description.
A green box appears at the top of the page, saying
Almost done - configure Akismet and say goodbye to spam. (See Figure 4-6.)- Click the Set up Your Akismet Account button in the green box to navigate to the Akismet screen.
If you already have an API key, enter it in the Enter an API Key text field; then click the Connect with API Key button to save your changes.
You can stop here if you already have a key, but if you don't have an Akismet key, keep following the steps in this section.
An API key is a string of numbers and letters that functions like a unique password given to you by Akismet; it’s the key that allows your WordPress.org application to communicate with your Akismet account.
Click the Get Your API key button on the Akismet Configuration screen.
The WordPress page of the Akismet website opens (
https://akismet.com/wordpress).Click the Activate Akismet button.
The sign-up page for WordPress.com opens. Because Akismet was created and is owned by Automattic, the company behind WordPress.com, you need to create an account on WordPress.com to use Akismet.
Enter your email address, desired username, and password in the provided text fields; then click the Continue button.
The Pick Your Plan page opens.
- Choose among these options for obtaining an Akismet key:
- Enterprise: $550 per year for people who own professional sites, a large network, or multisite installations of WordPress and want additional priority support and an unlimited number of sites.
- Plus: $59 per year for people who own a small commercial or professional site or blog.
- Personal: Name your price. Type the amount you’re willing to pay for the Personal plan. This option is for people who own one small, personal WordPress-powered site. You can choose to pay nothing ($0), but if you’d like to contribute a little cash toward the cause of combating spam, you can opt to spend up to $120 per year for your Akismet key subscription.
Select and pay for (if needed) your Akismet key.
After you’ve gone through the sign-up process, Akismet provides you an API key. Copy that key by selecting it with your mouse pointer, right-clicking, and choosing Copy from the shortcut menu.
- Go to the Akismet screen by clicking the Akismet Anti-spam link on the Settings menu in your WordPress Dashboard.
- Enter the API key in the Enter an API Key text box, and click the Save Changes button to fully activate the Akismet plugin (as shown in Figure 4-7).

FIGURE 4-6: After you activate Akismet, WordPress tells you that the plugin isn’t quite ready to use.
FIGURE 4-7: Akismet verification confirmation message on the Akismet screen.
Configuring Akismet
On the Akismet screen, after you’ve entered and saved your key, you can configure three options to further configure your spam protection:
- Comments: Select this option to display the number of approved comments beside each comment author.
- Strictness: By default, Akismet puts spam in the Spam comment folder for you to review at your leisure. If you feel that this setting isn’t strict enough, you can select the option to have Akismet silently delete the worst and most pervasive spam so that you never have to see it.
- Privacy: Here, you can configure Aksimet to display a privacy notice below the comment form on your posts. Displaying this notice can help you adhere to the GDPR guidelines. (See Book 3, Chapter 2 for information on GDPR.)
Akismet catches spam and throws it into a queue, holding the spam for 15 days and then deleting it from your database. It’s probably worth your while to check the Akismet Spam page once a week to make sure that the plugin hasn’t captured any legitimate comments or trackbacks.
Rescuing nonspam comments and trackbacks
You can rescue any nonspam captured comments and trackbacks by following these steps (after you log in to your WordPress Dashboard):
Click Comments on the left navigation menu.
The Comments screen appears, displaying a list of the most recent comments on your site.
Click the Spam link.
The Comments screen displays all spam comments that the plugin caught.
- Browse the list of spam comments, looking for any comments or trackbacks that are legitimate.
If you locate a comment or trackback that’s legitimate, click the Approve link directly below the entry.
The comment is marked as legitimate. In other words, WordPress recognizes that you don’t consider this comment to be spam. Then WordPress approves the comment and publishes it on your site.
Check your spam filter often. I just found four legitimate comments caught in my spam filter and was able to de-spam them, releasing them from the binds of Akismet and unleashing them upon the world.