Chapter 3
The Interdimensional Traveler: A Full Body Character Design
In this chapter we will design and sculpt a bipedal character. This character walks on two legs—upright like a human—but we want to make sure that, even though he is a biped, his nature is entirely alien to human. As we talked about in Chapter 1, “ZBrush as a Character Design Tool,” this design is a character more than a creature: he has personality and character as well as an internal life. This will be somewhat malevolent in atmosphere, but it is important that this design inspire awe and some trepidation rather than total revulsion or fear. We will look at ways to break convention in silhouette, proportion, and structure to create a character that is new and interesting within the confines of being humanoid in overall appearance.
This lesson focuses on how to manipulate the viewer’s expectations by breaking the normal placement of humanoid features and proportions. By lengthening the figure and giving it a sweeping gesture, you create a beautiful form that is then contrasted with grossly emaciated forms and skeletal shapes, both of which inspire some degree of fear. These contrasts, combined with breaking the normal expectations of the figure, create a sense of trepidation in the viewer when looking at the design.
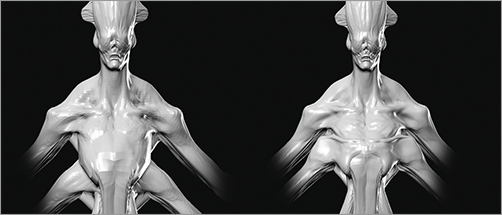
From a technical standpoint, we will look at how to adjust proportions, develop ideas quickly with the sculpting brushes, and add entirely new limbs to an existing model without having to rework the mesh. We will glue new pieces on to the model. Figure 3-1 shows the final character.
Figure 3-1: Here we see the final character after the sculpting and posing process as well as the finishing pass detailed in Chapters 4 and 11.
The Brief: Archon
The character we will create in this chapter is an interdimensional traveler called “The Archon.” He is a high-ranking member of a caste of beings that travel between worlds, colonizing them for their own needs. His motivations are to promote the interests of his own alien race and therefore may run counter to those of humanity. He considers humans to be like cattle, and his awesome power combined with his aristocratic arrogance make a dangerous combination. The character should communicate regality and strength without being a brute or animalistic force. He is magical in his presence and uses his ability to manipulate space and time to subjugate the beings he encounters. Ancient cultures may have feared and worshiped these creatures as gods.
The brief we just read contains much information about the character we are being asked to design. You will notice it is full of keywords such as alien, powerful, regal, and arrogant. These are points that will help us define the attitude and presence of the character though the design process.
You may also note this brief has no information about the visual look of the character. Briefs like this will be given when a director is interested in exploring a vast array of possibilities to find the best solution to his character. We call this process a design journey, and it involves traveling down various concept paths with the expectation that most of them will not be selected as the final design. Each one will give some insight into the best possible solution to the character design.
Even though there are no visual descriptions, we can intuit some elements from the director’s description. Regal, high-ranking, and god imply a tall, muscular character, like Zeus, perhaps. Or maybe he is a valiant warrior who has battled his way to the top. Here is where you can choose to be creative. Try to find ways to confound your own expectations and instincts. If you immediately think tall, what happens if you try to communicate these traits in a small fat character? This is where the excitement and originality for design come in. In this chapter we will create a lithe, slender character that has the presence of a decadent king or a strange high priest. Remember, this is an alien that travels between dimensions. It is a perfect opportunity to twist the expectations of a human body in strange ways.
Establishing Your Basic Figure
We will begin by considering the most basic aspects of the figure. These aspects are gesture, form, and proportion. I will often begin working on a character by thinking of the overall gesture of the figure. I will think about the attitude of the character and how it is communicated through his stance. I find that I can get into the mind-set of the character by standing up and assuming the posture or stance of the character. It is much like acting, and a good designer needs to be able to get into the head of his subject, to be able to assume its identity and communicate it to the viewer.
Proportion is another key element, especially in humanoid figures. A figure with an eight-head or ten-head proportion will appear massive while a six- or five-head figure will appear diminutive and small. The proportions of the figure can quickly lead the viewer to make all kinds of assumptions about the character, including its relative size, age, demeanor, and mobility. Variations in proportion can greatly impact how we view a character. A larger head-to-body ratio can appear less graceful and imposing while a smaller head-to-body ratio appears taller and, in some cases, more imposing. Later in this book you will see how a larger head-to-body ratio is used for the Forest Spirit character design in Chapter 8, “Sculpting the Forest Spirit.” We touched on these topics in Chapter 1, but these concepts are so important that I would like to touch on them again here.
Gesture
We talked about gesture in Chapter 1, and it has come up many times over the various projects. We will reference gesture a few times in this chapter, and many of the decisions we make will be informed by the desire to create an appealing gesture in the figure. If you have read my previous two books, the concept of gesture should be familiar. It is, in my estimation, one of the three tenets of sculpture: gesture, form, and proportion.
Gesture is the implied line or life of a figure. If you were to draw a line through a figure that represented its overall stance or thrust, this would be the gesture line (Figure 3-2). A poor gesture results in a stiff or lifeless figure. Figure 3-3 shows the final figure from this chapter with gesture lines overlaid. Notice how the gesture lines work even on a neutrally posed figure. In any position, the model needs to display some sense of life and spring in its limbs.
Figure 3-2: Here we see a sculpture of a rugby player with the gesture lines indicated.
Figure 3-3: Here is the final figure with gesture lines overlaid.
Form
As we develop this character, we will be thinking of the forms he is composed of and how those forms interrelate. When we design a fantasy character, dealing with form is much different than when we work on a representational sculpture of a human figure. For this character, we are able to exploit the form language, the way the various shapes make the viewer feel. We can experiment with creative combinations of the shapes and push them in new and exciting ways. As we have already seen in previous projects, it’s important to consider the character in its most basic forms and evaluate how those forms interrelate.
Proportion
As we saw in Chapter 1, proportion refers to the relative sizes between the parts of a figure. Proportion is very important in this particular design as we make a conscious effort to move far away from human proportions to elongate this character to an extreme degree. These longer proportions communicate an elegance and grace and, when combined with the more menacing shape language of the head and bony anatomy, also malevolence or danger.
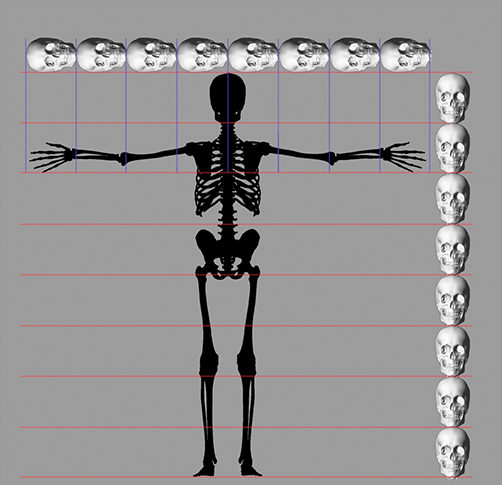
How will we know how to manipulate proportions to get effects like this? Well, we need to understand a baseline guide to human proportion first. When we have this as a fundamental measure of a “normal” human, we can then make educated decisions on how to break those rules. A fundamental measure is often referred to as a canon. A canon is merely a set of rules used to measure a figure. The human body has several, but one of the most popular is the eight-head canon (Figure 3-4).
Figure 3-4: This image shows a heroic male figure divided into eight head measures. This is the eight-head proportional canon.

The eight-head canon helps you measure the figure by breaking it into eight equal head measurements. By knowing where each body landmark falls at each head measure, you can quickly and accurately construct a figure in a convincing proportion. The eight-head canon is popular because it is a very heroic proportion that results in a large body and long legs. There is a degree of elegance to the figure, and you often find this measurement used in comic book art.
Table 3-1 shows how to break a figure down into the eight-head canon and where the major landmarks fall in Figure 3-4. We will be using these measurements as a basis to depart from the form of the human body to create a more alien figure. For example, when we lengthen the arms, we will use the canonical rule that the body length equals the arm-span width to help us create an accurate-looking arm span. Figure 3-5 shows how the total head measure of the body also applies to the normal arm span of a human. By breaking rules like this, you can subtly or more drastically affect the manner in which a character is perceived.
Table 3-1: Eight-head Canon for Figure Breakdown
| Landmark | Head Measure |
| Chin | Head 1 |
| Nipples | Head 2 |
| Navel | Head 3 |
| Pubic bone | Head 4 (midpoint of figure) |
| Lower thigh | Head 5 |
| Bony protrusion of knee (tibial tuberosity) | Head 6 |
| Lower shin | Head 7 |
| Bottom of feet | Head 8 |
Figure 3-5: Here you can see how the total head length of the figure also applies to its arm span.
Understanding proportion allows you to break the rules in an educated way. For example, if you enlarge the head and hands of a normal-sized figure, the resulting proportion appears adolescent. If you enlarge them too much, they can start to feel childlike or even overly stylized. Knowing how proportions work allows you the freedom as an artist to manipulate them. This section will give you the basic information you need to understand the eight-head proportional canon. For more information on creating a full human figure in the eight-head canon, see my book ZBrush Digital Sculpting Human Anatomy.
Roughing in the Body Proportions
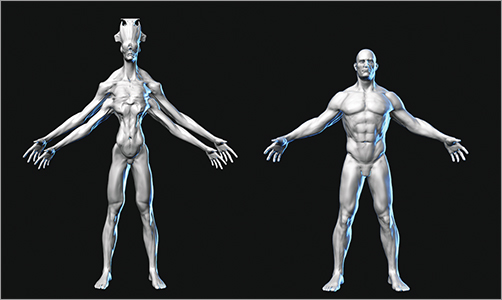
We will begin this character by working in an existing human ZTool. This gives us the benefit of having the most basic forms sculpted in already as well as having a standard human form and proportion to start from (Figure 3-6). These will all be changed significantly in the final piece, but I always find it is nice to have a baseline to begin from that is more than a simple box model. This can greatly help in terms of speed if you need to get designs out quickly. I don’t consider this a cheat, especially if you created the base models. I have included a basic human body model on the DVD or download files. This model is from ZBrush Digital Sculpting Human Anatomy. If you want to create your own, the entire process is there. The book also offers more information on human anatomy.
For this creature, we will be breaking and accentuating certain anatomical elements to give it a sense of emaciation.
Figure 3-6: The standard human model and the final creature together
Changing the Proportions
We will use a combination of the Transpose tools and the Move brush to shift the body portions on this mesh. Follow the steps below to start changing the shape of the human mesh into something far more alien. If you want more in-depth information on the Transpose tools, see my book ZBrush Character Creation: Advanced Digital Sculpting.
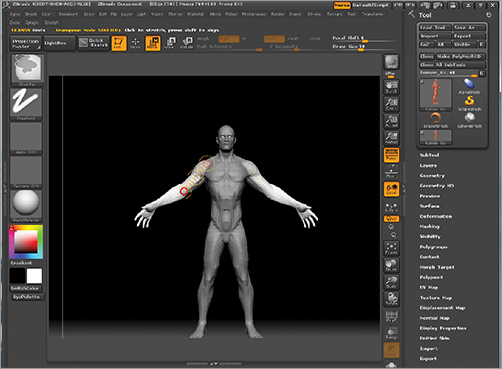
1. Load the human ZTool into ZBrush by opening the Tool menu and clicking the Load button. Browse to the human.ztl file on the DVD or download files. Draw the model on the canvas and press the T hot key to enter edit mode (Figure 3-7).
Figure 3-7: Load the human ZTool into ZBrush and enter edit mode.

2. With the human model in edit mode, we are now ready to shift the forms around. The first and most basic changes come first. We know the figure will have a much more elongated proportion, so we will begin by stretching the central core of the figure as well as his arms and legs. Select the Move button from the top of the screen to enter Transpose Move mode (Figure 3-8). You can also enter Transpose Move mode by pressing the W hot key. Alternately, you could select the Transpose brush from the Brush menu (Figure 3-9).
Figure 3-8: The Transpose Move button at the top of the screen

3. We will use Transpose masking to mask the upper body from the lower body. Transpose masking works by pressing the Ctrl button and click dragging along the body. The mesh will mask based on the underlying topology. You want to mask the body from the waist up. If you need to manually adjust the mask, feel free to use the mask pen tool or the masking rectangle; both are under the Brush menu.
Figure 3-9: The Transpose brush is also found in the Brush menu.
4. To stretch the length of the body, click and drag from the ZTool off to the background. If you hold Shift while you do this, the transpose line will draw in a straight line. Release the mouse and the key when the line is drawn.
5. Hold Shift again and click and drag in the center circle of the line. Because you are holding Shift, the movement will constrain to the axis of the transpose line. Move the lower body down, stretching the length of the torso. Compare Figure 3-10 to the previous image to see this effect.
6. We will now extend the arm length as well. Transpose mask the body so that the arms are unmasked. Again you can manually adjust the masking using the mask pen and rectangle brushes. Draw a transpose move line from the shoulder to the elbow. Once this line is in place, while holding Alt, click and drag in the circle at the elbow (Figure 3-11). This will lengthen the arm.
Figure 3-10: Mask the upper body as in image A, then lengthen the torso with the Transpose Move brush as in image B.
Figure 3-11: Mask the body to isolate it from the arms to facilitate lengthening them. Then lengthen the arms using Transpose Move by Alt click dragging in the circle at the elbow.
7. This stretches the upper arm but not the lower, so it will not complete the effect we want. I want to give the forearm a slightly longer proportion relative to the upper arm. To do this, mask to the elbow and use Transpose again to stretch just the forearm. Click at the elbow and draw the line to the wrist. Then click and drag the last circle to stretch the forearm (Figure 3-12).
8. The final effect is seen in Figure 3-13. Based on what we know about human proportions, we want the fingertips to fall almost halfway down the thigh. If you make the arms look too short, it will give the character a squat compact appearance, which is unappealing.
Figure 3-12: Stretch the forearms by masking to the elbow and using Transpose Move to stretch the limb as in the previous step.

Figure 3-13: The arms on this figure have been lengthened at both the upper and lower arm bones.

A rule of thumb I use with my students in class is, when in doubt, elongate the proportion slightly because long limbs will look like a stylization where short ones tend to look like a mistake. This also works for the sizes of hands and feet. Common errors are to make hands and feet too small, which always looks like a mistake. If you make them slightly larger, it looks like a stylistic choice, and the view is far more forgiving. But do this within reason; you don’t want all your characters to have cartoon character mitten hands!
Accentuating the Bony Landmarks
In the next stage we will accentuate the skeletal landmarks to add a sense of emaciation as well as a jagged, angular skeleton beneath thin, leathery skin.
1. Use the select Rectangle or select Lasso brush to hide the arms so that you can see and work on just the central core of the figure.
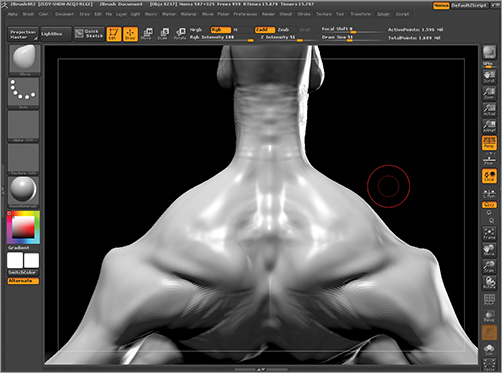
2. Rotate to a side view and with the Move brush pull the points of the pelvis and ribcage forward, as shown in Figure 3-14.
I am pulling these points forward because they are common bony landmarks on the human body and important to note when trying to place the surrounding muscular and skeletal anatomy. Figure 3-15 shows these on a skinned human model. The hip points are called the anterior superior iliac crests, and the ribs represent the inferior border of the thoracic arch. Both can be seen on the skeleton in Figure 3-16.
Figure 3-14: Use the visibility rectangle to hide the arms so that you can work on the gesture of the figure’s core.
Figure 3-15: The bony landmarks called out on a human figure
Figure 3-16: The bony landmarks on a skeleton model
People have a very sharp eye for human anatomy, even if they have no artistic training whatsoever. We know human bodies because we see them every day and live in one. This is why someone with no artistic training can see when something is “off” on a human model. Viewers have a sense of what looks natural, so they know when it looks “wrong” on your figure. The difference between a conscious decision to break proportion and a mistake is that decisions made on the proportion will be harmonious with the rest of the figure in terms of its overall look of the character. A mistake will not work in concert with other elements of the character design, which is why it sticks out to the viewer. Mistakes are not decisions, so they do not combine harmoniously with the other design choices. If you make a conscious decision to break with the rules of anatomy, this decision tends to be reflected and harmonious with the design. For this reason the viewer will accept them.
For example, people will typically recognize that the skeleton is close to the surface at the points of the pelvis we just sculpted, even if they do not know the name of the part of the skeleton they are seeing. By pulling these bony landmarks forward, it creates a jagged, aggressive quality to the very physiology of the character. We have taken points on the skeleton that the viewer will remember seeing on a normal body and pulled them out to create a sharp, aggressive shape. Psychologically, this creates a sense of surprise in the viewer because he expected those points but not in that shape. This effect is further compounded because the shapes created are aggressive ones as opposed to rounded softer shapes that communicate less aggression. I also use the Move brush to tuck in the lower back, giving the waist a very narrow wasplike quality. This gives the impression of a more emaciated figure with a more prominent skeletal structure.
At this point I decided to adjust the gesture of the figure to give it a more sweeping S-curve. Mask the torso, and using Transpose, shift the hips forward (Figure 3-17). This gives the figure’s stance a lithe quality leading with the hips. It is almost serpentine. To accentuate this, use Transpose Rotate to rotate the legs back from the hip and forward from the knee to create the S shape seen in Figure 3-18.
Figure 3-17: Shift the hips forward with the Move brush.
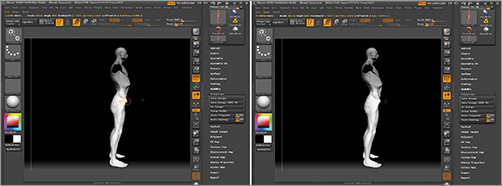
Figure 3-18: Rotate the legs back from the hip and forward at the knee to create the S-curve seen here.
I now use the Move brush to readdress the shape of the ribcage. It has gotten lost a little in the stretching, and I want to be sure the masses of the pelvis and torso remain intact. These give the long figure its sense of internal structure. Using the Move brush, I pull the thoracic arch out farther to create the sharp plane break seen in Figure 3-19. This is one of those jagged, aggressive shapes that both pulls the physiology away from human and subconsciously suggests aggression, or forward thrust, in the figure’s stance.
Figure 3-19: Here the shape of the ribs has been altered to give them more distinct character.
At this point, I pull the hip bones of the iliac crest forward and narrow the waist (Figure 3-20).
In the process of stretching the legs and torso, the midline, or groin, of the figure has moved out of place. There is too much distance between it and the hips. Using the Move brush, I shift it back up. This has the effect of also lengthening the legs a bit more (Figure 3-21).
Figure 3-20: Narrowing the waist and sharpening the bony landmarks of the hips and torso. By removing any soft forms, we add a more attenuated and disturbing feel to the anatomy.
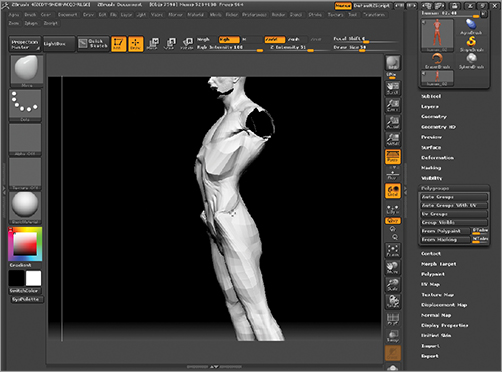
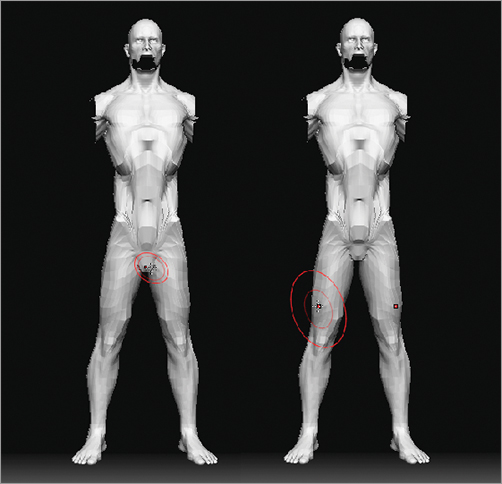
Figure 3-21: Shifting the groin up lengthens the legs. In the figure on the left, you see the original groin position. In the figure on the right, you can see the effect of raising this point.
Now we want to catch shadow in areas to suggest more attenuated sinewy muscle in the body. Select the Standard brush and at the midriff carve in some hollows beneath the thoracic arch to give the impression of tight-knit abdomen muscles extending down the torso (Figure 3-22). Again, this is based on real anatomy that has been pushed into a more extreme representation. As you can see in Figure 3-23, the abdominal muscles do indeed flow in the direction I am placing them on this figure. The idea is that I am suggesting the presence of the muscles by pulling out bits of shadow around them without having to completely sculpt the entire muscle. This helps to keep things a little more subtle. While working on the form, I will often switch to the BasicMaterial2 material because it has a specular shine that I find makes it easier to judge form.
I decide I need to lengthen the legs again. Using Transpose Move, I elongate them (Figure 3-24). This change makes the leg length closer to the length of the arm from the pit of the neck to the fingertips. You can measure this manually using the transpose line. Click and drag from the pit of the neck to the fingertips and note the value at the upper left of the screen. Draw another transpose line from the groin to the toes and compare this measurement (Figure 3-25). They should be close to equal.
Figure 3-22: Etching in the abdominal muscles
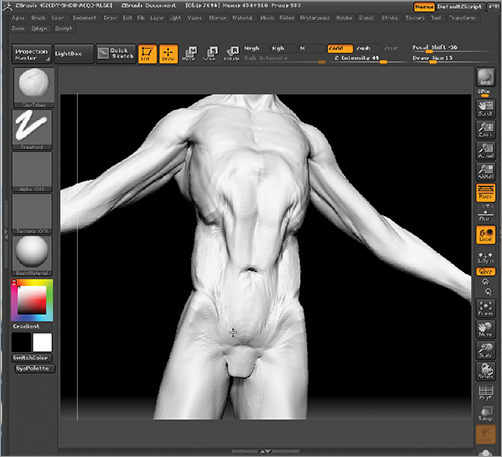
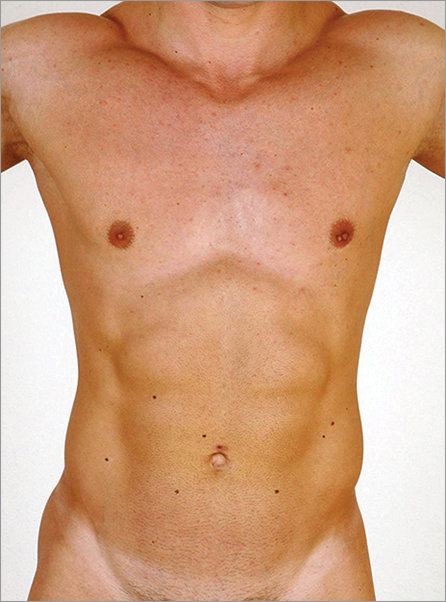
Figure 3-24: Lengthening the leg

Figure 3-25: Use a transpose line to compare the measurement from the groin to the floor with the measurement from the pit of the neck to the fingertips. The measurements should be close to equal.
At this point, we are ready to address the head in more detail. We will look for a sense of character in the head through the way in which its shapes interlock and relate to the rest of the figure. We will also look at ways to confound audience expectations and alter normal human features to create an inhuman and unsettling design.
Let’s look at the head and face in more detail now.
Position and Placement
I want to bring the head forward so that it continues the S-curve created by the body. As it stands, it sits too squarely over the shoulders. I want the stance to be more languid and long than that.
Use Transpose masking to mask the body from the head (Figure 3-26). Use a Transpose line to rotate the head forward, as shown in Figure 3-27. Note that I use the pit of the neck as my center of rotation. This is because I want to lengthen the neck, and rotating from here causes the least distortion to the neck and creates a more graceful length by extending the head out toward the front of the figure.
Remember, I want the proportions on this character to all be longer than normal. The distance from the pit of the neck to the chin is typically one-third of a head, but I will make it much longer here. When moving central parts such as the head, be sure to turn off X symmetry by pressing the X hot key. If you don’t do this, you run the risk of separating the two halves of the head or making them collapse into themselves. This won’t always be apparent when looking from the side view. When you have finished making the changes, turn X symmetry back on.
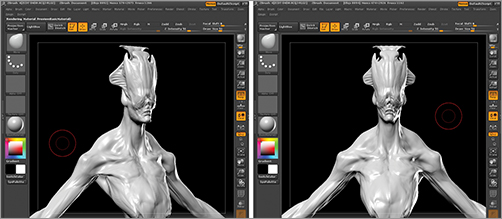
Using the Move brush, elongate the chin and the top of the head. I also accentuate the cheekbones using the Standard brush (Figure 3-28). The face will ultimately take on a cadaverous look, and the head will be quite longer than a normal human’s. This stage is about moving the forms away from human toward something that borrows elements from the normal but carries them into strange combinations.
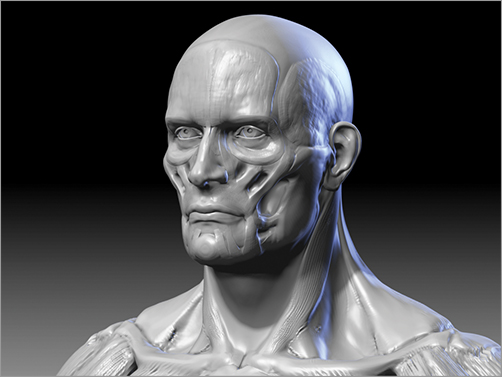
Step up a subdivision level and smooth out the eye details to create empty sockets. Using the Standard brush, I sketch in the nasal cavity and pull shadow out beneath the cheekbones (Figure 3-29). This is to suggest that the facial muscles extend from the cheekbones to the mouth (Figure 3-30). Again, this is playing on the human nature to recognize accurate anatomical structures on instinct. We have seen these shadows on human faces; seeing them here communicates that this is a thin, sickly body with a cadaverous face—unsettling combinations!
Figure 3-26: Isolating the head with a mask

Figure 3-27: Rotate the head forward.
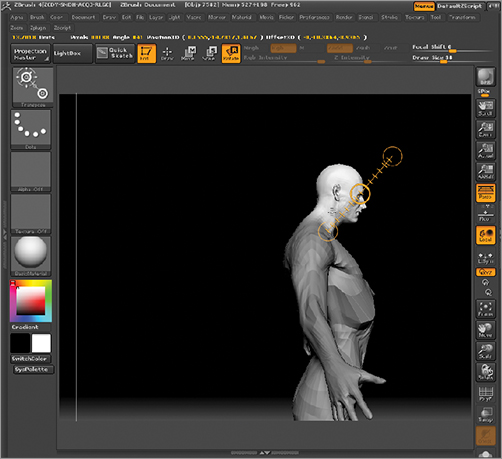
Figure 3-28: Use the Move brush and Standard brush to alter the shape and character of the head.

Figure 3-29: Using the Standard brush to suggest facial anatomy. Overstating the bony structure creates a cadaverous look in the character.

Figure 3-30: The anatomical structure of this creature’s face is based on the actual facial anatomy seen here. Note the way existing bone structure and muscles have been slightly accentuated to monstrous effect.
Creating the Head Crest
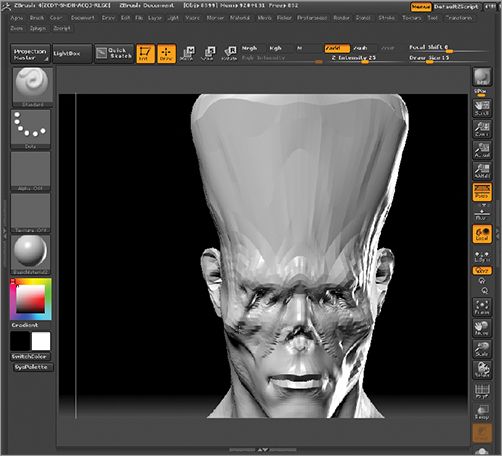
Now I want to create the head crest. I know that I want the shape of the creature’s head to be tall and suggest the headdress of a bishop or a crown. This is to subconsciously reinforce the imposing, regal quality of the figure. Follow these steps as I build up the head crest.
Use the Move brush to pull the top of the head up (Figure 3-31). The shape I am going for should suggest a crown or a bishop’s hat (Figure 3-32).
Figure 3-31: Pull the top of the head up with the Move brush.

Figure 3-32: The head crest is based on the shape of a bishop’s mitre. Using cultural references like this subtly suggests power, royalty, and solemnity to the viewer.

Use the Move brush to create the strange crest shape. This breaks up the form and gives it the feeling of an ornate headdress that is actually part of his anatomy (Figure 3-33). This is similar to the sagittal crest on the top of a gorilla’s head (Figure 3-34).
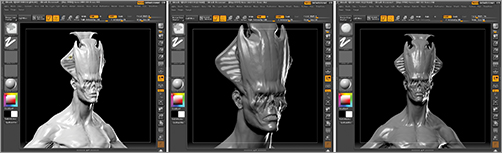
In an attempt to make the character even more disturbing, I will remove the eyes. Because he is a godlike interdimensional traveler, it’s unlikely he needs or uses normal senses the way we understand sight, sound, smell, and touch. Use the Clay Tubes brush to stroke across the bone structure of the eye sockets to fill it in with what looks like draped skin (Figure 3-35). This gives an unsettling effect because the presence of the facial anatomy suggests eye sockets but there is nothing in their place but draped skin. Again, we upset the viewer’s expectation to create a strong reaction.
Figure 3-33: Further shaping the crest of the head with the Move brush to create a more complex shape language

Figure 3-34: This gorilla skull shows a pronounced sagittal crest.
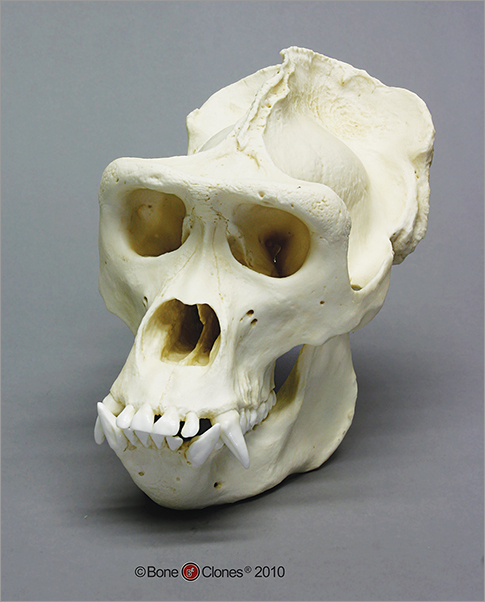
Image courtesy of www.boneclones.com.
Figure 3-35: Using the Clay Tube brush, stroke across the eye sockets to fill them in.
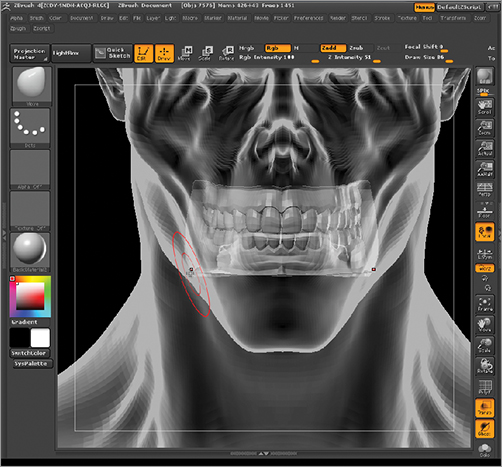
We will now add teeth to the head using a SubTool. This is so that there will be teeth inside the mouth if we decide to give the face some expression later. I have included a ZTool of teeth gums and a tongue made by Jim McPherson on the DVD or download files.
From the Tool menu, load the teeth ZTool. When the teeth are loaded into ZBrush, they will appear on the canvas in place of the figure. Open the Tool library from the Tool palette and select the figure to return to the model. Now that the teeth are loaded, you can add them to the figure as a SubTool by selecting Tool then SubTool and then Append (Figure 3-36).
Use the Transpose Move and Scale tools to shift the teeth into the head. Scale them down with Transpose Scale so that they lay inside the mouth cavity (Figure 3-37). You may find it is easier to make precise movements of the teeth if you temporarily turn off Perspective with the P hot key.
Figure 3-36: Appending the teeth ZTool into the model
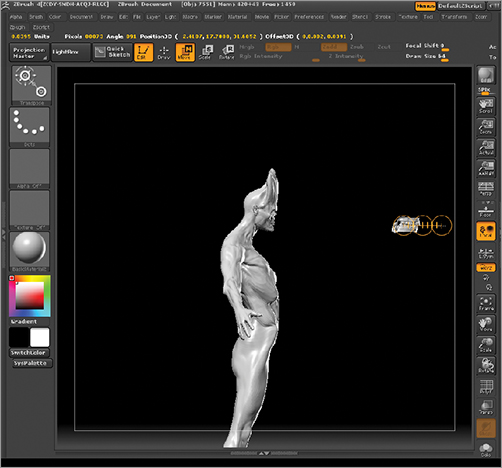
Figure 3-37: Move the teeth into the head. Turn on Transparency to place the teeth accurately inside the head geometry.
Using Topological Masking
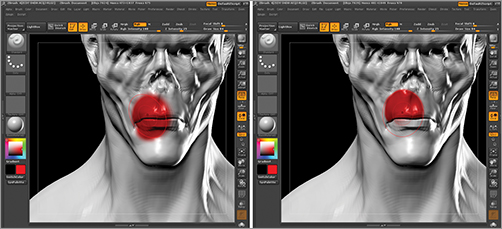
Now we want to open the lips slightly to expose the teeth. We will use the Move Topological brush to accomplish this task (Figure 3-38). You may notice that if you try to move the lips with the normal Move brush it will grab all of the faces under the red brush falloff circle, making it impossible to separate the two lips. The solution to this is to use a special variant on the Move brush called Move Topological. Move Topological will move the underlying faces with a falloff based on how close the faces are topologically instead of just moving all of the faces under the brush falloff. The model in Figure 3-39 is colored to show how the falloff of the Move brush compares with the falloff of the Move Topological brush. Follow these steps to use the Move Topological brush.
Figure 3-38: Open the lips slightly with the Move Topological brush to reveal the teeth.
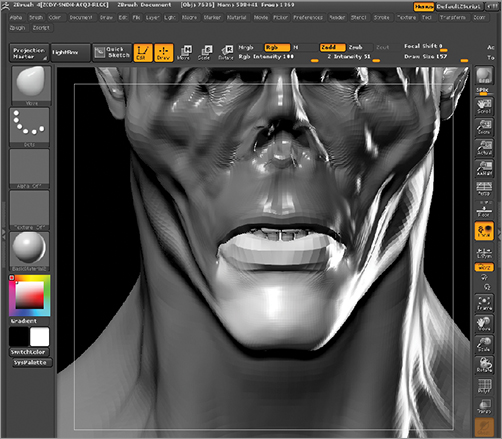
Figure 3-39: The falloff of the Move brush compared to the Move Topological brush is illustrated with this colored region. Notice how the opposite lip remains unaffected by the Move Topological brush.
1. Select the Move Topological brush from the Brush palette in the main Brush menu at the top of the screen.
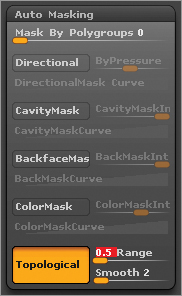
2. Open the Auto Masking submenu and set the range slider to 0.5 (Figure 3-40). The range slider controls how much of the mesh will be affected by the Move Topological brush. This value may be different, depending on your model scale.
Figure 3-40: Setting up Topological masking
3. Click and drag the lower lip. You will find it moves just those faces close to the center of your brush that are topologically near to the falloff zone. This allows you to move the lips independently of each other. This can be used in any tight areas of the mesh such as the eyes and ears and between fingers and toes. Here we see the lips open with the teeth partially exposed (Figure 3-41). When using Topological masking on any brush, be sure to step to a lower subdivision level: the action of the brush is slower on dense models because ZBrush needs to calculate the topology of the surface with every stroke.
Figure 3-41: Opening the lips

Continuing the Head Crest
At this point I feel the silhouette of the head is drab and needs to be revisited. Using the Move brush, I mask out a strip of faces behind the existing head crest structure.
1. Use the Move brush to pull the faces up as seen in Figure 3-42.
Figure 3-42: Isolate a strip of mesh behind the crest with a mask, then pull the unmasked faces up.
2. Rotate to a front view and pull the faces out into an oval shape that extends out for the outline of the front form. Shape the top of this crest into a T shape, as seen in Figure 3-43. This adds more visual interest to the crest by introducing an interesting interplay between positive and negative space.
3. I continue to refine the shape by moving parts to overlap the silhouette in interesting ways (Figure 3-44).
4. Use the Masking Pen brush to create some vent shapes down the edges of the crest. These could be hearing or some other sensory organs developed for the spaces between worlds in which these creatures dwell (Figure 3-45).
Figure 3-43: Further refining the shape of the crest into more complex shapes. Here we explore more contrast between positive and negative spaces in the head crest.

Figure 3-44: Further refining the crest shapes
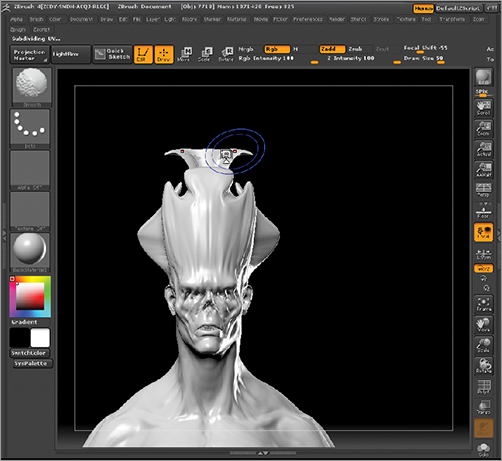
Figure 3-45: Drawing mask lines on the sides of the head to push in vent shapes
5. Now I make a bolder statement with the eye sockets and fill them in entirely. This creates an interesting interlocking form between the sagittal crest and the facial structure.
6. Select the Clay Tubes brush and turn off the Alpha (Figure 3-46). I fill in the eye sockets (Figure 3-47) and build up the resulting form as seen in Figure 3-48.
7. Using the Clay Tubes brush, I stroke along the head crest and bone structure of the face to unify the shapes and give the feel of skin stretching across the forms (Figure 3-49).
8. At this stage we have a figure with an extremely long, attenuated form. Up to now, we have yet to bring that same elongation into the hands and fingers. We will use the Transpose tools to lengthen the hands and give them a more graceful and slender appearance (Figure 3-50).
9. Use the Clay Tubes brush to build up the bony structure of the hands. Pick out shadow areas between the metacarpals. Metacarpals are the technical anatomical names for the bones of the hand or palm. The finger bones are called phalanges. This helps create a sense of emaciated skin over gnarled bone (Figure 3-51).
Figure 3-46: The Clay Tubes brush with the Alpha off
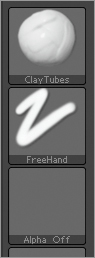
Figure 3-47: Filling in the eye sockets

Figure 3-48: Here you can see the individual forms of the crest, face, and eyes color coded. Notice how these shapes interlock together.
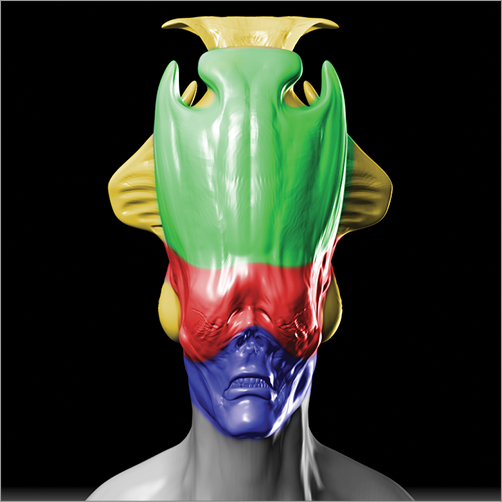
Figure 3-49: The final filled-in eyes
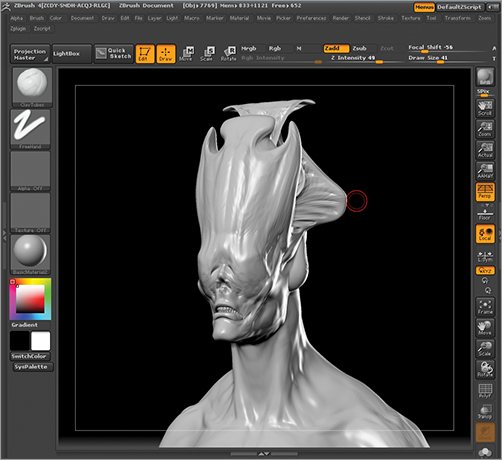
Figure 3-50: Lengthening the hands to give them a more elegant quality

Figure 3-51: Here we see the gnarled hand sculpture after further detailing and posing.

Revising the Shoulders and Arms
Now we will make some changes to the shoulder girdle of the figure. This will include making alterations to the shape of the muscular and skeletal forms in the shoulder area. We will also be adding an entirely new set of arms later on, which will demand we have an understanding of how the anatomy of the shoulder functions; otherwise, we will not be able to incorporate the new physiology in a convincing and functional manner. Before we get too deep into these changes, let’s take a look at what the shoulder girdle actually is and how it functions.
The shoulder girdle is the skeletal structure that allows the arm to move through its full rotational axis (Figure 3-52). It consists of the collarbone, the shoulder blade, and the upper arm bone. These parts are more properly known as the clavicle, scapula, and humerus (Figure 3-53). Without these skeletal components, no movement of the arm would be possible.
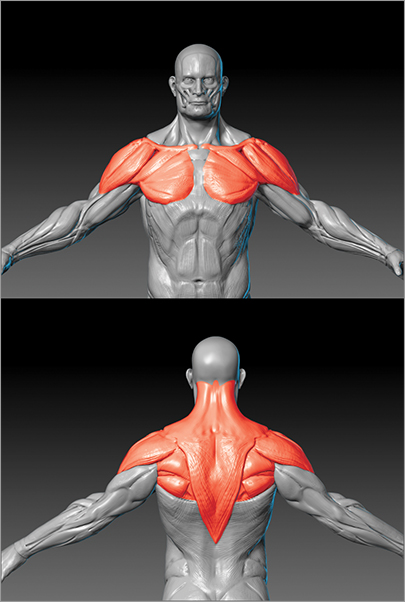
The shoulder girdle is manipulated by several important muscles. The most recognizable of them are the sternomastoids and trapezius in the front and the trapezius and rhomboids in the back (Figure 3-54).
Figure 3-52: Here you can see some of the range of motion possible with the shoulder girdle.
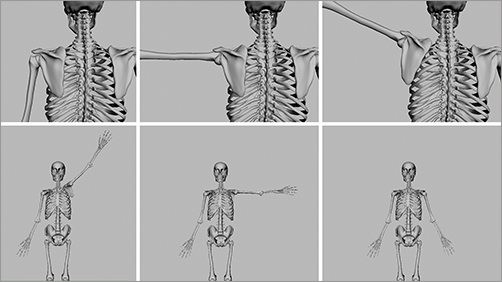
Figure 3-53: Shoulder girdle seen in the skeleton
Figure 3-54: The muscles of the shoulder girdle
Adding New Arms
At this stage I decide we need to break the silhouette even more daringly. I decide that such a long torso could support a second set of arms. This allows for a complex silhouette—breaking human forms. It also allows a character like this to perform more complex tasks with four limbs at his disposal. It implies the character has a different way of thinking and interacting with his environment and will allow for some striking performances on screen. On a subconscious level, this silhouette will suggest some ancient god forms that are depicted with multiple limbs. All of these elements lend themselves to the type of feeling I am trying to evoke in the viewer with this character.
There is a great challenge to adding a second set of upper appendages to a character. This applies whether you are adding a second set of arms or a pair of wings, which are very structurally similar to arms. The challenge is that any pair of arms requires a functioning shoulder girdle to be realistic physiological elements to the character. It’s problematic when a design simply adds an arm coming out of the trunk of the body. This takes none of the complex anatomy of the shoulder into account and creates an arm that would never actually move and makes no physiological sense. As we have already seen, viewers have an innate sense of what appears to be anatomically viable. If your characters do not make some kind of physical sense, they will never be as convincing or compelling as characters created with attention paid to the underlying anatomical structure.
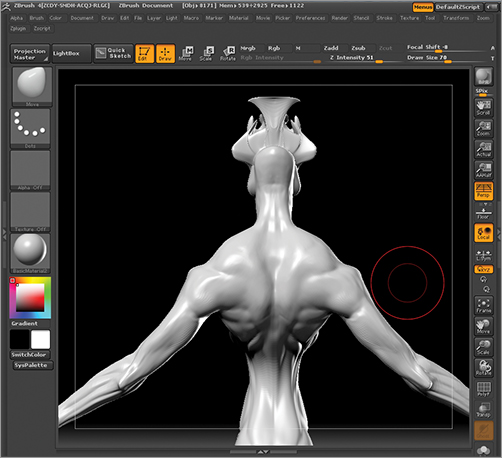
To compensate for this we need to determine a logical way to attach the arm to the body. Figure 3-55 shows my solution to this issue. Notice how I created a new sweeping clavicle that attaches to the sternum and allows the pectoralis muscles of the lower arm set to insert along the lower border of the ribs. From the back view, a second set of scapulas is clearly visible. Details like this give the impression that there are muscles there to insert in the skeleton and make motion possible. Follow the steps below to see how I added these arms.
Figure 3-55: Here you can see how I address the anatomical demands of a second set of arms by integrating the pectoralis and clavicles into the ribcage. From the back view, a second set of scapulas can be seen as well.
1. First we will duplicate the body ZTool. Under the Tool and SubTool submenu click the body SubTool so it is active and then click the Duplicate button (Figure 3-56).
2. This will create a copy of the body as a SubTool. Select this copy and use Transpose to shift it down slightly (Figure 3-57).
3. Remember in the first chapter when we talked about rhythm, contrast, and avoiding symmetry? To create a nice descending rhythm of scale and to avoid perfect balance between all four arms, I want to make the lower arms slightly smaller. This will make them appear subordinate to the upper arms and will help the viewer process the shape of the character and read a pair of arms as dominant. You will notice that when all four arms are the same, the character somehow seems less interesting or appealing because there is less variety in the forms. The repetition in size of the arms also echoes the extreme tapering of the overall design, which goes from wide shoulders down to a drastically narrowed waist (Figure 3-58).
4. Use the visibility Rectangle or Lasso brushes to hide all but the arms. This brush is accessed by pressing Ctrl + Shift and click dragging a green show marquee around the areas you want to maintain as visible (Figure 3-59). You want to isolate just the arms from the duplicate body and then delete the hidden geometry. Notice in the image that I have Transparency on for clarity so that the main body SubTool appears transparent.
Figure 3-56: Duplicate the body ZTool

Figure 3-57: The duplicated arms are moved down with the Transpose Move tools.
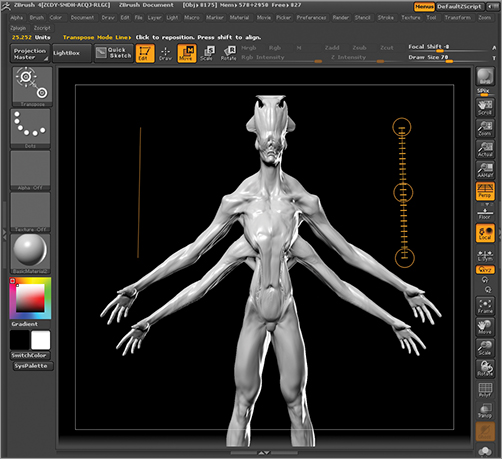
Figure 3-58: Scaling down the extra arms with Transpose Scale.
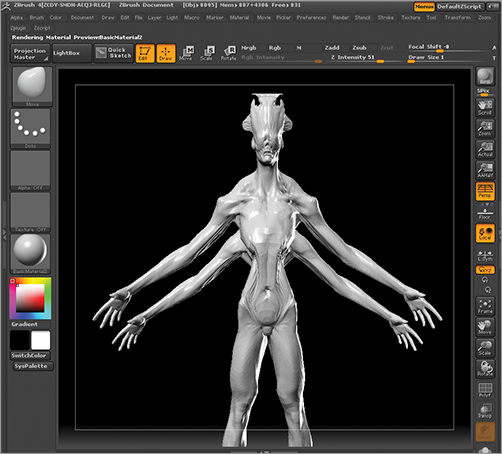
Figure 3-59: Hiding the body from the duplicate arms so that only the arm geometry is visible (the original body SubTool is transparent in this image)

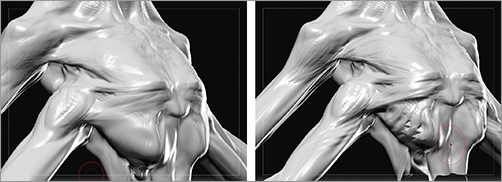
5. Using the Transpose tool, shift the arms forward so that they fall in the middle of the abdomen and just forward from the upper arms in side view (Figure 3-60). You may want to use the Move brush to gently shift the shape of the shoulders to fit into the volume of the body. You want the front of the chest to fall on the front of the ribcage and the back of the new figure to fall near the back of the main body.
6. Lastly, we will push the shapes of the shoulders to be a little more stylized and extreme. I want the silhouette here to be less humanoid. I will accomplish this by accentuating the bones of the shoulders where the scapula and the collarbone meet: this is called the acromion process (Figure 3-61). With the Move brush, pull these bony landmarks out and raise the trapezius (Figure 3-62).
Figure 3-60: Shift the new arms forward and use the Move brush to conform them to the shape of the lower ribcage so that they appear to attach.

Figure 3-61: The acromion process
Figure 3-62: Changing the shoulder shapes
Giving the trapezius a more angular overall shape creates a large diamond shape from the upper body silhouette (Figure 3-63). This large diamond becomes a striking, iconic aspect of the character’s overall look. Figure 3-64 shows the back anatomy.
Figure 3-63: The shape of the trapezius in silhouette creates a strong diamond configuration.
Figure 3-64: The anatomical structure of the creature’s back
Attaching the Arms to the Body
As it stands, the arms are just a SubTool sitting inside the body ZTool. We will want to “glue” the two SubTools together so that we can sculpt across the transition between the two models. This will allow us to effectively blend the shapes together and can be accomplished in two ways. The first uses the InsertMesh button to maintain your current ZTool, its topology, and its subdivision levels while blending the separate arm meshes into the sculpture. The second technique uses the new ZBrush 4.3 Dynamesh and InsertMesh brush technique. The drawback to this second approach is that you will lose your topology and your subdivision levels. The benefit of the second technique is that the arms and body will be joined together into a new mesh. I will demonstrate the Insert Mesh technique here, and we will use the InsertMesh brush technique to add geometry to our figure in Chapter 10, “Rendering The Enforcer.”
1. Make sure the secondary arms and the main body still have the same number of subdivision levels. Both should be at the highest level.
2. We want to delete the hidden parts of the secondary arms to save geometry to sculpt on later. Select the secondary arms and mask them by Ctrl click dragging a mask marquee around the whole model (Figure 3-65). This is necessary because we will be deleting hidden faces. If you do this without masking the higher subdivision level, ZBrush will sometimes lose details from your mesh. The mask effectively frees the details while you delete hidden faces.
3. Step down to the lowest subdivision level and press the Tool Geometry Delete Hidden button to remove the hidden faces. ZBrush will preserve your details and your subdivision levels while deleting the unused body from the secondary arms (Figure 3-66).
Figure 3-65: Drawing a masking marquee around the secondary arms (transparency is on)
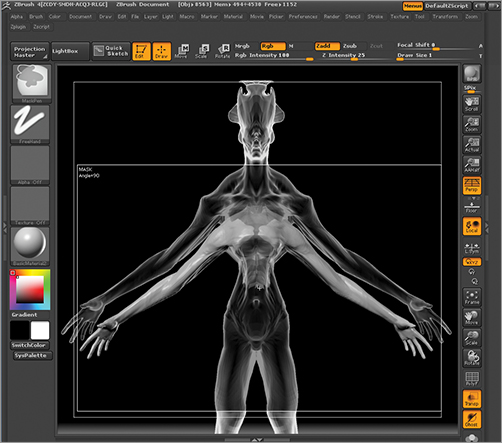
Figure 3-66: Delete hidden faces on the second set of arms to permanently remove the hidden body geometry we don’t need.

4. Step the arms back to the highest subdivision level. Make sure your body SubTool is also at the highest subdivision level. In the SubTool menu, select the arms SubTool. This should be just above the body in the SubTool stack. Press the MergeDown button (Figure 3-67) and click OK on the dialogue box. This will merge the arms into the body SubTool while retaining all your subdivision levels.
Figure 3-67: The MergeDown button
It is important to note that when using the InsertMesh button, as we have done here, you are able to maintain your subdivision levels and the two meshes combine into a single ZTool. Notice that the two meshes are still separate models even though we can use the Clay Tubes brush to blend across the seam. When using the InsertMesh brush, you will create an entirely new Dynamesh model that essentially shrink-wraps itself over the body and the new arms. This means you have a single mesh but will also lose your subdivision levels and your original topology. We will look at the InsertMesh brush as well as Dynamesh in Chapter 10.
5. You can now blend across the seams using the Clay Tubes brush. Select the Clay Tubes brush. From the main Brush menu, open the Modifiers submenu and set the Brush Modifier slider to –20 (Figure 3-68). This value affects the depth and level of blending accomplished with the brush when stroking across two meshes, as we will do here. You may find that this value needs to be adjusted to get the best results. Stroke along the seams between the shoulders and the torso to blend the models together (Figure 3-69).
Figure 3-68: The Brush Modifier slider is found under the Brush and Modifiers menu as well as in the Brush palette screen.
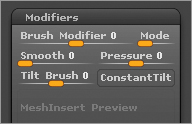
Figure 3-69: The Clay Tubes brush can blend across the seam between two separate meshes when the SubTools have been merged into one.
In this section we have seen how to use the InsertMesh button to add new geometry to our model while retaining detail, topology, and subdivision levels. In Chapter 10 we will look at how to add geometry using the new Dynamesh and InsertMesh brushes. Now let’s move on to the final touches to this figure. Remember to check the videos on the DVD or download files for this chapter, as I have recorded the entire process of this character for absolute clarity. This way you can see each brush and technique in detail as it is used.
Finishing Touches and Final Passes
In this last pass we will add some secondary form and some minor details to the figure. The purpose of these smaller details is to add a sense of attenuated muscle anatomy to the figure. We want it to feel like skin stretched over muscle and bone with little to no body fat. We will add some general final details, but this is really just to catch highlights in the specular shader and add interest to the form. Many of these steps are illustrated in the video on the DVD or download files. I will call out a few details that I think are the most important. Follow these steps to accentuate some of the anatomical forms of the model.
I want to suggest the ribs beneath the skin of the torso. Select the Standard brush with Alpha 01. Dial back the ZIntensity and sketch in a few depressions to suggest the ribs where the skin is stretched over the bony forms (Figure 3-70).
Figure 3-70: Suggesting the ribs with the Standard brush and ZSub
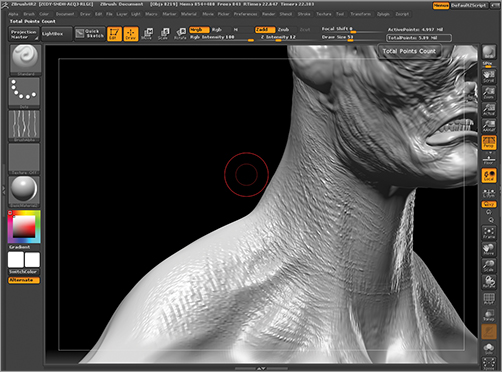
Rotate to the back view. With the Standard brush and no Alpha, I deepen some of the shadow areas around the scapulas (Figure 3-71). I also add the cervical vertebrae from between the shoulder blades and continuing up the neck (Figure 3-72). I don’t spend much time here because I know the illustration will be of the figure from a front or three-fourths view. I do know we will revisit this model for a 3-D print, so I am careful to give some attention to the back view now.
Figure 3-71: Refining the shape of the scapulas
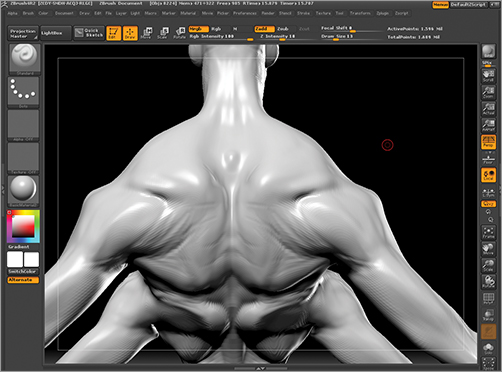
Figure 3-72: Adding the cervical vertebrae
Zoom into the face and use the Sandard brush with Alpha 01. Dial down your draw size to about 25 and loosely sketch raised wrinkles all around the mouth and eye areas. Try to keep these lines gestural and loose. The idea is to create the impression of raised tissue wrinkles in the skin, like wet tissue paper over bone (Figure 3-73). You may continue these wrinkles down the neck.
A quick way to add raised wrinkles like this to select Alpha 58. Figure 3-74 shows Alpha 58 applied to the model surface with ZAdd on. This helps create a fine crosshatching wrinkle pattern of raised rather than recessed lines.
Figure 3-73: Using the Standard brush and Alpha 1 to freehand sculpt a wrinkle pattern on the face
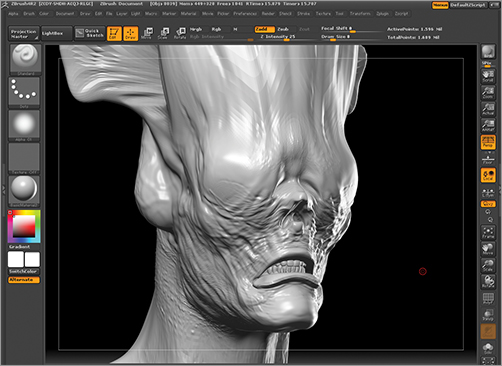
Figure 3-74: Using Alpha 58 to create a fine wrinkle pattern
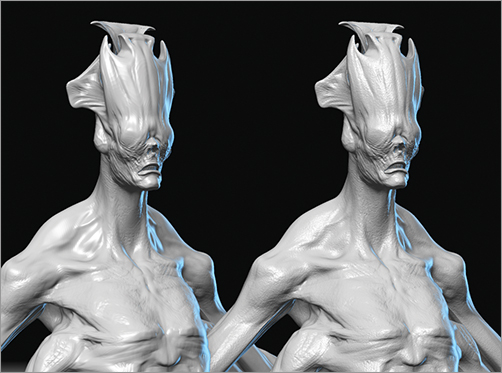
Now we will add an overall noise pass to the skin. Do not get lost in sculpting details on this model. The idea is to communicate the concept of a character; details will never sell a concept. If it’s an integral detail such as scaly skin or a certain type of skin texture, that’s fine; otherwise, try to keep your surface generally detailed and remember we will be adding a lot in Photoshop in the next chapter. As long as the secular surface is broken up and does not appear plastic, this will be fine (Figure 3-75). A noise pass usually suffices to cover this. There are two ways to detail the figure, manually with brushes and automatically with the noise function. See the DVD or download files for a video detailing both approaches. In this section we will quickly add some noise with the ZBrush Noise Maker plug-in.
Figure 3-75: Noise pass on skin compared to the undetailed plastic look of skin
To add noise to the figure, first determine whether you want an overall noise pass or just want to add noise to specific areas. You can mask any area you do not want to be affected by the noise. This is helpful if you want a larger noise pattern on the body and a finer one on the face. We will add an overall noise pass to the figure as a whole.
1. Step up to the highest subdivision level of the figure.
2. Open Tool and Surface and press the Noise button. This will open the Noisemaker tool for ZBrush. In the Noisemaker menu, you can finely control all aspects of the surface noise (Figure 3-76).
Figure 3-76: The Noisemaker tool allows you to add finely controlled noise to your character’s skin.
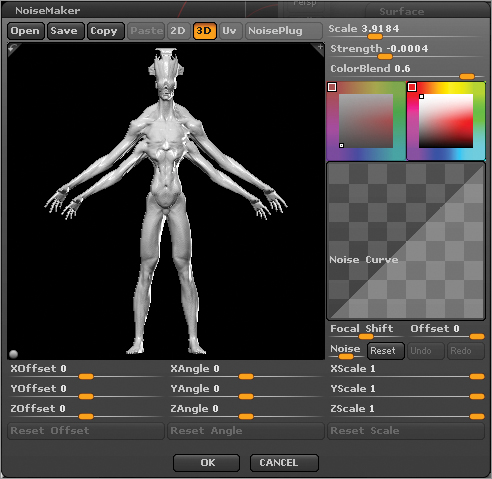
3. Set the Scale value to 3.91 by adjusting the slider. The value need not be exact: you can judge the effects from the preview window.
4. Set the Strength slider to –.0004. If you want to zoom into the preview window, click in the upper right corner of the window. You can also rotate the model to get a better view by clicking inside the window. When you are happy with the look of the noise, click OK.
5. The noise will now display in the ZBrush document window. This is a rendering effect, though, and not actually part of the mesh detail. To “bake” the noise in as sculpted detail, press Tool, Surface, and Apply to Mesh button. The noise will now be applied to the highest subdivision level. If you lose detail or the noise is not crisp enough, you may need to undo, add a subdivision level, and try again.
That completes this section on designing the biped character. We have looked at how to interpret a character brief and how to break humanoid anatomy into new and surprising forms. We have also looked at some technical processes for adding entirely new parts to the model without losing details or subdivisions. We will now move on to Chapter 4, “Posing the Interdimensional Traveler,” where we will pose and render passes from ZBrush that we will then use as a basis for illustrating the character in Photoshop.
Before we move on, I’d like to share some thoughts from a good friend and incredible artist, Zack Petroc. Zack has been a huge influence on my work as an artist for years. Zack has been developing a graphic novel created entirely with ZBrush and Photoshop. I invited Zack to share some of the details of that process in this book to show some of the unique ways you can use ZBrush to illustrate creatures and characters.
Adaboy and the Saints of Alchemy: A Sculpted Novel by Zack Petroc
Thanks to Zack Petroc for contributing this section! In 2005, Zack, a model supervisor at Disney Feature Animation, opened Zack Petroc Studios, which focuses on the development of unique new content and one-of-a-kind training. The Studios’ first independent project, Adaboy, gives viewers direct access to behind-the-scenes story development techniques, allowing them to follow along as the story evolves from concept to completed project.
The Story
Long before the Age of Enlightenment, in the secluded hamlet of Addletown, the orders of religion and alchemy shared a precarious but peaceful coexistence. A deadly explosion in a rogue alchemist’s lab upset the balance and gave the church leverage to outlaw alchemy once and for all.
Thirteen years later, the alchemist’s first son works to secretly rebuild the alchemical order. In an attempt to destroy these new elixirs of science and quell the uprising, the town’s religious elders unwittingly unleash hordes of underworld creatures and the roving dead.
As their defenseless town is sieged, a ragged band of children escape into the surrounding forest. Led by Adam Lamarck, the alchemist’s second son, the children must rescue their town. Placing their faith in the alchemist’s untested weapons of science and the moral code of their upbringing, each child must choose between selfless actions and self-preservation.
The Process
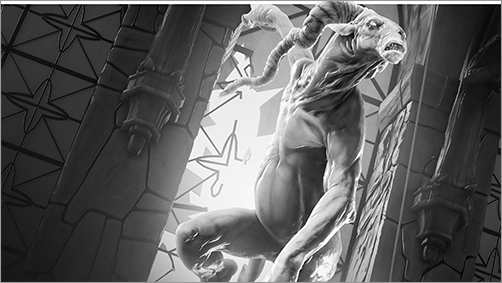
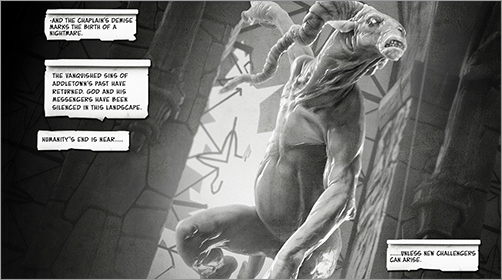
The team at Zack Petroc Studios is using ZBrush in the creation process of its first media output for Adaboy, a downloadable animated comic. For this example we’ll be looking at the creation of the Rambouillet creature as it is revealed for the first time, entering the alchemist’s lab (Figure 3-77).
Figure 3-77: The sculpted comic panel revealing Rambouillet for the first time
At the core of every new character is a design sculpt, the product of translating the 2-D designs and other inspirational references into a 3-D asset. It represents and communicates all the design intentions of your character. “It’s important for us to block in the entire design in a low-resolution form to see how all the individual pieces relate,” says Zack. “We don’t want to get caught up in any details until we know the overall shape and design language is working” (Figure 3-78).
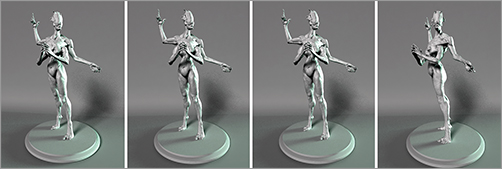
At this stage, quick poses are often done using Transpose Master and other tools in ZBrush to gain a feeling of how the character might act, as well as to test movement constraints due to the design or costume. If the story calls for your character to hold a sword over his head in several scenes, now is time to make sure your costume won’t prohibit that from happening (Figure 3-79).
Once the design is finalized, an organized and animatable mesh can be created to allow for better deformations and overall consumption in any animation pipeline (Figure 3-80). It is not always necessary and was not used for the images highlighted in this tutorial. It’s an option that can be executed at any stage in development or when deemed necessary to allow the asset to be translated to any other media. For example, the same design sculpt is used to create a mesh suitable for feature film animation and a next-generation game. The requirements of these two different model types are extremely different, but both leverage the design sculpt to dramatically cut down on their individual creation times.
Figure 3-78: The character design sculpt

Figure 3-79: Quick poses are created with Transpose Master to ensure that the design can fulfill the pose needs for the character.

Figure 3-80: The Rambouillet head retopologized

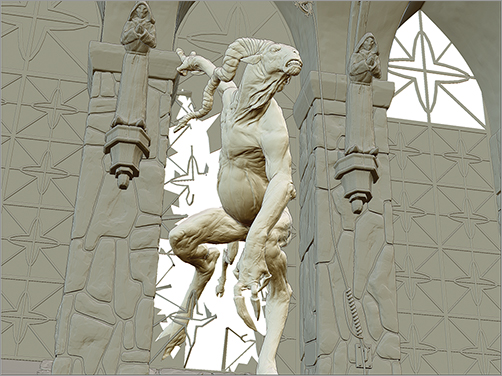
For use in the animated comic, the model is posed based on a storyboard sketch to match the action dictated by the boards. In this case, Transpose Master in ZBrush is used to move the Rambouillet into position and define its pose (Figure 3-81).
Figure 3-81: Rambouillet in pose on the digital set
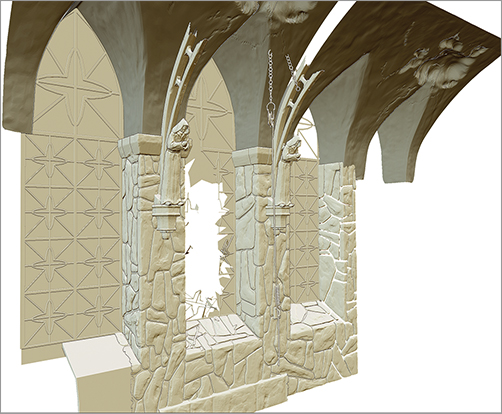
A similar “rough to fine” approach is used to develop the alchemist’s lab based on design intentions and story needs. A polygon modeling software is used to create many of the low-resolution base objects. They are imported into ZBrush in groups, and a high-frequency detail pass is applied (Figure 3.82). Parts of the set that are outside of the camera’s view are hidden to speed up render times.
The images are rendered in individual passes using ZBrush (Figure 3.83). Separating render passes allows for easier comping of the final image in Photoshop. The same render pass and Photoshop composite process is detailed in Chapter 5, “Painting the Interdimensional Traveler.”
Figure 3-82: The alchemist’s lab set
In Photoshop, the layers are combined to create the final image. A variety of layering options are used to achieve the desired effect. For example, shadow and occlusion passes are often layered on top of base color passes using the Multiply layer setting. Figure 3-84 illustrates the in-progress compositing of the individual passes.
Next, the text boxes, dialogue, and other effects such as atmosphere and lighting are layered in. When the desired integration of all the elements is achieved, the final image is flattened and ready to be rolled into the story. In the case of an animated comic, many of the individual elements are created separately and then layered in to allow for a variety of animation techniques to be applied through proprietary software and output as a downloadable app. The final image is seen at the start of this section.
Figure 3-83: The render passes
Figure 3-84: The passes composited together