Chapter 10
Rendering the Enforcer
For this chapter, I have invited ZBrush and Maya expert Eric Keller to share his knowledge of the BPR rendering system. Eric has extensive experience with rendering for production across various platforms. His work with the ZBrush rendering system has been very impressive. You may know Eric from his books Mastering Maya as well as the staple ZBrush book, Introducing ZBrush. I am excited to have him sharing his techniques in this chapter!
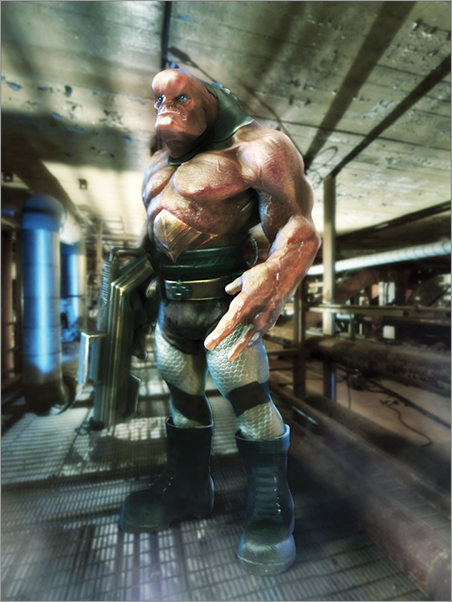
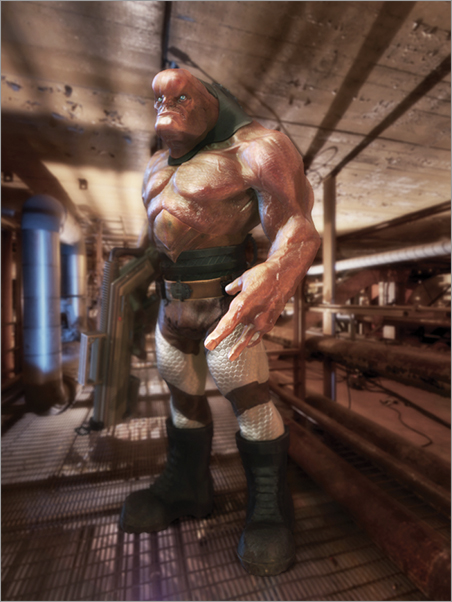
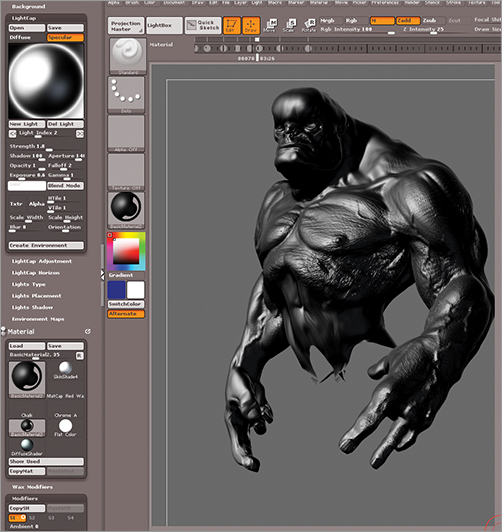
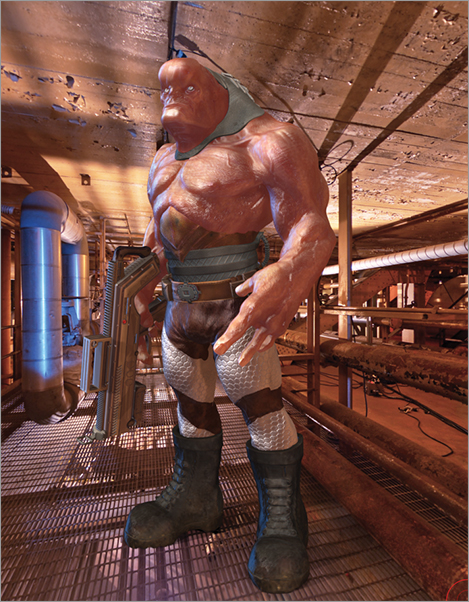
This chapter covers techniques for rendering a creature directly in ZBrush using its advanced “BPR” (Best Preview Render) technology. ZBrush’s rendering capabilities have taken a massive leap forward with the recent release, giving you many creative options for generating amazing images entirely within ZBrush. This eliminates the need to export your models to other 3-D software for rendering. Figure 10-1 shows a render of the Enforcer character created with BPR in ZBrush.
Figure 10-1: The rendered enforcer
The Brief: The Enforcer
This character is named “Ph’nglui mglw’nafh of Venus” or simply, “The Enforcer.” He is an all-purpose tough guy who wanders from spaceport to spaceport picking up work as a hired gun, bouncer, or bounty hunter. He is generally a tough character but has a fondness for Yuggothian rabbits, which he raises in a climate-controlled hutch back on his ship.
Look Development in ZBrush
Often you will find that a director wants to see some variation in materials and color before they make a decision on the final character. This is often called “look development” or “look dev.” The brief for this chapter is to explore some variation in skin and material representations on the Enforcer character. Using the ZBrush material menus, explore how to create and apply material representations to the Enforcer character and produce some final showpiece renders.
The primary advantages of rendering in ZBrush are speed and flexibility. While the ZBrush rendering system is not a physically based photorealistic renderer such as V-Ray or Mental Ray, I consider it an excellent “artistic” rendering option. In other words, your goal when rendering in ZBrush should be to make a pleasing composition that shows off the model as opposed to creating a photorealistic one through the simulation of physical light properties, which is a task better suited for external rendering systems.
This means that if you’re used to working in Maya’s Hypershade or in 3dsMax’s material editor or any other integrated 3-D animation and rendering package, you’re going to find that the ZBrush approach is very different if not altogether alien. So expect a little “quirkiness” when rendering in ZBrush, but if you’ve come this far with ZBrush, a little quirk should come as no surprise.
ZBrush offers options for rendering realistic and stylistic lighting such as ambient occlusion, subsurface scattering, depth of field, and image-based lighting. But these features are not based on physical simulations of light—rather, ZBrush uses some special “cheats” to achieve these effects, which are designed to create an artistically acceptable result. This is why I consider ZBrush as an “artistic” rendering solution. The approach to designing lighting and materials is very flexible and fast and even fun once you get the hang of how all of these elements work together in ZBrush. While this chapter is not intended to be a comprehensive guide to every single feature, it should give you a good sense of how powerful ZBrush rendering is as well as some ideas you can use for your own projects.
This project uses Scott’s Enforcer model as the subject. Our goal is to use the ZBrush lighting, material, and rendering toolset to help make the character look believable and impressive. The final image should be portfolio quality, and we’ll see just how far we can go without leaving the ZBrush environment.
You’ll find that ZBrush’s rendering tools are great for look development because you can test, tweak, render, and create variations very quickly. In a production environment, speed is of utmost importance. If you can pump out 10 different options for your director to review in the time it takes to render a single still in another 3-D program, clearly you’ll have a competitive advantage over many other artists.
Establishing the Lighting Using LightCap
One of the most interesting tools introduced in ZBrush 4 R2 is the LightCap lighting editor. This interface is meant to augment the existing lighting interface with more advanced options so that you have more specific control over how the simulated lights interact with the surface properties of your model.
Lighting, rendering, and material development all work together in Zbrush, so often you’ll be moving back and forth between various palettes as you tweak settings. That being said, I think it’s easiest to start by setting up a basic lighting scenario and go from there. While working on the lighting, there are a few things you can do to make the process a little faster. The Enforcer model is fairly dense and, while ZBrush renders are fast, you can save some time while tweaking lights by making adjustments in the Render palette.
1. Open up the Enforcer_start.ZPR project located in the Chapter 10 folder on the DVD or download files. The model looks very blocky because all the SubTools have been set to the lowest subdivision level. This helps speed up the performance of ZBrush while working. Scott has modeled all the elements and polypainted details on the surface.
2. In the SubTool subpalette of the Tool palette, select the enforcer_body SubTool, which is at the very top of the SubTool stack. Press the Solo button on the right shelf so that all other SubTools are hidden from view.
3. The body has a total of seven subdivision levels, and at subdivision seven the point count is about 3.35 million. While establishing the lighting, we don’t need to be at the highest SDiv level. Set the SDiv slider to level 4. At this level the body has 52,224 points, just enough so we get an accurate read on the silhouette and major details, while at the same time the performance of ZBrush is not compromised.
4. Open the Render palette and place it in a tray for easy access. Under the Render Properties subpalette, set the Details slider to 1 and turn on the Smooth Normals button (see Figure 10-2).
Figure 10-2: Adjust the Details slider and turn on Smooth Normals in the Render palette.
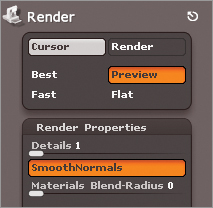
The Details slider controls the resolution of the maps used by the lights to create shadows and the overall quality of the lighting, which you’ll be setting up in a moment. While establishing your initial lighting scenario, you can set this to 1, and then, as you get closer to a final render, you can raise this setting to improve quality. A lower setting means a faster render, a higher setting means higher quality but increased render time.
The Smooth Normals button softens the edges where polygons meet so that the surface looks nice and smooth at lower subdivision levels when you render with BPR. Activating this feature is another great way to speed up a render while testing because it allows you to get a good sense of what the final high-resolution render will look like even while working at a lower subdivision level.
5. In the SubTool subpalette, turn off the little eyeball icon. This disables polypainting, which will hide the colors and details on the model. This way we can see how the lights interact with the surface without the interference of the colors on the model.
6. Set the color in the Color palette to white.
7. Press the BPR button at the top of the right shelf (hot key = Shift + R). The model renders in a few seconds. The skin looks gray. Because of the basic material, you can see some shadows but overall it looks pretty boring. That’s a perfect place to start (Figure 10-3)!
Figure 10-3: A starting place for lighting the model has been established.
8. Open the Light palette and place it in the left tray. The Material palette is already there by default. There are two lights activated in the basic light options at the top of the Light palette. Click on both of these lightbulb icons to turn them off (the icons are orange when they are on and gray when they are off). The model will turn black, indicating that the lights are off.
9. Set the Ambient slider below the lightbulb icons in the Light palette to 0; this way you can be sure that no additional light is affecting what you see on the canvas (Figure 10-4).
Figure 10-4: Turn off the Lightbulbs in the Light palette and set Ambient light to 0.

10. We’re going to work in the LightCap editor, which I think is a much easier and more powerful interface for designing ZBrush lighting than the classic ZBrush lightbulb interface. Expand the LightCap subpalette of the Light palette.
LightCap is a term invented by Pixologic to refer to their unique lighting technology; “LightCap” is short for “light capture.” LightCap creates a texture file that stores the lighting information that you create for the scene. This texture is mapped to a virtual sphere that surrounds the model. The color, position, and intensity of the lights are contained in this texture. The Details slider that you adjusted at the start of the exercise controls the resolution of the texture, so higher setting creates more detailed lighting. You don’t need to work with the texture file directly—instead you’ll use the LightCap interface to add, edit, and remove lights from the scene. The interface and its controls are found within the LightCap subpalette.
Lights in ZBrush do not appear as 3-D elements like they do in most 3-D packages. You won’t see the light source on the canvas—instead the position of the lights is determined by where you place dots on the sphere shown in the LightCap interface.
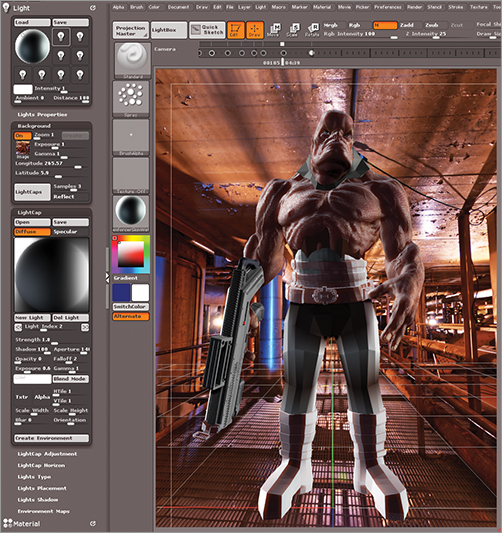
11. Press the New Light button in the LightCap palette. The new light appears as a red dot surrounded by a fuzzy gray area (see the left image in Figure 10-5). Also the model appears on the canvas dimly lit. The new light is shining directly at the model.
12. Drag the red dot in the LightCap interface up to the left. You’ll see the lighting update on the model as well. Increase the Strength slider and the light becomes brighter. This light will be the key light for the moment.
13. The Aperture slider sets the overall size of the light as it spreads across the surface, the Falloff adjusts the softness of the edge of the light (you can create an interesting “graphic novel” style of lighting by setting the Falloff to 10 (see the left image in Figure 10-6). Let’s start by creating a basic but realistic style of lighting. Set Strength to 1.5, Aperture to 90, and Falloff to 10 (see the middle image in Figure 10-5).
14. Click the New Light button to add a second light. You’ll use this light to create rim lighting. Drag this light off to the lower right corner until it is all the way off the sphere. Increase the strength to 0.8. The rim light does not need to cast shadows so set the shadow slider to 0.
15. Add a third light to create side lighting. Move this light down to the right corner. Set the Strength to 0.3 and Aperture to 45. Click on the color swatch and set the color of the light to a cool pale blue (see the right image in Figure 10-5).
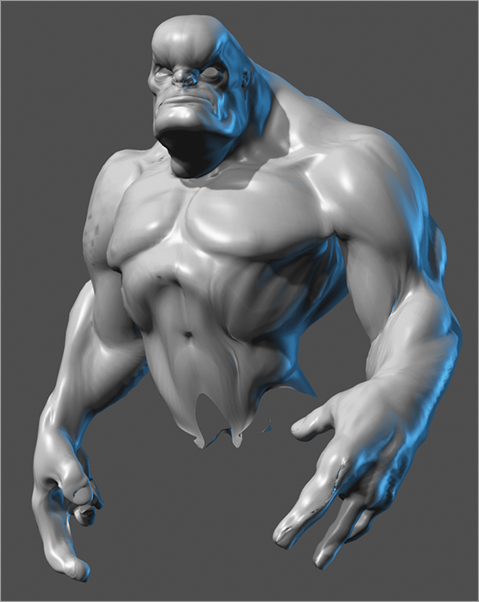
16. Press the BPR button to render the scene (see the right image in Figure 10-6).
Figure 10-5: Use the LightCap interface to add and edit lights. You can create a basic three-point light setup as a starting place in LightCap.
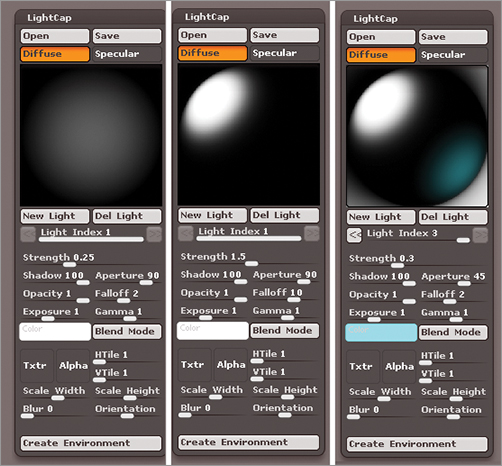
Figure 10-6: Set the aperture of the light to 0 to create a “graphic novel” style render (left image). The character is rendered using BPR and a basic light setup (right image).

You now have a basic three-point light setup. This is a good starting place, which will give you context as you develop the materials. You’ll probably revisit these lights frequently as you work. Save the project so you can return to this arrangement later if you need to.
Here are a few tips on working within the LightCap subpalette:
- You can select a light by clicking on its red dot in the interface. However, if you have a lot of lights, you can use the Light Index to switch from one light to the next. You can add as many lights as you want to LightCap, so it can get pretty crowded! The index number is determined by the order in which the lights are added.
- You can edit the specular intensity separately from the diffuse intensity using the Opacity slider. Press the Specular button at the top of the interface to switch to specular mode and then adjust the Opacity slider. If you want a light to have no specular highlight, switch to Specular mode and set Opacity to 0. If you want a light to have a specular highlight but no diffuse light, set Opacity above 0 while in Specular mode and switch to Diffuse mode and set Opacity to 0. Opacity affects the influence of the diffuse or specular component without affecting the intensity of the light (see Figure 10-7).
- You can use the blend mode to control the quality of the light. The blend modes are similar to layer modes found in programs such as Adobe Photoshop (screen, multiply, overlay, soft light, etc.). A light with a black color and a blend mode set to Mutiply will actually create a dark spot.
- Use the Alpha button to add an alpha texture to the light—this way you can actually shape the light as if a gobo is applied to the light. Textures can also be applied using the Txtr button. This creates the effect of a gel being applied to the light. Use the HTile and VTile sliders to create a repeating pattern for the alpha. Orientation, Scale Width, and Scale Height sliders can also be used to adjust the shape of the light (see Figure 10-8).
Figure 10-7: Switch between Diffuse and Specular mode to adjust the opacity of the diffuse or specular component of the selected light.
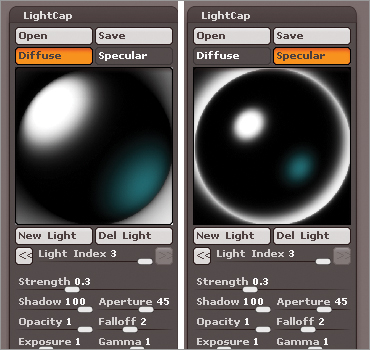
Figure 10-8: You can add alphas and textures to affect the shape of the light.

- If you create a LightCap arrangement that you want to use in other projects, you can use the Save button in the LightCap subpalette to save it to your local disk using the .ZLD format. LightCap lighting is also saved as part of a project file (.ZPR).
Now it’s time to start developing an advanced material that will make the Enforcer look more realistic in the BPR render. You’ll be surprised at how far you can go with ZBrush materials but it takes some understanding of how the material interface works and some patient tweaking. We’ll start with the body of the Enforcer so that we can establish the look of his flesh based on the light setup created in the previous section.
Material Shaders
ZBrush materials are composed of one or more “shaders,” which are layered on top of each other. The interface itself lists the shaders from left to right. The shader mixer is used to determine how the shaders are blended together. It can get confusing really fast, so I like to try to work on each component of the material individually to establish the basic properties and then spend some time blending them together.
One of the oddest quirks about materials in Zbrush is that you never create a material from scratch; instead you edit an existing material and then save it under a new name. The same goes for the shaders that make up the material. So there’s no “new material” or “new shader” button. You start with a material that has the number of shaders that you need, and then you copy other shaders into the shader slot and then tweak as needed. It is an odd way to work and if you’re already confused, don’t stress out. Going through the process a few times will make it a bit clearer. It’s always best to break it down into its simplest components.
To create a believable skin material, we need three basic elements. I like to separate each of these elements into its own shader and then combine these shaders into a single three-shader material. The shaders we’ll need to achieve this are:
A Diffuse Shader This determines how the light is scattered as it is reflected off of the very surface of the skin. This shader is responsible for the overall color when combined with the polypainting. I imagine what dry skin would look like and then create a shader to simulate this look. We’ll use the basic shader to handle the diffuse shading.
A Specular Shader This determines how the skin reflects all of the light sources in the scene—in other words, the shiny quality of the skin. This is layered on top of the diffuse shader and is responsible for giving the skin a wet or oily quality. We’ll use a standard shader to create the specular quality.
A Subsurface Scattering Shader This shader simulates the luminescent quality of the skin. As photons of light penetrate the layers of skin they bounce around, pick up the color of the deeper layers of tissue, and then exit the skin giving it a kind of glow. This helps make the model look as though it is made up of living flesh. In many 3-D packages, this effect is simulated by more or less replicating the physical properties of light. In ZBrush, the effect is done using a gradient of colors—this is a cheat, but it’s an effective one!
Create the Diffuse Shader
The diffuse shading is pretty straightforward. Using the Basic shader combined with the controls in the LightCap editor, you’ll create the overall surface quality of the skin. Diffuse shading simulates what happens when photons of light are reflected off of a rough surface. The tiny bumps on the surface cause the light to be “diffused” back into the environment, in other words, they bounce off of the surface in all directions. Think of sunlight reflected off of concrete. Skin is not as rough as concrete but you can imagine that by adjusting the settings you can give the viewer some sense of the creature’s character.
1. Continue with the project from the previous section.
2. Set the subdivision of the creature’s body to 7 and turn on the paintbrush icon in the SubTool palette to activate polyPainting. The colors of the skin appear on the surface but you’ll also notice that a material has been painted on the creature. Until you remove this material, you won’t be able to see your new custom materials update as you work.
3. In the Material palette, select the Flat Color material. On the top shelf, press the M button. In the Color palette press the Fill Object button (Figure 10-9).
Figure 10-9: Fill the surface with the Flat shader to remove any materials that have been painted onto the model.
This fills the surface with the Flat Color material. You’ll see the polypainted colors on the creature’s skin but the shadows and shiny qualities disappear. By filling the surface with the Flat Color material, you reset the materials on the surface, so now, as you switch from one material to another, the surface will update accordingly. This is a great technique for erasing any materials that have been painted on the surface. It’s very important that the M button is active on the top shelf and NOT the Rgb or Mrgb buttons—otherwise you’ll erase the colors that have been polypainted on the surface!
4. From the Material library, choose the BasicMaterial shader. Open the Tray on the left side of the canvas and expand the Material modifiers.
There are a lot of sliders here controlling a wide variety of material qualities. If you wanted to, you could use this one shader to control every aspect of the surface—however you’re actually going to use this material to control only the diffuse quality, which means that only a few settings need to be adjusted on this shader. By separating material qualities (diffuse, specular, and subsurface) into different shaders, you’ll have more flexibility via the shader mixer. It’s just one possible approach out of many different strategies.
5. Set the Specular slider to 0.
6. Set the Ambient slider to 0 and the Diffuse slider to 70.
If you expand the Diffuse Edit curve below the Diffuse slider and edit the shape of the curve, you won’t see much of a change on the model. Why is this? Well, here’s one of the quirks of ZBrush that may cause a little head scratching. The Diffuse slider in the Material modifiers does in fact control the amount of diffuse light reflected by the surface. However, the spread of the diffuse highlight on the surface is controlled by the LightCap settings. So you need to return to the LightCap settings in the Light palette to adjust the overall spread of the diffuse lighting.
7. In the LightCap palette, set the Light Index to 1 so that you’re editing the key light. Increase the Aperture to 120 and the Falloff to 5.
8. Set the Light Index to 3 so that you are editing the fill light. Set Strength to 0.35 and Aperture to 80 (See Figure 10-10).
9. Set the ColorizeDiffuse slider to 25. At the bottom of the Material palette, click on the Dif color swatch and choose a pale blue. This tints the diffuse light a little (see Figure 10-11). By making the color cool, it desaturates the surface somewhat when combined with the warm colors of the polypainting. A little desaturation helps to make it look more realistic.
10. Create a render using BPR (hot key =Shift + R) to see how the materiallooks so far (see Figure 10-12).
Figure 10-10: Adjust the LightCap settings to increase the spread of the Diffuse light across the surface.
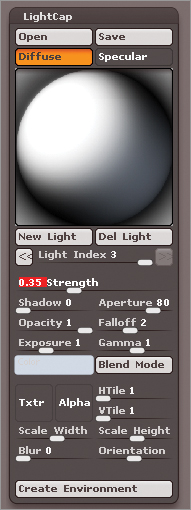
Figure 10-11: Increase the Colorize Diffuse slider and set the Diffuse color to a pale blue.
Figure 10-12: The results of the diffuse shader rendered with BPR

11. Use the Save As button in the Material palette to save the material as DiffuseShader.ZMT. It’s very easy to accidentally overwrite a shader in ZBrush so I find it’s a wise practice to save the materials whenever I work on them.
12. Save your project!
Create the Specular Shader
The specular shader will set the overall amount of specularity for the material. This gives the surface a wet or oily look and also controls how much of the environment is reflected in the surface. The rim lighting you created earlier using the LightCap editor will show up a bit more as specularity is increased.
1. Continue with the project from the previous section.
2. Select the BasicMaterial2 Shader from the Material palette.
3. In the Modifiers for the material, set the Ambient and Diffuse sliders to 0. The model should appear mostly dark and very shiny.
4. Set the Specular slider to 20. The specularity of the overall skin shouldn’t be too shiny, at least not yet. Later on, you’ll learn how to paint in areas that are shinier than others.
Just as with the Diffuse settings, the Specular edit curve in the Material modifiers doesn’t affect the quality of the specularity because the LightCap settings are overriding the curve. To change the spread of the highlights on the surface, you’ll revisit the LightCap palette and make a few adjustments.
5. Expand the LightCap subpalette of the Light palette and press the New Light button to make a new light. You will adjust this light so that it will affect only the specular component of the material.
6. Make sure the Diffuse button is on in the LightCap editor and set Opacity to 0. Press the Specular button and move the light to the upper left of the sphere.
7. Increase the Strength to 1.8, Aperture to 140, and set Exposure to 0.65. This creates a sort of broad highlight across the surface of the skin (see Figure 10-13).
Figure 10-13: Edit the LightCap settings to adjust the spread of the specular highlight across the skin.
8. Use the Save As button in the Material palette and save the material as SpecularShader.ZMT.
9. Save the project.
Create the Subsurface Scattering Shader
The last ingredient for the skin shader is the subsurface scattering. This is what helps bring the skin to life by adding that luminescent quality. Working with subsurface scattering (SSS) in ZBrush is a little tricky since there are a few ways to create this effect and the interface is not terribly intuitive. The goal is to add a hint of reddish color that is stronger on the thinner parts of the model. If the effect is too strong, the model will look like wax or plastic.
It is best to develop the SSS shader in isolation so that the influence of other material properties, such as the diffuse and specular highlights, doesn’t confuse the result.
1. Continue with the project from the previous section.
2. In the Render palette, enable the Sss button—if this button is not active, the effect will not appear when you press the BPR button (see Figure 10-14).
3. Rendering SSS adds to render time, so lower the SDiv slider to 4 so that testing doesn’t take as long.
4. From the Material palette, select the Fresnel Overlay material. This material contains two shaders—a basic shader, similar to what you used for the diffuse and specular shaders, and the Fresnel Overlay, which creates a gradient of colors used for subsurface colors.
5. In the Material modifiers, make sure the S1 button at the top of the palette is selected—this is the first shaders slot. Press the little circle so that it turns into a dot (see the left image in Figure 10-15). This is a switch that turns the basic shader off. This shader will not be used—turn it off so you can focus on just the settings in the S2 slot.
6. Press the S2 button to switch to the Fresnel Overlay shader. Make sure the circle is not a dot so that the shader is actually on (see right image in Figure 10-15).
The color swatches at the bottom control the colors used in the gradient and the sliders at the top control the amount of influence of each color. The shader is essentially a way to mix the colors together. The Fresnel Factor slider controls the strength of the gradient based on the viewing angle of the surface.
Figure 10-14: Turn on the SSS button in the Render palette.
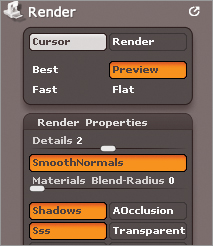
Figure 10-15: In the modifiers for the Fresnel Overlay material, turn the S1 slot off and the S2 slot on, using the circle icons on the buttons.

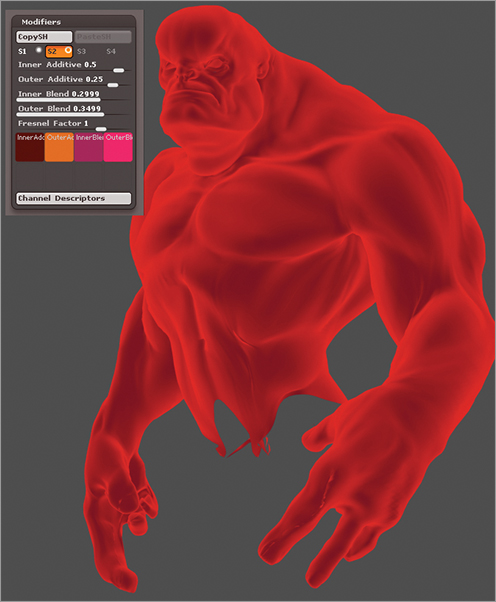
7. Click on the Inner Additive swatch and choose a deep red color. Set the Inner Additive slider to 0.5 and the Fresnel Factor to 1. You’ll see the surface appear red on the parts of the surface that face the front.
8. Click on Outer Additive and set the color to orange, set Outer Additive to 0.25. The edges that face away from the front pick up the orange color.
9. Click on the Inner Blend color swatch and set the color to a dark magenta and set the Inner Blend to 0.3. You’ll see that the inner blend color is overlaid on top of the Inner Additive color. As you increase the Inner Blend slider, the influence of the magenta slider becomes stronger.
10. Set the Outer Blend to a lighter magenta and set the Outer Blend strength to 0.35. This adds color to the Outer Additive Color (Figure 10-16).
Figure 10-16: Adjust the colors in the Fresnel Overlay shader to create a gradient of warm colors on the surface of the model.
The colors and values are fairly subjective and you’ll most likely want to tweak them as you work. These warm colors are meant to give the impression of tissue beneath the skin. At the moment, the gradient is applied to the entire surface. The Fresnel Factor slider is going to shift the gradient colors toward the edges when it is set to a positive value and toward the center when it is at a negative value. Many of these settings will be tweaked once you start putting the material together, but at least now we have a place to start.
Of course, this is just a gradient—it is not subsurface scattering just yet. To finish the basic effect you need to adjust some settings in the Mixer.
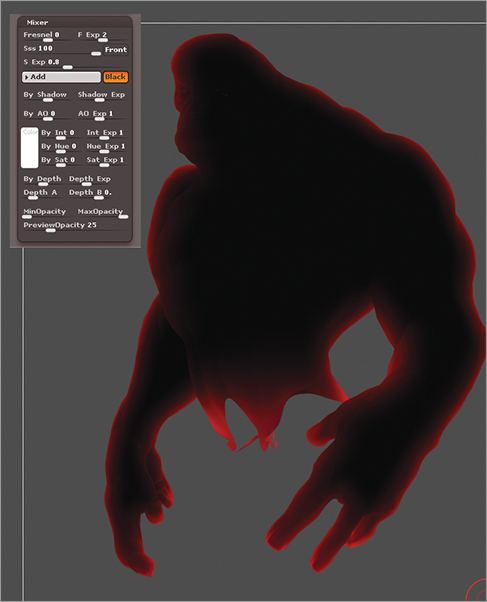
11. Expand the Mixer subpalette below the modifiers. Set the SSS slider to 100. The surface will become very dark.
12. Set the S Exp slider to 0.8. This controls how much of the SSS effect comes through. Lower values mean that more of the effect is visible, indicating a thinner surface. A setting of 0.8 is probably too low for our lumbering Enforcer character, but at the moment, it will help you to see the effect more clearly while you tweak.
13. Set the blend mode to Add and turn on Black. The Black button means that the SSS shader will be composited on top of a black color, which means the other shaders will not affect the quality. In general, this speeds up the rendering of the effect.
14. Press the BPR button to see a rendering of the SSS effect. It looks a little odd, but now that it is working, you can start building the skin material by combining it with the diffuse and specular shaders you’ve already created (Figure 10-17).
Figure 10-17: The Mixer determines how the colors of the Fresnel Overalay shader are used in the subsurface scattering effect. Adjust the settings and then render with BPR to see the result.
15. Save the material as SSS Shader.ZMT.
16. Save the project.
Create a Material from the Three Shaders
To create a single material form the Diffuse, Specular, and SSS shaders, you will copy each shader into one of the slots of the TriShader material and then use the Mixer to control the amount of influence each shader has on the material itself.
1. Continue with the project from the previous section. Make sure that the Diffuse shader, Specular shader, and SSS shader are all loaded into ZBrush. If they are not, you can use the Load button in the Material palette to load them from your local disk.
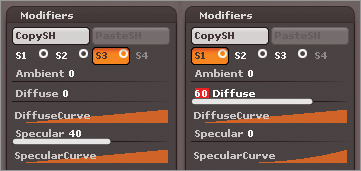
2. Select the Diffuse shader and press the CopySH button in the Material modifiers.
3. Select the TriShaders Material from the Material palette, don’t worry about the way the model looks at the moment—it will update as you switch materials. Select the S1 button at the top and press the PasteSH button to paste the Diffuse shader into the first slot of the TriShaders material (Figure 10-18).
Figure 10-18: Copy the S1 shader from the Diffuse shader. Use the PasteSH button to paste it into the S1 slot of the TriShaders material.

4. Repeat these steps to paste the S2 shader of the SSS Shader into the S2 slot of the TriShaders material and then the S1 shader of the Specular shader into the S3 slot of the TriShaders material.
5. Save the material as enforcerSkin.ZMT.
Next, you’ll do a little tweaking to get the three shaders to work together a little better.
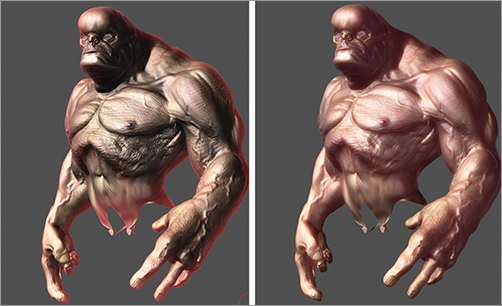
6. Press the BPR button on the right shelf (hot key = Shift + R) to create a render. The left image in Figure 10-19 shows the result. At this point, it is not completely convincing. The SSS effect is too strong, resulting in a red fringe around the edges.
Figure 10-19: Turn on the Wax Preview button in the Render palette and adjust the Strength in the Wax Modifies subpalette of the Material palette.

7. Open the Material modifiers and click on the S2 slot so that the settings for the SSS shader are available. Set the Fresnel Factor to 10. This pushes the lighter colors of the gradient toward the edges and keeps the darker reds and magentas toward the center of the object.
8. In the Mixer, set the SSS slider to –35. Setting this to a negative number makes the effect more prominent toward the center of the object and will eliminate the odd fringe effect seen in the previous render. It also cuts down on the overall strength of the effect.
Finally one additional “cheat” you can use to sell the look of the skin is to increase the Wax Modifier slider. The wax modifier simulates translucency by adding a warm coloring to the edges of shadows cast on the surface. This gives a slight glow to the skin.
9. In the Render palette, turn on the Wax Preview button in the Render Properties (left image in Figure 10-19). This option just gives you a preview of what the wax modifier effect looks like on the surface. More importantly, it keeps the warning window from appearing every time you adjust the Wax Modifier slider (see right image in Figure 10-19).
10. At the top of the Material palette, set the Strength slider to 60 in the Wax Modifier subpalette of the Materials palette. Create a BPR render. The result is shown in the right side of Figure 10-20.
Figure 10-20: Left image shows a BPR render of the skin material after all the shaders have been combined. The right image shows the render after tweaking the shader values.
11. Use the Save button in the Material palette to save the material as enforcerSkin.ZMT. Save the project as well.
The skin material is starting to take shape but the specular highlights look very even, giving it a very “CG” look. Skin naturally has variation in the amount of shininess it has, depending on how much oil and sweat is produced by that part of the body. One way to achieve this variation is to create a similar but slightly more specular version of the skin material and then paint this into areas on top of the original skin material. The materials can then be blended together when rendered.
1. Continue with the last version of the project. Make sure the enforcerSkin material is loaded. Select it in the Material palette. Make sure the Enforcer’s body is at the highest SDiv level (should be level 7).
2. You need to fill the current tool with the enforcerSkin material before another material can be painted on top. Make sure the M button on the top shelf is activated. Open the Color palette and press the Fill Object button. The model won’t look any different, but at this point the surface should keep the enforcerSkin material, even if you switch to a different material.
3. Open the material library and choose the enforcerSkin material. Press the CopyMat button (left image in Figure 10-21).
Figure 10-21: Select the enforcerSkin material and press the CopyMat button (left image). Select another material and press the PasteMat button (right image).
4. Select a different material, such as the skinShade04 material. Press the PasteMat button, This overwrites the selected material with the copied enforcerSkin material that has been copied to the clipboard. The only way to create a new material in ZBrush is to copy one material on top of another (right image in Figure 10-21).
5. Use the Save button to save the material as enforcerSkinWet.ZMT.
6. Make sure the enforcerSkinWet material is selected in the material palette. Select the Standard brush in the brush library.
7. Open the Material palette, select the S3 slot in the Modifiers, and set the Specular to 40. Select the S1 slot and the Diffuse to 60. This makes the material just slightly shinier, creating a wet look (see Figure 10-22).
Figure 10-22: Set the Specular slider in S3 to 40 (left image). Set the Diffuse slider in S1 to 60 (right image).
8. Set the Stroke Type to spray and, from the Alpha palette, choose Alpha 40, which is a tiny dot. In the Stroke palette, set the Placement to 1 and Scale to 0. This increases the distance between each dot in the spray stroke and removes variation in the scale of each dot. The brush will be used to spray small dots of the enforcerSkinWet material on the surface. Turn off LazyMouse.
9. On the top shelf, turn off Zadd and Rgb and turn on M. This ensures that only material information is painted on the surface and the colors and surface are not disturbed.
10. Finally, before you start painting the material, you will create a cavity mask so that the enforcerSkinWet material is applied only to the very surface and not in the wrinkles and crevices on the surface. Expand the Masking subpalette of the Tool palette and set the Intensity slider below the Cavity asking button to 100. Adjust the edit curve for the cavity mask so it looks like Figure 10-23.
Figure 10-23: Edit the Cavity Profile curve so that it looks like this image
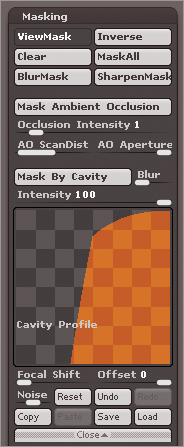
11. Press the Cavity Mask button to create the mask. The darker areas of the surface will appear darker. Turn off the View Mask button. This hides the mask without removing it.
12. Now you are ready to start painting the material. Set the Draw size to a small value such as 10, zoom in on the head, and use the Standard brush to paint the enforcerSkinWet material on the surface of the skin. Choose areas of the face where the surface tends to be oilier, such as the nose, lips, forehead, and cheeks below the eyes (see upper left in Figure 10-24).
13. Paint on the arms and chest to create the look of damp, clammy skin.
14. Paint a fair amount of the enforcerSkinWet material on the fingernails to make them appear shinier than the surrounding skin (see lower left on Figure 10-24).
15. Continue to paint over the surface of the Enforcer’s skin. Try to vary the size and placement of the strokes (see Figure 10-24).
16. In the Render palette, set the material blend radius to 4. This setting will blend the materials together, removing the jagged edges where the two materials meet on the surface when rendered. If you set the value too high, the blending might blur the transition too much, and the effect is lost. This setting may need to be adjusted, depending on whether you are rendering the model close up or from far away.
17. Create a test BPR render by pressing Shift + R (see Figure 10-25).
Figure 10-24: Use the Standard brush to paint the enforcerSkinWet material on the parts of the surface that you want to appear oily or wet.

Figure 10-25: The Enforcer body is rendered using BPR. The material Blend property removes the jagged edges between the painted materials.

18. After you paint the materials on the model, you can continue to edit the settings of either material and they will update.
19. Save the project when you are satisfied that the skin is looking sufficiently realistic when rendered.
ZBrush projects should save all of your custom materials as part of the project file. However, in reality ZBrush frequently “forgets” to load your materials. Sometimes when you load a project, your carefully crafted skin shader may appear completely wrong. This is why it is always a good idea to save you materials as ZMT files separately from the project. If you load the project and it looks as though the character’s skin has gone haywire, you should be able to fix the problem by loading your saved materials using the Load button in the Material palette.
Now that you have a nice looking skin shader all set up, you can move on to other parts of the Enforcer character. However, it might be a good idea to add a little more interest to the lighting, especially if you are going to start dealing with reflective surfaces such as the metallic parts of the model.
You can quickly create a background for the model using a spherically mapped image. This image can also be used as the basis for a more complex LightCap lighting arrangement. In this section, you will download an image from the Internet and use it to create more stylistic lighting for the Enforcer.
Create a Background Image
A background image of an environment is a great way to quickly add visual interest as you develop the look of a character. Seeing a character in context will also help you make decisions about how to design the materials used in the model. The best background images to use are spherically mapped images. A few example images can be found in the Textures/Panoramas folder of LightBox. However, these images are a little too pleasant and pastoral for the Enforcer. Another great source of free panoramas can be found online at the sIBL archive at http://www.hdrlabs.com/sibl/archive.html.
Because of copyright restrictions, these images can’t be included on the DVD or download files that come with this book. However, you are free to download them and use them in your own project. Follow these steps to create a background image for the Enforcer.
1. Open a web browser and go to the following URL: http://www.hdrlabs.com/sibl/archive.html (see Figure 10-26).
Figure 10-26: Point your Internet browser to the sIBL archive to find a number of spherically mapped panoramic images.
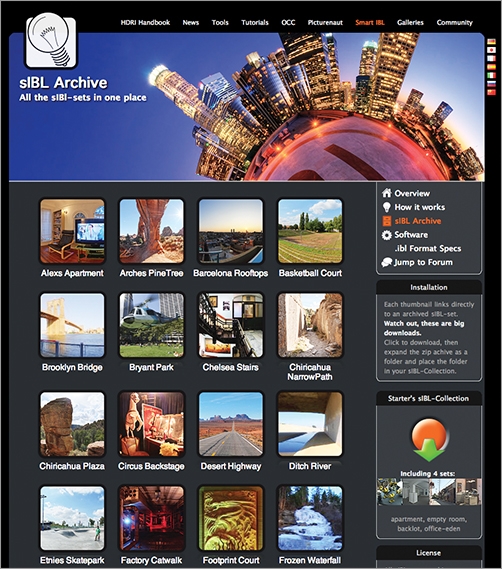
2. On the front page are a number of archives you can download. I felt the Factory Catwalk images seemed most appropriate for this character. Click on the Factory Catwalk icon to download a zip file containing the images.
3. Once the archive is downloaded, unzip the compressed folder and place it in an easy-to-find location on your local disc.
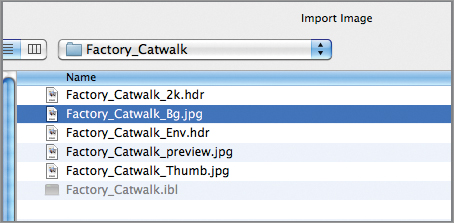
You can import jpegs and HDR (high dynamic range) images into ZBrush to use as backgrounds and for image-based lighting. High Dynamic Range images contain many levels of exposure, which is why they are often used for image-based lighting in 3-D applications. However, you can get good results using a jpeg as well, and the render will be a little faster.
4. In ZBrush, open the Texture palette and click on the Import button. Find the downloaded folder and import the Factory_Catwalk_Bg.jpg image (Figure 10-27).
Figure 10-27: Import the Factory_Catwalk_Bg.jpg image into the Texture palette.
5. Open the Light palette, expand the Background subpalette, and click on the button labeled Textu. Select the Factory_ Catwalk image. After a few seconds, you will see it appear behind the Enforcer.
6. To align the view of the model and the background, you can adjust the value of the Longitude and Latitude sliders in the Background subpalette of the Tool palette. It helps to turn off Solo, so that you can see the whole model. Turn on the Floor and Persp buttons on the right shelf and adjust the Angle of View slider in the Draw palette (see Figure 10-28).
Figure 10-28: Adjust the latitude and longitude of the image as well as the view of the model so that they look properly aligned
7. Once you have a view you like, press the LightCaps button in the Background subpalette of the Light palette. This creates a new LightCap based on the image (see left image in Figure 10-29).
8. The model looks much darker since most of the LightCap colors are extracted from the ambient lighting of the image. Use the New Light button to add a light to the LightCap. Adjust the Strength, Aperture, and Falloff of this light so that it lights the model in a more pleasing way. Feel free to add a couple of other lights for fill and backlight as well (see right image in Figure 10-29).
9. Once you have a LightCap set-up you like, use the Save button in the LightCap subpalette to save the LightCap as catWalkLights.ZLD.
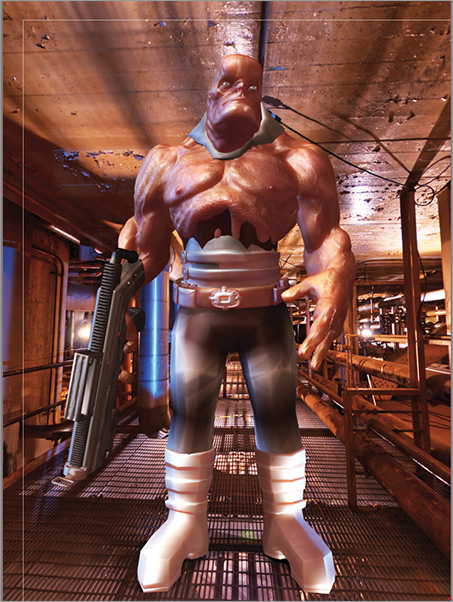
10. Create a test render using BPR and adjust the lights as needed (see Figure 10-30).
Figure 10-29: Create a LightCap based on the colors of the image by pressing the Background button (left image). Add lights as needed to make the model more visible (right image).
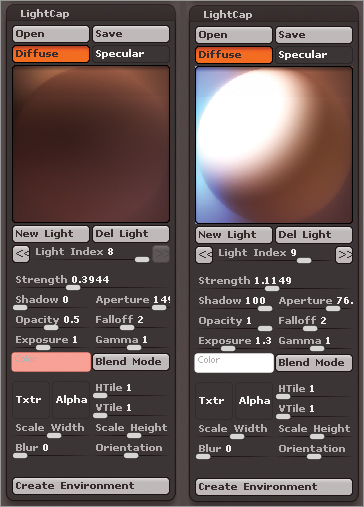
Figure 10-30: Render using BPR to see how well the model is integrated with the lights.
Create the Look of Worn Leather
In the last section you learned how to create variation in specular reflections over the surface of the skin by painting a slightly more reflective material on top of a similar, but more diffuse, material. In this section, we’ll take a look at a more advanced technique that uses the Material Mixer. This technique uses the intensity of the colors painted on the surface to determine which parts have stronger specular reflection than others. We will use this technique to make the Enforcer’s leather corset appear worn and well-used.
The Material Mixer
The Material Mixer’s function is to determine how shaders within a material are layered on top of each other. The advanced settings at the bottom of the Mixer offer controls that set criteria for the strength of the shader based on everything from shadow strength to the hue, intensity, or saturation (or any combination) of the colors painted on the surface. Using these controls, you can create some pretty amazing material effects. This tutorial is going to keep things fairly simple. You will create a two-shaded material: One shader will be very diffuse and the other, very specular. Then you will set the Mixer up so that the specular material is stronger on the parts of the surface that are darker in color and the diffuse shader is stronger on the parts of the surface that are lighter in color. This creates a realistic effect since rough surfaces tend to diffuse reflected light, making them appear lighter than reflective surfaces. Think of a worn leather jacket: the crevices, which are not as exposed to wear and tear, tend to be smoother and shinier than the exposed parts, which become rougher and lighter in color.
1. Open the latest version of the project.
2. In the SubTool stack, find the SubTool named “corset.” Select this SubTool and turn on the Solo button, so that the other SubTools are hidden. Set the SDiv slider to the highest setting (see Figure 10-31).
Figure 10-31: The corset is prepared for editing.
3. In the Light palette, turn off the Background image. This will speed up the performance of ZBrush.
4. Open the Material library and select the DoubleShade1 material. Open the Material Modifiers subpalette.
5. In the SubTool stack, turn on the little paintbrush icon so that polypainting is enabled for the surface—most likely, it is on already and you should be able to see the dark red and orange colors painted on the corset.
6. On the top shelf, make sure the M button is on and Rgb and Mrgb are not on.
7. Open the Color palette and press the Fill Object button. This fills the corset with the currently selected material, which should be the DoubleShade material.
8. In the Material Modifiers subpalette, click on the circle for the S2 shader, so that it turns into a dot. This means that the S2 shader is off and only the S1 shader is visible in the material.
9. The S1 shader will be the diffuse shader (see left image in Figure 10-32). Make the following adjustments to the settings. If a setting is not listed, then you don’t need to change it:
Ambient: 0
Diffuse: 90
Specular: 0
Colorize Diffuse: 80
High Dynamic Range: 1.5
Click the Dif color swatch and choose a light tan color.
10. Now switch to the S2 shader. Turn it on by clicking on the dot on the S2 button (See right image in Figure 10-32). Turn the S1 shader off.
Figure 10-32: The shader settings for S1 and S2 of the DoubleShade material

11. Make the following adjustments:
Ambient: 0
Diffuse: 0
Specular: 100
Metalicity: 15
High Dynamic Range: 3.5
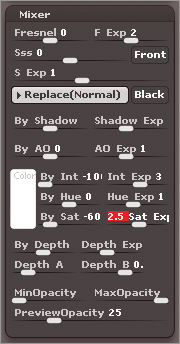
12. Now turn both S1 and S2 on and make sure the S2 button is highlighted, indicating that it is the selected shader. Expand the Mixer subpalette and make the following adjustments (Figure 10-33):
By Int: –100
Int Exp: 3
By Sat: –60
Sat Exp: 2.5
The By Intensity (By Int) slider sets the strength of the shader based on the intensity or value of the surface colors: setting this to –100 means that the shader is stronger where the surface is darker. The Intensity Exponent (Int Exp) controls the smoothness of the transition of the shader. The By Saturation (By Sat) controls the strength of the shader based on the saturation of the colors on the surface. So by setting this to a negative value, those parts of the surface that are colored with dark, unsaturated colors will be the shiniest parts of the surface.
Figure 10-33: The Mixer settings for the S2 shader
13. Save the material as “wornLeather.ZMT.”
Paint In the Worn Areas
Now that the basic material is set up, it is time to start painting in the worn areas. The colors that have already been painted on the surface will serve as a base coat. They are fairly dark reds and oranges and at the moment the surface looks fairly shiny. In this section, you will paint lighter colors over the surface and you will see how these lighter areas appear less shiny than the darker areas thanks to our worn leather material. The great thing about this approach is that the materials are blended smoothly as the colors on the surface transition from light to dark.
1. Continue with the project from the last section. In the Brush palette, select the Standard brush. Make sure the Rgb button on the top shelf is on. ZAdd, ZSub, M, and Mrgb buttons should be off.
2. Set the Rgb intensity to 22.
3. Select the alpha 58.
4. In the Brush palette, set Spin Center to 1 and Spin rate to 5. This rotates the alpha as you paint, which helps to create a nice pattern of overlapping marks.
5. In the color palette, set the color to a light yellowish tan.
6. In the Masking palette, set Cavity Mask intensity to 100 and press the Create Cavity Mask button. Turn off “View Mask” so that the mask is invisible as you paint.
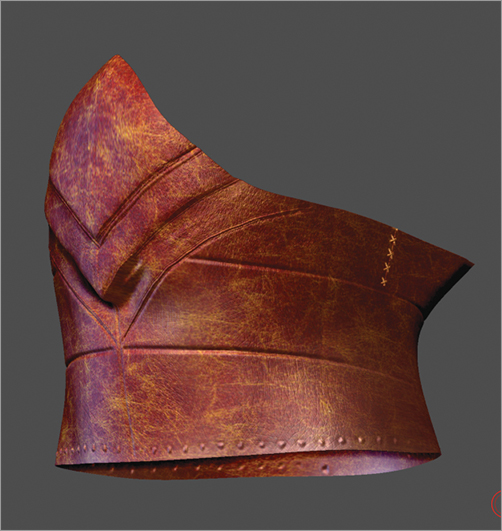
7. Paint the light tan color over the surface of the corset. As you paint, you should see that the lighter areas are less shiny than the darker areas. Paint so that the darker areas are mostly within the cracks of the corset (see Figure 10-34).
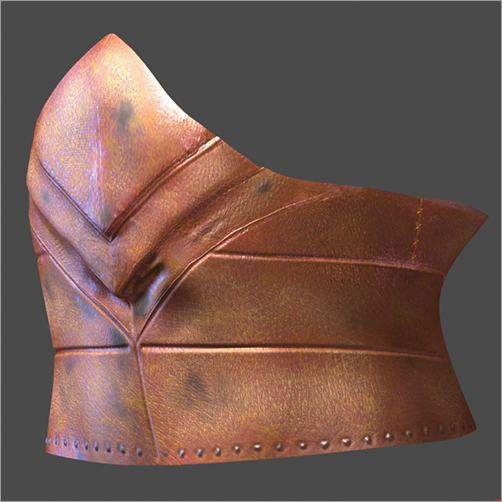
8. Paint a dark gray on the studs and add a few oily splotches to sell the worn look. Figure 10-35 shows the corset rendered with BPR.
9. You can adjust the settings in the shaders of the wornLeather materials to fine tune the look after you have painted the surface. Save the project when you’re happy with the way it’s looking.
Figure 10-34: Lighter colors are painted on the surface. The remaining darker colors appear shinier than the lighter areas.
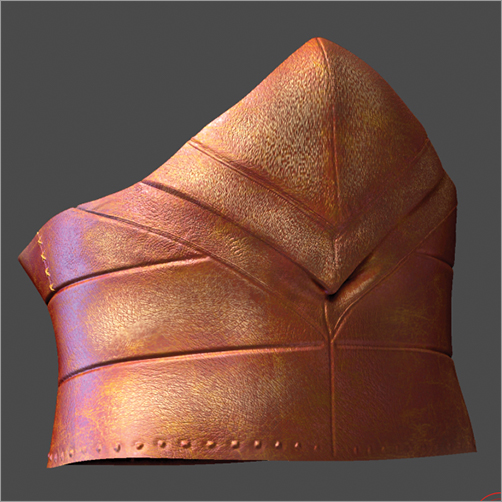
Figure 10-35: The corset rendered with BPR
Keep in mind, in this demonstration you used a material containing two shaders and just a couple of settings in the Mixer. Try using the TriShaders or the QuadShaders material and experiment with other Mixer settings. You will quickly realize that there are limitless creative possibilities with these tools!
Metallic surfaces in ZBrush are easy to simulate and, in fact, there are a number of metal materials that come loaded into the ZBrush material library already. In addition, there are a huge number of free material presets that you can download from Pixologic’s website. In this section, you’ll learn where to find these materials and how they can be used on the metallic parts of the Enforcer character.
MatCap Materials
MatCap stands for “material capture,” just as LightCap stands for “light capture.” The idea behind both technologies is very similar. Like LightCaps, MatCap materials use a texture to determine how the material is lit and shaded. The specular highlights, diffuse reflections, and other material qualities are “baked” into a texture and ZBrush references this texture when it renders the image.
There are two key things to watch out for when using MatCap materials:
- Since specular highlights and reflections are baked into the material, it is possible to render a surface in which the highlights are not aligned correctly with the direction of the lights in the composition. Figure 10-36 shows an example where the highlights on the sphere and the torus are not properly aligned with each other and neither highlight is aligned with the shadow-casting light when the scene is rendered with BPR.
- The LightCap editor can be used to create MatCap materials. This is a really great way to design MatCaps. All you need to do is select a MatCap material from the upper half of the Material library and then open up the LightCap editor and make some changes. As soon as you make any changes to the LightCap editor, the lighting is instantly baked into the selected MatCap material. This is great, except that it means that it is very easy to accidentally destroy the current material and Undo is not going to reverse the changes (see Figure 10-37).
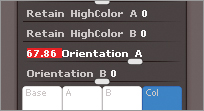
The first problem is fairly easy to solve. In the Modifiers for MatCap materials there is an Orientation A slider, which allows you to rotate the MatCap texture so that you can align the highlights with the lights in the scene (see Figure 10-38).
Figure 10-36: The highlights of the rendered model are not aligned with the shadows.
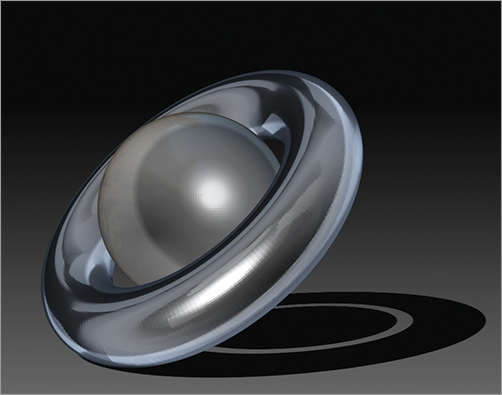
Figure 10-37: Making changes in the LightCap editor while a MatCap material is selected causes the LightCap info to overwrite the MatCap properties automatically
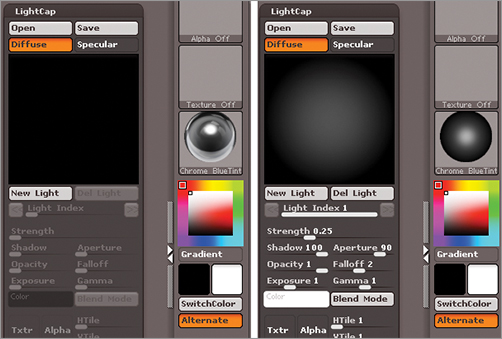
Figure 10-38: The Orientation A (and Orientation B) slider allows you to rotate the texture applied to MatCap materials so that the highlights can be properly aligned.
As for the second issue, the best way to prevent this situation form ruining your hard work is to save often. Save your materials when you edit them and save your projects and tools as well. Mind that you do not make changes to the LightCap editor while a MatCap material is loaded in the Material library, unless it is your intention to use the LightCap editor to design a material.
MatCap Library
To create the materials for the metallic parts of the Enforcer, you will download some MatCap files form the online MatCap library, save them to a LightBox folder, and then fill the surface with the material.
1. Open a web browser and go to the following URL: www.pixologic.com/zbrush/downloadcenter/library/. Here you will find the MatCap library. Click on the link for MatCap metal in the library interface.
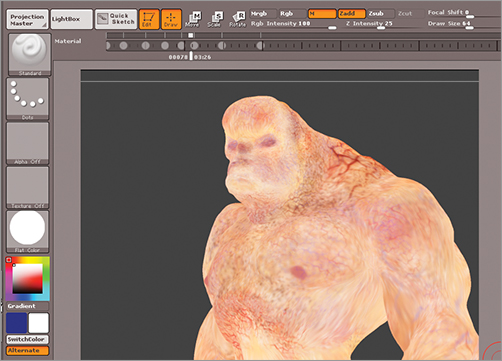
2. The materials are listed on the left. As you click on each one, you will see it preview on the troll character to the right (Figure 10-39). When you find a material you like, click on the link below to download it. The file will download as a ZIP archive.
Figure 10-39: The MatCap library contains a large number of free materials, including many metallic samples.

3. Unzip the archive to extract the ZMT file. These files are materials that have been designed by users and uploaded to Pixologic’s website for everyone in the ZBrush community to use.
4. Place the ZMT file in the ZBrush 4R2/ZMaterials folder.
5. In ZBrush, open LightBox and click on the Materials link. You should see your downloaded materials here. For this project, I downloaded sc_tinMan.ZMT, bgs_silvery.ZMT, bgs_brushed_aluminium.ZMT, gk_ultra_oil.ZMT, ok_gunmetal.ZMT, fg_rusted_grey_metal, and ok_pewter.ZMT. Feel free to download any materials you think will look interesting on the model.
6. To load a material into the current ZBrush session, double click the icon in LightBox (see Figure 10-40).
7. Select the SubTool you want to apply the material to. Turn on the SubTool’s paintbrush icon in the SubTool palette to activate polypainting.
8. Set the SubTool to the highest SDiv level and then turn on the M button on the top shelf. You can then either use a brush to paint the material on parts of the surface or use the Fill Object button in the color palette to coat the entire SubTool with the material.
Figure 10-40: The downloaded materials are available in the Materials folder of LightBox.

Scott has already applied materials to most of the Enforcer’s SubTools but feel free to try applying your own materials as well. Looking at the Modifiers for the materials will help you understand how they work. MatCaps generally base their color information on the texture seen at the bottom of the Material Modifier subpalette and the sliders are used to adjust the various properties of the texture and how they are applied to the surface. Some materials, such as the fg_rusted_grey_metal.ZMT, use shaders to combine both MatCap shaders and standard materials.
The final process for rendering the Enforcer involves making a few adjustments to the render properties, rendering with BPR, and then adding a few post-process effects using BPR Render Filters.
Render the Enforcer
Once the lighting and the materials have been set up, you are ready to render the image. In this section, you will prepare the project for a high-quality render in ZBrush.
1. Load the most recent version of the project into ZBrush.
2. In the Light palette turn on the On button in the Background subpalette. You may need to reload the background image if it is not available.
3. Spend a few moments aligning the view of the Enforcer with the background. This may require adjusting the Focal Length slider in the Draw palette so that the perspective of the character matches the perspective in the background.
4. Now, to create the final lighting you will want the metallic parts of the character to reflect the background image so that the character looks more integrated with the scene. Turn on the Reflect button next to the LightCaps button in the Background subplatte of the Light palette (see Figure 10-41).
Figure 10-41: Press the Reflect button in the Background subpalette of the Light palette.

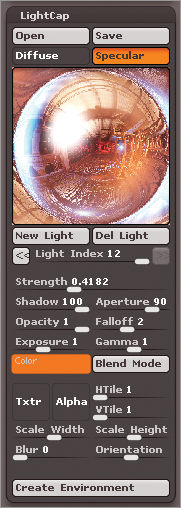
5. Press the LightCaps button. This will replace the LightCap with a new version based on the background image. It does mean that any lights you added will need to be added and adjusted again. If you click on the Specular button you will see the background image has been mapped to the specular highlights of the LightCap lights (see Figure 10-42).
Figure 10-42: The background image has been mapped to the specular highlights in the LightCap editor.
6. This is a good time to save your project and save the LightCap file as well. I saved the LightCap file as catWalkLights02.ZLD.
7. In the SubTool palette of the Tool palette, press the All High button. This sets all of the SubTools to their highest subdivision level. This will take a few minutes to calculate.
8. Open the Render palette and set the Details slider to 3. Make sure Smooth Normals is off.
9. Turn on the Shadows, Ambient Occlusion, SSS, and Wax Preview buttons in the Render properties.
10. Make sure Floor is activated on the right shelf and that the grid lines of the floor are aligned with the floor in the background image. BPR will cast shadows onto the grid in the render and, if the scene is aligned with the background image, these shadows will appear integrated with the background.
11. Press the BPR button (hot key = Shift + R). The render will take a while to calculate, so this is a good point to take a break! Figure 10-43 shows the completed BPR render.
Figure 10-43: The BPR render of the scene
After the render is complete, do not change the view of the Enforcer—not only will you lose the render you worked so hard at creating, but it will take just as long to create a new render. However, if you don’t change the view, ZBrush stores the ambient occlusion and other render information in a buffer. This means that if you need to redo the render, it should not take as much time, as long as you don’t change the view of the scene! This is a great time saver if you need to adjust the lighting or change a material property.
Once the render is complete, you are still not finished. In the next section, you will use the Render Filters to add postproduction effects to the render. This will help separate the Enforcer from the background as well as allow you to adjust the look of the image in real time.
BPR Render Filters
The idea behind the BPR render filters is similar to Photoshop filters but with the added advantage that the filters take into account 3-D depth information, shadow information, ambient occlusion, and other properties specific to ZBrush renders. This means that you can adjust the image after it has been rendered. As long as you don’t change the view of the image, the filters will alter the render in real time. This is an effective time saver and the filters do a lot toward making your BPR render really stand out. This exercise introduces techniques for using the filters on the Enforcer image.
1. Once the BPR render of the Enforcer is complete, place the Render palette in a tray and expand the BPR Filters subpalette.
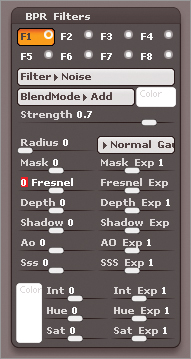
2. There are eight slots for the filters labeled F1 through F8. The filters are layered on top of each other from the lowest to the highest slot number. Each slot button has a dot in the upper right that is a switch. To turn on a filter, click on the dot so that it turns into a circle. Click on the dot on the F1 button to turn the filter on.
3. By default, the F1 filter is a noise filter. The render now appears brighter and noisy. The settings in the lower half of the BPR Filters subpalette control how the filter is applied (see Figure 10-44).
Figure 10-44: Turn on the F1 filter in the Filters subpalette of the Render palette.
It would be nice to separate the Enforcer model from the background image. A good way to do this is to adjust the intensity so that the background is slightly darker than the Enforcer model.
4. Click on the drop-down menu below the filter buttons and set the Filter to Intensity.
5. The Strength slider controls the magnitude of the effect. Set this slider to –0.25. A negative value for Intensity causes the image to become darker.
6. Of course, the filter has been applied to the whole image so everything looks darker. The sliders in the BPR Filters subpalette control how the filter is applied to the image. Set the Mask slider to –1. The Mask slider bases the filter on the alpha of the model. Setting this to a negative value means that the background is filtered while the model remains unaffected. Setting the Mask slider to a positive value reverses this.
7. Turn on the F2 button and set the filter to Saturation. Set the Strength slider to –0.5. This takes some of the color out of the image (a positive value makes the colors in the image more vibrant). Now set the Depth slider to 1. This means that the filter is applied based on depth information so that those parts of the model closer to the font receive less of the filter. Now the Enforcer has a bit more color on the closer parts, which helps to increase the sense of depth in the composition.
8. Turn on the F3 filter and set the filter type to Green. Set Strength to 1. Click on the Blend Mode button and choose Screen from the list. A green color is applied over the model. We want this color to appear only as a very subtle shade to the occluded and shadowed parts of the model. Green complements the warm colors of the image and, by using it in the shadowed areas, the shadows will appear less saturated, making the image a little more realistic. Set Shadow to 0.24 and Ao to 0.5. The Ao slider only works when you render the image with ambient occlusion activated.
9. Turn on F4 and set the filter to Fade. The model suddenly looks transparent! The Fade slider blends the model with the background. Set the Fresnel slider to 0.9. This means that the filter is applied to the edges of the model that face away from the viewing angle. Set the Strength slider to 0.15. This makes the effect very subtle. By adding a subtle fade to the edges on the model, you can cheat the look of making the subject more integrated with the background.
10. Turn on the F5 filter. Set the filter to Noise and the blend mode to Add. Set the Radius to 1. This increases the size of the noise grain a little. Set the Depth slider to –0.35 so the effect is stronger at the front of the image. Set the Strength slider to 0.05. Set the Int slider at the bottom to 20 so that the filter is applied based on the intensity of the image. These settings help add a bloom to the highlights in the image, which helps with the contrast, making it look a little more photographic.
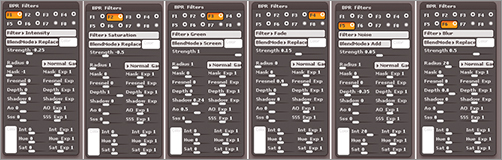
11. Finally, add some blurring to increase the depth of field. Turn on the F6 filter, set the filter to Blur, and the Radius to 20. Set the Depth slider to 0.8 and the Strength to 0.5. Figure 10-45 shows the settings I used for each filter.
12. You can go back and make adjustments to the other filters or add more filters as needed. You can tweak until you are absolutely satisfied with the image. Experiment using the other filter modifiers, such as Saturation (Sat), SSS (subsurface scattering), and Hue. The Exponent sliders let you adjust the falloff of the effect. Figure 10-46 shows the render with the filters applied.
Figure 10-45: The settings for each filter
As long as the filters are on, each time you render this scene with BPR the filters will be reapplied. This also means that the filters are applied if you render an animation using the Timeline.
Keep in mind that the render passes are also available in the Render palette (Figure 10-47) so you can export these along with the final, filtered BPR render, bring them all into Photoshop to use in a paintover, or just for final tweaking. I felt that, overall, the BPR render was nice but the gun was getting lost in the background, so I took advantage of the render passes to solve this problem in Photoshop.
These images can be further worked in Photoshop using the techniques shown in other chapters. Figure 10-48 shows the Enforcer with a pass of Photoshop paint to help punch up the lighting as well as adjust the overall color temperature.
Figure 10-46: The BPR render with the filter applied

Figure 10-47: The render passes in the Render palette

Figure 10-48: BPR render passes further adjusted in Photoshop by Scott Spencer