Chapter 7
Sculpting a Mermaid Character with Dynamesh
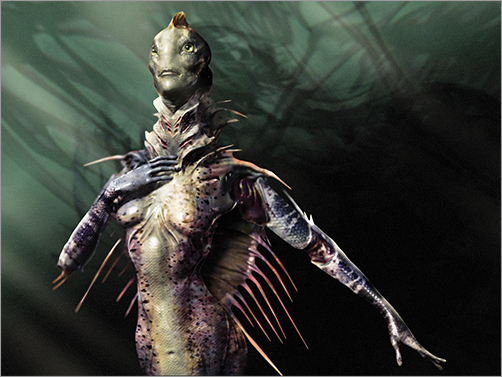
In this chapter, we will create an ichthyoid character, a different take on the mermaid archetype. Ichthyoid is the technical term for a fish or fishlike vertebrate animal. We will execute this design using a different ZBrush tool for generating base meshes. Previously, we have worked with imported models, generic meshes, or ZSketch strokes. In this chapter we will explore a new development in ZBrush 4 R2 called Dynamesh. Dynamesh allows you to dynamically build up a character using what essentially amounts to a ball of dynamically updating clay. We will be able to push and pull a single ZBrush Polysphere and even add new parts—seamlessly incorporating them into the original volume. This is a groundbreaking new approach to sculpting and I am excited to share the technique with you here. It allows a seamless creative process to take place in ZBrush in ways never before possible. Figure 7-1 shows the character we will create in this chapter.
Figure 7-1: The mermaid character

The Brief: Creating the Aquatic Female Character
Our design brief for this chapter is to create an aquatic female character, a new take on the mermaid. The mermaid should not follow the typical archetype of female torso on a fish body; rather, look for ways to create an appealing feminine character while combining humanoid and fish form language. The character need not appear helpless or vulnerable; instead she should seem fully capable of self-defense in an underwater environment while retaining beauty, sense of grace, and elegance. The character should appear much more ichthyoid than human.
We will execute this brief using dynamesh as our primary design tool. This will allow us to build up the volumes of the character with no concern for the underlying base mesh. Dynamesh allows us to approach this figure just like we would a traditional clay sculpture, by adding and removing mass when and how we need to, rather than trying to push an existing volume into the shapes we need.
Using Visual Cues to Communicate Character
In the process of working this brief, we will need to create an undoubtedly alien character—in this case, an undersea being with ichthyoid qualities that reads to the audience as being female. How do we accomplish this? To successfully communicate humanoid and aquatic qualities, we need to find real world touchstones we can incorporate into the design. These visual cues serve to subconsciously push the viewer’s mind to make the assumptions we want them to make about the character. We have seen this already in how we treat the jawline of an aggressive character or how we use shape language to communicate malicious intent as opposed to kindness. In this case, we will look for typically female qualities we can incorporate into the design.
Since we know this character needs to appear more alien than human, we know we will need to rely on the body proportions and the shape and relationship between the facial features to communicate a sense of the feminine. Without being able to rely on cultural gender cues like hair and costume, we will rely instead on a generalized baseline of skeletal and facial shape relationships that will lead the mind to read the figure as female.
Stereotypes and Tropes in Design
In design we sometimes have to play with stereotypes as a visual shorthand to communicate some things to the audience. For example, when creating this feminine-looking creature, we will rely on some facial structural cues that are stereotypically feminine within a narrow band of western culture. It is important to keep in mind there are vast variations of female and male faces in the human population just like there are variations in body types, skin tones, and costume. When we try and shape the viewer’s perceptions while relying on generalized perceptions, keep in mind the elements we rely on in this chapter are exactly that, generalizations and not a barometer for any kind of visual standard of “beauty.”
Skeletal and Morphological Differences Between the Sexes
Since we will need to create the impression this character is female rather than male while retaining a distinctly alien anatomy, we will need to understand the common general visual cues that help us sex the skeleton. From a skeletal standpoint, the female skeleton tends to be smaller and lighter than the male’s. The humerus bones, in the upper arms, are typically longer than in the male. The ribcage is narrower and the thoracic arch is not as widely set (Figure 7-2). The torso in the female is slightly longer than the male, while the lower extremities (legs) are shorter and the shoulders and ribs are narrower. There is a common myth that women have one less rib than men. This is not so, as both men and women have 24 ribs including the two “floating” ribs.
Figure 7-2: The differences in the male and female skeleton are illustrated here.
The female pelvis is wider than and not as high as the male pelvis. The inguinal ligament is not as defined in the joint between the hips and the lower extremities. The pelvis may appear to have a slight inclination forward compared to the typical male pelvis. The wider pubic arch creates a larger space for the abductors of the thigh to attach. This leaves an opening between the legs in a more slender figure where the inner thighs are not padded with fatty tissue. This is because the origins of these muscles will be farther from the midline of the body than in the male (Figure 7-3).
The measuring point used on the skeleton, the great trochanter of the femur, is generally considered the widest point of the male hips. On the female, this widest point appears lower due to the differences in the way fat tissues are distributed (Figure 7-4).
The face is where we will try to incorporate many of the more subtle visual cues. Figure 7-5 shows a female face of European descent with some typical features called out that feminize the forms. We will incorporate elements like the shape of the chin, the more acute angle of the jaw, and the rounder structure of the cheeks into this mermaid character. The addition of these visual cues should cause the viewer to perceive the face as feminine despite its absolutely alien nature.
Figure 7-3: The thoracic arch (in red) is wider in the male ribcage and narrower in the female. Also note how the pelvis is lower and wider in the female.
Figure 7-4: Here you can see the great trochanter on the skeleton and the fat pad of the hips, which create the widest point on the hips.

Figure 7-5: Here we can see some of the key feminine facial features we will try to incorporate into our character design.
Remember that human and animal anatomy are two powerful tools in your arsenal as a designer. An understanding of how skeletal and muscular anatomy are arranged in nature allows you to combine natural structures from various sources in new and viable ways. This level of understanding also helps you influence the audience’s perceptions by exploiting key shape relationships that communicate things on a instinctual level about the character. This mermaid is a perfect example. We will combine a ichthyoid face with humanoid elements and by playing on the audience’s expectations of what is a stereotypically feminine, you can communicate that this completely nonhuman creature is female, graceful, and potentially dangerous due to her spiny fins.
By understanding how the viewer will react to various combinations of shape language and proportion, you can influence the audience’s perceptions of your character on a deeper level. When you are thinking about your characters in this level, it becomes less a question of “how do I put neat shapes together?” and more of a case of “how do I combine shapes that tell the story I want to communicate about this creature?”
Dynamesh is a new tool developed for ZBrush 4 R2. Essentially, Dynamesh tries to replicate the feel of sculpting in practical clay by allowing you to continually pull new forms from the base shape, interactively combine new meshes into the existing volume, and even carve away negative spaces, all the while maintaining an easily workable even quad mesh layout. This frees you from really having to think about the underlying topology as you work. It also allows you to create any kind of volume for sculpting without having to be tied to the limits of a base mesh. This is highly beneficial in cases where you might want to carve out a large negative space in a model. In previous workflows this was not easily accomplished. With Dynamesh, the mesh will update to accommodate any new shapes you create or remove from the model.
Getting a Feel for Dynamesh
In this section, we will look at a basic demonstration of Dynamesh using basic primitives. We will create an abstract organic shape as an opportunity to experiment with the Dynamesh workflow before we dive into creating a figure sculpture.
1. Open ZBrush or create a new project. Open the Lightbox and from the Tool section load the Polysphere ZTool. Step down to the lowest Subdivision level and under Tool Geometry, click the Del Higher button to remove the higher subdivision levels.
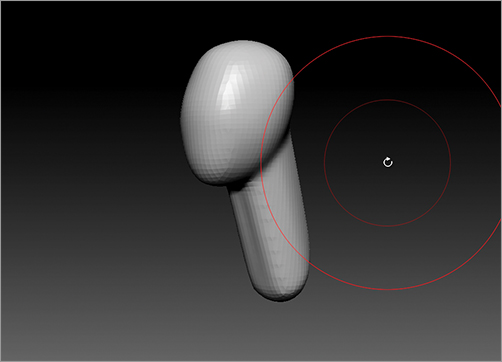
2. From the Brush menu, select the Move brush. Turn on X symmetry and start to pull the sphere out into a larger shape. Don’t be afraid to stretch the mesh beyond its normal limits. You will see the mesh starts to distort as the underlying polygons are stretched (Figure 7-6).
Figure 7-6: The underlying mesh will distort when the Polysphere is stretched beyond the limits of its underlying topology.

3. At this stage it is impossible to alter the shape of the sphere further without adding new subdivision levels because the underlying mesh is stretched beyond its limits. Using Dynamesh, we will now rebuild the underlying mesh to support the new form. Click Tool Geometry and set the Dynamesh Resolution slider to 32. Press the Dynamesh button (Figure 7-7). If you forgot to delete the higher subdivision levels, ZBrush will ask if you want to freeze subdivision levels—if so, press no. ZBrush will now rebuild the mesh into an evenly spaced all-quads topology that supports the current shape (Figure 7-8).
Figure 7-7: Dynamesh enabled at a resolution setting of 32

Figure 7-8: The dynameshed geometry
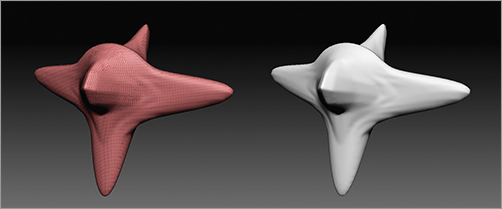
4. Using the Move brush, continue to shift the geometry—stretching it into new directions. You may also try using the Snakehook brush, which often pulls the geometry beyond the limits of the mesh (Figure 7-9). When you are satisfied with the new shape, we will dynamesh again to correct the geometry to better support the form.
5. To re-dynamesh the model, hold down the Ctrl key and click and drag a masking marquee on the document window—do not mask the model, simply Ctrl + Click + Drag somewhere off the model (Figure 7-10). ZBrush will again apply dynamesh and rebuild the underlying geometry to support the shapes you have created (Figure 7-11).
Figure 7-9: Stretching the shape further
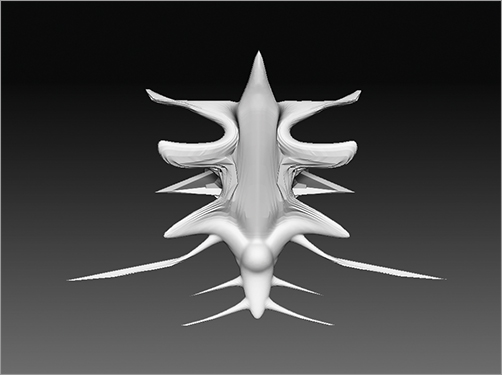
Figure 7-10: Drag a masking marquee somewhere off the model with Ctrl + Click + Drag while in Dynamesh mode to re-dynamesh.
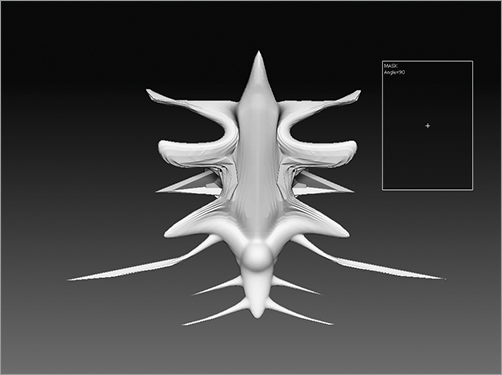
Figure 7-11: The new form dynameshed to rebuild the underlying topology

It is not necessary to add subdivisions when Dynamesh is on because they will be deleted whenever you Ctrl + Drag to execute Dynamesh. If you want to increase the resolution of your Dynamesh, you can adjust the resolution slider under Dynamesh in the Geometry menu. It is best to consider it a blocking in or rough-form building tool. Once you get the general form in, you will exit Dynamesh mode and begin to add subdivision levels and sculpt as you normally would in ZBrush. For this reason, I avoid setting the resolution slider too high. I use Dynamesh to establish the overall forms while maintaining a workable lower resolution mesh. To exit Dynamesh mode, simply press the Dynamesh button under Tool Geometry.
Now that we understand the basic approach to Dynamesh, let us look at some of the added functionality of the Insert Mesh brushes.
Insert Mesh Brushes
ZBrush 4 R2 has further developed the insert mesh functionality to incorporate it into a set of brushes called the Insert Mesh brushes. We will look now at how these brushes are used to incorporate new geometry into the model seamlessly.
1. Enable Dynamesh again if you have turned off Dynamesh mode. From the Brush menu, select the Insert Sphere brush (Figure 7-12). Click and drag on the ZTool in the document window to insert a sphere.
2. The model will automatically mask. This allows you to manipulate the sphere with the Sculpting or Transpose tools. Position the sphere where it intersects the model and clear the mask by Ctrl + Click dragging a marquee of the model. At this point the mask is merely cleared—the model has yet to be dynameshed. Draw another masking marquee of the model again to update the Dynamesh. The spheres will now be incorporated into the rest of the model (Figure 7-13).
4. The Mesh Insert brushes can also be used in a subtractive manner. That means you can add volume with them as well as subtract. From the Brush menu, select the Insert Cylinder brush. Click and draw a cylinder on the mesh while holding down the Alt key. Any time you draw a mesh with the Mesh Insert brush while holding Alt, it will subtract that volume rather than add it (Figure 7-14).
5. Clear the mesh and then draw a second mask marquee to apply Dynamesh. The cylinders will disappear and their volume will be subtracted from the model (Figure 7-15).
Figure 7-12: Using the InsertSphere brush

Figure 7-13: The sphere is placed and then the sphere is incorporated with Dynamesh.
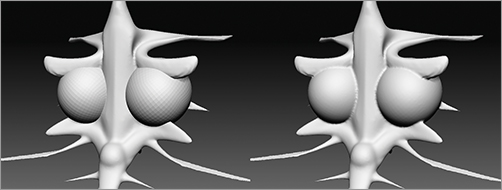
6. Mesh Insert allows you to incorporate multiple copies of a mesh at one time. Select the Insert Sphere brush and draw a new sphere on the model. Scale and position the mesh (Figure 7-16). Press W to enter Transpose Move mode. Draw a transpose line and while holding down Ctrl + Click, drag in the center circle to drag the spheres. If you hold Ctrl, this will actually drag a new copy of the sphere (Figure 7-17).
7. Drag multiple copies of the spheres along the model (Figure 7-18). When you are done, clear the mask then execute a Dynamesh by control-click dragging again on the document window. The spheres will be incorporated into the model (Figure 7-19).
Figure 7-14: Draw a cylinder with the Insert Cylinder brush while holding Alt.
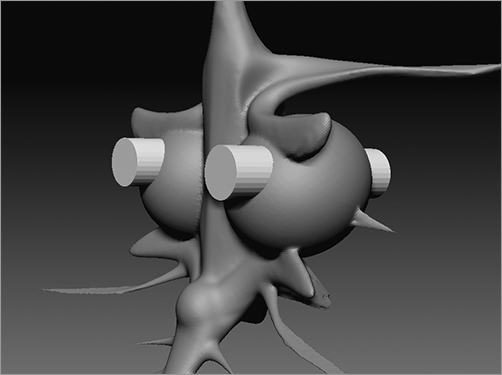
Figure 7-15: The cylinder volumes subtracted from the mesh
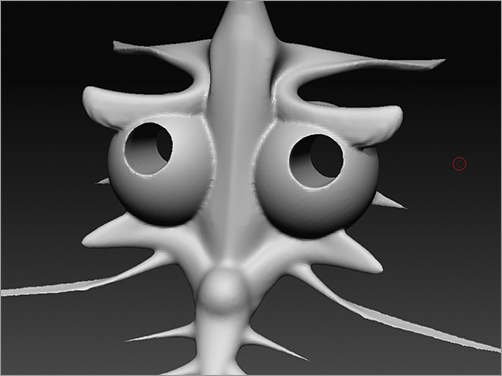
Figure 7-16: A new sphere scaled and positioned
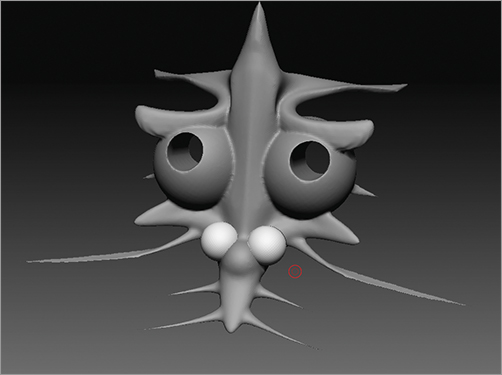
Figure 7-17: Ctrl + Click drag in the center circle of the transpose move line to make copies of the sphere.
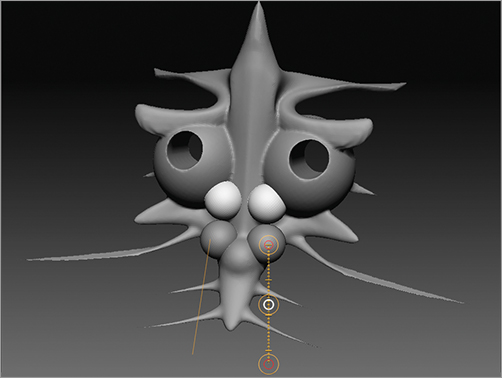
Figure 7-18: Placing copies of the sphere up the length of the model
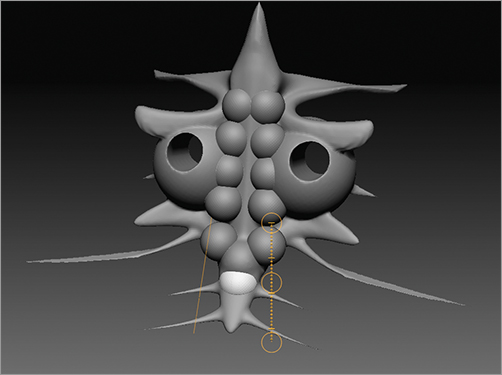
Figure 7-19: Dynamesh combines all the meshes into one volume.

Now we have a general overview of the Dynamesh tools. We are ready to start using them to create an actual character.
In the following sections, we will build up a figure from basic volumes using the same techniques demonstrated above. We will also use the Mesh Insert brush to add arms from an entirely different model. Let’s get started.
Start the Figure: Base Shapes
We will use a Polysphere to start this figure. Beginning with the head, we will create the major forms of the head, neck, torso, shoulders, waist, and arms by inserting basic primitives. Follow the steps below to block in the figure.
1. Initialize ZBrush. From the Lightbox, select the Polysphere ZTool. Draw it on the canvas and enter edit mode.
2. Select the Move brush and rough in the general shape of the head (Figure 7-20). This will be a feminine character so try to focus on keeping a more acute angle to the jaw and a smaller chin. A more masculine figure head would have a wider jawline and a more pronounced chin.
3. Isolate the area for the neck with a mask (Figure 7-21). Select the Move brush and turn up the Draw size so you can move the whole unmasked area with one stroke. Pull the neck geometry down from the head form (Figure 7-22).
Figure 7-20: Start to shape the head with the Move brush.
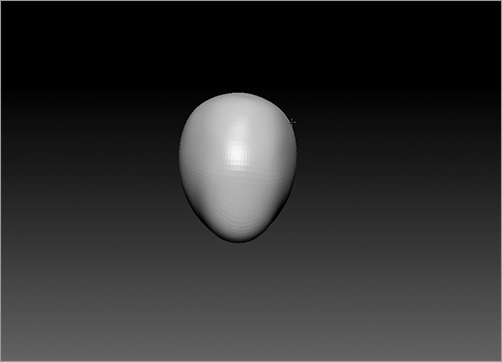
Figure 7-21: Isolate the neck with a mask.
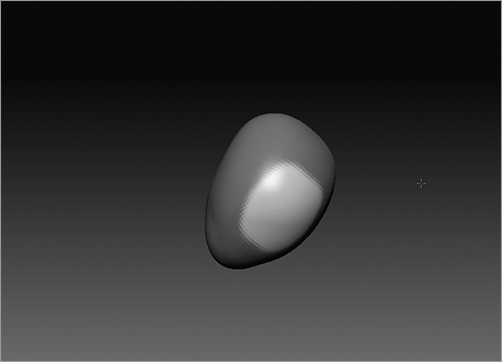
Figure 7-22: Use the Move brush to pull the neck down from the head.

4. We are now ready to apply Dynamesh. Open Tool Geometry and set the resolution slider to 24. Drag a masking marquee to apply the Dynamesh (Figure 7-23).
Figure 7-23: Dynamesh used to resurface the head and neck form
5. We will now add the torso. Rather than try to stretch the neck into a torso shape, we will simply use Insert Sphere to add a sphere. This is the best approach since the torso will take on an egg form from the ribcage and it simply makes good sense to add a primitive sphere form and then shape that into the torso mass. From the Brush menu, select the Insert Sphere brush
6. Insert a sphere into the mesh and then switch to the Move brush. Shift the sphere into an egg form. Using the Move brush, I suggest the hollow area in the ribs known as the thoracic arch. Dynamesh to merge the pieces into one mesh (Figure 7-24).
When making this ribcage, I am trying to keep in mind this is intended to be a feminine creature. This should be reflected in the shape of the ribcage. As we saw earlier, the male ribcage is larger and wider set—the thoracic arch is more open, while on the female ribcage the arch is narrower and the overall size of the mass is smaller (Figure 7-21). The ratio of size between the ribcage-shoulders and hips will all help to immediately lead the viewer to ascribe feminine traits to the character even if she has several overwhelming ichthyoid qualities as well.
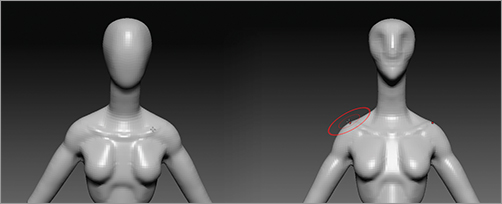
7. Using the Mesh Insert brush, draw two spheres for the shoulders (Figure 7-25). With the Move brush, shape them to help create the scapulas from behind and the trapezius muscles from the front (Figure 7-26).
8. Dynamesh to combine the shapes into one (Figure 7-27).
9. Rotate to a side view and with the Move brush, check the gesture of the neck. I adjust this slightly to give a more graceful curve from the head to the shoulders. As I work, even at this early stage, I am trying to remain aware of the need to maintain graceful feminine forms (Figure 7-28).
Figure 7-24: Create an egg shape for the torso.

Figure 7-25: Insert spheres for shoulders.

Figure 7-26: Shaping the spheres into the trapezius muscle and scapulae

Figure 7-27: Shoulders dynameshed

10. Insert another sphere for the waist. Shift it into position and using the Move brush, give it the general shape of the pelvis, the abdominal muscles, as well as the muscles of the lower back (Figure 7-29). Try and be aware of how the masses of the body interlock and interrelate. They are not just stacked shapes—rather, they are puzzle parts that interlock (Figure 7-30).
11. Add two more spheres to serve as the buttocks. Shape them with the Move brush as shown in Figure 7-31. Use the Inflate brush with a low ZIntensity setting to inflate the two spheres against each other to create the illusion of the gluteal cleft where the two glutes meet. Dynamesh to combine these parts.
12. Select the Insert Cylinder brush. Draw two cylinders into the mesh and position them with transpose move. These will serve as the base shapes from the upper arms (Figure 7-32). I will insert the lower arms in a later step. Dynamesh to combine the parts (Figure 7-33).
Figure 7-28: Adjusting the gesture of the neck for a more graceful curve

Figure 7-29: Add a sphere for the waist.
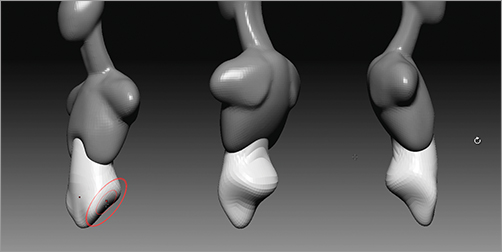
Figure 7-30: Here you can see the interlocking volumes of the body color coded. Remember that the forms are not simply stacked in space—rather, they interlock like a puzzle.
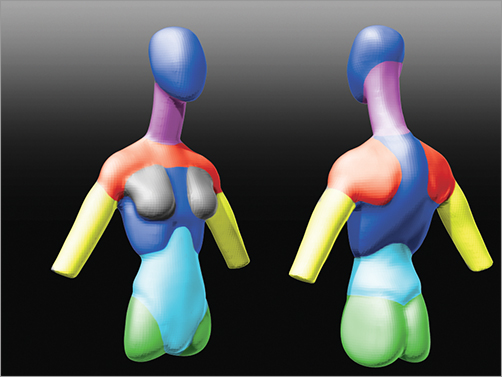
Figure 7-31: Add two spheres for buttocks.
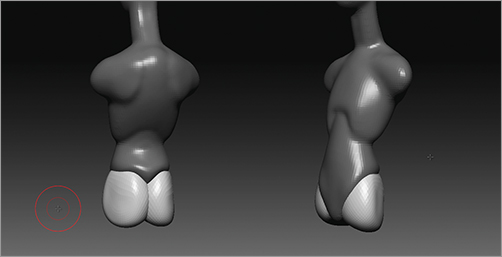
Figure 7-32: The upper arms are created from inserting cylinders.
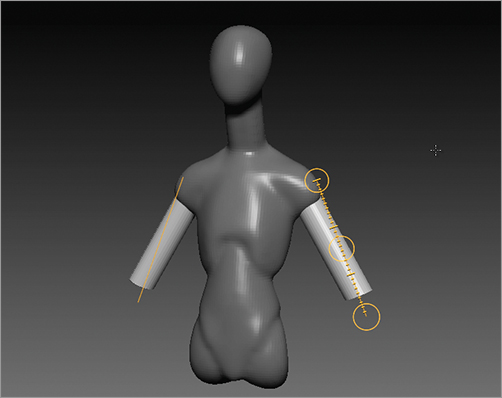
Figure 7-33: The arms combined with Dynamesh
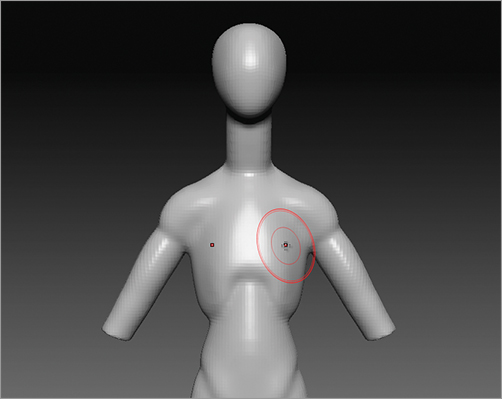
13. Since this is a “mermaid” and a feminine character, we will add a major secondary sexual characteristic by giving the figure a bustline. This will immediately convey to most viewers that the figure is female as opposed to male. The breasts are added by placing two Mesh Insert spheres on the ribcage (Figure 7-34). Be careful when placing the breasts that you do not treat them like spheres stuck on the front of the body. These forms lay against the cylinder of the ribcage and should have a sense of weight.
14. Rotate to the side view and with the Move brush, bring the top of the breasts up to the collar bone. They should take on a teardrop shape where the weight is in the bottom of the form. There should be a definite sense of the tissue laying against the ribcage rather than being a large unnatural volume stuck on the body (Figure 7-35).
15. Remember that the muscles of the chest lay beneath the breast. The pectoral muscle needs to be apparent where it extends from under the breast to attach to the upper arm (Figure 7-36). Use the Move brush to create this form, which also serves as the front wall of the armpit. Dynamesh to combine the forms.
16. Using the Standard brush, sketch in the shape of the clavicles. At this stage, I also suggest the placement of the eyes by creating two depressions on the head. These are not final details, just landmarks to help me see while I work (Figure 7-37).
Figure 7-34: Insert spheres to serve as the basis for the bust
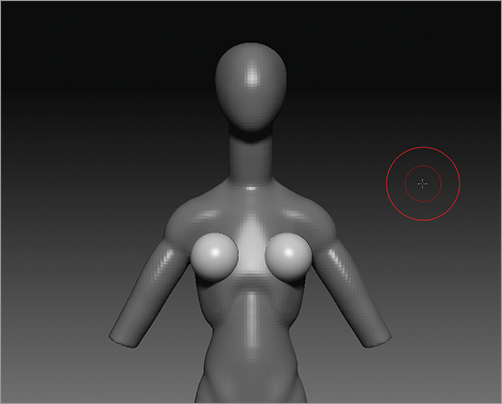
Figure 7-35: Adjusting the breast from the side
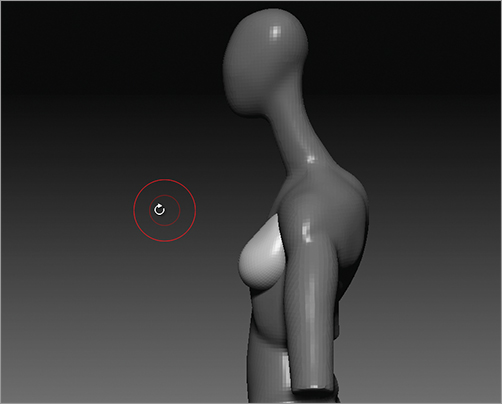
Figure 7-36: The pectoralis muscle extends from beneath the breast to the upper arm, forming the front wall of the armpit.
Figure 7-37: Sketch in the shape of the clavicles with the Standard brush.
At this point, the primary shapes of the figure are completed. We are now ready to start to address secondary forms.
Working with Secondary Forms
In this section, we will address the figure’s various body parts, adding details that will infuse character and complexity. We will add the arms and hands as well as several fin forms. The idea behind the fins will be to break up the silhouette with fin forms, creating a more complex and interesting shape.
Create the Neck Fins
The neck fins will be created by inserting a sphere, changing its shape, and then duplicating it up the length of the neck. The form is intended to suggest both a fin structure as well as a high ruff collar as seen on fashions in the seventeenth century.
1. Begin by inserting a sphere with the Insert Sphere brush. Turn off X symmetry so only one instance of the sphere is drawn. Use the Move brush to flatten the sphere into a fin shape, as seen in Figure 7-38. Once you are satisfied with the shape of the initial fin form, draw a transpose move line. While holding down Ctrl + Click, drag the center circle to duplicate a new instance of the neck fin and position it slightly above the first. I scale this new fin down slightly.
2. Use the Move brush to alter the shape of the front of the fin so it incorporates into the neckline, as seen in Figure 7-39.
Figure 7-38: Insert neck sphere and change the shape. Then duplicate it by Ctrl + Click dragging the transpose line.

Figure 7-39: With the Move brush, shape the front of the fin so it integrates into the neck in an interesting way.
3. Duplicate 3 more instances of the fins up the neck. Be sure to change the scale as you go, so the shape will taper toward the head (Figure 7-40).
4. Using the Move brush, I add a kick to the uppermost fin. This helps to add some character to the shape (Figure 7-41).
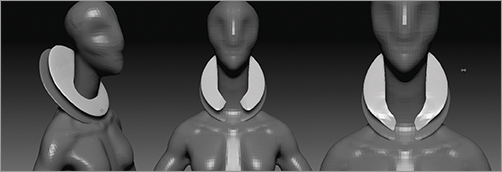
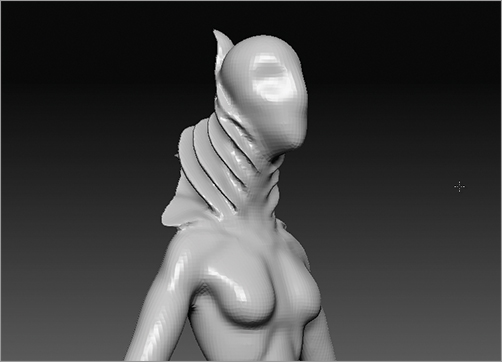
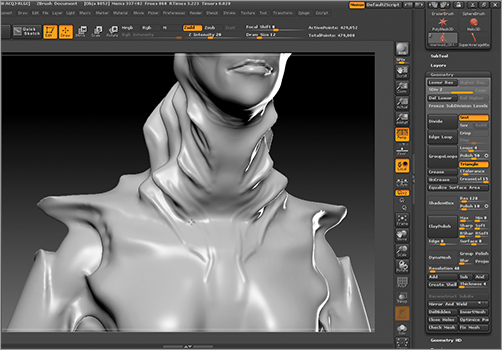
5. Duplicate the fin again and bring it down to the shoulders. I widen this instance and give it a wide flared quality like a collar or short shawl. The fins are intended to suggest the flowing fin of a manta ray (Figure 7-42). Clear the mask and update the Dynamesh to combine the fins into the body (Figure 7-43).
Figure 7-40: Duplicate the neck fins up toward the head.
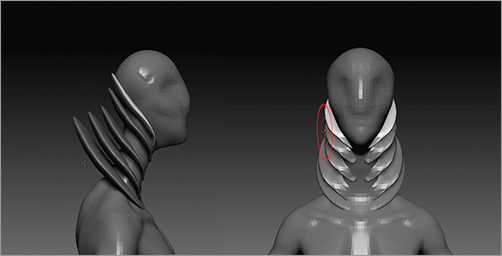
Figure 7-41: Adding a visual twist to the tip of one fin
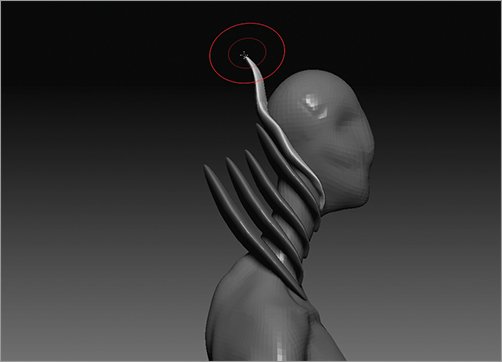
Figure 7-42: The fins ready to dynamesh

Figure 7-43: The fins dynameshed into the sculpture
6. At this stage, the fins are simply concentric rings leading up the neck. I want to add some interest to them by changing the negative spaces they create. I will do this by subtracting some volume from the fins and thereby giving some complexity to their form. Select the InsertSphere brush. Turn on Z symmetry and draw two spheres while holding down Alt. Transpose scale them to intersect with the neck fins as shown in Figure 7-44. Remember that when we dynamesh, the volume of the spheres will be subtracted form the fins. Update the dynamesh by drawing a marquee off the model (Figure 7-45).
7. At this point, I want to add a cowl or cloak structure which will suggest both a draped cape as well as a fin in the manner of a manta ray. This is intended to break up the back of the figure silhouette and give the impression of a sweeping beautiful drapery.
8. Turn off X symmetry. Insert a sphere in the back as seen in Figure 7-46. With the Move brush, shape it as seen in Figure 7-47, so it extends from the neck fins down to the hips.
9. Dynamesh to combine the parts together by clearing the mask and then drawing another masking marquee off the model (Figure 7-48).
Figure 7-44: Inserting spheres to the neck for use as a subtractive object
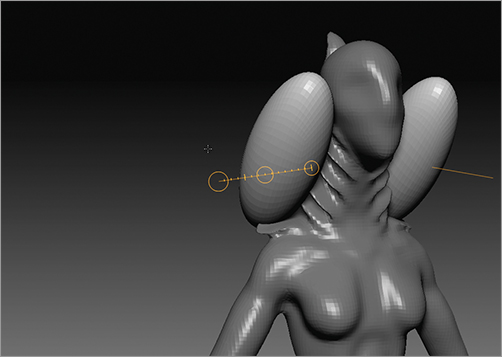
Figure 7-45: The sphere volumes subtracted from the fin forms
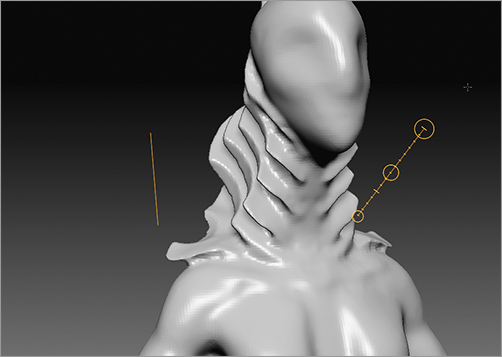
Figure 7-46: Insert a sphere into the back to create the cowl.

Figure 7-47: Shape the sphere so it conforms to the back and creates a large draping fin shape, similar to a manta ray.
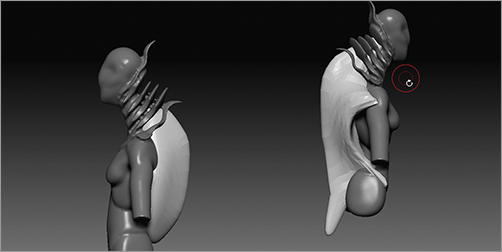
Figure 7-48: The back fins dynameshed

Next we will use MeshInsert to create a series of vents down the sides of the figure. This adds both visual interest as well as the impression of a biological function to the flaring membranes at the sides of the body. I feel these may serve as a method of locomotion where water may be taken in and then expelled, much in a manner similar to squid locomotion.
1. Turn on X symmetry and add two spheres to the mesh. Using the Move brush, flatten them into disk shapes. Place them in the armpits of the figure.
2. Draw a transpose line and while holding Ctrl + Click, drag the center circle to create a second pair of vents below the first pair. Shape these and scale them to follow the contours of the cowl form. Again, duplicate several instances down the length of the body, as seen in Figure 7-49. Combine the mesh with Dynamesh (Figure 7-50).
Figure 7-49: Adding vents to the back fin structure

Figure 7-50: The vents dynameshed into the whole

Head Details
In this section, we will start to add some more details to the head of the figure. Starting with the crest fin and moving on to eyes, lips, and details. We are nearly done with the Dynamesh phase and are ready to move into traditional ZBrush sculpting.
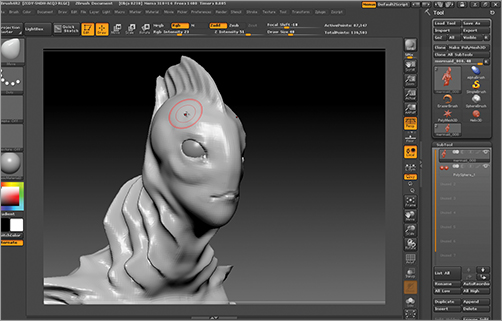
1. Mask the top of the mesh with a marquee. Isolate a strip of faces, which we will use to create the top fin (Figure 7-51).
2. Using the Move brush, pull the fin faces up and shape them as seen in Figure 7-52.
Figure 7-51: Mask the top of the head to create a cranial fin.
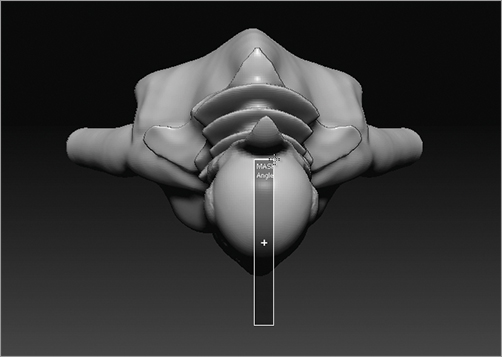
Figure 7-52: Use the Move brush to shift the faces up from the top of the head to create the fin shape.

3. We will now add eyeballs to the mesh. Append a Polysphere into the ZTool and place it with Transpose Move and Scale. Mirror it across the X axis using the SubTool master plug-in (Figure 7-53).
Figure 7-53: Add spheres for eyes.

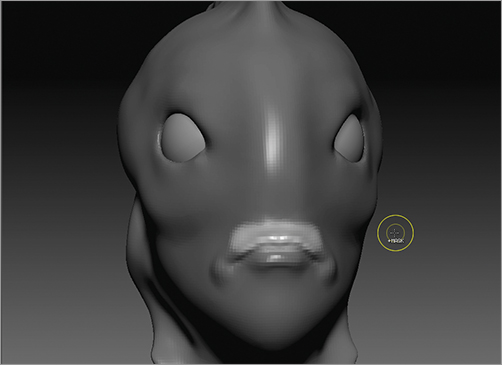
4. Using the Clay Tubes brush, reinforce the basic forms of the face (Figure 7-54). I intend to keep this face as simple as possible while still communicating an appealing feminine quality. The less detail I put in here, the more soft and streamlined it should appear. It is a tricky balancing act to get that right. Turn on Transparency mode and isolate the faces behind the eye with a mask (Figure 7-55). Next, pull those faces out to the surface of the eyeball. We will use these to sculpt eyelids and other membranes around the sphere of the eye (Figure 7-56). Even though fish do not have eyelids, we want to give her some humanoid characteristics to the eyes since these are key to creating a sense of empathy with the character.
5. Use the Move brush to shift the lids around and create a tear duct (Figure 7-57). Here, the cheekbone is masked to help protect that form from the Move brush while we work the eye area. At this stage, I use the Standard brush to suggest the lips by etching in the gesture of the lip line.
Figure 7-54: Using the Clay Tubes brush to start to reinforce the facial structure
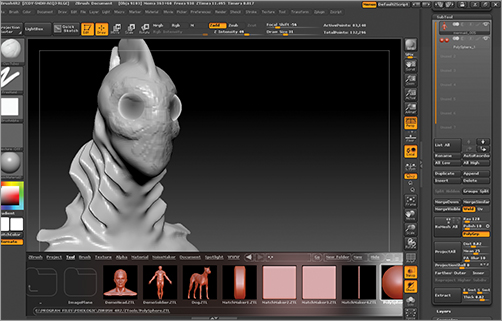
Figure 7-55: Isolate the faces behind the eye with a mask.
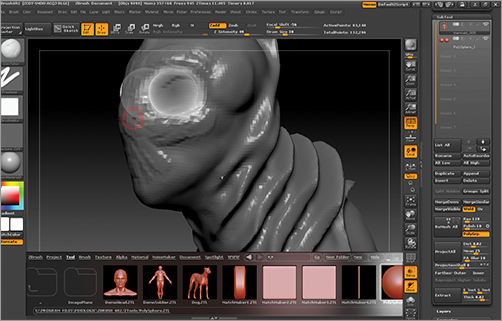
Figure 7-56: Bring those isolated faces to the surface of the eye and suggest eyelids.
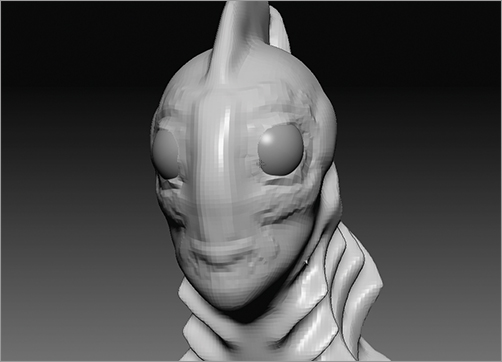
Figure 7-57: Create the tear duct. The cheekbone is masked to protect the form from being inadvertently changed with the Move brush as we work this area.

6. The eyes are refined with the Move brush. Using the Standard brush, start to suggest the shape of the lips. The lips are further refined by gently inflating the upper and lower lip forms (Figure 7-58). We will return to the lips later after we exit Dynamesh mode. At this stage, they require more resolution than we are able to provide without dividing the mesh again.
Figure 7-58: Sculpting the eyes and lips
Adding the Forearms and Hands
We will add the forearms and hands by cutting them off an existing mesh. One of the strengths of the Insert Mesh brushes is that they are capable of inserting any mesh that can be loaded into ZBrush, so long as it has only one subdivision level. For the arms, we will use the forearms off the SuperAverageMan tool.
1. Open the Lightbox Tool menu and select the SuperAverageMan ZTool. Double click to select it. It will replace the current model displayed on screen as the active ZTool. Press the F key to center the model in the document window.
2. From the Brush menu, select the SelectLasso brush. ZBrush will notify you that this brush is now the active selection brush—Click OK and make sure X symmetry is off.
3. Draw a selection marquee around the forearm, isolating it from the rest of the model (Figure 7-59).
4. With the arm isolated, click on Tool Geometry delete hidden, to remove the body, which we will not need.
5. The arm is very thick and masculine. We will want to reduce its mass slightly so it will fit better with the mermaid character. Open the Tool Deformation menu and set the inflate slider to –2. This will cause an overall shrinkage in the arm, thinning the fingers and hand (Figure 7-60).
Figure 7-59: Isolating the forearms with a select lasso
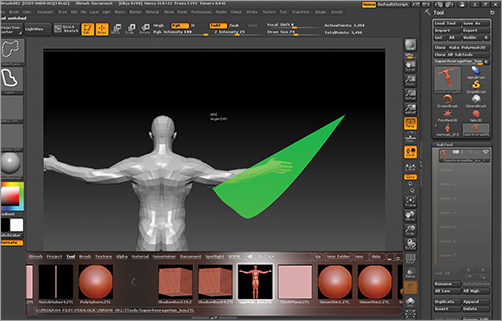
Figure 7-60: Thin the arm with inflate set to –2. Here the arm has been deflated by –2 to thin the fingers. The slider automatically resets to 0 after each use.

6. The arm is now ready to be inserted into the mermaid model. From the Tool menu, select the character mesh. It will replace the arm on screen as the active ZTool. Press F to refocus the model to the center of the document window.
7. From the Brush menu, select the InsertEar brush. Open the Brush Modifiers menu and Click on the little window that shows the ear. When you do this, the pop-up tool library opens and you can select from any of the 3-D meshes. Here you may browse to any loaded ZTool and select it as the inserting mesh. From this tool menu, select the forearm in its place (Figure 7-61).
8. The arms are now set to be the meshes inserted by the InsertEar brush. This will only be for this session and the brush will reset when you restart or initialize ZBrush. Turn on X symmetry and draw the arms into the model (Figure 7-62).
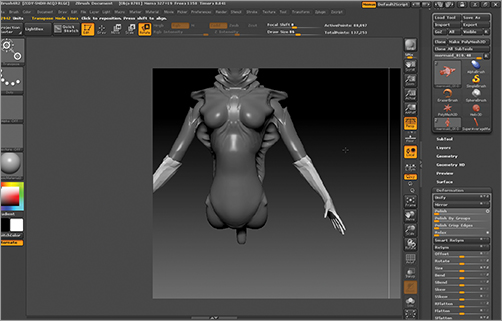
9. Use the Transpose Move and Scale tools to position the arms and scale them to the body (Figure 7-63). Dynamesh to combine them into the body (Figure 7-64).
Figure 7-61: Selecting the forearm to insert
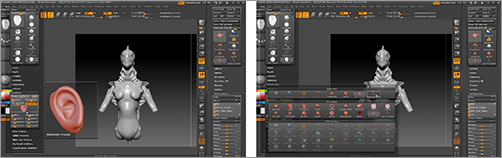
Figure 7-62: Arms drawn with the MeshInsert brush
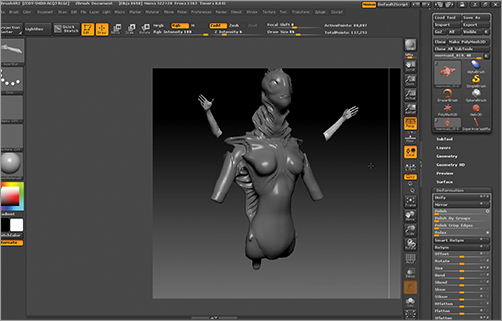
Figure 7-63: Arm inserted and positioned

Figure 7-64: The arms combined with Dynamesh
10. The elbow joints are isolated with a mask and pressed in to create a sharp lip on the upper and lower arms. This helps suggest a hard carapace around the limbs, like a shell (Figure 7-65).
11. At this point, I pull a kick off the elbow. This serves as a defense structure, biologically. Aesthetically, it suggests an elbow length glove and helps extend the graceful line of the arm back from the figure (Figure 7-66).
Figure 7-65: Using a mask to create detail in the joints at the elbows
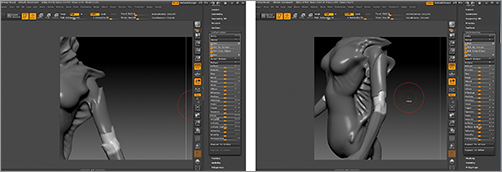
Figure 7-66: Using the Move brush, pull a spike from the elbow—this suggests a defensive structure and helps to create an elegant line in the arm.
All the various parts of the figure are in place—we now want to move on to detailing the figure. The first step will be to turn off Dynamesh.
Adding Final Details
At this phase, we are done with the need for Dynamesh. While we could execute Dynamesh with a higher resolution setting to get more detail, in my experience this is an inefficient way to work. I like to use Dynamesh to establish the primary and secondary forms of the character and then switch into normal subdivision level sculpting to further refine the forms. This allows us to have a range of subdivision levels to move between as we work. Turn off Dynamesh by clicking the Tool Geometry Dynamesh button. Now we will start to finesse the figure by adding finer lips and other details.
Sculpting the Lips
Now that we are out of Dynamesh mode, we can start to add subdivision levels and include more fine detail in the model. In this section, we will refine the lips. The lips and eyes are the central humanizing features in this character—it is the point of reference where the viewer will try to relate to the figure. For this reason, I try and introduce as much character as possible in this area.
1. Add a subdivision level by pressing Ctrl + D. This gives us the level of resolution we need to add the subtlety required for the lips. I choose not to add much detail to the face. I want it to keep its primary general form with subtle shifts in planes to help create a sense of delicate beauty rather than creepy detail.
2. Use the Standard brush to sketch in the gesture of the upper lip line. This is the ledge of the lips where the face meets the soft tissue of the lip itself (Figure 7-67).
Figure 7-67: Tracing the lip line

3. Select the Clay Tubes brush with the alpha off, and set the ZIntensity to a low value near 20. Use this brush to add some fleshy mass to the upper lip. Extend this fleshiness to the corners of the mouth. Pucker the forms here around the points where the lips end. These soft round shapes are called the nodes of the lips and they are an important landmark to make the lips look realistic. These shapes are visible on your own mouth—use a mirror for reference as you work on this area (Figure 7-68).
Figure 7-68: Puckering the shapes around the nodes of the lips

4. Use a mask to isolate the lower lip from the upper lip. Select the Inflate brush and set the ZIntensity low. Inflate the lower lip to give it a sense of supple fullness. We will try to make these lips feel full to add a sense of softness to the face. A typical feminine facial feature is a larger lower lip. This is one of many visual cues I will try to introduce to this non-human face, to communicate specific human and gender cues (Figure 7-69).
5. Invert mask and use the Move brush to further shape the bow of the upper lip—for a feminine character such as this, the gesture in the lips is very important to get right. You may find as you work that just the slightest movement in any direction can throw the expression off. It will take time to get the eyes and lips just right, so be patient (Figure 7-70).
Figure 7-69: Masking the upper lip

Figure 7-70: Working the upper lip
6. Select the Standard brush and Alpha 01. Dial down the draw size and deepen the line between the lips. Be sure to pick out a bit of shadow in the very corners of the lips (Figure 7-71).
7. Use the Clay Tubes brush with no alpha to build up the form of the upper lip. I blend this area up in the the area of the skull between the eyes. While there is no nose on this character, I want a prominent ridge between the eyes, as it mirrors the structure of an ichthyoid skull (Figure 7-72).
Figure 7-71: Deepen the line between the lips.
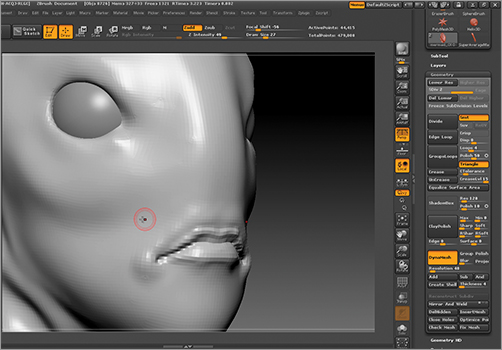
Figure 7-72: Building form with the Clay Tubes brush and no alpha

8. Use the same brush to add a subtle brow bone and mass in the cheekbones. Notice how the cheeks curve in and up—this is a very feminine facial feature compared to more angular or defined cheeks. A more masculine face would have cheeks that angle in and down as well as a wider jawline (Figure 7-73).
9. Using the Standard brush and the Move brush, add further refinements to the eyes. In Figure 7-74, you can see how the lids are shifted to conform to the sphere and the tear duct has been sculpted. These are not structures that would be present on an ichthyoid animal, but I am taking artistic license to create a more humanoid eye.
Figure 7-73: Adding the cheekbone curve

Figure 7-74: Detailing the eye

Final Detail Pass
We are now at the final stages of the figure. We have completed the majority of the work on the primary and secondary forms. At this point, we will add the last details to tie the character together. Since we have suggested that some parts are hard shelled and exoskeleton, like the arms, we will add some finer details like bumps and ridges that help accentuate the feeling of a hard, armored surface in those areas.
1. At this stage, I add ridges to the body with the Standard brush (Figure 7-75). This creates more interesting surface details and helps create a series of graceful lines flowing around the surface of the body.
Figure 7-75: Adding ridges to the body
2. Zooming into the face, I now add some subtle details to the lips and wrinkles in the face (Figure 7-76). Details like these will catch light and shadow and give a more natural and interesting look to the face.
3. From the Lightbox Brush menu, I select one of the Scales brushes (Figure 7-77). This is used to quickly suggest scale texture on the body. I chose the ScalesLizard brush as well as ScalesFish and combined them on the body in different areas (Figure 7-78). These brushes allow you to quickly stroke a repeating scale texture along the surface of the model.
Figure 7-76: Adding facial details

Figure 7-77: Select one of the Scales brushes from the Lightbox to add scale texture to the body

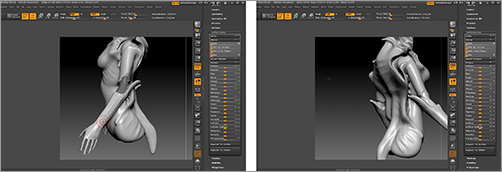
That completes this lesson. Figure 7-79 shows the final posed figure. The pose was created using Transpose and the render was accomplished by using ZBrush’s built in BPR tools and Photoshop post processing. I posed the character using the Transpose tools and added some spines along the fins with the Snakehook brush. Using the same Photoshop techniques we supply to the Interdimensional Traveler and Forest Spirit characters, I created the image seen in Figure 7-79. See the DVD or download files for a copy of this image with all the Photoshop layers intact.
In this chapter we have learned how to create a feminine creature using Dynamesh to build our forms from basic building blocks. By building up shapes in digital clay and combining them together, we were able to develop the figure in a process very similar to traditional sculpting. Dynamesh is one of the most powerful new ZBrush tools in R2 and should become indispensable to anyone who needs to quickly develop a character in ZBrush without feeling yoked by the concerns of generating a base mesh or suitable topology.
See the DVD or download files for the associated source files and a narrated video of this design process. There you will find more tips and details that we didn’t have space to cover in the chapter.
Figure 7-78: Adding scales with the Scale brush

Figure 7-79: Final painted image