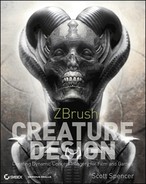
Chapter 8
Sculpting the Forest Spirit
In this chapter, we will be creating a character I call the Forest Spirit. This being is based on the ancient mythological character Pan and appears as a hybrid between human and animal forms. This lesson is a good exercise in anthropomorphism, the practice of ascribing human traits to non-human creatures. We will look at how to use human photo reference and animal reference to blend elements between the two. We will look at how to use shape language to create a softer character with a more empathetic look rather than one who communicates malicious intentions. We will also see how we can use the ZBrush brush set to create the sagging forms of an older body rather than a more fit anatomical form.
Using Reference as Inspirational Material
In this chapter, we will make extensive use of reference materials. These consist of photos of two elderly men as well as photos of a goat and a ram. These will not be used to create an exact likeness. Rather, I will use elements from each photo to help add interest to my design. I will look at parts of the human head that would work well combined with the ram’s and then combine the elements in my sculpture. It’s always important to use reference whenever possible, as it helps you break your own habits and preconceived notions when working. It also opens new and interesting avenues in the design and of course adds a level of realism to your work.
Figure 8-1 shows some of the reference photos I used for this project. The photos all came from the exceptional photo reference site www.3D.sk. The site has been kind enough to allow me to supply you with several photosets on the DVD or download files including those images we use as reference here. I highly recommend investing in a subscription to 3D.sk and the sister site www.photo-reference-for-comic-artists.com/ (Figure 8-2).
The Brief: Forest Spirit
The brief for this chapter is to design a character called “The Forest Spirit.” This wise old man is a cross between a human and a goat or ram. He is a magical being but almost always appears in corporeal or solid form. The Forest Spirit is ancient and kind, although he can be a fierce defender of his forest home. The spirit should have elements of an old human man and a ram mixed together. Reference images of the god Pan are provided for inspiration.
Figure 8-1: Here you can see the various photo reference images used for this character loaded into Spotlight in ZBrush.
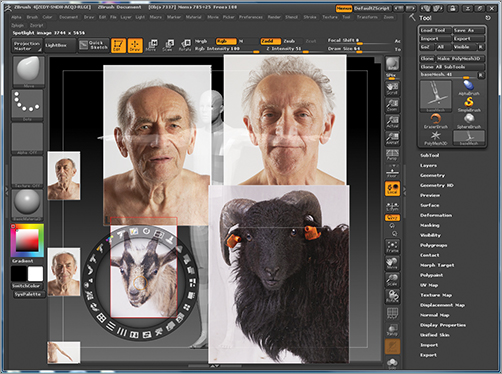
Figure 8-2: The sites 3D.SK and www.photo-reference-for-comic-artists.com

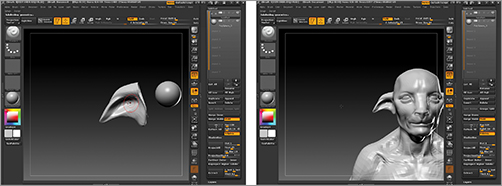
When using photo reference while you work, you have a couple of different options. You can load it in your favorite photo browser outside of ZBrush and switch between ZBrush and your viewer as you work. Alternatively, you may choose to load your reference into Spotlight within ZBrush. Spotlight is a ZBrush texturing tool that allows you to load and store several high-resolution photos and view them in the document window as you work. While it is primarily a texturing tool, it can also be used to store and use photo references. Follow these steps to load your reference images into Spotlight. Please see the DVD or download files for a video tutorial on the Spotlight interface and its uses.
1. In ZBrush, click the Texture Import button and load one of the reference images supplied on the DVD or download files. The image will automatically load into the texture palette (Figure 8-3)
2. Under the Texture menu, click the Add to Spotlight button (Figure 8-4). This causes the image to load into the Spotlight tool. The image will now be added automatically to the spotlight interface that appears over the document window (Figure 8-5).
Figure 8-3: Import an image into the texture palette.
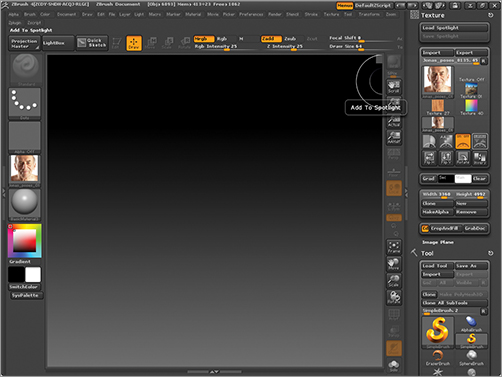
Figure 8-4: Click Add to Spotlight to add the image to the Spotlight tool.

3. Now press Import again and select several more pieces of photo reference. They will all automatically be added to the Spotlight when you click the Open button on the file browser window (Figure 8-6).
4. To organize the images clearly in the document window, press the Tile Unified button on the spotlight ring (Figure 8-7). This will cause all the images to be tiled at the side of the screen. You may click and drag photos in the Spotlight interface. Scale up by clicking on the Scale icon and dragging clockwise, and scale down by dragging the icon counterclockwise in the Spotlight dial. Note that the selected image is outlined in red in Spotlight (Figure 8-8). If no image is selected, then you will move all the images at once.
Figure 8-5: The image will now appear over the document window along with the Spotlight circle control.
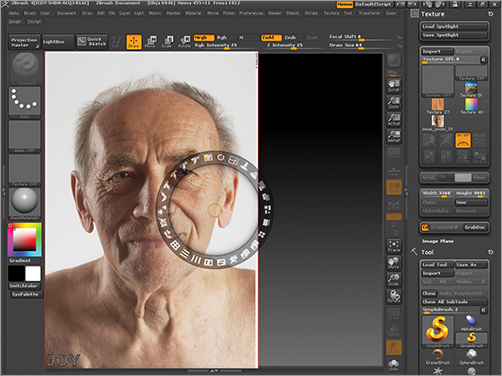
Figure 8-6: Multiple images can be added to Spotlight at once.

Figure 8-7: Press the Tile Unified button to organize the images to the side of the screen.

Figure 8-8: Click on the image to move and scale it over the document window.

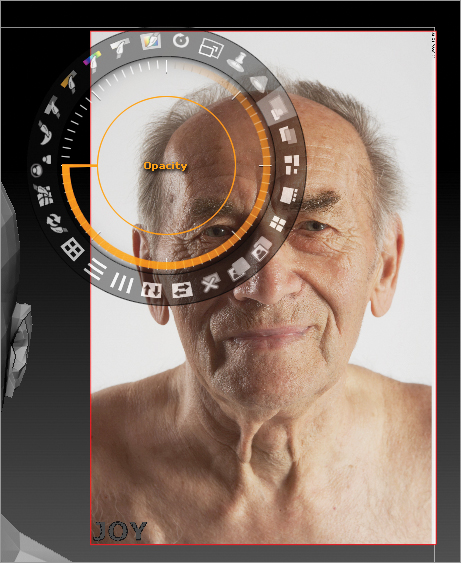
5. You may press the Z key to exit the Spotlight interface and leave your reference open while you work (Figure 8-9). The ring will disappear while the photos remain visible, and you are able to sculpt and paint on your model. If you want to make the reference partially transparent, adjust the opacity option on the Spotlight ring by clicking and dragging the icon (Figure 8-10).
It is very important to note that if you want to sculpt a surface while spotlight images are visible, they have to go into the Brush menu and turn off the Spotlight Projection button in the Samples subpalette. Otherwise only the Move brush works and none of other brushes work. This is because Spotlight is using the images as a projection mask. Thus, if the images are pushed off to the side, then ZBrush acts as if the whole surface is masked.
Figure 8-9: Press Z to sculpt with spotlight open.
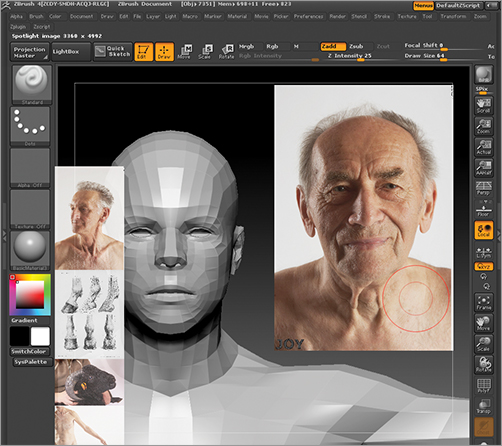
Figure 8-10: Click and drag the opacity icon to change the transparency of the reference image.
Spotlights are loaded under the File Spotlight menu. Spotlights cannot be saved with Project files and must be saved and loaded separately. While a Spotlight is loaded, you can enable and disable it with the Shift Z hot key.
6. You can save the Spotlight file for future use by clicking the File Spotlight Save Spotlight button (Figure 8-11). This will store a file that contains all your reference images at full resolution. This can be loaded back into any scene at a later date. Spotlights must be saved on their own as they will not be stored within a project file.
Figure 8-11: Save a Spotlight file for use later.
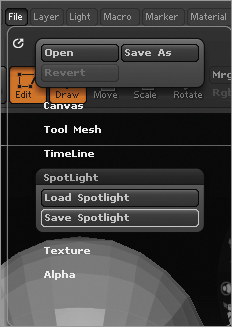
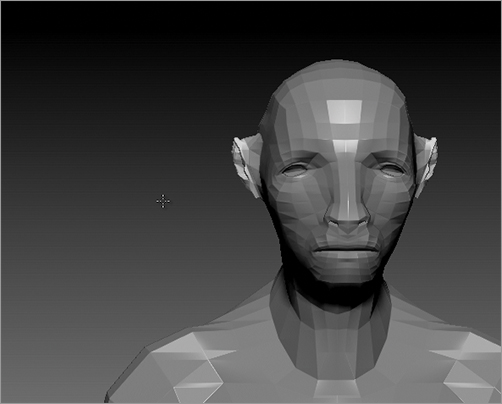
Figure 8-12: Load the basemesh.ztl file. The figure is an average male in a very rigid pose.

We will begin this sculpture using a generic human ZTool from Pixologic. This model is available on the DVD or download files as basemesh.ztl. This mesh I use often for my generic bipedal characters because it has a nice even edge layout—it does not have too much detail—and lends itself well to being divided to a high subdivision level when the computer RAM can handle large models. Follow the steps below to load and start to modify this mesh. Be sure to see the DVD or download files for this full process captured on video for more tips and techniques.
1. Load the basemesh.ztl file from the DVD or download files. This is a generic male figure of average build (Figure 8-12).
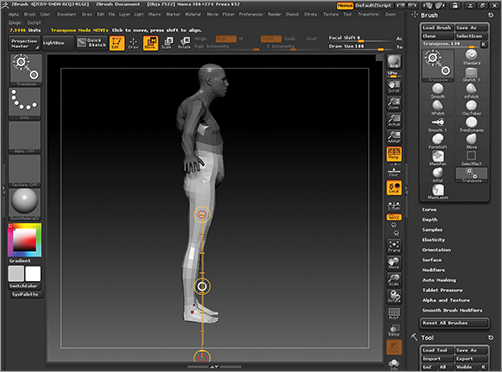
2. Immediately I want to relax the pose, as I find the arms outstretched in a T formation, while sometimes preferable for rigging, is far too stiff. Many setup artists actually will prefer to have a copy of the model in a more natural relaxed pose, but since we are concerned here with design rather than technical considerations, we will focus on posing the character in a natural, appealing manner. Select the Transpose Rotate brush by pressing the R hot key. This will select the Transpose Rotate brush.
3. Using the masking brushes as well as Transpose Masking, make sure the body is masked and the arms are unmasked. Ctrl + Click on the masked area to feather the masking edges. Draw a transpose line from the shoulder to the middle of the arm (Figure 8-13). Click and drag on the last circle of the line to rotate the arm down (Figure 8-14). The mesh will get slightly distorted as you rotate and shift the arm geometry. Don’t let this worry you—it will be fixed easily with the Move brush later.
4. Select the Move brush and correct the volume of the torso mass. This has collapsed as a result of rotating and lowering the arms (Figure 8-15).
5. At this stage, I want to start to bring in elements from my photo reference. I like the figure proportions and posture shown in Figure 8-16. The figure in the reference has an unusually short torso, which I want to bring into the character we are working on here. Part of this compressed distance is the stoop in the man’s posture.
Figure 8-13: Isolate the arms with a mask to facilitate transpose rotating them down.
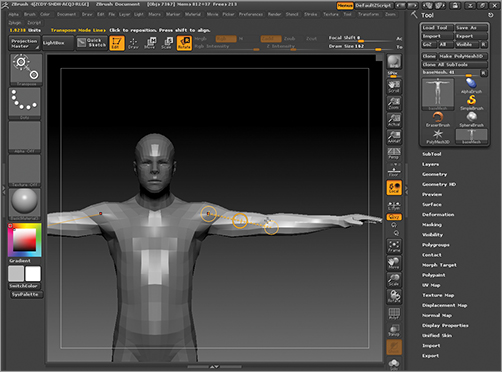
Figure 8-14: The arms are lowered into a more relaxed position.
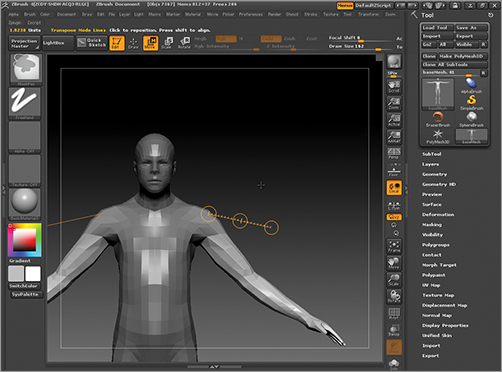
Figure 8-15: Correcting the torso mass with the Move brush
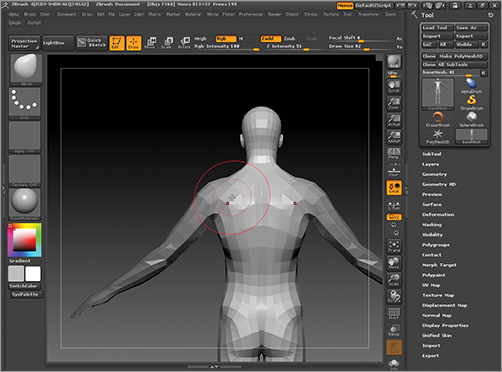
Figure 8-16: We will now try and recreate elements of the torso seen here in this photo reference from 3D.SK.

In addition to the abbreviated proportion of the torso, I also like the sagging slushiness of the fat and muscles. Figure 8-17 shows the features that I will try to bring into the sculpture as we progress. Notice the fold of flesh at the abdomen as well as the heaviness in the chest fat contrasted with the very sinewy arms. This model shows a marked lack of skin elasticity and a sinewy muscle definition. This is common in old age, when muscle mass diminishes and the skin and fat starts to sag across the form. It creates a blend of high definition in some areas and a loose fattiness in others. Some specific points of interest are the bony landmarks of the scapula (shoulder blades) and acromion processes—or the point where the skeleton is closest to the skin at the top center of the shoulder (Figure 8-18). By accentuating shapes like this, you can reinforce the lack of soft tissues to the viewer.
Figure 8-17: These elements are interesting features I want to incorporate into my sculpture.
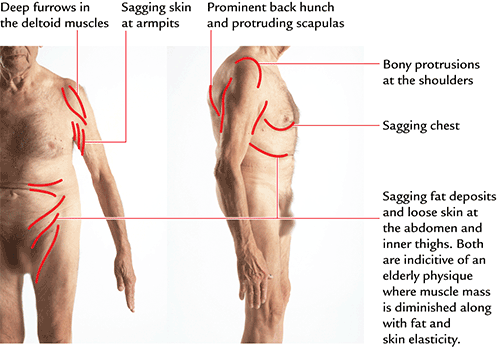
Figure 8-18: Bony landmarks like the acromion process help accentuate the emaciated aspect of the figure by calling attention to the underlying skeletal form.

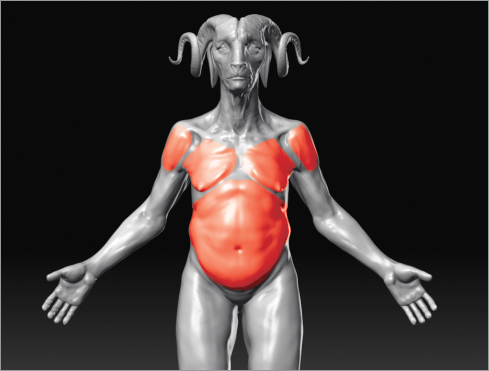
We will exploit other skeletal landmarks like this as we work on this figure as well as various major muscle forms. Points on the skeleton like the acromion process, thoracic arch, and epicondyles of the humerus all help us reinforce the sense of skeletal structure under the skin. Figure 8-19 shows many of the muscular and skeletal forms we will be working with.
By knowing where these landmarks are, you can choose how much to accentuate them. The more prominent all the bony landmarks and the more frequent their appearance, the more emaciated the figure becomes. Combined with prominent muscle forms, the figure takes on a more fragile or undernourished appearance (Figure 8-20).
With the above anatomical guidelines in mind, we will now start to adjust the form of the figure. At this stage we will alter both the proportion as well as the general silhouette to give more of a compressed, heavy, and stooped appearance. Follow the steps below.
1. Use the Move brush to pull the scapulas out and shift the shoulders forward. This will help create the hunched-back appearance seen in the photo reference (Figure 8-21).
2. The head needs to be slung further forward to give a sense of weight and strain on the neck muscles. If this figure holds his head too high, he will not appear as old or stooped as we want. Remember as well he will likely have large horns that would also be a weight on his head. Transpose the neck down and use the Transpose Rotate brush to adjust the relationship between the head, neck, and shoulders (Figure 8-22).
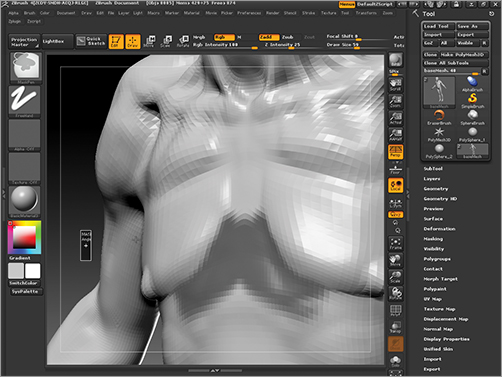
3. By using the Move brush to pull the chest muscles down and forward slightly, a sag is created in the whole upper body (Figure 8-23).
4. We will now squash the torso proportion slightly by compressing the distance between the ribs and pelvis. Mask the upper body and select the Transpose Move brush. Draw a transpose line down the legs from the side view (Figure 8-24).
Figure 8-19: Bony landmarks on the figure

Figure 8-20: A figure with both well-defined muscle forms as well as prominent skeletal landmarks appears undernourished but sinewy to the viewer.
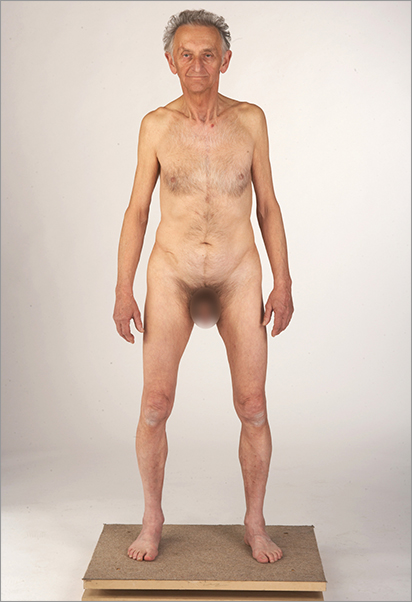
Figure 8-21: Pulling the scapulas back and shoulders forward with the Move brush to hunch the back

Figure 8-22: Use Transpose Rotate to bring the head and neck forward.

Figure 8-23: Pull the chest forms out slightly and down to create a sense of sag in the chest fat and muscle.

Figure 8-24: To compress the torso, mask the upper body and draw a transpose line down the leg.
5. Click and drag in the transpose circles to shift the pelvis up slightly toward the ribs. Switch to the Move brush to further adjust the shapes in the hip area (Figure 8-25). I have widened the hips as well as brought them up. Take care not to lengthen the legs too much as you stretch with the transpose line.
Figure 8-25: Making further adjustments to the torso proportion with the Move brush
6. Figure 8-26 shows the model at this stage with the gross-form changes introduced. We will continue to refine the forms and their relationships in the next sections. With the Move brush, some more subtle changes are introduced, including more weight to the belly and very slight overhangs where the love handles will be (Figure 8-27).
7. Zoom into the neck. With the Move brush, shift the area of the collarbones down and lower the back or trapezius muscles (Figure 8-28). This helps create a longer and more graceful neck. This will help attain a more appealing character when the large horns are added later. A long neck is also helpful in keeping with the look and character of a goat, helping to blend the human and animal anatomies.
Figure 8-26: The basic proportions of the torso blocked in with the Move and Transpose tools
Figure 8-27: Subtle mass additions to the flanks and belly with the Move brush create more of a sense of weight and gravity to the figure.

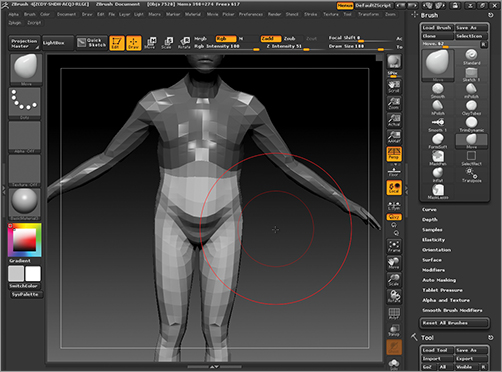
Take note that so far we have not divided the mesh at all. The shapes we are making are large general forms and are best considered with as little geometry as possible. This helps keep you from becoming lost prematurely in too many details, it also helps you create broad, appealing form relationships because the mesh is light and responds well to big shape changes with the Move and Transpose tools. Lower-resolution meshes make it much easier to see and manipulate large-scale form changes. I recommend always staying at the lowest possible subdivision level to support the type of shape you are creating at that time. We will now move on and start to change the shape of the head.
Figure 8-28: Lower the clavicles and reduce the trapezius muscles to lengthen the neck.
As we work on this character, we are constantly trying to incorporate elements from our photo references of animal and human anatomy into a unified whole. It’s important that the piece be unified and not just animal features stuck on a human body.
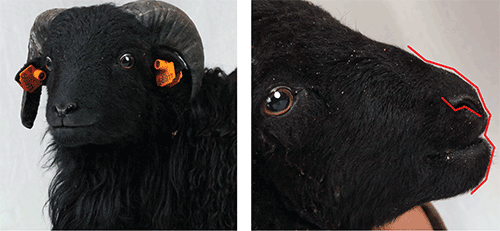
1. With the Move brush, elongate the “muzzle” shape of the mouth and nose from the side view (Figure 8-29). We want to mirror a shape similar to the ram seen in Figure 8-30. We want to give the face the same overall length—especially between the eyes and the end of the nose. The nose and lips will remain close together—this proportion between the features will ultimately trigger the viewer to associate the animal with features common to the bovid animal family (goats, rams, and other horned quadrupeds).
2. Next, we will adjust the shapes of the cartilages of the nose to integrate it more with the upper lip in a manner similar to the animal reference. We will also round out the lower jaw to get a smoother transition from the lip to the chin (Figure 8-31). Using the Move brush, shift the shapes of the nose and lower jaw as seen here (Figure 8-32).
Figure 8-29: Elongate the mouth and nose bridge with the Move brush to give a muzzle form to the lower face.

Figure 8-30: The photo reference of the Ram from 3D.SK

Figure 8-31: Features of the nose and mouth on the photo reference we want to incorporate. Notice how the nose and lower jaw integrate into the form of the lips. Also notice how close the nose is to the upper lip, essentially meeting it.
3. We are taking care here to create large blunt shapes in the face. Figure 8-33 shows the snout being slightly broadened and flattened with the Move brush. I had noticed it was looking rather sharp from the top view, creating a harsher appearance to the face. We will follow this same design methodology of blunting forms though the whole body, as these blunt forms are less aggressive than angular or sharp shapes. They are also in keeping with the shape language inherent in the face of a goat or a ram. While the overall facial wedge might be angular, the internal forms of the snout, teeth, and eyes tend toward broad, flat forms, softening the viewer’s reaction.
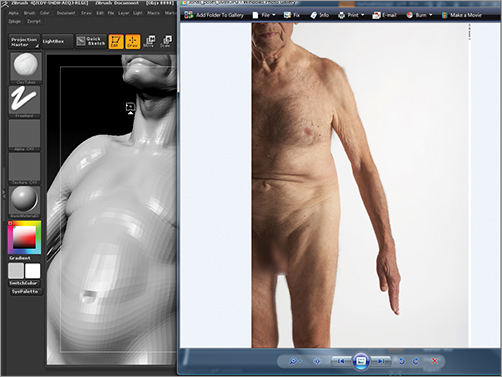
4. At this stage, I check my photo reference to determine what human features I want to use to inspire the shapes of the head. Open the Spotlight file that contains our photo reference, or use it in a separate viewer on your screen (Figure 8-34). The spotlight file used here is available for you on the DVD or download files.
Figure 8-32: The nose and lower jaw altered

Figure 8-33: The snout is broadened and blunted with the Move brush from a three-quarters up view.
Looking at the reference, I am interested in incorporating this man’s broad cheekbones and flattened head. These features both lend themselves to the facial structure of the animal and allow me to find a common point of morphology to anchor both the animal and human aspects of the face (Figure 8-35). Areas of interest are the broad, blunt cheekbones, the rounded shapes of the brows (which, while furrowed, do not express anger due to their soft shape and angle), the broad upper lip, and the rounded chin.
Figure 8-34: The photo reference open in Spotlight

Figure 8-35: The large, broad shapes seen in this image lend themselves to the animal reference. I will try to incorporate these into the character’s head as anchors between the animal and human facial structures.

At this stage, I need to polygroup the ears separately from the head to make it easier to shape and move them into a new form. I know this character will have vastly different ear shapes than those on a human head. To polygroup the ears, follow these steps.
1. From the Brush menu, select the Lasso brush. Isolate the ears as seen in Figure 8-36.
Figure 8-36: Use a selection Lasso brush to isolate the ear geometry from the head.

2. With the ears isolated on screen, go to Tool Polygroups and Click Group Visible (Figure 8-37). This will assign a new polygroup to just the ear faces. This group will display a different color when the model is in polyframe mode (Figure 8-38). You will not be able to see the backside faces of the ear in ZBrush unless you turn on double-sided view. To do this, go to Tool Display Options and turn on the Double button.
This new polygrouping makes it much easier to select and mask the ears from the head. All you need do is Ctrl + Shift + Click on the polygroup and it will be isolated on the screen. This saves you the trouble of having to lasso it out each time you want to hide the head.
Figure 8-37: Click Group Visible to polygroup the geometry on screen

Figure 8-38: The ears in a new polygroup
3. Ctrl + Shift + Click the new ear polygroup to isolate them on screen. Mask the ears then Ctrl + Shift + Click on the background to show the full model again.
4. Ctrl + Click on the backdrop to invert the mask so the head is now masked and the ears unmasked. Use the Move brush to alter the shape of the ear. Note that the mask will protect the head geometry from unintentional changes (Figure 8-39).
Figure 8-39: Manipulating the ears with the head masked
We will move on from the ears for now and address the face. The ears are now polygrouped and shifted from the head geometry so we can easily create new shapes from them later in the process. We will now start to make some changes to the head based on the photo reference we stored in the Spotlight.
Figure 8-40: Shaping the cheekbones, temporal ridge, and lower jaw based on the photo reference

1. Open the photo reference Spotlight to view the head reference again. If you want you can load the spotlight file Spotlight.ZSL off the DVD or download files. Looking at the photo of the model Jonas (Jonas_poses_0135.JPG from the DVD or download files), I am looking at the crests of the cheekbones and the temporal ridge of the skull. These are very particular lines in the man’s face and, using the Move brush, I start to introduce them on the character’s head.
2. I also use the Move brush to round out the lower jaw based on the photo reference (Figure 8-40). I also start to suggest the loose skin that will sag beneath the chin by pulling some of the points in the mesh down under the jaw line (Figure 8-41).
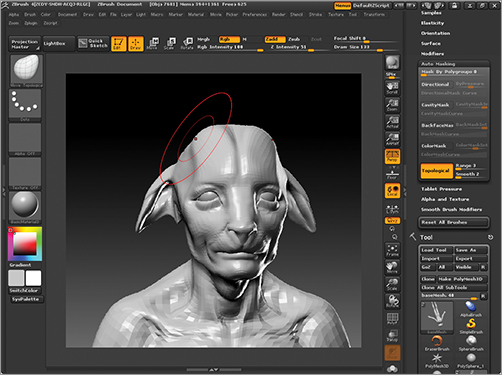
3. Be sure to work the head from multiple views. If you spend the whole time working from the front view, it will cause you to overlook shapes and problems from other sides. Figure 8-42 shows the head rotated into a down view, which I use while I smooth back the cheekbones slightly.
4. Use the Move brush now and zoom in on the eye areas. Enlarge the eyes by pulling at the edges with the Move brush (Figure 8-43). I also want to rotate the eyes so they are on a different angle than a human eye—more in keeping with the angle of the ram’s eye (Figure 8-44).
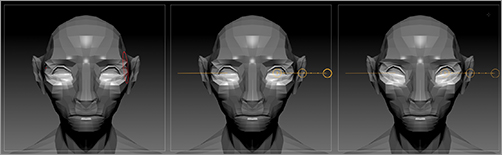
5. To rotate the eyes, mask out the eye area and then invert the mask. Next, draw a transpose rotate line from the center of the eye out. Click and drag in the outer circle to rotate the eye geometry. (See Figure 8-45.)
Figure 8-41: Suggesting the waddles beneath the chin
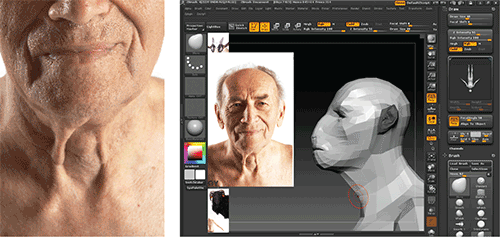
Figure 8-42: Be sure to work the sculpture from multiple angles to maintain coherence between all your shapes.
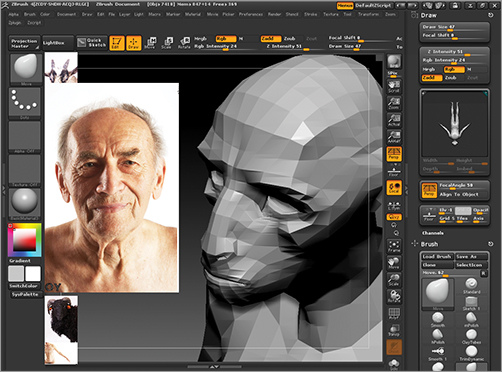
Figure 8-43: Enlarging the eye with the Move brush
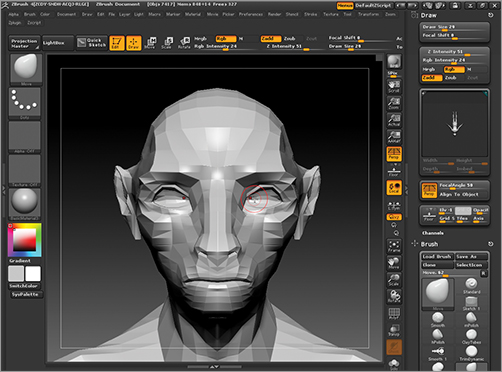
Figure 8-44: We will rotate the eye geometry to match the angle closer to the ram’s eye angle.

Figure 8-45: The eye area isolated with a mask in preparation for rotating the geometry. A transpose line is then drawn from the center of the eye out and used to rotate the eye shape.
Now that we have the general form of the face roughed in, we may start to focus in on more facial details. Divide the mesh once, so we can have more subdivision levels to carry the finer forms of the figure.
1. Divide the mesh by pressing the Ctrl + D hot key or click Tool Geometry Divide.
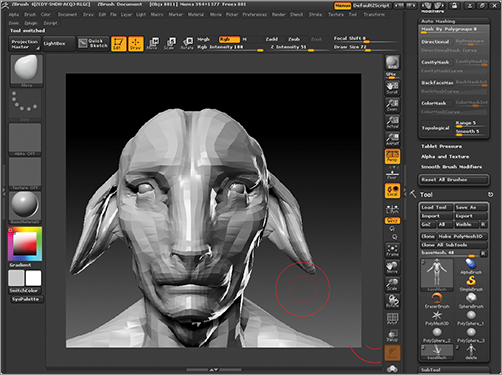
2. Open the Spotlight with your photo reference and enlarge the ram photo (Figure 8-46). If the Spotlight is already loaded, it can be enabled by pressing Shift + Z.
3. From this image, we will be looking at the character of the mouth and nose (Figure 8-47). To make changes to the mouth, we will need to move the lips independently of each other. This will require the use of a specialized brush. From the Brush menu, select the Move Topological brush.
Figure 8-46: From the photo reference Spotlight, enlarge the ram photo

Figure 8-47: This photo shows an interesting view of the mouth and nose we will use for reference.

The Move brush tends to grab any and all geometry under its falloff range. This makes it unsuitable for pulling one lip over another or working in the mouth area. The Move Topological brush has a topological masking function applied, which allows it to grab only those faces adjacent to the one beneath the center of the brush. Figure 8-48 shows the effect of the normal Move brush compared to the Move Topological one. I have set the brush to also apply color so you can clearly see the area being impacted when topological masking is on and off.
The topological masking function is found under Brush Auto Masking and can be applied to any of the brushes. The Move Topological brush is a preset brush with topological masking already applied. Depending on the scale of your model, you may need to lower the Range slider as small as .5 for best results. Try to reserve this brush for low-resolution meshes as it tends to get bogged down on dense models.
4. Using the Move Topological brush to shift the upper lip over the lower. This keeps the mouth from looking like just a slice into the head but gives it form and depth as well as the potential for expression (Figure 8-49). Select the Standard brush and with ZSub on and a small draw size, add the split that runs from the nose through the upper lip. This split is called the philtrum (Figure 8-49).
Figure 8-48: The image on the left shows the Move brush; the right image shows the Move Topological brush. The topological masking function allows you to isolate the brush’s effect to just those faces adjacent to the center of the brush.

Figure 8-49: Shift the upper lip over the lower lip with the Move Topological brush. Then with the Standard brush, add the philtrum, or spit from the nose to the mouth

5. Select the Inflate brush. Gently, inflate the mouth and nose area to pucker the forms together. Don’t overdo this pass—it’s just to give some mass to the lips and nose and help them look fleshier (Figure 8-50).
6. At this stage, eyeballs are added from the Polysphere ZBrush primitive just as we did in Chapter 2, “The Character Portrait: Sculpting the Alien Mystic.” Please see the DVD or download files for this process in action.
7. The eyelids are conformed to the spheres using the Move brush. I droop the eyes to give an older, softer look to the face (Figure 8-51).
8. We will now add some more detail to the face. Add a subdivision level with the Ctrl + D hot key.
9. We will now add the fold of fatty tissue next to the nose, known as the nasolabial fold (Figure 8-52). Isolate the area with a mask as seen in Figure 8-53. This fold of skin is particular to the physiology of a human face and the manner in which the mouth and nose interact during speech. Adding it to this creature’s head further ascribes humanoid qualities to his face.
Figure 8-50: Use the Inflate brush to add a sense of mass and fleshiness to the upper lip and nose.

Figure 8-51: Drooping the eyelids over the sphere of the eye
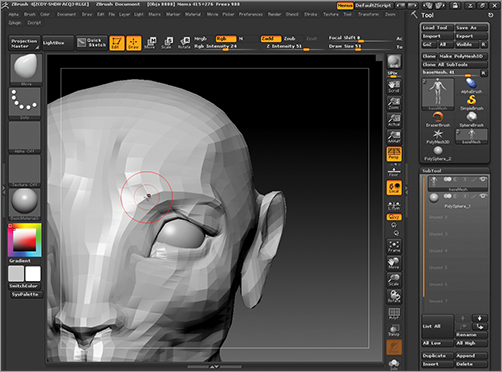
Figure 8-52: The fold of fatty skin next to the nose is called the nasolabial fold.
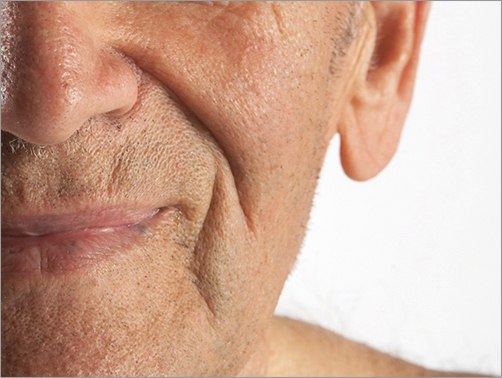
Figure 8-53: Isolate the area of the fold with a mask.

10. Using the Move brush, pull the nasolabial fold out. Smooth the hard edges and refine the form further with the Standard or Inflate brushes (Figure 8-54). Be sure to use the Clay Tubes brush to flesh out the space between the fold and the cheekbones. This area is filled out with muscles of facial expression and fatty tissue. We need to suggest this muscular anatomy exists to justify the existence of the nasolabial folds. This is because these folds of skin exist partially as a result of pulling of muscles over time from the cheekbone to the corners of the mouth.
11. Moving up to the eyelids, I want to give the impression of puffy soft skin around the eyes. Mask the brow line as seen in Figure 8-55 and with the Clay Tubes brush, add a sock pucker form to the upper lid. Remember to make sure the alpha is off on the Clay Tubes brush. This soft fleshiness will help suggest the drooping, older eyelids. Note the eyes in photo reference (Figure 8-56) have a soft puffiness.
12. Isolate the ear polygroup by Ctrl + Shift + Clicking on it. Select the Move brush and pull the shape of the ear out from the sides of the head (Figure 8-57). Use the Move brush to shift the points of the ears to fall downward with gravity—giving them a loose floppy look.
Figure 8-54: Pull the nasolabial fold out with the Move brush
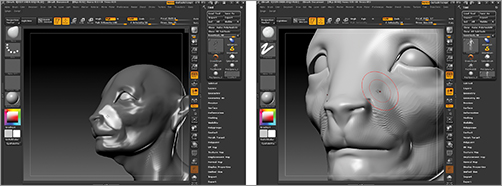
Figure 8-55: With the Clay Tubes brush, add a sense of fleshiness to the eyelid.
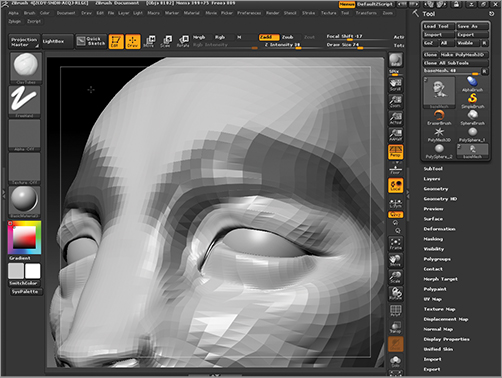
Figure 8-56: The eyes in the photo reference show a soft puckering like what we are trying to introduce in the model.
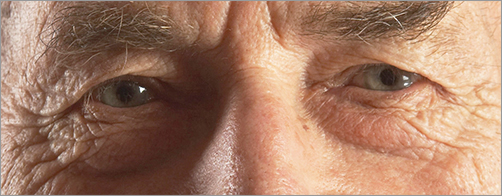
Figure 8-57: Changing the shape of the ear with the Move brush
The head will go through many changes before we arrive at the final character. I will step away now and look at the body. Later, we will return to the face and make some further form changes before the project is completed.
With the head and face refined, we will now return to our general form and start to give the body and limbs much more detail. We will pick out skeletal landmarks as well as suggest the knotted sinewy muscularity seen on the photo reference. Remember that when you combine the look of prominent bony landmarks with muscle groups you give the impression of a figure with very little body fat. If you add rounded fatty forms at the bottom of key areas like under the arms, buttocks, and chest you give the impression of elderly sagging skin over a body losing muscle mass. In the following section, we will look at how I give the body much more detail and character.
The first skeletal landmark we want to sculpt are the clavicles, or collarbones (Figure 8-58). The collarbones will be the skeletal landmarks that allow us to place the deltoid muscles, the shoulder blades, and even the major muscles of the neck. It is a central bony landmark that is extremely important to get accurate and early in the process. A pronounced set of clavicles also helps a neck look thinner.
Figure 8-58: The first bony landmark will be the clavicles.

1. Select the Clay Tubes brush from the Brush menu. Turn off the alpha and dial down the ZIntensity. Sketch in the sternomastoids and clavicles as seen in Figure 8-59. I also build up the chest fat over the pectoralis muscles and tug it down with the Move brush to add a sense of sag to the area.
2. Checking the photo reference, I decide to address the silhouette of the arms. I want this character to have very thin arms with prominent furrows between the musculature, as seen in Figure 8-60.
Figure 8-59: Sketching in the clavicles and sternomastoids with the Clay Tubes brush

Figure 8-60: Compare the arms of the figure to your photo reference.
3. Using a combination of the Move and Claytubes brushes, define the outer edge of the deltoid and bicep muscles. Make sure to get the brachioradialis of the forearm where they originate from the humerus and flow down the forearm (Figure 8-61).
Figure 8-61: Roughing in the arm anatomy

4. Use the Claytubes brush to build up fatty tissues on the belly and sides of the ribcage (Figure 8-63). I find the Claytubes brush with no alpha is the best tool for building up fat mass. It adds form in a subtle manner perfectly suited for this kind of shapes.
5. Always try to consider the effect of gravity on any fleshy form but especially those that are intended to be soft and fatty. When sculpting fat, a useful technique is to use the Move brush to tug the fatty forms down into crescent shapes. See Figure 8-64 for an example of how forms are made to feel heavier and more sagging by pulling slightly on the bottom edge of any form. Often I will mask part of the surface and then pull forms over the masked area to create the appearance of folds of flesh.
6. Mask the clavicles. We will now sketch in the part of the pectoralis muscle that attaches to the clavicles. It’s called the clavicular head of the pectoralis. By showing the definition between the various heads of the chest muscles, you can accentuate the emaciated look of the figure. Fatty tissues usually fill out the spaces between the muscle heads. The same form is very subtle but visible on the photo reference here (Figure 8-65).
7. Using the Standard brush, deepen the hollows between the muscles of the neck. Here you can see the two heads of the sternaomastoid muscle attaching to the sternum and clavicle (Figure 8-66).
Figure 8-62: This image should be helpful when identifying the anatomy of thearm—keep in mind this figure will have the same muscle forms but the mass willbe greatly reduced due to the age and physique of the character.
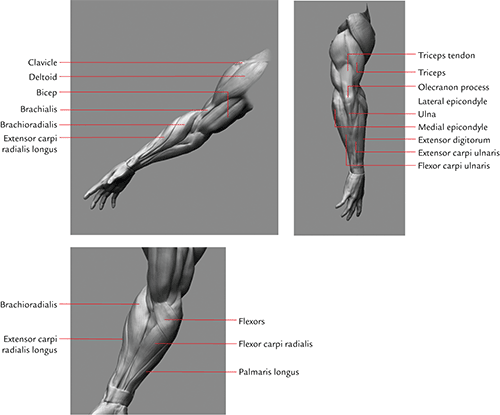
Figure 8-63: Adding fat with claytubes
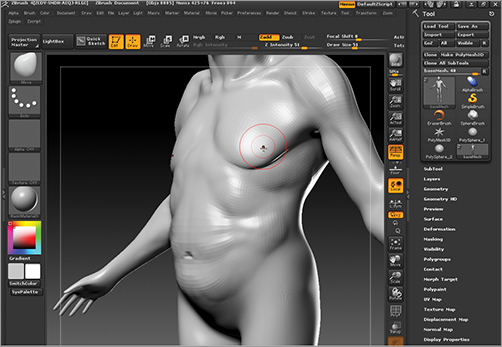
Figure 8-64: Adding sag to the fatty form with the Move brush.
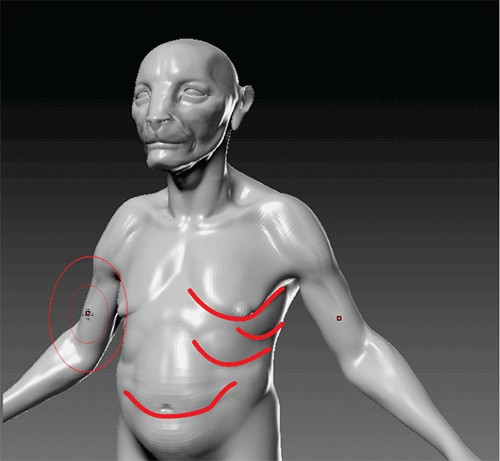
Figure 8-65: Sculpting the clavicular heads of the pectoralis muscles. The clavicles here are masked out.
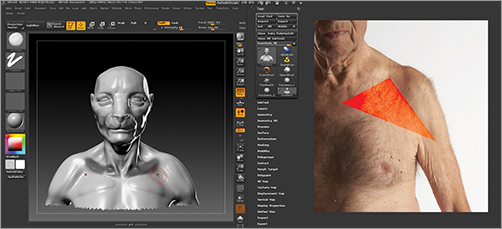
Figure 8-66: Accentuate neck muscles

8. Rotate to the back view and sketch in the scapulae (Figure 8-67). Also, be sure to add the bony landmark of the seventh cervical vertebra. This is the prominent part of the spine that’s at the base of the neck on your back. The thinner a human is, the more pronounced this vertebra will become. It’s also an important visual landmark to place the other relevant muscles of the back.
9. With the Standard brush on ZSub, I knick out a hollow between the two pillars of the trapezius muscles where they attach to the base of the skull (Figure 8-68). Again, by catching a shadow here with this hollow, you help add interest to the shapes of the back as well as a sense of anatomical veracity. While the viewer may not know anatomy, they will have an instinctual eye for what “feels right,” as we observe people every day. Accurate forms on a fantasy character are extremely important since they help add realism to an otherwise fantastic form.
10. With the Standard brush, I etch in a division between the sterna and clavicular heads of the pectoral muscles (Figure 8-69). This kind of deep anatomical detail is only visible on one who is exceptionally fit or old, as it is only visible when the fatty tissues between the muscles break down.
11. Rotate to focus on the neck. Here I will use the Standard brush in conjunction with the Clay Tubes brush to stroke across the anatomy that has already been sculpted in place. The idea is to create strokes that traverse across the larger muscles and bones to give the impression of skin and tendons stretching over the anatomy. By “obscuring” the shape of the clavicles, for example in the areas where the strokes cross over the form, it gives the impression of a drape of skin over the bone. If the bone were clearly outlined with no “lost” edges, it would look sculpted and less interesting (Figure 8-70).
Figure 8-67: Sketching in the scapulae
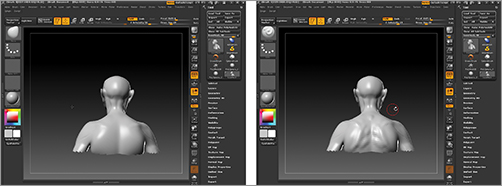
Figure 8-68: Adding a hollow between the pillars of the trapezius that attach to the base of the skull
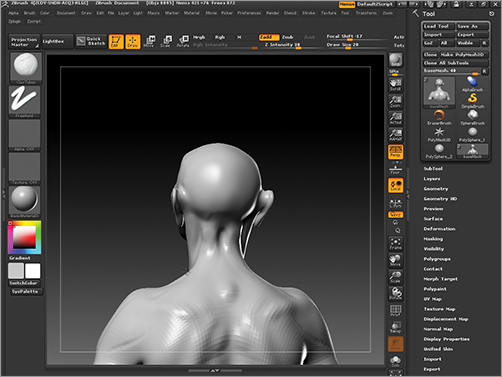
Figure 8-69: Etching in a division between the sterna and clavicular heads of the pectoral muscles

Figure 8-70: Stroking across the clavicles to lose the shape in some areas and suggest skin draped over the bone

Don’t be afraid to lose the shape of the sculpture in some areas. If every bone and muscle is clearly defined by a shadow, it will look carved out and generally unconvincing as organic form. You create the impression of skin by allowing your muscle and skeletal forms to be lost in some areas by stroking your brush across them, filling in areas and making it look like the underlying shapes are covered by a drape of skin and fat. Take any recognizable shape and drape a sheet over it or stretch a balloon across its surface. Notice how the forms are still visible but the deepest areas are filled out by the stretch of the material across it. This is how skin and fat behave over bone and muscle.
12. Looking at the chest, I feel the space between the pectoral muscles is unnaturally deep. I select the Clay Tubes brush with no alpha and stroke between the pecs to create more of the sternum (Figure 8-71). Also note that I spread the space between the sternomastoids slightly to create a more natural pit to the neck. The hollow at the base of the neck is properly called the sternoclavicular fossa.
Figure 8-71: Adding sternum

13. I decide to add weight to the chest fat over the pectoral muscles with the Inflate brush. Stroke along the bottom edge, massing out the lower portion. This will create the sense of fat settling with gravity and being pulled down the chest causing the skin to sag and pucker. Mask out the underside of the chest fat to help create the fold of flesh (Figure 8-72).
Figure 8-72: Pec fat
14. At this point, I notice the gesture of the clavicles seems off. With the Move brush, adjust the shape of the clavicles so they sweep out with a more graceful line, as seen in Figure 8-73.
Figure 8-73: Adjust the clavicles

More Facial Refinements
As I have been working on the body, it has become apparent the head is too short and too feline. At this point I revisit the head to make some changes. Remember that sculpting and design is best approached holistically. Always move around the sculpture and work from multiple angles and keep circulating among the different parts of the figure. For this reason, we continue to develop at different stages and revisit areas to bring them into the next stage of development. Always avoid working on one part of the figure for too long—it causes the overall look of the character to become unbalanced, with one piece far further developed than the rest. The steps below detail how I made the necessary changes to the head.
1. Using the Move brush, create the two crests on top of the head seen in Figure 8-74. These will be the points of origin for the horns later in this chapter.
Figure 8-74: With the Move brush, create the two crests seen here—this will be the point of insertion for the horns
2. Isolate the lower face with a mask and use Transpose to shift the top of the head up, lengthening the form (Figure 8-75)
3. Step down to the lower subdivision levels. With the Move brush, spread the eyes and make them smaller (Figure 8-76). I also lower and round off the top of the head to give it a blunt form. Later in this chapter we will look again at how I try to keep many broad, blunt shapes in this design (Figure 8-77).
After some more enhancing with the Move brush, Figure 8-78 shows the new face shape. I prefer this as it feels less cat-like and far more in keeping with the character of the animal reference. Originally I thought larger eyes would be a good design choice—large eyes tend to create empathy with a character—but in this case, large eyes are too far off the model of a goat or ram—a feature of those animals are small, wide-set eyes. Smaller eyes also help give an older look to the face while larger eyes feel more childlike. By shrinking the eye size, the character immediately starts to look more goat-like. I also push the ears in closer to the head with the Move brush—this will be even more important in the next step, when we create the large spiral horns. The ears need to be falling, out of the way of the horn geometry.
Figure 8-75: Stretching head
Figure 8-76: Spreading the eyes apart and making them smaller
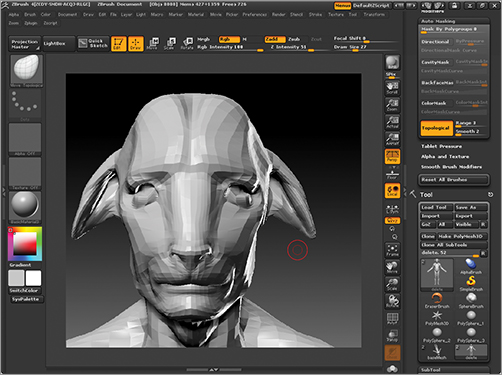
Figure 8-77: Lowering the top of the head

Figure 8-78: Altering the face shape
Creating the Horns
The horns for this character will be a spiral configuration—very similar to ram horns but with some fantasy elements. The horns are best created using ZBrush primitives. ZBrush has a wide array of primitive shapes that can be manipulated to create all manner of basic models for use in your designs. Follow these steps to create the horns.
1. From the Tool menu, select the ZBrush primitive Helix3D (Figure 8-79).
2. The tool will initially look like a spring with tapers on each end. We will need to customize the shape. To do this, open the Tool Initialize menu to access the settings that determine the overall shape of this primitive (Figure 8-80).
Figure 8-79: Select the Helix3D ZBrush primitive to create the horn.
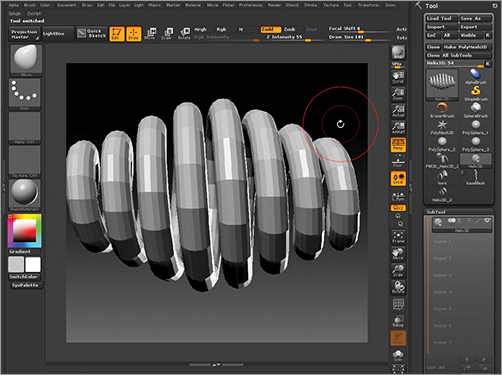
Figure 8-80: Open the Initialize menu to customize the helix shape.
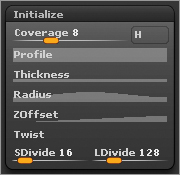
3. Set the coverage slider to 1.96. The rest of the geometry is controlled by curves. Figure 8-81 shows the curve settings for each of the following parameters: Profile, Radius, Thickness, Zoffset, and Twist. The settings will result in a horn shape like the one seen in Figure 8-82. We are now ready to import this geometry into the character SubTool stack.
4. When you selected the Helix3D tool, the character was automatically deselected. From the Tool menu, select the figure once again.
5. Under the Tool SubTool menu, click Append and select the Helix3D tool that we have modified. You should be able to tell it from the thumbnail (Figure 8-83).
6. ZBrush will automatically convert the ZBrush primitive into a polymesh so that you can sculpt it using the sculpting brushes. We will now need to scale and position the horns in relation to the head (Figure 8-84).
Figure 8-81: Adjust the curves under Initialize to reflect those shown here.

Figure 8-82: The final horn shape will look like this.
Figure 8-83: Select the helix SubTool.

Figure 8-84: The horns appended into the stack, but the size and placement needs to be corrected.
7. Make sure the horn is the active selected SubTool from the SubTool menu. Press the E hot key to enable the Transpose Scale brush. Scale the horn down to a more manageable size. Use Transpose Move (the W hot key) to shift the horn into position on the head (Figure 8-85).
8. When the horn is placed correctly, use the mirror function in the SubTool master ZScript to mirror it across the X axis (Figure 8-86). Figure 8-87 shows the figure so far. We are now ready to move on to looking at the arms and legs of the character. We need to bring the same level of attenuated musculature and saggy skin to the rest of the body.
The horns are divided and detailed with the standard brush and a variety of masks. For the process in detail, see the accompanying video on the DVD or download files. There you can see the process I followed to create texture and detail on the horns.
Figure 8-85: Scale the horn down.
Figure 8-86: The horns mirrored

Figure 8-87: The figure so far
At this stage, I check the figure proportions using the transpose line as a measuring tool. The figure is close to six heads tall and with the horns added is starting to look a little too heavy. I adjust the body-to-head ratio so the character is approximately seven heads tall. To see this process in detail, please see the narrated video on the DVD or download files.
Refining the Legs
At this point, I decide to change the overall structure of the legs. I will break the normal human leg forms and alter the character’s legs to be more of an ungulate leg formation. Ungulates, which means “being hoofed” or “hoofed animal,” are several groups of mammals, most of which use the tips of their toes, usually hoofed, to sustain their whole body weight while moving. Figure 8-88 shows a bit of reference for this kind of leg. This etching is from the classic animal anatomy book Atlas of Animal Anatomy for Artists by W. Ellenberger, H. Dittrich, H. Baum (Figure 8-89). This is one of my favorite animal anatomy books and I highly recommend it as a low-cost and highly informative reference book. The following steps detail how I convert this character’s leg formation from a human, or plantigrade structure to an ungulate, or hoofed-leg formation. It is always good practice to try doing animal sculpture from reference like this. By careful study of living animal anatomy, you can create a better base of knowledge to pull from for your fantasy characters. Figure 8-90 shows an exquisite equine sculpture by artist Hardh D. Borah. This figure was created in ZBrush and 3D printed.
1. Isolate the legs from the body with transpose masking (Figure 8-91).
2. Use Transpose Rotate to bend the legs at the three key joints shown in Figure 8-92.
Figure 8-88: Ungulate leg ref

Figure 8-89: Atlas of Animal Anatomy for the Artist is a classic text and one of my favorite animal anatomy books.

Figure 8-90: Creating animal sculptures from reference is a good way to practice and to add to your knowledge base of animal physiology for use in fantasy characters.

Figure 8-91: The legs isolated from the body with a mask
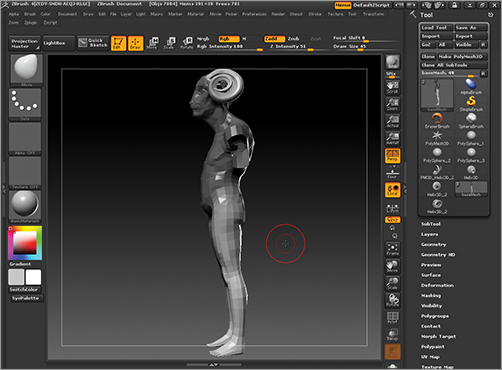
Figure 8-92: Bend the leg at these three points.

3. Shape the foot into a hoof form, taking care not to distort the toes. We don’t need the actual toe geometry so we will delete them in the next step (Figure 8-93). Figure 8-94 shows the shape of the legs at this stage.
Using GoZ to Reform the Foot
We will now look at how to delete the toe geometry without losing the sculpted detail of our mesh. To do this, we will use the free ZBrush plugin GoZ. GoZ allows you to transfer your lowest-resolution mesh into a compatible polygon-modeling software, such as Maya, Modo, 3dsMax, or Cinema, make changes to the geometry, then return to ZBrush, and retain all your sculpted subdivision levels. We will follow these steps to delete the toes and create a foot shape more suitable for sculpting a hoof.
1. With the body as the active SubTool, press the GoZ button, located under the Tool menu (Figure 8-95).
Figure 8-93: Shape the feet into hooves

Figure 8-94: The legs at this stage

Figure 8-95: Press the GoZ button to transfer the body mesh to Maya.
2. The body will now export from ZBrush and open in Maya ready for editing (Figure 8-96). Focus in on the foot geometry and delete the toe facts, as seen in Figure 8-97.
3. Select the edges shown in Figure 8-98 and collapse them. Be sure to do this on the top and bottom of the foot.
4. Select an edge along the hole in the foot. Use the Mesh Fill Hole function to close the hole (Figure 8-99). Select the Edit Mesh Split Polygon tool and cut new edges, connecting the edge flow from the top to the bottom of the foot while maintaining the all-quad layout of the mesh (Figure 8-100).
Figure 8-96: The body mesh loads into Maya, ready for editing.
Figure 8-97: Delete the toes from the mesh, as seen here

Figure 8-98: Collapse these edges

Figure 8-99: Fill hole

Figure 8-100: Split poly
5. When this is done for both feet you are ready to export back to ZBrush. Make sure the mesh is selected in Object mode and press the GoZ Shelf button (Figure 8-101).
Figure 8-101: Press the GoZ Shelf button to return to ZBrush.

6. The mesh will transfer back into ZBrush. A dialogue box will ask if you want to transfer the high-resolution details. Select Yes (Figure 8-102).
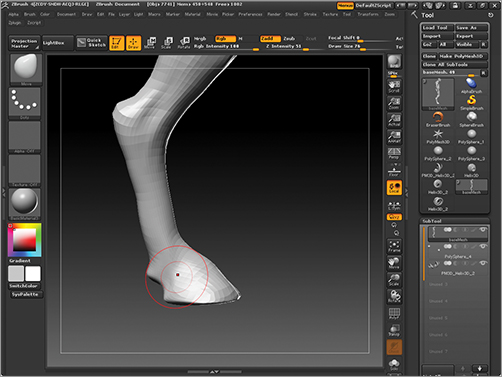
7. Back in ZBrush, use the Move brush to reshape the hoof based on the reference materials (Figure 8-103). GoZ will apply a mask to any unaltered areas of the ZTool when you return to ZBrush. Be sure to clear this mask before you continue.
The mesh is now updated. The ZTool has no toes and in their place are quad faces ready to be sculpted into hooves. For the remainder of the legs process, please see the DVD or download files for a fully narrated video showing the sculpting process for this character. We will now move on to the arms and hands.
Figure 8-102: When transferring back into ZBrush, a dialogue box will ask if you want to transfer high-resolution details. Select Yes.
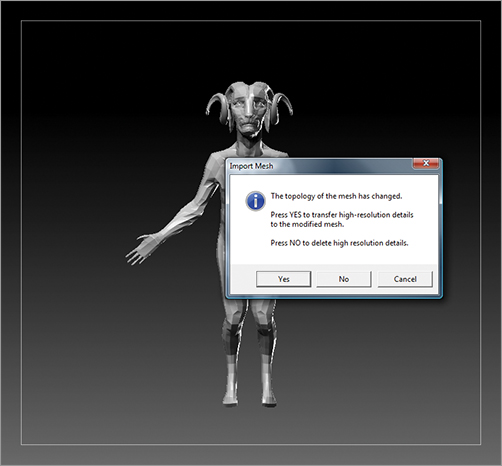
Figure 8-103: Reshape the hoof according to the reference materials
Refining the Arms
Like the rest of the body, the arms will be based on the human photo reference. As before, it is important to get the muscular quality of the arms while retaining their thin and sinewy appearance. This will be accomplished by keeping the muscle mass low and the fatty tissues concentrated in the undersides of the limbs, as if they are being pulled by gravity. The following steps show the arms in progress.
1. Isolate the area for the bicep muscle with a mask. Using the Claytubes brush, stroke the bicep, taking care to get the flow of the muscle correct from beneath the deltoids and pectoral muscles (Figure 8-104).
2. Isolate the area for the triceps muscle with a mask (Figure 8-105). Using the Clay Tubes and Inflate brushes, rough in the three heads of the triceps muscles. Don’t get too specific at this time, we just want to get the general form suggested. The arm anatomy, like the rest of the figure, is best developed in passes, as you work around the figure (Figure 8-106).
Figure 8-104: Sculpt the biceps.
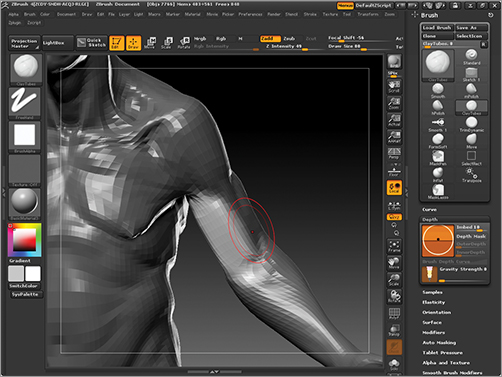
Figure 8-105: Isolate the triceps with a mask.

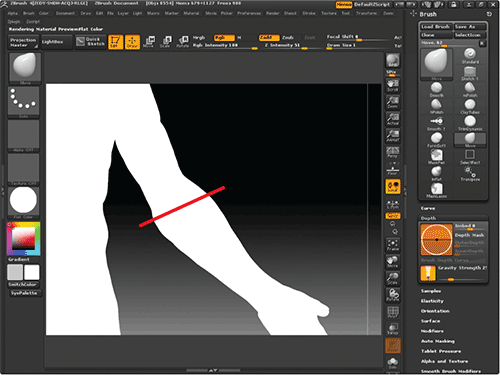
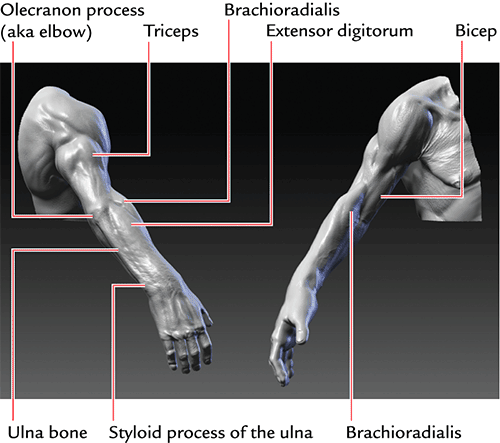
3. On the forearm, be sure to get the angle of high points accurate from the front view. This represents the relationship between the crest of the extensors on top of the arm and the crest of the medial epicondyles on the bottom. These two landmarks help us get the correct shape of the arm in silhouette (Figure 8-107).
4. On the elbow, make sure to get the landmark of the olecranon process as well as the V shape created by the origin of the extensor muscles of the forearm (Figure 8-108).
Figure 8-106: Rough in the triceps.

Figure 8-107: Correct crests in silhouette
The key points above are of great importance when working the arm. For a full look at the process of sculpting the arm as well as the hand, see the video on the DVD or download files. We will now look at the process I used to add some tertiary details like wrinkles around the joints, fat deposits, and other surface features. If you are interested in a more in-depth look at these topics as they apply to the human figure, please check out my book Digital Sculpting Human Anatomy, where I address figure sculpting and anatomy in detail.
Figure 8-108: Landmarks on back-of-arm elbow and extensors
Adding Skin and Fat Details
In this section we will look at how to add wrinkles, folds, and fat deposits to the character. Details like these give the impression that there is skin over the underlying anatomy and add an enormous amount of character to the figure. It is important, even on the most fit of models, to give the impression of fatty deposits pressed together in areas they would naturally be fatty. Details like this make the figure appear to be flesh and blood rather than polygons carved into anatomical shapes.
Masking is used extensively when trying to create folds of fat and flesh. Often I will mask an area, then sculpt against the mask to create a sharp overhang where a fold of fatty flesh or a wrinkle overhangs. This helps create a realistic undercut where the folds of flesh resides. Let’s take a look at some of the techniques I used to create the fleshy details of this model. Again, be sure to watch the video on the DVD or download files for the whole process.
1. To create the folds of back fat follow these steps. In the back view mask under the pads of fat commonly called “love handles.” Use the Inflate brush to stroke along the masked edge increasing the mass of the love handles (Figure 8-109).
2. Extend the mask over the love handles. We will now add a layer of back fat. Again, use the Inflate brush to stroke along the masked edge and use the Move brush to tug the newly inflated fat roll down to give a sense of gravity pulling at the fatty tissues (Figure 8-110).
Figure 8-109: Sculpting the oblique fat pads aka “love handles”
Figure 8-110: Inflate fat tug move
3. Step up a subdivision level so we can add more specific wrinkles. Using the Standard brush, I etch folds in under the scapulas and the roll of back fat directly beneath the shoulder blades (Figure 8-111). Use the Inflate brush with the gravity modifier on to add weight to the folds (Figure 8-112). The gravity modifier is found under the Brush Depth menu (Figure 8-113). Point the arrow down for the direction of pull and set the strength slider until the effect is acceptable. Gravity will pull the mesh in the direction of the arrow while the brush affects the surface. When used with the Inflate brush, it will tug down on the faces while inflating them automatically, adding sag to the flesh.
Figure 8-111: Using Standard brush to accentuate folds
Figure 8-112: Inflate with gravity
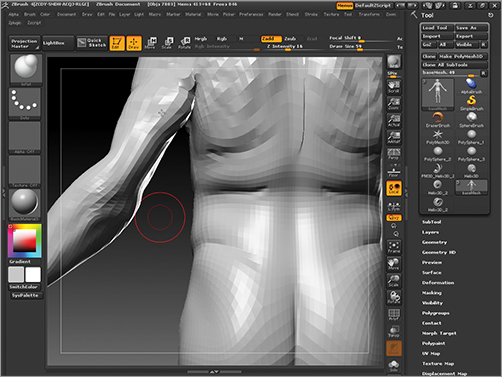
Figure 8-113: The gravity slider

4. A sag is created at the buttocks by inflating along the lower edge of the gluteus, allowing the flesh to sag slightly over the back of the thigh. Smaller wrinkles are added in, using the Standard brush with alpha 1 set to ZSub (Figure 8-114).
Some areas of the photo reference show area areas of finely concentrated wrinkles that give the impression of thin tissue—like skin (Figure 8-115). The armpits and the back both feature concentrated raised wrinkles that give the skin a loose, gathered look. To create wrinkles like this, use the standard brush with alpha 58 and ZAdd. Figure 8-116 shows the wrinkles at the armpit created with this technique.
Figure 8-114: Sagging the buttocks
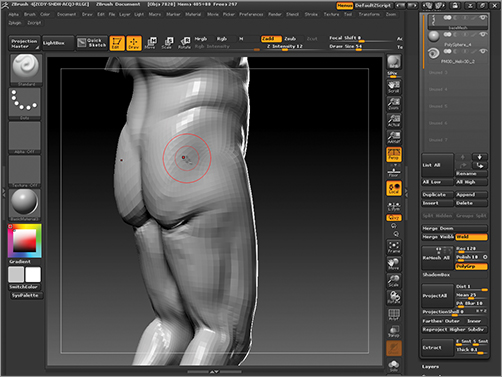
Figure 8-115: Raised wrinkles such as these gather at the areas where the skin is sagging most. It creates a sense of loose tissue skin.
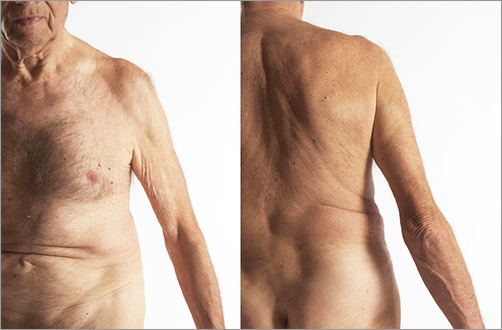
Figure 8-116: The wrinkles seen here are created by using the Standard brush with alpha 1 and ZAdd mode on to build up layers of wrinkles that are raised rather than etched into the skin.

Throughout the process of working on this character, I have tried to maintain a consistent shape language. The face and body all maintain a consistent series of broad, blunt shapes designed to soften the perception of the character and make him seem less intimidating. These broad forms were inspired by those already occurring in the face of a ram.
Figure 8-117 shows the face of the figure with the broad shapes highlighted. See how the consistent shape is a broad, blunt form from the top of the head down to the nose and shin. The crests of the head where the horns insert are rendered with a slight softness to the edge, to keep them from becoming too angular.
Figure 8-117: The shape language for the character face

Taking the same idea into the body, see how the torso is essentially the same kind of shape? As we have seen in Chapter 1, “ZBrush as a Character Design Tool,” always consider characters as their most basic shape relationships. Here you can see the same shapes echoed into the body from the head (Figure 8-118).
Figure 8-118: The shape repetition on the torso consists of multiple broad blunt forms
The hands as well carry this same language. The fingers are broad and blunt as opposed to long and tapered, even the shape of the hand itself is a broad and flat wedge (Figure 8-119).
Here you can see the teeth are also considered in the same way (Figure 8-120). While a goat or ram would have large broad, flat teeth anyway, I find it important to mention that these shapes echo all the way to the dentals.
Figure 8-119: The shape language of the hands
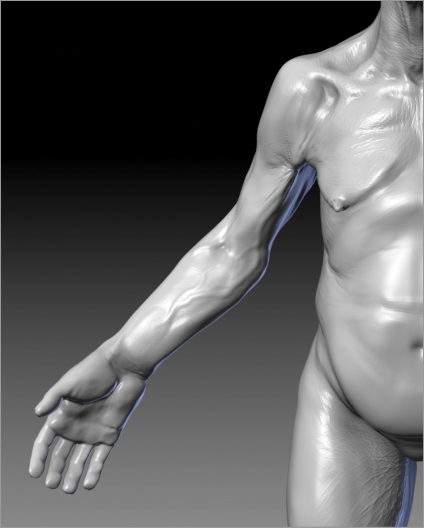
Figure 8-120: Teeth shape language
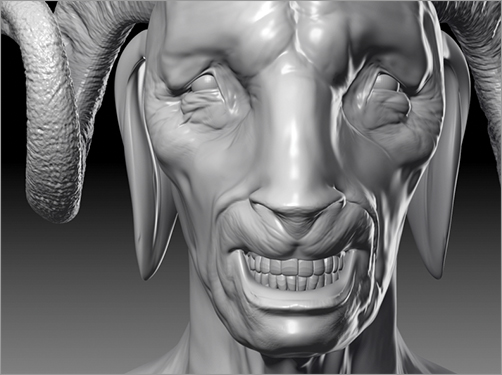
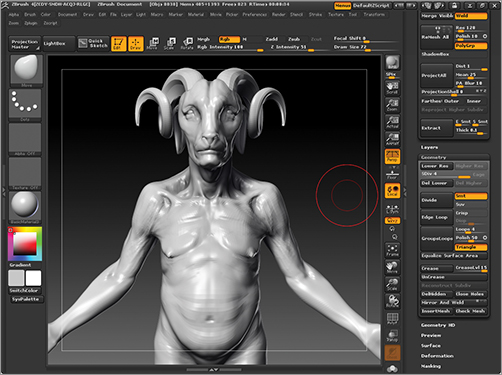
Figure 8-121: The final figure sculpture
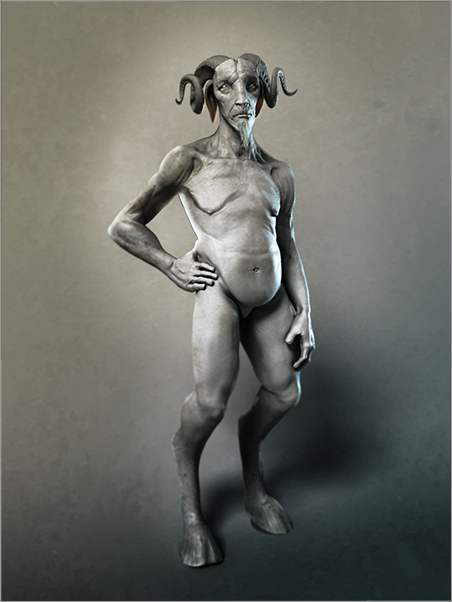
That completes this chapter’s lesson on designing the Forest Spirit. Figure 8-121 shows the final figure sculpture for this chapter. In this chapter, we further explored shape language, repetition of forms, using photo reference for inspiration, and sculpting techniques for fat and fleshy folds. In the next chapter, we will pose, compose, and paint the final presentation image in Photoshop.