Day 26 Basic Switch Configuration and Port Security
CCNA 640-802 Exam Topics
![]() Perform, save, and verify initial switch configuration tasks, including remote access management.
Perform, save, and verify initial switch configuration tasks, including remote access management.
![]() Implement and verify basic switch security (including port security, unassigned ports, trunk access, and so on).
Implement and verify basic switch security (including port security, unassigned ports, trunk access, and so on).
Key Topics
Today we review the commands necessary to perform a basic initial configuration of a switch. For basic switch security, we review changing default virtual local-area networks (VLANs), Secure Shell (SSH) configuration, and port security.
Basic Switch Configuration Commands
Table 26-1 reviews basic switch configuration commands.
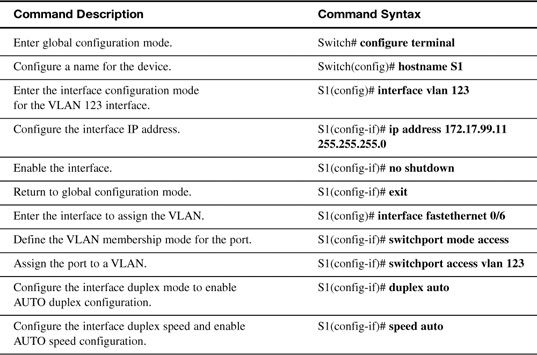

In reference to the commands in Table 26-1, keep in mind the following:
![]() The default VLAN for all ports is VLAN 1. Because it is a best practice to use a VLAN other than the default VLAN 1 as the management VLAN, the command in the table uses VLAN 123.
The default VLAN for all ports is VLAN 1. Because it is a best practice to use a VLAN other than the default VLAN 1 as the management VLAN, the command in the table uses VLAN 123.
![]() By default, the native VLAN assigned to 802.1Q trunks is also VLAN 1. It is a security best practice to define a dummy VLAN as the native VLAN—a VLAN that is distinct from all other VLANs. We discuss trunking configuration on Day 23, “VLAN and Trunking Configuration and Troubleshooting.”
By default, the native VLAN assigned to 802.1Q trunks is also VLAN 1. It is a security best practice to define a dummy VLAN as the native VLAN—a VLAN that is distinct from all other VLANs. We discuss trunking configuration on Day 23, “VLAN and Trunking Configuration and Troubleshooting.”
![]() Although the enable password command is shown in the table for completeness, this command is superseded by the enable secret command. If both are entered, IOS ignores the enable password command.
Although the enable password command is shown in the table for completeness, this command is superseded by the enable secret command. If both are entered, IOS ignores the enable password command.
![]() To configure multiple ports with the same command, use the interface range command. For example, to configure ports 6 through 10 as access ports belonging to VLAN 10, you would enter the following:
To configure multiple ports with the same command, use the interface range command. For example, to configure ports 6 through 10 as access ports belonging to VLAN 10, you would enter the following:
Switch(config)#interface range FastEthernet 0/6 – 10
Switch(config-if-range)#switchport mode access
Switch(config-if-range)#switchport access vlan 10
Configuring SSH Access
Figure 26-1 graphically shows the steps to configure a switch (or a router) to support SSH.

The following description details the steps shown in the figure:
Step 1 Change the vty lines to use usernames, with either locally configured usernames or an authentication, authorization, and accounting (AAA) server. In Figure 26-1, the login local subcommand defines the use of local usernames, replacing the login subcommand in vty configuration mode.
Step 2 Configure the switch to accept both Telnet and SSH connections with the transport input telnet ssh vty subcommand. (The default is transport input telnet, omitting the ssh parameter.)
Step 3 Add one or more username name password pass-value global configuration commands to configure username/password pairs.
Step 4 Configure a DNS domain name with the ip domain-name name global configuration command. This command is necessary only if you want to use a domain name instead of an IP address.
Step 5 Configure the switch to generate a matched public and private key pair, as well as a shared encryption key, using the crypto key generate rsa global configuration command.
Step 6 Although no switch commands are required, each SSH client needs a copy of the switch’s public key before the client can connect.
Configuring Port Security
If you know which devices should be cabled and connected to particular interfaces on a switch, you can use port security to restrict that interface so that only the expected devices can use it. This reduces exposure to some types of attacks in which the attacker connects a laptop to the wall socket or uses the cable attached to another end device to gain access to the network.
Port security configuration involves several steps. Basically, you need to make the port an access port, which means that the port is not doing any VLAN trunking. You then need to enable port security and then configure the actual Media Access Control (MAC) addresses of the devices allowed to use that port. The following list outlines the steps, including the configuration commands used:
Step 1 Configure the interface for access mode using the switchport mode access interface subcommand.
Step 2 Enable port security using the switchport port-security interface subcommand.
Step 3 (Optional) Specify the maximum number of allowed MAC addresses associated with the interface using the switchport port-security maximum number interface subcommand. (Defaults to one MAC address.)
Step 4 (Optional) Define the action to take when a frame is received from a MAC address other than the defined addresses using the switchport port-security violation {protect | restrict | shutdown} interface subcommand. (The default action is to shut down the port.)
Step 5A Specify the MAC address(es) allowed to send frames into this interface using the switchport port-security mac-address mac-address command. Use the command multiple times to define more than one MAC address.
Step 5B Alternatively, instead of Step 5A, configure the interface to dynamically learn and configure the MAC addresses of currently connected hosts by configuring the switchport port-security mac-address sticky interface subcommand.
When an unauthorized device attempts to send frames to the switch interface, the switch can issue informational messages, discard frames from that device, or even discard frames from all devices by effectively shutting down the interface. Exactly what action the switch port takes depends on the option you configure in the switchport port-security violation command. Table 26-2 lists actions the switch will take based on whether you configure option protect, restrict, or shutdown (default).

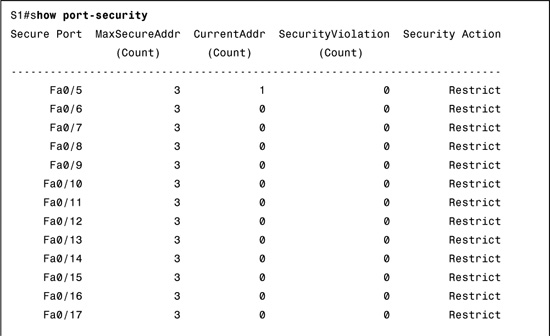
Example 26-1 shows a port security configuration where each access interface is allowed a maximum of three MAC address. If a fourth MAC is detected, only the offending device’s traffic will be discarded. If the violation option is not explicitly configured, the traffic for devices that are allowed on the port would also be discarded because the port would be shut down by default.
Example 26-1 A Port Security Configuration Example
S1(config)#interface range fa 0/5 - fa 0/24
S1(config-if-range)#switchport mode access
S1(config-if-range)#switchport port-security
S1(config-if-range)#switchport port-security maximum 3
S1(config-if-range)#switchport port-security violation restrict
S1(config-if-range)#switchport port-security mac-address sticky
To verify port security configuration, use the more general show port-security command or the more specific show port-security interface type number command. Example 26-2 demonstrates the use of both commands. In the examples, notice that only one device is currently attached to an access port on S1.

Shutting Down and Securing Unused Interfaces
Router interfaces, as you know, must be activated with the no shutdown command before they become operational. The exact opposite is true for the Cisco Catalyst switches. To provide out-of-the-box functionality, Cisco chose a default configuration that included interfaces that would work without any configuration, including automatically negotiating speed and duplex. In addition, all interfaces are assigned to the default VLAN 1.
This default configuration exposes switches to some security threats. The security best practices for unused interfaces are as follows:
![]() Administratively disable the interface using the shutdown interface subcommand.
Administratively disable the interface using the shutdown interface subcommand.
![]() Prevent VLAN trunking and VTP by making the port a nontrunking interface using the switchport mode access interface subcommand.
Prevent VLAN trunking and VTP by making the port a nontrunking interface using the switchport mode access interface subcommand.
![]() Assign the port to an unused VLAN using the switchport access vlan number interface subcommand.
Assign the port to an unused VLAN using the switchport access vlan number interface subcommand.