
BONUS CHAPTER 1
Installing and Configuring 3ds Max 2012
Choosing an operating system
Understanding hardware requirements
Installing 3ds Max 2012
Authorizing the software
Setting the display driver
Before you can enjoy all the great features in 3ds Max, you have to install the software and get your system configured properly. This bonus chapter helps you do just that. After you're finished here, you're ready to go.
Choosing an Operating System
If you're purchasing a new computer to run 3ds Max and have the luxury of customizing your system, you can do several things to make life easier. One of your first decisions is what operating system to use to run Max. 3ds Max 2012 can run on Windows XP, Windows Vista, and Windows 7. You also can run Max on a Mac using Boot Camp or Parallels Desktop.
Caution
Max 2012 does not run on Windows XP Home.
Regardless of the operating system you choose, make sure you have installed the latest Service Pack (which you can download for free from Microsoft's website at www.microsoft.com). Each of these operating systems enables you to run multiple copies of 3ds Max at the same time on a single machine. If you're running the 64-bit version of Max, you need to be running a 64-bit operating system.
Note
If you plan to install Max onto a Windows Vista computer, you need to turn off User Access Control (UAC) in the Command Panel before starting the installation.
Also note that Windows 2000, Windows NT, Windows 98, and Windows ME are not supported.
Hardware Requirements
To get good performance from 3ds Max, you need a fairly meaty machine. A good default system to use is a Pentium i5 or i7 or an AMD Athlon-based computer with 4GB or more of RAM (and 4GB of swap space) and a decent-sized hard drive and monitor. If need be, you can get by with as little as 2GB of RAM (with 2GB of swap space), but you may spend lots of time watching your computer churn furiously to keep up. A dual Intel Xeon, a dual AMD Athlon, or a 64-bit Opteron system is recommended.
Note
Max is optimized for any system that has the SSE2 extended instruction set.
3ds Max has been compiled to run on both 32-bit and 64-bit computers. If you elect to use a 64-bit system, Max will be able to deal with dramatically larger data sets. For the 64-bit version of Max, you need a minimum of 4GB of memory, with 8GB recommended.
One element of your system that will probably have the greatest impact on the performance of 3ds Max is the graphics card. Any good graphics card has specialized hardware that will take much of the workload off your computer's CPU, freeing it up to do other tasks. 3ds Max is very graphics-intensive, and a little extra money in the graphics card department goes a long way toward boosting your performance.
The good news is that hardware-accelerated graphics cards are becoming cheaper: You can get great cards for $200–$300. When searching for a graphics card, make sure it can support a resolution of at least 2048×1024 at 16-bit color with 3D graphics acceleration, including support for OpenGL and/or DirectX 9.0c and 10. You also want a minimum of 512MB on the graphics card, but look for cards with at least 1GB or more for 3D graphics acceleration. You can use some of the graphics boards built to run computer games; however, be aware that some boards claim to support OpenGL but actually support only a subset of it. Before going out to make your purchase, you can access a list of certified hardware on the Autodesk website using Help ![]() 3ds Max on the Web
3ds Max on the Web ![]() Certified Hardware menu.
Certified Hardware menu.
Tip
A video card is only as good as the available drivers. Max relies heavily on these drivers. If the driver has trouble, then your display flickers, has speed problems, or just plain doesn't work. Both nVidia and ATI video cards have excellent drivers with broad support.
For the complete installation, you need 3GB of hard drive space. You can get by with less if you choose the Compact installation option. Another handy piece of hardware to have is a scrollable mouse. A scrollable mouse makes moving through menus and the Command Panel easier, and it gives you a third button, which you can use to navigate the viewports. Max also ships on DVD-ROM, so you need a DVD-ROM drive to install the software. Max also supports graphics tablets.
Tip
If you can install Max on a separate physical drive from the drive that Windows runs on, then you'll see an increase in speed because Max doesn't need to compete with Windows for access to the hard drive.
Installing 3ds Max 2012
Installing Max is straightforward. Here's what you need to do:
- Insert the Max Installation DVD into the DVD drive. The setup program starts automatically. If you don't have Windows Autorun enabled, or if the setup program doesn't start, run the Setup.exe program on the DVD.
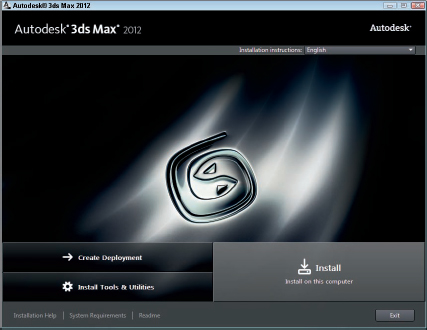
- When the setup program starts, the 3ds Max 2012 Installation window, shown in Figure 1, displays a menu of three options: Install, Create Deployments, and Install Tools and Utilities. The Create Deployments link begins a wizard for installing a network version of Max, and the Install Tools and Utilities link gives you access to install the supporting tools, including the Max SDK. Click the Install link to continue.
Note
The Install Tools and Utilities link includes links to install 3ds Max 2012 SDK and SDK Help for Visual Studio, Network License Manager, Allegorithmic Substance Designer, ArchVision Dashboard, SAMreport-Lite (which requires a license), RPC Plug-in with sample content, EASYnat 2.5 trial, Craft Director Studio, PixelActive CityScape promo, Okino PolyTrans and NuGraf plug-in demos, and TurboSquid Tentacles. You also find info links for learning more about each of these tools and utilities along with links to download a trial of other Autodesk products.
FIGURE 1 The first page of the installation wizard divides the products into several choices.
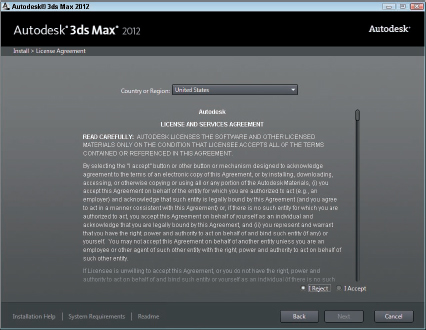
- In the next screen, the 3ds Max 2012 Setup Wizard shows the Software License Agreement, as shown in Figure 2. Choose your country and read the corresponding License Agreement. After you've read the agreement, click the “I Accept” option. Click Next to move on.
FIGURE 2 The License Agreement requires that you accept the agreement to continue.
Tip
Many of the features of 3ds Max are listed as separate installations on the Products screen, including the Composite 2012, Autodesk Backburner (used for network rendering), and the Autodesk Material Library. If you don't select some of these options, you can save some disk space, but the feature is not installed. You can install them later if you need them.
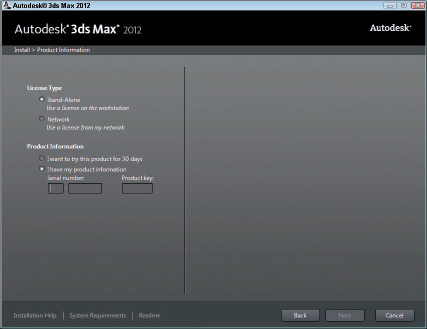
- The next screen, Figure 3, lets you specify to install a Stand-Alone or Network version of the software. You also can input a serial number or install the software as a 30-day trial. Then click Next.
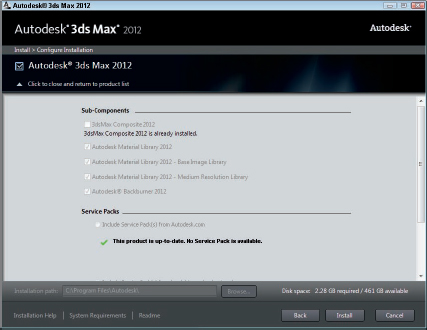
- The next screen lists the various components, as shown in Figure 4. After reviewing the product list, click the check box for any additional products that you want to install at the same time. Be sure to select the version that matches your operating system.
FIGURE 3 The Product Information screen requires a serial number, or you can install a 30-day trial.
FIGURE 4 The Configure screen lets you select the components to install.
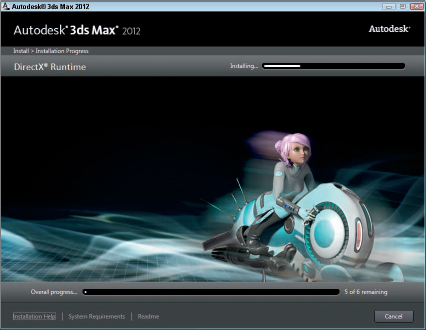
- After this, the installation starts and progress bars are updated to show the progress of the installation, as shown in Figure 5.
FIGURE 5 The progress of the installation is shown on this screen.
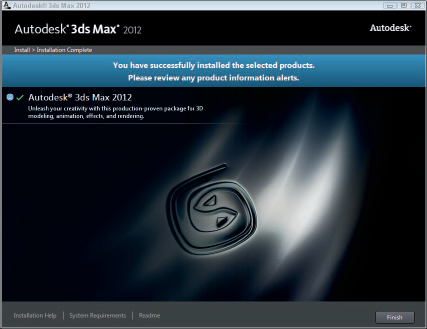
- When the installation is complete, a screen appears informing you so, as shown in Figure 6. The final screen also includes an option to view the Readme file that you can enable.
In the lower-left corner of the installation window are links for Documentation and Support.
Tip
Unlike many Readme files, Max's Readme file includes detailed information about a list of features, including clearer descriptions about the features’ idiosyncrasies and a troubleshooting section. If you're having trouble with a specific feature, see the Readme file.
Note
The completed Max installation does not require Windows to be rebooted.
FIGURE 6 Once installed, a summary page shows the components that were installed.
Registering and Activating the Software
After Max is installed, you can start Max using the desktop shortcut or the Start menu, but Max requires that you register and activate the software through Autodesk for permanent use. The software continues to run for 30 days without activation, but after 30 days it quits working.
An Activation screen appears when you start Max after installation. Using this screen, you can launch the Activation Wizard or run the software unactivated for 30 days. The Registration Wizard automatically appears when you select the Activate the product option and click the Next button.
The first screen of the Registration Wizard lets you get an activation code or enter an activation code if you have one. To obtain an activation code, you need to enter information such as your name, address, and company name. You also can specify whether this copy is an upgrade. If you're upgrading your Max version, you need to include the serial number for your previous version. The Serial Number and Request Code are automatically filled in using the numbers you entered during the installation. You can authorize the software using a direct connection to the Web, fax, e-mail, or regular mail.
If you receive an activation code via fax, e-mail, or mail, you can select the “Already have an activation code” option on the first screen that appears when you run Max and click Next. A screen opens where you can enter the activation code. The wizard registers this number with Max and completes the registration process.
Caution
The activation code is specific to a particular computer and works only for that computer. If you want to install the software on a separate computer, you need to obtain another activation code.
Note
After you activate Max, a dialog box for the Customer Involvement Program appears. This program lets you send comments on the software to Autodesk. You also can access this dialog box in the Help ![]() Customer Involvement Program menu. The program lets you submit comments anonymously or with contact information, or to select not to participate.
Customer Involvement Program menu. The program lets you submit comments anonymously or with contact information, or to select not to participate.
Setting the Display Driver
When Max is first run, a dialog box of Learning Movies appears. This screen shows several short movies that explain the basic features of Max and are worth previewing. These movies are different for 3ds Max and 3ds Max Design.
As part of the Max default installation, the Nitrous drivers are installed. Because Max knows these drivers are available, it uses them to run the software by default. Even though Nitrous is used by default, you can change the display driver to Direct3D or OpenGL if you want.
If Max is running, you can change the display driver in Max by choosing Customize ![]() Preferences and clicking the Choose Driver button in the Viewports panel. This opens the Display Driver Selection dialog box where you can select a different display driver, as shown in Figure 7. If you change the graphics driver, you need to restart Max before the new driver is used.
Preferences and clicking the Choose Driver button in the Viewports panel. This opens the Display Driver Selection dialog box where you can select a different display driver, as shown in Figure 7. If you change the graphics driver, you need to restart Max before the new driver is used.
Note
Most recent graphics cards include support for both OpenGL and DirectX built in, so you may want to try OpenGL or Direct3D to see if they work.
FIGURE 7 This dialog box lets you choose the display driver to use.
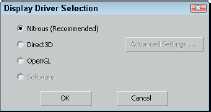
You can choose one of several drivers to use in Max: Software, OpenGL, Direct3D, or Nitrous. You also have the option of selecting a custom driver.
Tip
If you want to change a display driver when starting Max, select the Start ![]() All Programs
All Programs ![]() Autodesk
Autodesk ![]() Autodesk 3ds Max 2012
Autodesk 3ds Max 2012 ![]() Change Graphics Mode program.
Change Graphics Mode program.
Nitrous
The Nitrous display drivers are the default drivers and the best ones to use if supported by your video card. The Nitrous drivers are based on Direct3D, but have special features unique to Max, including the ability to render using non-photorealistic methods.
New Feature
3ds Max 2012 uses specialized drivers named Nitrous.
Direct3D
Direct3D uses the graphics card's hardware capabilities and simulates anything else it needs in software. You must have DirectX 9.0 or higher installed for these drivers to work, but it is installed by default automatically, so you should be good to go. Simulating different features makes Direct3D run on a wide range of computers, but it can be much slower. If your graphics card's drivers support all of Direct3D in hardware, then using this driver might give you good performance. If it switches to software mode, however, it will be much slower.
OpenGL
If your graphics card supports OpenGL in hardware, this is a great driver to use. OpenGL works under all Windows operating systems and is typically present on high-end graphics cards. In order for Max to use OpenGL, the drivers must support OpenGL 1.1 or later. One of the features enabled with the OpenGL drivers is Virtual Viewports.
Software
The software display driver option is Max's own built-in software graphics driver. Because the software driver does not take advantage of any special graphics hardware that your graphics card supports, your computer's CPU does all the work. The nice thing about this option is that it works on any computer, even if you don't have a good graphics card.
If you're having display problems, try starting Max using software drivers to make sure that everything has installed correctly. Next, try the different graphics drivers to see whether you can move up to something faster.
Updating Max
Max includes a feature for checking for and automatically installing updates. From within Max, you can select Help ![]() 3ds Max on the Web
3ds Max on the Web ![]() Updates. This menu command opens a web page where the updates are posted.
Updates. This menu command opens a web page where the updates are posted.
You also can schedule Max to look for updates automatically using the Communication Center button in the InfoCenter toolbar. This button provides access to a dialog box where you can be automatically informed when updates are available.
Moving Max to Another Computer
A stand-alone license of Max can exist on only one computer at a time. If you reinstall Max on a different computer, you need to export the license to the new computer. Exporting a license is accomplished using the License Transfer Utility, shown in Figure 8. This utility can be found in the Start ![]() All Programs
All Programs ![]() Autodesk
Autodesk ![]() Autodesk 3ds Max 2012 folder.
Autodesk 3ds Max 2012 folder.
Note
If you are running Max from a network, an alternative to exporting a license is borrowing one using the Help ![]() License Borrowing
License Borrowing ![]() Borrow License menu command. The Help
Borrow License menu command. The Help ![]() License Borrowing
License Borrowing ![]() Return License menu command returns the borrowed license when you're finished.
Return License menu command returns the borrowed license when you're finished.
FIGURE 8 Use the Portable License Utility to move a Max license to another computer.
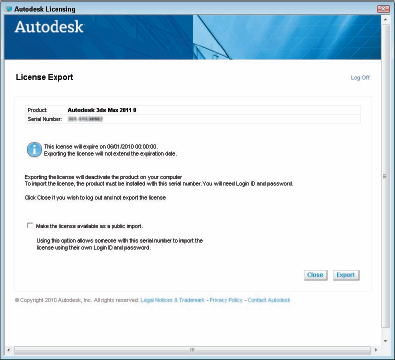
The Portable License Utility displays all licenses on the current computer and the identification code for the computer (which has been blanked out for this figure). Select the license to export, and click the Export button. This saves the license to a file that you can import using the same utility on the new computer. After you export your license, it continues to work on the original computer for a 24-hour grace period.