
14.3. Using SQL to Enhance Forms
Using SQL, you can enhance your forms in many ways, including allowing quick and easy record sorting, narrowing a list of records by applying selections, and using combo box values to limit the drop-down lists for other combo boxes. These are all powerful tools that help your user get more value from your application. Let's study these techniques one at a time.
14.3.1. Sorting on Columns
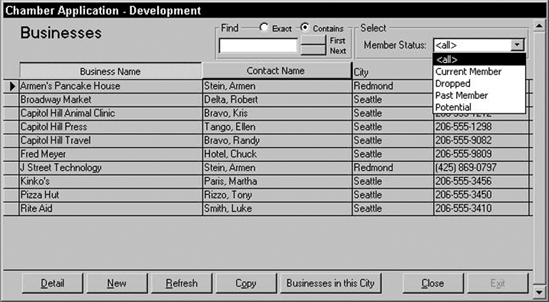
Users often expect the ability to sort on columns, similar to other Windows applications like Outlook. For example, if you have an index form of businesses, your user may want to sort on either the Business Name or Contact Name column, as shown in Figure 14-1.
Figure 14.1. Figure 14-1

In this example, the user can click either the Business Name column heading or the Contact Name column heading. The two toggle buttons are in an option group called optSort. This control has an After Update event that contains the following code:
Private Sub optSort_AfterUpdate()
On Error GoTo Error_Handler

    Dim strOrderBy As Variant
    strOrderBy = Null

    Select Case Me!optSort
        Case 1 'Business Name
            strOrderBy = " tblBusiness.BusinessName, " & _
                "tblBusiness.LastName, tblBusiness.FirstName"
        Case 2 'Contact information
            strOrderBy = "tblBusiness.LastName, " & _
                "tblBusiness.FirstName, tblBusiness.BusinessName"
        Case Else
    End Select

    strOrderBy = " ORDER BY " + strOrderBy

    Me.RecordSource = ReplaceOrderByClause(Me.RecordSource, strOrderBy)
    Me.Requery

Exit_Procedure:
    On Error Resume Next
    Exit Sub Error_Handler:
MsgBox "An error has occurred in this application. " _
    & "Please contact your technical support person " _
    & "and tell them this information:" _
    & vbCrLf & vbCrLf & "Error Number " & Err.Number & ", " &
Err.Description, _
    Buttons:=vbCritical, title:="My Application"
    Resume Exit_Procedure
    Resume

End Sub
This technique takes advantage of the fact that you can change the recordsource of a form while it is already open, and then requery the form. When you do, the form is reloaded with the records from the new recordsource, including their sort order.
We build a new Order By clause based on the button that is clicked. To swap the new Order By clause into the RecordSource, we use a function called ReplaceOrderByClause. The codes for this function and its cousin ReplaceWhereClause are at the end of this chapter. For now, just assume that the Order By clause will be magically "cut and pasted" into the SQL string in the RecordSource property of the form.
NOTE
A SQL string RecordSource: In order to replace part of the SQL string in a Record-Source property, you need to start with a SQL string! That means to use this technique, you can't have just the name of a query or table in the RecordSource. It needs to be a real SQL statement. To make one, just take the query name, say qryBusinesses, and turn it into a SQL string like "Select * From qryBusinesses". Then you'll be able to manipulate it with new Where and Order By clauses.
So, when your user clicks a column heading, the records are instantly resorted by that column. This is much more intuitive and Windows-standard than right-clicking or selecting menu options. Your user will appreciate how easy it is to sort records this way.
Sorting isn't the end of the story. Let's examine how you can also provide instant record selection also.
14.3.2. Selections on Index Forms
One of the most powerful features you can offer your user is the ability to narrow a set of records so that they can more easily find the information they are looking for. By adding selection criteria to your index forms, you add a lot of power to your application with only a little work.
14.3.2.1. Easy Selection Criteria on an Index Form
The simple selections are the most common. Your user would like to be able to narrow the recordset by selecting a criterion for a particular field. However, you also need to provide the ability to open the selection up again to include all records, as shown in Figure 14-2.
Figure 14.2. Figure 14-2
First of all, the default selection criterion for a field is <all>. To include this in the drop-down list for your criteria combo box, you must use a Union query. An easy way to understand a Union query is to think of it joining tables vertically instead of horizontally; a Union query adds records to the result instead of columns. In this case, we just want to add one additional record: the <all> value.
A Union query cannot be built using the Query Designer, but fortunately it isn't difficult to build using SQL. In this case, the RowSource for the Combo box looks like this:
SELECT tblMemberStatus.MemberStatusKey, tblMemberStatus.MemberStatusName
FROM tblMemberStatus
UNION
SELECT "<all>", "<all>" FROM tblMemberStatus
ORDER BY tblMemberStatus.MemberStatusName;
Note that the Union is really just patching together two Select statements. The first one returns the actual member statuses from tblMemberStatus. The second one is "fake"; it just returns the values "<all>" and "<all>".
Sometimes cheaters do prosper: To more easily build your Union query, build the first part (that retrieves records from a table) using the Query Designer. Then, switch over to SQL View and add the Union and second Select parts.
Since the Order By clause specifies that the records should be sorted in an ascending order by MemberStatusName, the <all> value appears at the top of the list since "<" is a lower value than any alphabet letter. The code to process the user's criteria selection is in the After Update event of the Combo box:
Private Sub cboMemberStatusKey_AfterUpdate()
On Error GoTo Error_Handler

    SelectRecords
    cboMemberStatusKey.Requery

Exit_Procedure:
    On Error Resume Next
    Exit Sub
Error_Handler:
    MsgBox "An error has occurred in this application. " _
    & "Please contact your technical support person " _
    & "and tell them this information:" _
    & vbCrLf & vbCrLf & "Error Number " & Err.Number & ", " &
Err.Description, _
    Buttons:=vbCritical, title:="My Application"
    Resume Exit_Procedure
    Resume

End Sub
This code calls another procedure in this form called SelectRecords. We don't want to actually rebuild the SQL statement here, because we may add other selection criteria fields later. By rebuilding the Where clause in a central procedure, we can easily add the new criteria fields with a simple procedure just like this one.
NOTE
Why the extra Requery? You'll notice that there is a Requery of the combo box after SelectRecords runs. This is there to handle a little bug that has been in the last several versions of Access, including Access 2003. The bug causes the text in an unbound combo box to become invisible if the recordset of the form contains no records. Requerying the combo box (just the control itself, not the whole form) causes the mysterious invisible text to appear again.
The SelectRecords procedure is where the SQL statement is rebuilt and the form requeried:
Public Sub SelectRecords()
On Error GoTo Error_Handler

    Dim varWhereClause As Variant
    Dim strAND As String

    varWhereClause = Null
    strAND = " AND "

    If cboMemberStatusKey & "" <> "<all>" Then
        varWhereClause = (varWhereClause + strAND) & _
            "tblBusiness.MemberStatusKey = """ & _
            cboMemberStatusKey & """"
    End If

    varWhereClause = " WHERE " + varWhereClause

    Me.RecordSource = ReplaceWhereClause(Me.RecordSource,
varWhereClause)
    Me.Requery

EnableDisableControls

Exit_Procedure:
    On Error Resume Next
    Exit Sub
Error_Handler:
    MsgBox "An error has occurred in this application. " _
    & "Please contact your technical support person " _
    & "and tell them this information:" _
    & vbCrLf & vbCrLf & "Error Number " & Err.Number & ", " &
Err.Description, _
    Buttons:=vbCritical, title:="My Application"
    Resume Exit_Procedure
    Resume
End Sub
Note that if the combo box contains "<all>", no Where clause is built at all. The ReplaceWhereClause function is designed to just remove the Where clause (and return all records) if a Null is passed in for the WhereClause parameter.
All this code runs immediately when the user chooses a different criterion in the drop-down list, and the records meeting the criteria are displayed. If there are any records that match the selection criteria, they are displayed and the command buttons are enabled, as shown in Figure 14-3.
Figure 14.3. Figure 14-3

Now that we've seen how the selection looks to the user, let's examine the VBA code more closely. Using some simple techniques, we can handle multiple selections of different types on the same form.
14.3.2.2. The Amazing Expandable SelectRecords Procedure
The code in SelectRecords to build the Where clause may seem overly complex, but there are good reasons: expandability and flexibility. It is all ready for you to add more criteria fields. For example, if you wanted to add another selection for District, you would just need to add:
If cboDistrictKey & "" <> "<all>" Then
    varWhereClause = (varWhereClause + strAND) & _
        "tblBusiness.DistrictKey = """ & _
        cboDistrictKey & """"
End If
The key to this expandability is the concatenation of varWhereClause and strAND. When the procedure starts varWhereClause is null. And it continues like that until the code discovers a specified selection criterion.
When it does, the phrase
(varWhereClause + strAND)
performs its magic. The first time it runs, varWhereClause is still null, so the null-propagating "+" operator (see Chapter 8, "Executing VBA") does NOT add the word "AND".
However, the second time it runs (because the user has specified another selection criterion), things are different. Now, varWhereClause has a value in it, so the "+" operator successfully concatenates the "AND" onto the string before the next part of the Where clause is added.
When all the pieces have been built, the final step is to add the word "Where" onto the front of the newly built Where clause. However, we don't need it if there are no selection criteria, so it's "+" to the rescue again. If varWhereClause is still Null, then we have the following statement:
varWhereClause = " WHERE " + varWhereClause
This will append "WHERE" to the front of varWhereClause, but only if varWhereClause has a value. If it doesn't, it will remain Null. Regardless of the order in which you build the parts of the Where clause, this logic will work. It makes the SelectRecords procedure very easy to change and expand.
Now that we have seen how to build Where clauses with multiple fields, let's look at a couple of other selection scenarios you might encounter.
14.3.2.3. Selection Criteria Using Numeric Keys
The previous selection examples assumed that you were using text fields. If your combo box contains a numeric value (such as an AutoNumber key), the Union query looks a little different. Let's say the DistrictKey is an AutoNumber primary key:
SELECT tblDistrict.DistrictKey, tblDistrict.DistrictName
FROM tblDistrict
UNION
SELECT  0, "<all>" FROM tblDistrict
ORDER BY tblDistrict.DistrictName;
Note that the first "<all>" value has been replaced with a 0, to match type with the other numeric key values. Since 0 isn't used by Access as an AutoNumber key, it won't be confused with a real record from the District table.
The code in the SelectRecords procedure will be a little different too:
If cboDistrictKey <> 0 Then
    varWhereClause = (varWhereClause + strAND) & _
        "tblBusiness.DistrictKey = " & cboDistrictKey
End If
Note that we are now checking to see if the combo box value is 0 instead of <all>. Also, with a numeric value you don't need all the nested quotes—you can just concatenate that number right after the equals sign.
14.3.2.4. Selection Criteria in Child Records
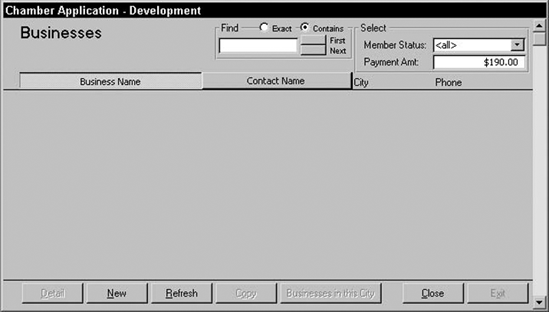
Sometimes, your user wants to be able to search for records that contain a value not in those records, but in their child records. In our example, they might want to find all Businesses that made one or more Payments of a certain amount, as shown in Figure 14-4.
Figure 14.4. Figure 14-4

In this case, we do not want to apply selection criteria to the Business records themselves. Instead, we want to display all Businesses that have one or more records in the Payment table that are for the desired dollar amount.
To perform this kind of selection, we use a subquery. A subquery is a query inside another query, and in this example it is used to select Businesses that appear in another query: A list of payments of a certain dollar amount. Just as with Union queries, subqueries cannot be represented directly in the graphical Design View. However, they are easy to build using SQL View.
In this case, where we want the Businesses that have made one or more payments of $150, the desired Where clause would be
WHERE tblBusiness.BusinessKey IN (Select BusinessKey
From tblPayment Where PaymentAmount = 150)
The key thing here is the SQL operator IN. Using IN allows you to determine if a value appears anywhere in a recordset from another Select statement. In this case, we want all Businesses whose BusinessKeys appear in a list of Payments that equal $150.
The code in the SelectRecords procedure looks like this:
If Not IsNull(txtPaymentAmt) Then
    varWhereClause = (varWhereClause + strAND) & _
        "tblBusiness.BusinessKey IN (" & _
        "Select BusinessKey From tblPayment Where" & _
        " PaymentAmount = " & Me!txtPaymentAmt & ")"
End If
Since the Payment Amount is a numeric value, we don't need the nested quotes. However, we do need to build the inner subquery with its own Select statement and wrap in its own set of parentheses "()".
Now we know how to apply different kinds of selections to a continuous index form. However, with all these selections going on, we need to take a look at what happens if the user specifies criteria that omit all of the records.
14.3.2.5. Disabling Buttons if No Records Are Displayed
When you give your user the ability to narrow a list of records, they might figure out a way to omit all of them! The subroutine EnableDisableControls is called just in case there are no records meeting the criteria. In this case, the user would get an error if they clicked the Detail button, because there wouldn't be a key to open the detail record with. To prevent this, the Detail button is disabled so that the user won't be able to click it, as shown in Figure 14-5.
Figure 14.5. Figure 14-5
The code to disable or enable the appropriate buttons looks like this:
Public Sub EnableDisableControls()
On Error GoTo Error_Handler

    If Me.RecordsetClone.RecordCount = 0 Then
        Me!cmdDetail.Enabled = False
        Me!cmdCityBusinesses.Enabled = False
        Me!cmdCopy.Enabled = False
    Else
        Me!cmdDetail.Enabled = True
        Me!cmdCityBusinesses.Enabled = True
        Me!cmdCopy.Enabled = True
    End If

Exit_Procedure:
    On Error Resume Next
    Exit Sub
Error_Handler:
    MsgBox "An error has occurred in this application. " _
    & "Please contact your technical support person " _
    & "and tell them this information:" _
    & vbCrLf & vbCrLf & "Error Number " & Err.Number & ", " &
Err.Description, _
    Buttons:=vbCritical, title:="My Application"
    Resume Exit_Procedure
    Resume

End Sub
Now that we've handled how to sort and select records on a continuous form, and to prevent errors when the selection omits all the records, let's examine how to enhance forms with cascading combo boxes.
14.3.3. Cascading Combo Boxes
Sometimes, you would like your user to choose a value of a combo box, and then use that value to limit the selections in another combo box. Since the upper combo box affects the lower, this is sometimes called "cascading" the combo boxes.
To accomplish this, you need the SQL statement building techniques described earlier in this chapter. Let's say we have two combo boxes: one for County and one for City. Each County can have many Cities and each City is in one County. The table design would look something like this:
| tblCounty | |
|---|---|
| CityKey | AutoNumber |
| CountyName | Text 255 |
| tblCity | |
|---|---|
| CityKey | AutoNumber |
| CityName | Text 255 |
| CountyKey | Long Integer |
When we present the selection form, we want the County to be selected first, then limit the City to those found in that County.
The control cboCounty will start off enabled in Design View, but cboCity will be disabled. In the After Update event for cboCounty, we'll include the following code:
Me!cboCity = Null

If IsNull(cboCounty) Then
    Me!cboCity.Enabled = False
Else
    Me!cboCity.Enabled = True
    Me!cboCity.Rowsource = ReplaceWhereClause(Me!cboCity.Rowsource, _
        "Where CountyCode = " & Me!cboCounty)
    Me!cboCity.Requery
End If
Let's take this code section by section.
Me!cboCity = Null
First, we clear out the City combo box by setting it to Null. We do this because we are in the After Update event of the County combo box, so we know it's been changed. If the whole County has been changed, then any value that was in the City combo box is no longer valid, so we just wipe it out.
If IsNull(cboCounty) Then
    Me!cboCounty.SetFocus
We are about to disable the City combo box, which won't be possible if it has the focus. Just in case it does, we set the focus back to cboCounty.
Me!cboCity.Enabled = False
Now, if the user just deleted the value for County (setting it to Null), we need to disable the City combo box, since they must choose a County before they can select a City.
Else
    Me!cboCity.Enabled = True
Alternatively, if the user changed the County to another value, the City combo box can be enabled so they can select a City.
Me!cboCity.Rowsource = ReplaceWhereClause(Me!cboCity.Rowsource, _
    "Where CountyCode = " & Me!cboCounty)
But now we need to limit the Cities in the drop-down list to those that are in the selected County. To do this, we modify the Rowsource property for the City combo box using our old friend ReplaceWhereClause.
Me!cboCity.Requery
End If
Although we have changed the Rowsource property of the City combo box, it won't take effect until we requery it. At this point, the user can go down and select from a list of Cities that are in the selected County. Our cascading selection is complete!
14.3.4. Using SQL for Report Selection Criteria
Many developers build Access reports so that their users can quickly view and print out their data. Consider a report to list businesses from the database, as shown in Figure 14-6.
Figure 14.6. Figure 14-6

However, your user will often want to print only some of the records, based on selection criteria. You can create a different report for each selection criteria, but that approach will result in duplication of report code and difficulty in handling combinations of selection criteria.
When novice Access developers want to allow their users to specify the selection criteria for reports, they often use parameter queries. Unfortunately, parameter queries have a few problems:
They prompt the user with a separate dialog box for each value
They don't allow any formatting or validation of the values
They often require the user to know key values instead of descriptions
They are awkward in handling Null or <all> values
A better way to prompt for report selection criteria is to display a form to gather them in easy to use fields and combo boxes. This way, you can handle null values, multiple criteria simultaneously, and validation checking.
For the business list report, your user wants to select whether to see all the businesses in the table, or just those with a particular Member Status, as in Figure 14-7.
Figure 14.7. Figure 14-7

After they make their selection and click OK, the report is displayed (Figure 14-8).
The first thing to note here is that the order of events might be different than you expect. Many programmers would think that the selection form opens the report when the OK button is clicked. In fact, it's the opposite. First, the report is opened. During its On Open event, the report calls the selection form in Dialog mode, which halts the report code until the selection form is hidden. Given below is the code in the On Open event of the report.
Private Sub Report_Open(Cancel As Integer)
On Error GoTo Error_Handler

    Me.Caption = "My Application"

    DoCmd.OpenForm FormName:="frmReportSelector_MemberList", _
        Windowmode:=acDialog

    'Cancel the report if "cancel" was selected on the dialog form.
    If Forms!frmReportSelector_MemberList!txtContinue = "no" Then

        Cancel = True
        GoTo Exit_Procedure
    End If
Figure 14.8. Figure 14-8

Me.RecordSource = ReplaceWhereClause(Me.RecordSource, _
    Forms!frmReportSelector_MemberList!txtWhereClause)

Exit_Procedure:
    Exit Sub

Error_Handler:
    MsgBox "An error has occurred in this application. " _
    & "Please contact your technical support person " _
    & "and tell them this information:" _
    & vbCrLf & vbCrLf & "Error Number " & Err.Number & ", " &
Err.Description, _
    Buttons:=vbCritical, title:="My Application"

    Resume Exit_Procedure
    Resume
End Sub
The important thing to note here is that during the report's Open event, its recordset has not been evaluated yet, so you still have a chance to change it. When you open the selection form in Dialog mode, the report code waits until that form is hidden.
Now it's time to see what the selection form really does. It has a few fields that are normally hidden, as shown in Figure 14-9.
Figure 14.9. Figure 14-9

The extra fields above the OK button are normally set to Visible = No. They hold three pieces of information:
The Where clause to use in the report's recordsource
A selection title to use in the report's heading
A field to indicate whether the report should continue (OK was clicked) or not (Cancel was clicked)
Red for Danger: It's a good idea to mark normally invisible fields in some special way, so that you can easily see them if you forget to hide them. A good technique is to make the background color of a hidden field red (BackColor = 255). That way you'll notice it if you forget to hide it!
Here's the code in the form that builds the Where clause and the selection title, both stored in the hidden fields:
Sub RebuildWhereClause()
On Error GoTo Err_RebuildWhereClause

'This subroutine builds an SQL WHERE clause based on the choices
'made by the user on the form. It can be used as the WHERE parameter
'in the OpenReport command. The invisible text box Me![txtWhereClause]
'displays the completed WHERE clause.
'
'SelectionTitle string that contains a title to place at the top
'               of the report, which specifies the selection made.
'               Stored on form in invisible text box
Me![txtSelectionTitle].

Dim varWhereClause As Variant
Dim strWhereAnd As String
Dim strSelectionTitle As String
Dim strComma As String
varWhereClause = Null
strWhereAnd = ""
strSelectionTitle = ""
strComma = ""

'Member Status Combo Box
If Not (Me!cboMemberStatus & "" = "") And Not _
(Me!cboMemberStatus = 0) Then
    varWhereClause = (varWhereClause + strWhereAnd) _
    & " (tblBusiness.MemberStatusKey = """ & _
    Me!cboMemberStatus.Column(0) & """) "
    strWhereAnd = " AND "
    strSelectionTitle = strSelectionTitle & strComma _
    & "Member Status = " & Me!cboMemberStatus.Column(1)
    strComma = ", "
End If

If strWhereAnd = "" Then
    varWhereClause = Null
Else
    varWhereClause = " WHERE " + varWhereClause
End If

Me![txtWhereClause] = varWhereClause
Me![txtSelectionTitle] = strSelectionTitle

Exit_RebuildWhereClause:
    Exit Sub
Err_RebuildWhereClause:
    MsgBox Err.Number & ", " & Err.Description
    Resume Exit_RebuildWhereClause
    Resume
End Sub
Notice that to build the Where clause, Column(0) of the combo box is used, because it contains the key value. However, to build the selection title, we use Column(1), since it contains the more friendly description of the Member Status record.
This code runs when the OK button is clicked. It rebuilds the Where clause and tells the report to proceed:
Sub cmdOK_Click()
On Error GoTo Err_cmdOK_Click

    RebuildWhereClause
    Me!txtContinue = "yes"
    Me.Visible = False

Exit_cmdOK_Click:
    Exit Sub
Err_cmdOK_Click:
    MsgBox Err.Number & ", " & Err.Description
    Resume Exit_cmdOK_Click
End sub
After the RebuildWhereClause procedure builds the first two hidden fields, just two more things need to happen. First, the third hidden field, txtContinue, is set to Yes. This is the field that the report will check to see if it should continue to open or just cancel.
Lastly, the current form's Visible property is set to False. Remember, this form was opened in Dialog mode, so hiding it causes the report code to continue running.
A Nice Side Effect: Because the selection form is always hidden, not closed, the selection criteria will be retained each time the form is used during an Access session. This makes it easier for your user to re-run reports with the same selection criteria or to adjust the criteria slightly instead of typing it all again each time.
If the user clicks Cancel, this code runs instead. It tells the report to stop opening:
Sub cmdCancel_Click()
On Error GoTo Err_cmdCancel_Click

    Me!txtContinue = "no"
    Me.Visible = False

Exit_cmdCancel_Click:
    Exit Sub
Err_cmdCancel_Click:
    MsgBox Err.Number & ", " & Err.Description
    Resume Exit_cmdCancel_Click
    Resume
End Sub
The only difference between this code and the OK code is that we don't bother to rebuild the Where clause, because the user is canceling anyway, and we set txtContinue to No so that the report will cancel itself before it even gets a chance to display anything.
When the report is cancelled it generates Error 2501, which you should handle so that your user doesn't see an ugly error message. See Chapter 9, "VBA Error Handling," for a description of how to do this.
By adding more fields to your selection form and building the Where clause to apply them to the report's recordset, you can deliver a report to your user that is very flexible and easy to use.
14.3.5. Altering the SQL Inside Queries
Sometimes it can be advantageous to alter the SQL inside a saved query. This is especially common when you are using pass-through queries to another database like SQL Server, but it can also come in handy when you need to nest Access queries several layers deep. Since the queries a few layers down can't be modified directly in a report or form's recordsource you may need to change them directly.
NOTE
Use the right syntax: Remember, if you use this technique for a pass-through query, you must use the SQL syntax of the back-end database, not Access syntax. For example, the wildcard in SQL Server is %, not *. Also, SQL Server expects string values to be surrounded by single quotes ('), whereas Access doesn't care whether you use single quotes (') or double quotes (").
First, you need to realize that this technique will work only if your user is using the front-end application database exclusively. Since we are changing an actual query in the application, you need to make sure that you aren't causing problems for other users. Most developers recommend that each user run a copy of the front-end application on their local computer, not share it on the network. If you follow this recommendation, altering saved queries in your front-end application will work just fine.
To change the Where clause in a saved query, use code like the following one:
Dim qdf as QueryDef
Dim db as Database

Set db = CurrentDB
Set qdf = db.QueryDefs("YourQueryName")

qdf.SQL = ReplaceWhereClause(qdf.SQL, strYourNewWhereClause)

set qdf = Nothing
set db = Nothing
The SQL property of the query definition contains the actual SQL statement of the query; it's the same SQL statement that you see in the SQL View in the Query Designer. Note that you don't have to do anything else to change it; the SQL is replaced instantly.
NOTE
But won't this bloat my database? Database bloating is a problem caused by the fact that Access doesn't reclaim unused space until the database is compacted, so the database size can increase dramatically if developers create and delete objects in the front-end database. However, replacing the SQL inside an existing query doesn't cause significant bloating.