
11.3. Event Property and Procedure Examples
The remainder of this chapter will apply all of the information covered in the above sections to get you started on the automation of Access Reports. The examples are in no particular order and possibly do not rely on each other for reader comprehension. In case an example is associated to another, it will be noted. This allows for the reading of only the property examples that are pertinent to you.
11.3.1. Report_Open(): Execute a Query Before Report Displays
The On Open event procedure works just like the On Open event procedure of forms, in that it is triggered when the form is opened. The functionality that can be placed within this event procedure is unlimited, but it is important to keep in mind that the code will trigger only once. If there is a repetitive task that needs to execute throughout the report, then the code should be moved to a different event procedure.
There are many things that may need to happen when a report is opened, but one task could be the preparation of data, just prior to printing. It is not uncommon in Access to base a report on a table that is used specifically for the report. There could be some complex calculations or last minute processing that need to be done before the report can print correctly.
For example, suppose that you need to execute a Delete Query, an Append Query, and an Update Query prior to printing a report. The Delete Query would be used to empty any previous data from the report table, the Append Query would retrieve the new base data, and the Update Query would finish the data population effort.
So, when the form is opened, completing the described operation is as simple as issuing the necessary OpenQuery statements. The following example demonstrates this technique:
Private Sub Report_Open(Cancel As Integer)
   'Show a message in the Status Bar
   DoCmd.Echo True, "Preparing Report Data...Please Wait"

   'Turn off the Warning Messages
   DoCmd.SetWarnings False

   'Populate the report table
   DoCmd.OpenQuery "qryInvoices_0Empty"
   DoCmd.OpenQuery "qryInvoices_1AddData"
   DoCmd.OpenQuery "qryInvoices_2UpdateTotals"

   'Reset the Warning Messages
   DoCmd.SetWarnings True
End Sub
In the above example, the code starts by showing a message in the status bar, by using the Echo statement. (Note that if the first parameter is set to False, then the screen will not refresh.) Next, the standard Access error messages are suppressed by issuing the SetWarnings statement with the parameter of False. From there, the queries to empty, add, and update the data are executed. (Notice the naming conventions used, which keep the queries in a logical order.) At the end of the procedure, the standard warning messages are turned on again.
This technique is quite useful in ensuring that the data is always up to date when the report executes, but also be aware that it will add significant processing time to the report generation time, especially in Preview mode.
11.3.2. Report_NoData(): What to do When There Is No Data to Display
The On No Data event property is triggered when there is no data to display in the report. Now, this may sound odd, because why would anyone create a report that has no data? The answer comes from the fact that any report can be called from code. When the report is opened, parameters can be supplied to allow for the report to be opened with different cross sections of the data.
The following code example opens a report, and passes query criteria to the report using the Where parameter.
Docmd.OpenReport "rptInvoice", Where := "OrderID = 1234"
Another method of opening a report with different data is by using a FilterName:
Docmd.OpenReport "rptCustomerDetails", _

  FilterName := "qryCustomersInUSA"
In the first example, the Where clause is used to restrict the data to be displayed to only those records where the OrderID is equal to the number 1234. In the second example, a query called "qryCustomersInUSA" is used to override the Report RecordSource property. Both of these techniques are very useful, and offer the developer options and flexibility that do not require the recreation of the same report layout with different RecordSources. As you can imagine, there are some developers that didn't know this, and in their databases you find:
rptMonthly_January
rptMonthly_February
rptMonthly_March
As you can imagine, that developer did a lot more work than was necessary, but give them credit, as they got the job done. So, that should be enough background to realize why the On No Data event property can be useful. Refer back to the first example, and imagine what would happen if for some reason OrderID 1234 had been deleted. If you executed the statement to open the Invoice report, then Access would still try to create the report, but would only produce a blank page, or even more strange results like #Name or #Error.
It is possible to verify that there is data for a report, prior to opening it, using a function such as DCount(). With this method, you can attempt to ascertain if there are any records prior to making the call to open the report. For example,
If DCount("*", "qryInvoices", "OrderID = 1234") > 0 then
  Docmd.OpenReport "rptCustomerDetails", Where := "OrderID = 1234"
End If
The above example is an extreme case, because the criteria is a hard-coded value, meaning that if any other OrderID is needed, the code would have to be changed to accommodate it. That is not so much the point of this exercise; instead, it is to demonstrate that having to check for records before a custom opening a report would add a significant amount of development time to each project.
Instead, the On No Data takes care of verifying that there is data, and allows for the cancellation of the report when there is no data found (see the following example).
Private Sub Report_NoData(Cancel As Integer)
  Cancel = MsgBox("No Records Found", vbInformation, Me.Caption)
End Sub
The previous example is very generic, because there are no hard-coded values. Because of this, and the simplicity of it, this code can be placed in every report in the database. The code itself sets the Cancel parameter, which is used to prevent any processing from occurring after the current procedure, to the result of the message box. Because the message box will only return a positive integer value (1, 2, 4, 8, and so on), the Cancel value will always be set to True when the No Data event procedure is executed.
(In Access, a True value is anything not equal to zero.) Finally, the Caption property of the Me object is an easy way to display information about the form in the message box.
As you step your way through VBA programming, be sure to take advantage of all aspects of the programming environment. The On No Data event property is one such property that can save you some development time and effort.
11.3.3. {Section}_Format(): Dynamically Display Page Numbers
The Format event procedure executes between the occurrences of when Access determines what data belongs in a report section, but before that data is formatted for printing. This procedure is suitable for making changes that affect page layout, such as displaying or hiding controls or for the creation of complex running calculations that span multiple groupings.
It is important to note that this event procedure executes for every section, including any sections that are not printed. To contrast this point, note that the Print procedure executes only when sections are printed. Unprinted sections will not execute, which may cause a problem for calculated running totals. Be sure to validate all numbers that are generated when performing a calculation on any report.
When using the Format procedure, the section (Detail, Header, or Footer) that is used will not only dictate when the event procedure should execute, but also what data is exposed at the time of execution. Exposed is a term that specifies that it is available for use by the developer. The following table describes these differences.
In the following sample code, the format procedure is used to change an attribute about the report page footer section.
Private Sub PageFooter_Format(Cancel As Integer, _
  FormatCount As Integer)
  If Me.Page Mod 2 = 0 Then
    'Display the even page number on the Right Side
    Me.txtPageOdd.Visible = False
    Me.txtPageEven.Visible = True
  Else
    'Display the odd page number on the Left side
    Me.txtPageOdd.Visible = True
    Me.txtPageEven.Visible = False
  End If
End Sub
In the above sample, it is assumed that there are two text box controls placed within the Page Footer. They are identical in their data properties, as both have the following controlsource:
="Page " & [Page]
When the word "Page" is used on a report, it refers to the current page number. (This is what is known as a reserved word, and should only be used for the intrinsic purpose.) For the expression specified as the controlsource, it concatenates the literal word "Page" to the number of the current page of the report.
i.e. Page 1
As far as formatting of the two text boxes are concerned, txtPageOdd is placed on the left side of the page footer, and is left-justified. txtPageEven is placed on the right side, and is right-justified. With this setup, turn your focus back to the code in the event procedure, and notice that sometimes the odd page number is visible, and other times the even page number is visible. The effect that this gives is that the page number will either be on the left or right side of the page, depending if the number is odd or even.
The way that this is controlled is through the use of the Mod operator. The keyword mod is short for modulus and returns only the remainder of a division calculation between two expressions. As applied in this situation, the page number is divided by the number 2, and the remainder is compared to zero. If a number is divided by 2, and has a remainder, then it is not an even number. The converse is that the number is even. So, the code determines if the page number is odd or even and then displays the proper text box to show the page number on the appropriate side of the page.
11.3.4. Section_Print(): Conditional Formatting of a Text Box
The Print event procedure executes after the data in a report section is formatted for printing, but before the section is printed.
This procedure is suitable for calculating running page totals that are printed in the page header or footer or for making changes that affect page layout, such as displaying or hiding controls. It is important to note that the Print Procedure executes only when sections are printed. Unprinted sections will not execute this procedure, which may cause a problem for calculated running totals. Be sure to validate all numbers that are generated when performing a calculation on any report.
When using the Print Procedure, the section (Detail, Header, or Footer) that is used will not only dictate when the event procedure should execute, but also what data is exposed at the time of execution. Exposed is a term that specifies that it is available for use by the developer. The following table describes these differences.
In the following sample code, the Print Procedure is used to change an attribute about the report, which resides within the Detail section.
Private Sub Detail_Print(Cancel As Integer, PrintCount As Integer)
  'Determine the number of items in Stock
  If txtUnitsInStock > 100 Then
    'Alert the reader with Red Text
    txtUnitsInStock.ForeColor = vbRed
  Else
    'Use Black for non-alerted values
    txtUnitsInStock.ForeColor = vbBlack
  End If
End Sub
In the previous example, the code determines if the current In Stock value of a product is greater than 100. If it is, then it changes the code to red for that record. If it is not, it returns the color back to black. It is very important to remember to return the color back to the original setting, or else after the first time the color is set to red, it will stay that way until the end of the report.
11.3.5. Compute a Running Balance
To apply what you have learned, the following example is a known problem for many users in all sectors of business. There are times when a user needs to compute a running balance based on a single column of numbers. This example uses a typical bank account, because most people can associate to it. The technique that is conveyed can be modified to pertain to invoices, mileage, weights, or anything else in your business model that would require a running balance. To start, suppose that there exists a table that stores bank account transactions, which may resemble Figure 11-5.
Figure 11.5. Figure 11-5

In the screenshot, there is an example data table, in which the Payee, Purpose, and Transaction Date fields self-explanatory. For clarification, the Amount field retains the dollar figure for each transaction, where positive values are deposits and negative values are withdrawals. (Your paper checkbook may have different columns for each, but the same principle would apply.)
When new developers are faced with the running balance task, they initially try to solve the problem within the table itself. They add a new column to the table, call it Balance, and then attempt to populate the data with a query. This technique works, but only for the sort order in which the query was executed.
For example, suppose that the developer decided to create the running balance based on Transaction Date. Figure 11-6 displays the results of the query technique.
Figure 11.6. Figure 11-6

This would appear to be a logical way to do it, but just for the sake of confusion, suppose that the user decided to sort the data by the Purpose column, and/or filter the data based on the Payee. (For the filter example, it is assumed that there are multiple months of transaction data.) If the user were to perform the sort, then the data, including the balance field, would be sorted. It would look like Figure 11-7.
Figure 11.7. Figure 11-7

Notice that the balance column retains the values that were assigned to it when it was populated by the query. To the unsuspecting user, they would either get confused, or worse, they would simply use the last number in the column as the final balance. This would not reflect graciously on any of the parties involved.
If this field and technique are utilized, then it requires that the developer recalculate the running balance values every time the data is sorted, filtered, or queried. This would be very time-consuming for the developer. It would also decrease the end-user performance for each of their data operations.
Another way to solve the running balance problem is with a report. Some developers may find this to be an easier way to display the data, because the report can perform the necessary data recalculations when it is executed. In case the sort order is modified, then the calculated balances are always correctly calculated. And, since a report can be displayed on the screen, it does not require the user to physically print the data in order to view it.
Figure 11-8 is a graphical representation of a running balance solution.
Figure 11.8. Figure 11-8
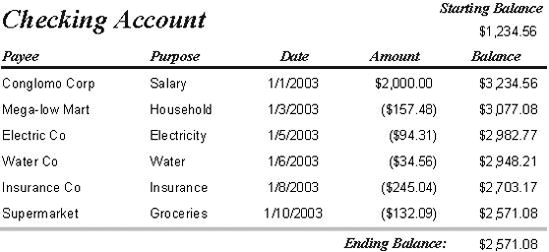
In the previous picture, the Balance column begins with a Starting Balance of $1234.56, which is then added to the first Transaction Amount, and then carried over to each of the remaining individual transactions. At the end of the report, the final balance is restated, for a quick-glance reference of the value.
11.3.6. Running Sum Property
As new report developers attempt to solve the running balance task, they soon learn about the Running Sum property of a text box. It appears rather straightforward and a logical approach to utilize this property to perform the calculation. What they don't know is that this property only performs 98 percent of the work at hand, but doesn't finish the job. In Figure 11-9, the report looks exactly the same, but it uses the Running Sum property for the Balance column..
Figure 11.9. Figure 11-9

The previous picture displays the running balance of all of the transaction records. The Balance field uses the same controlsource as the Amount field, but the Running Sum property for Balance is set to Over All.. (The choices for this property are Over Group, Over All, and No.) At first glance, anyone could be fooled that this data is accurate, but compare the first report picture with the second, and you can see that the report is significantly incorrect. Although the Running Sum property can perform the task of adding the previous value to the current value, it cannot incorporate the starting balance from the top of the report. Without the use of the starting balance, the ending balance will always be incorrect.
11.3.7. The Report Design
Now, to understand the code needed to perform the running sum task, it first involves understanding the construction of the report itself. It is assumed that you understand each of the different sections of the report generator. To help you understand the construction of the report, take a look at Figure 11-10.
Figure 11.10. Figure 11-10
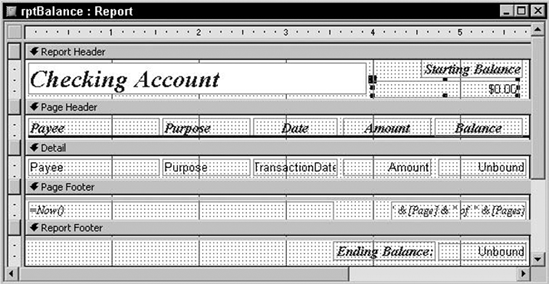
Figure 11-10 shows the report designer for a running balance report. There are several important controls that are used in the VBA code of the report. These fields are listed in the following table.
| Control | Property | Setting | Description |
|---|---|---|---|
| txt Amount | Controlsource | Amount Column | Bound to Amount Column in data table |
| txt Balance | Controlsource | Unbound | Value is set by the VBA code |
| Running Sum | No | Do not use the running balance. | |
| txt Balance_Starting | Controlsource | Unbound | Retrieves previous ending balance from a function |
| txt Balance_Ending | Controlsource | Unbound | Value is set by the VBA code |
The other properties of these controls are inconsequential to the remainder of the functionality of this example. Further, it is important to note that the Running Sum property is mentioned only to avoid any confusion, that it should be used for this example. The Starting Balance calls a VBA function to return the previous ending balance. As there may be many factors to the retrieval of this data, it is not discussed further, but instead assumed to retrieve the correct starting value for the example.
11.3.8. VBA Code Behind Report
Once the theory and controls, as described in the previous paragraphs, are understood, the only thing that remains is to examine the code itself, which resides in the Report's code module. The code is designed to use a module-level variable to maintain the running balance. At points throughout the report execution, the variable is either incremented or displayed.
In this example, all of the procedures for this code are displayed as one segment. It may appear overwhelming to a new developer, but understand that this is one of the code views that can be selected when developing in the VBA environment. (The other view displays only one procedure at a time.)
The example procedures are arranged top-down in the order in which they are executed after the report is opened. This is not required, but has been done to add to assist with reading comprehension. VBA is an event-driven language and does not require any specific order to the procedures. (Some procedural languages require that called procedure occur prior to the calling procedure.)
The final benefit of viewing this code in its entirety is that it demonstrates the importance of having clean, readable, and simple code. It is important to understand that programming does not stop when the functionality is complete. At some point, either you or another programming will be required to read, enhance, or worse, fix your code. As you view the code example, take note of the subtle difference that it makes when techniques such as a naming convention, indentations, and readable comments are included.
'Create a variable to hold the running balance.
Dim mdblBalance As Double

Private Function GetStartingBalance()
  'Get Starting Balance
  'Could be obtained via other dynamic methods
  GetStartingBalance = 1234.56

End Function

Private Sub Report_Open(Cancel As Integer)

  'Initialize the running balance to previous balance
  mdblBalance = GetStartingBalance

  'Set the starting balance in the Report Header
  txtBalance_Starting = mdblBalance

End Sub

Private Sub Detail_Print(Cancel As Integer, _
  PrintCount As Integer)
'Increase the balance by the current transaction amount
  mdblBalance = mdblBalance + txtAmount

  'Set the balance value to the new running balance amount
  txtBalance = mdblBalance

End Sub
Private Sub ReportFooter_Print(Cancel As Integer, _
  PrintCount As Integer)

  'Set the ending balance to the final balance amount
  txtBalance_Ending = mdblBalance

End Sub
In reviewing this code, the first thing that you should notice is that there are no more than 10 lines of actual code that you would have to write. All of the procedure headers and footers are created for you, and without the inclusion of developer comments, the coding effort is minimal. It is important to note that many facets of VBA do not require hundreds of lines of code, when designed correctly. In this case, the mixture of a few controls with a little bit of code offers a significant amount of functionality. If you find that you are coding with significant more effort than this, then you may want to rethink your methodology.
The code in the above example starts by declaring a module-level variable to hold the running balance. The variable must remain in scope throughout the life of the entire report, or else the running value would be lost. There is no need to declare the balance variable as Public (or Global) unless you need to refer to it outside of the report.
GetStartingBalance() is a procedure that is exposed to all other procedures within the report module. It is there to retrieve the previous ending balance from perhaps the last month. There are multiple paradigms that could be used for implementation, but for this example, a hard-coded value is supplied. In practice, you could store the previous balance in a table, or calculate it at the time the report is executed. It really depends on what functionality is supplied to the user when executing the report. For example, can they select a date range to print the report, or is it hard-coded by month?
The Report_Open() procedure executes one time when the report opens. In this example, the balance variable is initialized during this procedure, as it only needs to be initialized one time. You may have an example where a running balance needs to be reset at certain times throughout the execution of the report. If this is the case, then the variable initialization would need to occur in an event procedure that is executed multiple times throughout the generation of the report. An example of this would be a group header or footer. Also, the starting balance text box is populated with the initial value.
The processes of incrementing the running balance and displaying it on the report are both executed from the Detail section Print event procedure. Both of these steps are performed here, because at the time the value is computed, it needs to be printed. Separating these two steps between other event procedures can lead to the balance being increased at undesired intervals, and cause the wrong value to be written on the report.
The last section that is printed for a report is the Report Footer. This is commonly used for printing grand totals. For example, a sum of the Amount field would net the sum of the detail items for only the current report. In the example, the ending balance is displayed in the footer. This could be as a convenience to the user, or by their request.