
1.4. Creating a Switchboard for Your Database
Creating a Switchboard form is as simple as creating a form and configuring the form to launch when the database loads. Once you've created the form, add some command buttons to perform various actions you think your users might want to perform. We'll look at creating a switchboard from scratch in the following pages. Along the way, we'll use some of the other built-in wizards you can use to automate Access without code.
1.4.1. Begin at the Beginning
To create a switchboard, you'll first need to create a new form. Choose Forms from the Access bar and click the New button to launch the New Form dialog box. For a switchboard form you don't need to choose a table or query for the form's data source, just choose Design View from the list box and click OK.
You can give switchboard forms a nice title and maybe a couple of lines of text to serve as a brief explanation to users. After you've added these elements to the form, it might look similar to Figure 1-5. Any number of elements can be added to the form, including images, text, frames, fields, or other graphics. But what good is a form if it doesn't do anything?
Figure 1.5. Figure 1-5

In order for your form to do something, you'll need to add command buttons to the form. To add a new command button, choose the command button tool from the Control Toolbox and click anywhere on your form to insert the command button and start the Command Button Wizard. The first screen you'll see in the wizard (Figure 1-6) allows you to choose the type of action to perform.
We typically start designing the database's switchboard by adding two command buttons: One to launch the main data entry form (or forms as the case might be) and one to exit the database. The following steps will create a command button to launch the MySwitchboard form for data entry:
Figure 1.6. Figure 1-6

Choose Form Operations from the Categories list box.
Choose Open Form from the Actions list box and click Next (see Figure 1-7).
Access displays a list of all forms available in your database. Choose the appropriate form and click Next again.
You can open the form and display all records or choose a specific record to display. Click Next to continue.
The next step in configuring your command button allows you to associate text or an image with the button. In most cases, we choose to display text on the button rather than an image. However, if you are designing a multilanguage application, you might want to stick with universally recognizable images, rather than text. Enter the text of the button in the text box, as shown in Figure 1-8, and click Next.
The final step in the wizard is naming your command button. Access suggests a default name of "Command" followed by a number. You should enter a meaningful name for your command button and click Finish.
Figure 1.7. Figure 1-7

Figure 1.8. Figure 1-8

While it's tempting to just accept this name and move on, it's against all common programming recommendations. You should always give your command buttons (as well as your other controls such as text boxes, labels, combo boxes, and image controls) a meaningful name. Even if you don't follow established naming conventions, such as cmdfrmPurchaseOrder), you should still ensure the name you give to your objects is meaningful, otherwise you could be left editing code that's almost unreadable because none of your objects have recognizable names. Just imagine trying to edit code for a command button that launches a particular form when you have 100 command buttons on your form and you can't remember whether you were looking for Command53 or Command91.
You can create multiple command buttons using the previous steps. When you're done, your form might look something like Figure 1-9. Save your form and close it. The next step in creating your switchboard is configuring your form to launch when you start your database. Use the following steps to configure a start-up form.
Figure 1.9. Figure 1-9

Choose Startup from the Tools menu (see Figure 1-10). The dialog box that is displayed allows you to enter a title for your entire application, specify an application icon, a customized menu bar, and specify a startup form.
Figure 1.10. Figure 1-10
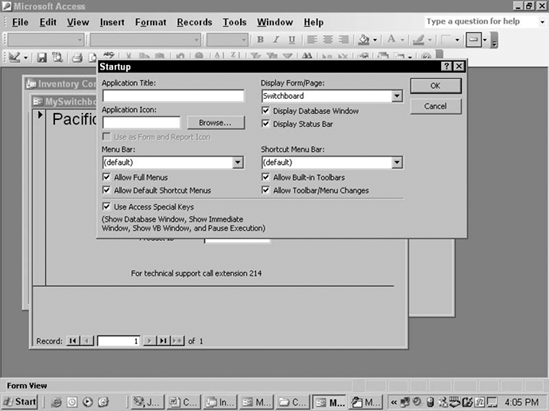
Use the drop-down box marked Display Form/Page and choose the switchboard form you created previously.
You can also choose whether users will see the Database Window and Status Bar or whether they will only see your custom switchboard form. If you're worried about users fiddling with the tables, forms, and reports in your database, it's often helpful to hide the Database Window. Savvy users can still access the DatabaseWindow (unless you take further steps to secure the database), but hiding the Database Window through the startup form at least makes it a little less tempting to fiddle.
Click OK to save your changes
The next time you launch your database, the My Switchboard form will automatically load for your users. You can have several switchboards within your application. For example, you might want to have a main switchboard that allows your users to explore various aspects of the application such as data entry, reporting, and application options (such as toolbar customizations or security options). When your users select the reporting button, you can launch a separate reporting switchboard with buttons for all of the reports in your application.
1.4.2. Create a Switchboard through the Switchboard Manager
There's another easy way to create a switchboard for your application. You can use the Switchboard Manager to create a new switchboard or edit an existing switchboard. Choose Database Utilities from the Tools menu and select Switchboard Manager from the popout menu (see Figure 1-11).
Figure 1.11. Figure 1-11

To create a new switchboard, click the New button. Enter a name for your new switchboard. Once you've created your switchboard, click Edit to control the items displayed on your switchboard. For a new switchboard, there won't be any items on the switchboard. Now click New (Figure 1-12). You can enter the text displayed on your switchboard and choose a command from the drop-down menu. You can choose from eight different commands including opening a form in add or edit mode, exiting the application, running a report, or running code or a macro. Depending on the command you choose, the third drop-down menu will change and allow you to choose a particular form, report, or macro.
Once you've added all of the necessary commands to your switchboard form, click Close to return to the Switchboard Manager. If you want your new switchboard to launch when the database loads, select it in the Switchboard Pages box and click Make Default. When you're done manipulating your switchboards, click Close.
Figure 1.12. Figure 1-12
