
16.5. User-Level Security
The most advanced security provided in Access 2003 is the user-level security. This method permits you to grant permissions to groups of users and/or to specific users for each object in a database. Objects include tables, queries, forms, reports, and macros, as well as the database itself.
Since user-level security is the most advanced form of security, it requires additional explanation. Thorough planning and documentation will be invaluable to set up and maintain user-level security.
User-level security does not override shared-level security. User-level security will require the user to log on to use a database in Access. However, if the user opens a shared-level protected database, the user will also have to know the password to that database. Also, as with shared-level security, user-level security does not prevent the data from being viewed using tools other than Access. So again, one option is that the database can be encoded to prevent viewing the data from other tools such as Windows Notepad.
16.5.1. Main Components of User-Level Security
There are two main components of user-level security in Access 2003:
With these two main components, there are two primary steps necessary to secure a database with user-level security:
Create or update the MDW file to define user groups and users.
Set up the database to grant user groups or individual users of the MDW file specific permissions to objects in the database.
The distinction, detachment, and dependency between the MDW file and the secured database will be clarified by the following discussion.
16.5.1.1. The MDW File
The MDW file is used to uniquely identify an individual Access user and the user groups to which that user belongs. The MDW file does not contain any information about the database that is being secured. Conversely, the database that will be secured knows nothing about the user groups or users defined in the MDW file until you begin to set permissions to objects in the secured database using the MDW file.
Because of the distinction between the MDW file and the secured database, it is important to consider the structure of the business that will be using database(s), as well as the purpose of the database(s).
When setting up the MDW file, you will define user groups and users. User groups should be designed around the roles people have in an organization. For example, one group might handle accounting activities while another group might maintain customer contacts.
A business or a single computer can have multiple MDW files. An Access user can choose the MDW file they want to use. Therefore, by taking the organizational structure into account, you can create an MDW file that can be shared by multiple databases across an organization.
Users can be assigned to one or more user groups. So if a user only handles accounting activities, they can be assigned to the accounting group. Later if the user becomes involved with customer contacts (changes or additions to their responsibilities), they can be assigned to the customer contacts group in addition to the accounting group. It is important to realize that permissions are cumulative, meaning that the user will have the maximum permissions allowed by combining the permissions rather than restrictions of each group that the user belongs to. There will be more discussion on the cumulative effect a bit later.
Later you will learn that granting permissions to a database is best done through user groups rather than by granting permissions to individual users. As just mentioned, users can change groups or roles. By granting permissions in a database to groups instead of users, you can change the permissions a user has simply by changing the group(s) that they belong to in the MDW file. The security changes will then be picked up the next time the user signs into that MDW file. On the other hand, if you had granted permissions to the user for a specific database, you would have to change the permissions that user has to that database (or any database where you have granted that user specific permissions).
When an MDW file is created, you specify an internal name (not a file name), an organization, and a workgroup ID. Since there can be more than one MDW file, the unique combination of these values authenticates the file.
Within the MDW file, each user is assigned their own Personal ID (PID). A user can belong to one or more user groups. Each user group is assigned its own Group ID (GID). The authentication information of the MDW file, together with the username and PID, uniquely identifies an Access user.
NOTE
Usernames in the MDW file are not associated with the names in the Windows user login.
When Access users have identified themselves using an MDW file, they receive a set of identifications. You can view this set of identifications as a set of pass codes or keys. Each pass code has a unique characteristic based on the authentication information of the MDW file plus the username and PID, or the authentication information of the MDW file plus the group name and GID.
The user-level secured database (not the MDW file) will use these pass codes to determine what permissions to grant a user when accessing the objects in that database. The factors for determining what user groups and users should be defined will become clearer with the discussion about setting permissions in a database that is to be secured. That's next!
Note: Before beginning to manipulate the information in an MDW file, it is highly recommend that you make a backup copy of the file. The default MDW file name is SYSTEM.MDW. The default location is C:Documents and Settings[username]Application DataMicrosoftAccess folder.
16.5.1.2. The Database to be Secured
The second component of user-level security is the database that is secured at the user level by granting permissions to each object in that database. Permissions authorize the actions that can be performed on an object. Those permissions are granted to Access users based on the pass codes in the MDW file that is in use when user-level security is set up.
An Access user does not use the MDW file until they open a database. The MDW file that is used is chosen by the user by joining the MDW file or is automatically chosen if the / wkgrp is used on the command line when Access is started. These techniques are discussed later.
The object types that can have permissions set include the database, tables, queries, forms, reports, and macros. Each object, regardless of type, has its own set of permissions. That is, each table in a database has a set of permissions distinct from other tables in the database. Therefore it is possible to permit a particular user group to have read-only access to some tables while allowing them to update data in other tables. For example, you could have database administrators be able to set values in lookup tables but not be able to change records that refer to those lookup tables.
When granting permissions to a user group or an individual user, the permissions are granted based on the pass codes previously mentioned. Remember that the pass code consists of the MDW file authentication information plus the group name and Group ID or the MDW file authentication information plus the username and Personal ID. Therefore, if a user has selected the wrong MDW file, even if the user is defined in the MDW file that they have selected, the user will not be granted the intended permissions because the pass codes will not be the same. This is another reason why it is important to maintain backups of your MDW file.
Microsoft Support provides additional information regarding Access Security and the MDW file. For an alternative explanation of security visit http://support.microsoft.com/default.aspx?scid=kb;EN-US;305542. You can search the Microsoft Knowledge base for more answers at http://support.microsoft.com/default.aspx?pr=kbhowto.
Permissions are granted to the user cumulatively. If permissions are granted to a user group, then all users who belong to that group receive those permissions as well as their own permissions. If a user is granted permissions that exceed any of the permissions of the groups that user belongs to, that user receives the additional individual permissions as well as the most permissive authority from each group that they belong.
To put this cumulative effect another way, when users identify themselves to Access through an MDW file, they receive pass codes as follows: one for their username and one for each group that they belong to. Those pass codes then grant that user all of the permissions that have been granted to each of those pass codes.
This cumulative effect shows why it is important to define the appropriate user groups when setting up the MDW file. This cumulative effect is also the reason to design your security around user groups rather than users. Since a user gets all of the permissions for each group that they belong to, if the user changes groups, you need only change the group that user belongs to rather than analyze and update the user's individual permissions for each object. Also, if another user starts working under a role you have defined in the MDW file, you need only set up that user and assign them to the group(s) that has the correct permissions for the database(s) that user will be using. This also means you do not have to change the permissions on each database the user will need to use.
As previously mentioned, permissions are assigned to each object in a database. Permissions are granted to specific user groups or users. If a database consists of lots of objects, lots of user groups, and lots of users, setting up user-level security can be a time-consuming process. Clearly, if you maintain permissions at the group level and not the user level, you reduce the amount of effort needed to set up and maintain user-level security.
Note: The Owner of the database or of an object in a database always has all permissions to that database or object in the database.
16.5.1.3. A Comment About User-Level Security
While working with an MDW file, we evaluated how effective Access user-level security is. We have heard that Access Security isn't really secure. This was in reference to Access's inability to provide true data security. Macro security is a different matter and is discussed in Chapter 20.
One concern came from one of the things we expected while opening and closing the forms to work with the MDW file. We discovered that the authentication information (name, organization, and workgroup ID) in the MDW file was not retained and displayed each time we displayed the Workgroup Administrator (Tools | Security | Workgroup Administrator...). The name and organization actually came from the machine we were using rather than from what we entered. We expected that all pieces of the authentication information would be used to make the MDW file unique and secure. Since the name and organization didn't display from what we entered, we wonder how secure the authentication information is. That is, could our MDW file be recreated more easily than you would expect since some of the authentication information may not have to be correct. This is particularly frustrating, because things like this might lead to complaints that "there is no security in Access."
Another issue comes from the fact that the owner of the database has full permissions to the database. (This is discussed later.) Since the default owner of a database is Admin and Admin is also a default user in any MDW file, this leaves situations where an Access developer can accidentally leave their database open for security breach (by simply forgetting to change the owner away from Admin).
In our opinion, Access could be much more reliable if the secured database is more aware of the authentication information of the MDW file that must be used to access it and simply not allow Jet Engine access to the database unless the MDW file is truly authentic. I'm sure there is a tradeoff between making Access an open tool useful for more common users and making it the reliable application development tool it can be. But as a member of the Pacific Northwest Access Developers Group (PNWADG.org) I am aware of a significant number of developers who have developed sophisticated applications using Access with no other tools. We would like rock-solid reliable security without having to turn to SQL Server and Access Database Projects (ADP files).
This is not to say Access security is completely unreliable. For applications that are maintained behind the security of a good, secure operating system, where only authorized users can access files, the Access security model can provide adequate protection. This protection can be set at the user level by authorizing users to the data they are supposed to be authorized to access. And with the additional features available in Access 2003 and Jet SP7 or greater, Access has very good security for applications you will build and deliver to clients.
The point is, don't give up on Access user-level security as totally ineffective. But do be aware that the Access security model is not hacker proof and choose your security measures wisely.
16.5.2. Methods to Create User-Level Security
There are essentially three effective methods to secure a database at the user level.
Use the Access user interface to maintain the MDW file and set database permissions.
Use Visual Basic for Applications to maintain the MDW file and database permissions. This includes using DAO, ADO, ADOX, or some combination thereof.
The User-level Security Wizard is perhaps the easiest, since the wizard takes you through all the steps necessary to secure the database. From the previous sections you should have a good understanding of the MDW file and how permissions are set. So, using the User-level Security Wizard can produce sufficient and effective results. The wizard can also be a good method to set up the initial security for a database.
Note: The User-level Security Wizard cannot be used while a database has shared-level security or if the project has been locked from viewing (both discussed earlier). You will have to disable those options while you run the wizard. These options can be added back after the wizard has completed its processes.
The wizard is very self-explanatory and quite useful for initial user-level security setup. However, after user-level security has been established and if it becomes necessary to modify the security settings for a database, the multistep process of the wizard can be cumbersome. Nevertheless, the wizard provides useful tools for making changes to security. For example, the wizard has the ability to set passwords for users and provides a random personal ID. Other Access user-interface options do not support this.
Additionally, the wizard has a set of default user groups that include a set of default permissions. These groups can be useful if the permissions fit the roles of users in the business that will be using your database. But before relying on these groups, it is important that you design your own groups consistent with the organizational structure.
The following section walks you through setting up and maintaining user-level security using the Access user interface. First it will show you the User and Group Accounts menu option. Then it will walk you through using the User-level Security Wizard. Later sections show you how you can maintain user-level security using VBA with DAO and ADO.
16.5.2.1. User-Level Security Using the Access User Interface
There are many steps involved with creating and using user-level security using the Access user interface. Fortunately, Microsoft provides the User-level Security Wizard to help with the initial setup as well as continued maintenance. In order to help you fully understand all of the components of user-level security, this section covers all of the options available to maintain security using the user interface.
16.5.2.1.1. Creating an MDW
Your first step in creating user-level security is to select or create the MDW file that will contain the user groups and users you will define. As mentioned earlier, this can be a new file or the default file provided when Access is first used.
The recommended approach is to create a new MDW file. The User-level Security Wizard will not permit you to use the default SYSTEM.MDW file. Also, if you corrupt the default MDW file, you will have to manually recover that file from another source.
Many developers prefer to create application-specific MDW files with names that indicate the underlying application. This makes it easy to keep track of the MDW associations. It also makes creating (or reading) shortcuts and target paths a bit more obvious.
TIP: Before beginning to manipulate the information in an MDW file, it is highly recommend that you make a backup copy of the file, even if you are creating a new MDW file. The default MDW file name is SYSTEM.MDW. The default location is the C:Documents and Settings[username] Application DataMicrosoftAccess folder.
To create or select the MDW file, select Security | Workgroup Administrator... from the Tools menu as shown in Figure 16-13.
The Workgroup Administrator dialog box displays information about the MDW file that is currently selected, as shown in Figure 16-14.
To create a new MDW file, select the Create. . . button. This displays the Workgroup Owner Information dialog box, as shown in Figure 16-15.
The Workgroup Owner Information dialog box requests the Name, Organization, and Workgroup ID. This information uniquely identifies the authenticity of the MDW file. The workgroup ID can be from 4 to 20 characters. This value should be treated much the same as a password to prevent anyone from guessing the value.
Select OK to display the Workgroup Information File dialog box shown in Figure 16-16.
Note that the default location is the C:Documents and Settings[username]Application DataMicrosoftAccess folder with the default name of SYSTEMx.MDW. Then enter the location for the workgroup file and click OK. The Confirm Workgroup Information displays all the settings for the MDW file as shown in Figure 16-17. Be sure to keep a record of the information displayed on this form.
Figure 16.13. Figure 16-13

Figure 16.14. Figure 16-14

Figure 16.15. Figure 16-15

Figure 16.16. Figure 16-16

Figure 16.17. Figure 16-17

TIP: You may wish to print an image or otherwise document the information on this form in the event you need to manually recover the MDW file. Alt+PrtScn is a handy tool for capturing the window so that it can be pasted into Word and printed or saved. Then click OK to create the MDW file or Change to alter the information.
When you create an MDW file, you will automatically be joined to that file. The MDW file that you last joined is automatically selected the next time you use Access under the same Windows user profile on the computer. Others who need to use the same MDW file should use the Join option to join an existing MDW file.
16.5.2.1.2. Joining an MDW
Users will join an MDW file to get access to the correct set of pass codes for the database they will use. Refer to The MDW file previously discussed for more information about pass codes.
To join an existing MDW file, select Security | Workgroup Administrator... from the Tools menu. The Workgroup Administrator dialog box displays, as show in Figure 16-14. Then click the Join ...button to display the Workgroup Information File dialog box, as shown in Figure 16-17. Enter the file name of the desired MDW file in the Workgroup text box or click Browse ... to select the file from the file system. Click OK to join that MDW file.
TIP: To have the MDW file automatically selected for a user when they start Access, add the /wrkgrp startup command-line option. To help your users, you may wish to create a shortcut that opens your database and applies this command-line option.
NOTE
If the user has access to the Workgroup Administrator menu option, this startup parameter does not prevent them from selecting another MDW file. However, the file specified in the command line is sill used to authenticate a user.
16.5.2.1.3. Updating the MDW File
By default, the MDW file contains one user (Admin) and two groups (Admins and Users). The Admin user is initially assigned to both groups. An MDW file must have at least one user that belongs to the Admins group. All users must belong to the Users group.
The first recommended action for an MDW file is to create a new user that you will use to administer the MDW file. Later you will remove the Admin user from the Admins group and change the ownership of the database to your new administrator. This is necessary because all MDW files have the Admin user and Admins group. If you do not make these changes, a default MDW file could be used to gain access to your database. (Learn more about this in the Setting Permissions on Objects section below.)
To create a new user as the administrator, select Tools | Security | User and Group Accounts. . . to display the User and Group Accounts dialog box as shown in Figure 16-18.
Then select the Users tab and click the New ...button to display the New User/Group dialog box as shown in Figure 16-19.
Enter the name for the user you will use as an administrator and a personal ID number. The personal ID must be 4 to 20 characters or digits in length. The same general rules as for specifying a password should be followed. You may wish to record the personal ID, especially for this new administrator user. This information is critical in the event that you need to recover the MDW file.
Tip: Later you will see how to use the User-level Security Wizard to set up user-level security. Since the wizard permits you to assign passwords and provides a random personal ID when you are setting up a new user, you may wish to wait until using the wizard to define the rest of the users.
Click OK to save the user. In the User and Group Accounts dialog box, shown in Figure 16-20, be sure the user you created is selected in the Name field.
In the Group Membership section of the form, in the Available Groups list, select the Admins group and click Add>> to add the Admins group to the new user.
To remove the Admins user from the Admins group, select the Admin user in the Name field. In the Member Of list, select the Admins group and click <<Remove.
16.5.2.1.4. Activating the MDW File
The MDW file does not become active until the Admin user in that MDW file is assigned a password. Meaning, that until the Admin password is set, Access does not require any user using that MDW file to enter their username and password. A user using a different MDW file will not be impacted by whether or not your MDW file is activated.
Figure 16.18. Figure 16-18

Figure 16.19. Figure 16-19

Figure 16.20. Figure 16-20

After the MDW file is activated, the prompt to enter a username is not displayed until the first-time user has performed certain operations in Access. These operations include opening a database or attempting to change information in the MDW file. The log-on prompt occurs only once per session or if the user joins another (or rejoins the current) MDW file.
Note: You can inactivate the MDW file by removing the password from the Admin user. This may be useful if you find problems while testing your security setup. This is another good reason to make a note of the password and keep it in a secure place.
To activate the MDW file, select the Change Log-on Password tab of the User and Group Accounts dialog box as shown in Figure 16-21. See previous section to learn how to display this dialog box.
Leave the Old Password field empty and enter a new Password the New Password field and the Verify field. Click Apply to apply the changes.
Figure 16.21. Figure 16-21

Since you effectively logged on as the Admin user when you created the MDW file, you must either close Access or rejoin the MDW file to have your new setting take effect. It is recommended that you activate the MDW file now and log on as the new administrator to be sure that you have a user that can perform further setup.
A shortcut to picking up the changed MDW file is to rejoin the MDW file. To do this, select Tools | Security | Workgroup Administrator. Click Join. . . . The MDW file that is currently in use will be displayed as the file name. Click OK to select that file. This logs the current user off. The next action that opens a database, including attempting to administrate the MDW file, will prompt for a username and password.
When you have logged on under the new administrator user, you may wish to give that user a password. Follow the same steps used to assign a password for the Admin user. Now you can define the user groups and users for the MDW file. Repeat the same steps you just used to define the new administrator user to define user groups and users.
To assign passwords to new users you must log on as that user or use Visual Basic and Jet to set passwords. Later you will see how to use the User-level Security Wizard to set up user-level security. Since the wizard permits you to assign passwords when you are setting up a new user, you may (yet again) wish to wait until using the wizard to define the rest of your users.
16.5.2.1.5. Setting Permissions on Objects
User-level security permissions are assigned to the database that needs security opened. As explained previously, permissions are granted to objects in the database for user groups or users. There is one caveat to this: the owner of the database or any object in the database always has full permissions.
This presents a bit of a problem. The first problem is that the user Admin owns a database if that database was created where the default MDW file was in use. Which means that database can be accessed through the Admin user of any MDW file, even after removing all permissions from the Admin user, even if the MDW file is not the one you use to set up user-level security.
The second problem is that the Access user interface only allows you to change ownership using the User-level Security Wizard. The upside to this is that the wizard also adjusts other permission settings very quickly. Since this is the case, the following leads you through the User-level Security Wizard.
Note: If you do not want to use the wizard to change database ownership, you can use your MDW file to log on to Access as the user you want to have ownership, and then create a new database and import all the objects.
16.5.2.1.6. Using the User-Level Security Wizard
This wizard is a great way to start setting up security on a database. By using the wizard you will secure the database so that:
Your new administrator user will own the database and each object in the database.
Your new administrator user will have full access to the database.
The Admins group will have full access to the database.
The default Admins user will have no access to the database.
The Users group will have no access to the database.
The database itself is encoded (see the section Encoding a Database).).
To start the User-level Security Wizard, select Tools | Security | User-level Security Wizard. . . . you start the security with the database open exclusively, you are prompted to reopen the database in shared mode. With the database open in shared mode, the Security Wizard dialog box shown in Figure 16-22 displays.
If you have followed the steps above to create an MDW file, you should already be joined to your new MDW file. This will enable the option Modify my current workgroup information file. If that option is not enabled, cancel the wizard and join your MDW file as described above.
Select the option to modify your current workgroup information file and click Next>. This displays the objects contained in the database as shown in Figure 16-23.
The wizard sets permission for the objects that are selected, but only for the predefined groups provided by the wizard. It also sets ownership for the selected objects. On the next panel of the wizard, you can select groups to receive permissions on the selected object. Since this is the first time through the wizard, select all objects using the All Objects tab and the Select All button. Click Next> to see the Groups panel shown in Figure 16-24.
Figure 16.22. Figure 16-22
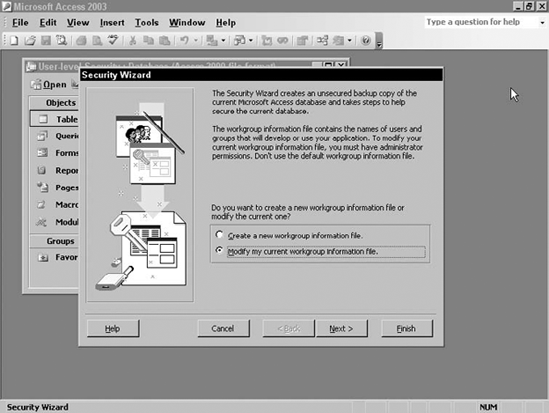
Figure 16.23. Figure 16-23

Figure 16.24. Figure 16-24
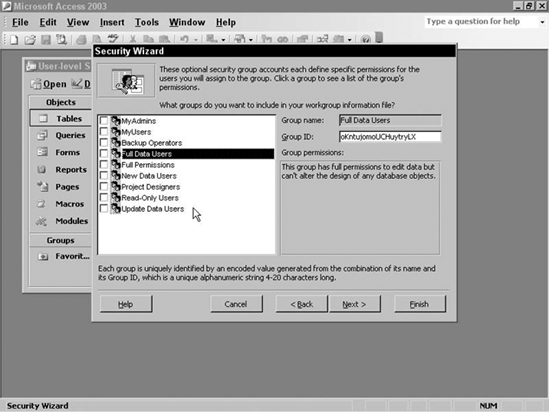
Since you have defined your own set of groups, they are displayed in the list. Also, the wizard provides a set of default groups to choose from. A description of the permissions that will be set is displayed at that right when you click Group. The advantage to using the default groups is that when they are selected, default permissions will be set up for the groups. A disadvantage is that any user signed in through Access (2003) will have the same default groups and permissions. You will notice the bright yellow caution notice posted by Access.
The wizard does not remove any groups from the MDW file. The wizard also doesn't know how to set up permissions for your groups. So you do not need to select your own groups. Click Next> to see the All users panel, as shown in Figure 16-25.
This panel permits you to adjust the permissions that will be set for the group Users. Recall that every user must belong to the Users group. Which means, anyone who logs on will receive the permissions assigned to the Users group. Therefore, it is strongly recommended that you select the No, the Users group should not have any permissions option to prevent unwanted access to your database.
Figure 16.25. Figure 16-25

TIP: Since all users are members of the Users"group, you may wish to grant the Open/Run permission of the Database object to this group. If you do so, you will not have to remember to set it for any new groups you create. You do provide better security if you use the No, the Users group should not have any permissions. And, since there may be some objects that you do not want all users to have Open/Run permission, the only way to provide that flexibility is to select No, the Users group should not have any permissions at this point.
After selecting No option, click Next> to display the New users panel as shown in Figure 16-26.
On this panel you can create new users and assign them a password. If you created your users when you set up the MDW file, you can skip this. If you didn't create your users earlier, you can add them now. If you do add users, be sure to record the PID (personal ID) in case you need to recreate the MDW file later.
Tip: Sometimes it is effective to use the same PID for all users. Since the PID cannot be changed by the user, having a standard PID for the database can make it possible to recreate a MDW file if necessary.
Click Next> to display the User/group assignment panel as shown in Figure 16-27.
Figure 16.26. Figure 16-26

Figure 16.27. Figure 16-27

This panel permits you to assign groups to users or users to groups depending on which option is selected. If you created new users on the previous panel, be sure to assign them to the appropriate group or groups.
Click Next> to display the Backup file specification panel as shown in Figure 16-28.
Figure 16.28. Figure 16-28

This panel asks you for the name of the file you want to use to store your unsecured database. This file will contain the database without the user-level security applied. You should keep this file until you have validated the security setup.
Click Finish to complete the User-level Security Wizard.
16.5.2.1.7. Adjusting Permissions
After you have used the User-level Security Wizard to establish some initial settings for security, you are likely to need to adjust those settings. The following describes how to adjust permissions for users and groups.
The steps described here can be accomplished through the wizard. They are presented to reinforce the reason for selecting the options described when using the wizard.
One of the first steps in setting up user-level security should be to remove all permissions from the group Users and from the user Admin. Recall that all users in an MDW file must belong to the Users group. Also recall that each user gets a set of pass codes from each group they belong to. Removing all security from the Users group ensures that no user will be granted permissions that you didn't intend to grant.
Note: The database owner and the owner of an object in the database always have full permissions to the database or object no matter how other permissions are set.
If the database was created prior to using your new MDW file, you may have to log on as user Admin to set permissions using your new MDW file. This happens because the default owner of a database created under the default MDW file is Admin. If you have not yet given your new administrative user ownership of the database, it will not have permissions to administer the database.
By now, you should have joined the MDW file that contains the user groups and users for which you will set permissions. If the database has previously been secured using user-level security, be sure that you are logged on as a user that has administrative permissions for that database.
Note: Since administrative permissions are granted by the database, not by the MDW file, a user that belongs to the Admins group of the MDW file may not be able to administer the database. The user will only be able to administer the database if the group the user belongs to or the user has been given administrative permissions or if the user is the database owner. Some permissions can only be set by the owner of the database.
To begin setting permissions, select Tools | Security | User and Group Permissions. . . . This displays the dialog box shown in Figure 16-29.
To remove the permissions for the user group Users, click the Groups option below the User/Group Name list. Highlight the group named Users. The form shows a list of all of the objects under the Object Name list for the type of the object selected in the Object type field. You can select multiple objects from the Object Name list using the click-and-drag-over, Ctrl-click, or Shift-click methods. To revoke all permissions from the selected objects, remove the check from the box for each permission.
Tip: Removing the check from the Read Design permission removes all other permissions except the Open/Run permission.
When the desired permissions are set or unset, be sure to click Apply before selecting another Object type or User or Group. Continue to remove permissions from the user group Users by selecting each of the other object types:Database, Query, Form, Report, and Macro. Permissions do not change until a user has logged into the database after the updated settings have been saved.
Note: In some instances, removing the permissions from <New Tables/Queries> does not prevent a user from creating a new table. You should verify these security settings for each user. (Using the User-level Security Wizard for the initial setup can prevent this problem.) If removing permissions using the user interface doesn't work, you can use Visual Basic to change permissions. This is described later.
Figure 16.29. Figure 16-29

Additionally, removing permissions from <New Form>, <New Report>, and <New Macros> objects does not always prevent a user from attempting to create a new object. However, if the user does not have permission to open the database exclusively, they will not be able to save the object.
As noted earlier, the owner of the database and the owner of each object in the database always have administrative permissions. Permissions cannot be revoked from these owners even if the permission settings are changed. For this reason you should use the User-level Security Wizard to perform initial setup of security. The wizard changes ownership of all of the selected objects to the user that is logged on when the wizard is run.
To change the owner of objects other than the database itself, select the Change Owner tab of the User and Group Permission form as shown in Figure 16-30.
Select the objects for which you wish to set permissions using the click-and-drag-over, Ctrl-click, or Shift-click methods. You may choose to assign ownership to a user group or a user. Since any user who belongs to the Admins group probably needs full access no matter what permission are set, setting the owner to Admins is desirable. Select the Groups option from the New Owner drop-down list. Select the Admins group. Then click Change Owner. Like setting permissions, each object type can have a different user. Be sure to set the ownership for each object type.
Figure 16.30. Figure 16-30

NOTE
New groups will not be granted any permissions. When you create a new group, be sure to grant Open/Run permission for the Database object type to that group, otherwise users that belong to that group and on other groups will not be able to open the database.
TIP: Since all users are members of the Users group, you may wish to grant the Open/Run permission of the Database object to this group. If you do so, you will not have to remember to set it for any new groups you create. However, you should also remember that since Users is a default group created by Access, this allows all users Open/Run permission of the Database object.
16.5.2.1.8. Finishing Up User-Level Security
If you have followed the steps up to this point, the new administrative user you created in the MDW file will be the only user with access to the database. And because you have used the User-level Security Wizard, you have given ownership of the database and all objects to your new administrator user. Therefore, you cannot accidentally remove permission from your administrator user.
Now you can begin to grant permissions for the objects in the database. In the MDW File section earlier, it was recommended that you grant permissions to user groups rather than to users. Recall that the reason for this is that a user's role may change. If that happens and you have granted permissions for that user, you will have to revoke them from each database where you have individually granted them permissions.
16.5.2.1.9. Encoding a User-Level Secured Database
Securing a database with user-level security does not prevent anyone from exploring the database using a tool other than Access. For instance, Windows Notepad could be used to look at the data contained in the database.
As with shared-level security, if your data needs to be more secure, you should encode the database. Fortunately, if you use the User-level Security Wizard, the database is encoded.
16.5.2.1.10. Linking to a User-Level Secured Database
Unlike shared-level security, linking to tables in a user-level secured database will not store security information. In fact, you must be joined to the MDW file associated with the database you are linking to before opening a database that links to it.
Recall that the username and password prompt only appear once per Access session. This happens when you take certain actions such as opening a database or attempting to maintain security. This establishes your identity to the MDW file you are joined to at that time.
If you use the wrong MDW file when you identify yourself to Access, you may not be prompted for a username and password. If you are not prompted, the Admin user password has not been set to activate the MDW file, so you become the Admin user by default. If you are prompted, the identity you establish will not be the same. Recall that your identity gets you access to a set of pass codes. These pass codes are a combination of the MDW file authentication information plus the username and PID or the MDW file authentication information plus the group name and GID. With the wrong pass codes, you will not be able to get the permissions the remote database has granted you.
16.5.2.2. User-Level Security Using DAO
User-level security can be maintained using VBA and DAO. This section demonstrates sample procedures for setting user-level security using DAO.
Users and Groups are collections of the Database Engine Workspace. The procedures defined here work with users and groups on the open a workspace in the current database engine. Therefore you must be joined to the correct MDW file to use these procedures.
Additionally, these sample procedures set permissions in the database that is open (CurrentDB). The sample ADO procedures, discussed later in this chapter, do not expect the database to be open.
The DAO.Permissions Enum enumeration defines the appropriate numeric values for setting a permission. The ShowSample DAO. procedure, discussed later in this section, demonstrates how to use this enumeration.
The following declarations are used in the procedures that show how to use DAO to set up user-level security.
Const cAdminUser = "MyAdmin"
Const cAdminPW = ""
16.5.2.2.1. Maintaining Groups with DAO
The AddGroupDAO procedure adds groups to the MDW file. The DropGroupDAO procedure drops groups from the MDW file.
To add a group, the procedure creates an object of type Group and sets the properties for it. It then appends the group to the Groups collection of the Workspace.
Public Sub AddGroupDAO(pGroupName As String, pGID As String)
On Error Resume Next
Dim ws As Workspace
Dim grp As Group
' connect to the engine with a workspace
Set ws = DBEngine.CreateWorkspace("DAOWS", cAdminUser, cAdminPW)
' create a new group object
Set grp = New Group
' set the objects properties
grp.Name = pGroupName
grp.PID = pGID
' append the group to the collection of groups
ws.Groups.Append grp
If Err.Number = 0 Then
    Debug.Print pGroupName & " added"
Else
    Debug.Print Err.Number, Err.Description
    Stop
End If
ws.Close
Set ws = Nothing
End Sub
To drop a group, the procedure simply deletes it from the Groups collection of the Workspace.
Public Sub DropGroupDAO(pGroupName As String)
On Error Resume Next
Dim ws As Workspace
' connect to the engine with a workspace
Set ws = DBEngine.CreateWorkspace("DAOWS", cAdminUser, cAdminPW)
' delete the group from the collection of groups
ws.Groups.Delete (pGroupName)
If Err.Number = 0 Then
    Debug.Print pGroupName & " deleted"
Else
    Debug.Print Err.Number, Err.Description
    Stop
End If
ws.Close
Set ws = Nothing
End Sub
16.5.2.2.2. Maintaining Users with DAO
The AddUserDAO procedure adds users to the MDW file. The DropUserDAO procedure drops users from the MDW file. Notice that the AddUserDAO procedure also calls the AddUserToGroupDAO procedure. This is to keep the data in the MDW file consistent with the Access rule that all users must belong to the Users group.
To add a user, create an object of type User and set the properties for it. Then append the user to the Users collection of the Workspace.
Public Sub AddUserDAO(pUserName As String, _
    pPassword As String, pPID As String)
On Error Resume Next
Dim ws As Workspace
Dim usr As User
' connect to the engine with a workspace
Set ws = DBEngine.CreateWorkspace("DAOWS", cAdminUser, cAdminPW)
' create a user object Set usr = New User
' assign the properties to the user
usr.Name = pUserName
usr.Password = pPassword
usr.PID = pPID
' append the user object to the collection of users
ws.Users.Append usr
If Err.Number = 0 Then
    Debug.Print pUserName & " added"
    Call AddUserToGroupDAO(pUserName,"Users")
Else
    Debug.Print Err.Number, Err.Description
    Stop
End If
ws.Close
Set ws = Nothing
Set usr = Nothing
End Sub
To drop a user, simply delete it from the Users collection of the Workspace.
Public Sub DropUserDAO(pUserName As String)
On Error Resume Next
Dim ws As Workspace
' connect to the engine with a workspace
Set ws = DBEngine.CreateWorkspace("DAOWS", cAdminUser, cAdminPW)
' delete the user from the set of users
ws.Users.Delete (pUserName)
If Err.Number = 0 Then
    Debug.Print pUserName & " deleted"
Else
    Debug.Print Err.Number, Err.Description
    Stop
End If
ws.Close
Set ws = Nothing
End Sub
The procedure that adds a user to a group first establishes a connection with the user that has already been added to the Users collection of the Workspace. Then it creates a group object to contain the group and appends it to the Groups collection for the user.
Public Sub AddUserToGroupDAO(pUserName As String, pGroupName As String)
On Error Resume Next
Dim ws As Workspace
Dim grp As Group
Dim usr As New User
' connect to the engine with a workspace
Set ws = DBEngine.CreateWorkspace("DAOWS", cAdminUser, cAdminPW)
' point to the user
Set usr = ws.Users(pUserName)
' create a connection to the group
Set grp = usr.CreateGroup(pGroupName)
' append the group connection back to the groups collection
usr.Groups.Append grp
If Err.Number = 0 Then
    Debug.Print pUserName & " added to " & pGroupName
Else
    Debug.Print Err.Number, Err.Description Stop
End If
Set usr = Nothing
Set grp = Nothing
ws.Close
Set ws = Nothing
End Sub
To drop a user from a group, delete it from Users collection of the group.
Public Sub DropUserFromGroupDAO(pUserName As String, pGroupName As String)
On Error Resume Next
Dim ws As Workspace
Dim usr As User
' connect to the engine with a workspace
Set ws = DBEngine.CreateWorkspace("DAOWS", cAdminUser, cAdminPW)
' delete the user from the groups collection
ws.Groups(pGroupName).Users.Delete pUserName
If Err.Number = 0 Then
    Debug.Print pUserName & " removed from " & pGroupName
Else
    Debug.Print Err.Number, Err.Description
    Stop
End If
ws.Close
Set ws = Nothing
End Sub
16.5.2.2.3. Maintaining Permissions with DAO
With your understanding of the detachment between the MDW file and the file that is being secured (see the first section under User-Level Security) you recognize that unlike users and groups that are maintained through the DB Engine Workspace, permissions are set against the current database.
The following procedures demonstrate setting permissions for Containers (SetPermissionsOnContainerDAO) and Objects (SetPermissionsOnObjectDAO).
Setting permissions for Containers (Tables, Queries, Forms, Macros) sets the permissions for the New object, for example, <New Table/Query>.
Public Sub SetPermissionsOnContainerDAO(pContainer As String, _
        pName As String, _
        pPermissions As Long)
On Error Resume Next
Dim db As Database
Dim con As Container
' connect to the current database
Set db = CurrentDb()
' point to the container
Set con = db.Containers(pContainer)
' point to the user within the container
con.UserName = pName
If Err.Number <> 0 Then
    Debug.Print Err.Number, Err.Description
    Stop
End If
' set the user's permissions for the container
con.Permissions = pPermissions
If Err.Number = 0 Then
    Debug.Print "Permissions set for " & pName
Else
    Debug.Print Err.Number, Err.Description
End If
Set con = Nothing
db.Close
Set db = Nothing
End Sub
Setting permissions on objects sets them for one object. Notice that SetPermissionsOnObjectDAO requires that you specify the container of the object. This is because a form and a table, for instance, could have the same name.
Public Sub SetPermissionsOnObjectDAO(pContainer As String, _
        pDocument As String, _
        pName As String, _
        pPermissions As Long)
On Error Resume Next
Dim db As Database
Dim doc As Document
' connect to the current database
Set db = CurrentDb()
' point to the document within the correct container
Set doc = db.Containers(pContainer).Documents(pDocument)
If Err.Number <> 0 Then
    Debug.Print Err.Number, Err.Description
    Stop
End If
' point to the user name of that document
doc.UserName = pName
If Err.Number <> 0 Then
Debug.Print Err.Number, Err.Description
Stop
End If
' set the permissions for that user
doc.Permissions = pPermissions
If Err.Number = 0 Then
Debug.Print "Permissions set for " & pName
Else
Debug.Print Err.Number, Err.Description
End If
Set doc = Nothing
db.Close
Set db = Nothing
End SubThis text does not include sample procedures for revoking permissions using DAO. Samples are included for ADO. In these DAO examples, permissions are set by determining which will be granted and by using AND operation on those values. However, you could write procedures to revoke permissions. The following code snippet shows you a method that could be used to set up a procedure to revoke specific permissions. (This code has not been tested.)
Public Sub RevokePermissionsFromObjectDAO(pContainer As String, _
        pDocument As String, _
        pName As String, _
        pPermissions As Long)
...
' revoke the permissions for that user
doc.Permissions = doc.Permissions and Not pPermissions
...
End Sub
The ChangeOwnerDAO procedure is included with the permissions section because owners always have full permissions. Notice that you can only change ownership on documents (that is, Tables, Forms, Reports, Pages, and Macros), not on the database or the containers.
Function ChangeOwnerDAO(pContainer As String, _
    pDocumentName As String, _
    pOwner As String, _
    pPassword As String)
Dim db As Database
Dim con As Container
Dim doc As Document
' connect to the current database
Set db = CurrentDb()
' access the desired container
Set con = db.Containers(pContainer)
' access the correct document
Set doc = con.Documents(pDocumentName)
' change the owner of that document
doc.Owner = pOwner
If Err.Number = 0 Then
Debug.Print "Owner changed to " _
& pOwner & " on " & pDocumentName & " in " & pContainer
Else
Debug.Print Err.Number, Err.Description
End If
Set doc = Nothing
Set con = Nothing
db.Close
Set db = Nothing
End Function16.5.2.2.4. Sample Setup Using DAO
The following sample shows various calls to the above DAO procedures.
Public Sub ShowSamplesDAO()
Debug.Print "Start sample...."
' start with a drop - this will error
' since "Fred Derf" isn't defined yet
Call DropUserDAO("Fred derf")
' add the user with no password and PID=1234
Call AddUserDAO("Fred Derf", "", "1234")
' set the permissions on the container
' this sets the permissions for things like <New Table/Query>
' use the Permissions Enum from DAO
' for multiple permissions, use "AND" between each
Call SetPermissionsOnContainerDAO("Tables", "Fred Derf", _
    DAO.PermissionEnum.dbSecReadDef And _
    DAO.PermissionEnum.dbSecRetrieveData)

' set permissions on a specific object
' in this case the object type is a Table and its name is "Table2"
Call SetPermissionsOnObjectDAO("Tables", "Table2", "Fred Derf", _
    dbSecFullAccess)
' add a groupd
Call DropGroupDAO("mygroup1")
Call AddGroupDAO("MyGroup1", "sdfxefhr3wqerf")
' add a user to the group
' notice that user names are not case sensitive
Call AddUserToGroupDAO("fred derf", "MyGroup1")
Call DropUserFromGroupDAO("Fred Derf", "MyGroup1")
' add another user and give him ownership over "Table2"
Call DropUserDAO("Mike Ekim")
' give Mike a password, NOTE: passwords are case sensitive
Call AddUserDAO("Mike Ekim", "mike", "2342355")
Call ChangeOwnerDAO("Tables", "Table2", "Mike Ekim", "")
Debug.Print "End samples"
End Sub
The ListUsersDAO procedure prints a list of the users and the groups they belong to and a list of groups and the users that belong to them. This procedure can be useful when you need to validate your users and groups setup.
Public Sub ListUsersDAO()
On Error Resume Next
Dim ws As Workspace
Dim usr As User
Dim grp As Group
' connect to the engine with a workspace
Set ws = DBEngine.CreateWorkspace("DAOWS", cAdminUser, cAdminPW)
Debug.Print "---- Users and their groups ---"
For Each usr In ws.Users
    Debug.Print usr.Name
    For Each grp In usr.Groups
        Debug.Print , grp.Name
    Next grp
Next usr
Debug.Print "---- Groups and their users ---"
For Each grp In ws.Groups
    Debug.Print grp.Name
    For Each usr In grp.Users
        Debug.Print , usr.Name
    Next usr
Next grp
ws.Close
Set ws = Nothing
End Sub
16.5.2.3. User-Level Security Using ADO
The Microsoft Jet Engine and ADO can be used to set up groups and users and permissions for user-level security.
Groups and users are set up using the SQL statements CREATE, ALTER, and DROP. As suggested by their names, these statements permit creating, altering (or modifying), and dropping (or deleting) user groups and users. The GROUP and USER keywords are used to indicate whether the action is for a user group or a user. The ADD and DROP statements are used to add users to a group or remove them from a group.
Permissions are set up using the GRANT and REVOKE statements. As suggested by the names, these statements are used to grant permissions to or remove permissions from an object for a user group or user. The SELECT, INSERT, UPDATE, and DELETE keywords are used to indicate which permissions are granted or revoked. (The table later in this chapter lists the meaning of these keywords and additional keyword options.)
These routines have some basic error trapping. You will of course want to improve the traps to suit your needs. The examples also include several Debug.Print statements to show the SQL statements to be executed for each operation. The following declarations are used in the procedures that show how to use ADO to set up user-level security:
Const cProvider = "Microsoft.Jet.OLEDB.4.0"
Const cDBName = "C:MyDatabase.mdb"
Const cMDWfile = "C:MySystem.mdw"
Const cAdminUser = "MyAdmin"
Const cAdminPW = ""
Enum eObjectTypes
    Database = 1
    Container = 2
    Table = 3
    Other = 4
End Enum
All procedures establish a connection to the database using the ADODB.Connection object. The provider for the connection is Microsoft.Jet.OLEDB.4.0. Indicate the MDW file by setting a value for the connection property PropertiesJet OLEDB:System database)(. Open the connection using the Data Source= your database. You only need to specify the database that will be secured when you set permission your database. You only need to specify the database that will be secured when you set permissions using the GRANT and REVOKE options. Otherwise the data source can be any database. Be sure to include the User ID and Password parameters for the Open method.
The Execute method executes the SQL statement. After the SQL statement has executed, the connection is closed and the object destroyed.
Note: The SQL statements in these examples cannot be executed from an Access Query.
16.5.2.3.1. Maintaining Groups with ADO
The first two procedures demonstrate techniques for adding a group (AddGroupADO) and dropping a group (DropGroupADO)
Notice that when a group is added, you can specify the Group ID. A group must be added before a user can be added to the group. If you wish to add a group name that contains an embedded space, enclose the name within square brackets ([]). You may wish to change the code to always add the brackets.
Sub AddGroupADO(pGroupName As String, pGID As String)
On Error Resume Next
Dim cnn As ADODB.Connection
Dim strCommand As String
' Open a connection to the database
Set cnn = New ADODB.Connection
With cnn
    .Provider = cProvider
    .Properties("Jet OLEDB:System database") = cMDWfile
    .Open "Data Source=" & cDBName _
        & ";User ID=" & cAdminUser _
        & ";Password=" & cAdminPW
    If Err.Number <> 0 Then Debug.Print Err.Number, Err.Description

    ' build the command to create the Group
    strCommand = "CREATE GROUP " & pGroupName & " " & pGID & ";"
    Debug.Print strCommand
    ' execute the command to create the Group
    .Execute strCommand
    If Err.Number = 0 Then
        ' nop
    ElseIf Err.Number = −2147467259 Then
        Debug.Print "Group name already exists."
Else
Debug.Print Err.Number, Err.Description
End If
End With
cnn.Close
Set cnn = Nothing
End SubWhen a group is dropped, users are dropped from the group but are not dropped from the security database.
Sub DropGroupADO(pGroupName As String)
On Error Resume Next
Dim cnn As ADODB.Connection
Dim strCommand As String
' Open a connection to the database
Set cnn = New ADODB.Connection
With cnn
.Provider = cProvider
.Properties("Jet OLEDB:System database") = cMDWfile
.Open "Data Source=" & cDBName _
& ";User ID=" & cAdminUser _
& ";Password=" & cAdminPW
If Err.Number <> 0 Then Debug.Print Err.Number, Err.Description
' build the command to create the Group
strCommand = "DROP GROUP " & pGroupName & ";"
Debug.Print strCommand
' execute the command to create the Group
.Execute strCommand
If Err.Number = 0 Then
' nop
ElseIf Err.Number = −2147467259 Then
Debug.Print "Group name does not exist."
Else
        Debug.Print Err.Number, Err.Description
    End If
End With

cnn.Close
Set cnn = Nothing
End Sub16.5.2.3.2. Maintaining Users and User Passwords with ADO
The next three procedures demonstrate techniques for adding a user (AddUserADO), dropping a user (DropUserADO), and setting a user password (AlterUserPasswordADO).
Notice that when a user is added, you can specify the personal ID. Also notice that the AddUserADO procedure automatically adds the user to the group Users with a call to AddUserToGroup. This is done to keep the MDW file consistent with the Access rule that requires that all users belong to the Users group.
NOTE
If you wish to add a username that contains an embedded space, enclose the name within square brackets ([]). You may wish to change the code to always add the brackets.
Sub AddUserADO(pUserName As String, pPID As String, pPassword As String)
On Error Resume Next
Dim cnn As ADODB.Connection
Dim strCommand As String
' Open a connection to the database
Set cnn = New ADODB.Connection
With cnn
    .Provider = cProvider
    .Properties("Jet OLEDB:System database") = cMDWfile
    .Open "Data Source=" & cDBName _
        & ";User ID=" & cAdminUser _
        & ";Password=" & cAdminPW
    If Err.Number <> 0 Then Debug.Print Err.Number, Err.Description

    ' build the command to create the user
    strCommand = "CREATE USER " & pUserName _
               & " [" & pPassword & "] " & pPID & ";"
    Debug.Print strCommand
    ' execute the command to create the user
    .Execute strCommand
    If Err.Number = 0 Then

        ' MS Access prefers to have all users assigned to the "Users"
        ' group. Since using SQL to add the user doesn't add the user
        ' to the group "Users", add this user to the group
        Call AddUserToGroupADO(pUserName, "Users")
    ElseIf Err.Number = −2147467259 Then
        Debug.Print "Account name already exists."
    Else
        Debug.Print Err.Number, Err.Description
    End If
End With

cnn.Close
Set cnn = Nothing
End Sub
Dropping a user from a group removes only that user without impacting the group or permission settings for the group that user belonged to.
Sub DropUserADO(pUserName As String)
On Error Resume Next
Dim cnn As ADODB.Connection
Dim strCommand As String
' Open a connection to the database
Set cnn = New ADODB.Connection
With cnn
.Provider = cProvider
    .Properties("Jet OLEDB:System database") = cMDWfile
    .Open "Data Source=" & cDBName _
        & ";User ID=" & cAdminUser _
        & ";Password=" & cAdminPW
    If Err.Number <> 0 Then Debug.Print Err.Number, Err.Description

    ' build the command to create the user
    strCommand = "DROP USER " & pUserName & ";"
    Debug.Print strCommand
    ' execute the command to create the user
    .Execute strCommand
    If Err.Number = 0 Then
        ' nop
    ElseIf Err.Number = −2147467259 Then
        Debug.Print "Account name does not exist."
    Else
        Debug.Print Err.Number, Err.Description
    End If
End With

cnn.Close
Set cnn = Nothing
End Sub
The AlterUserPasswordADO procedure and the ALTER USER PASSWORD SQL statement seem to suggest that you need to know the password to alter a user password. However, if the password is not known, you can specify a null password. To do this, use empty square brackets ("[]") or the SQL reserved word NULL for the password.
NOTE
You can also use empty square brackets or NULL to set the new password to nothing (that is, to clear the password).
Sub AlterUserPasswordADO(pUserName As String, _
                  pPassword As String, _
                  pOldPassword As String)
On Error Resume Next
Dim cnn As ADODB.Connection
Dim strCommand As String
' Open a connection to the database
Set cnn = New ADODB.Connection
With cnn
    .Provider = cProvider
    .Properties("Jet OLEDB:System database") = cMDWfile
    .Open "Data Source=" & cDBName _
        & ";User ID=" & cAdminUser _
        & ";Password=" & cAdminPW
    If Err.Number <> 0 Then Debug.Print Err.Number, Err.Description

    ' To specify and empty password, you can use either the NULL keyword
' or empty square brackets "[]" as parameters to this routine
' Alternatively, you could make this function like AddUserADO by
' surrounding each password with square brackets.
' e.g. " [" & pPassword & "] ".
' This will permit using the null string ("") to set the password.
strCommand = "ALTER USER " & pUserName _
& " PASSWORD " & pPassword & " " & pOldPassword & ";"
Debug.Print strCommand
' execute the command to create the user
.Execute strCommand
If Err.Number = 0 Then
' nop
Else
Debug.Print Err.Number, Err.Description
End If
End With
cnn.Close
Set cnn = Nothing
End Sub16.5.2.3.3. Maintaining Users and Groups with ADO
The next two procedures demonstrate how to add users to a group (AddUserToGroupADO) and drop users from a group (DropUserFromGroupADO).
NOTE
If a group name or a username has embedded spaces, enclose the name within square brackets ([]). You may wish to change the code to always add the brackets.
Sub AddUserToGroupADO(pUserName As String, pGroupName As String)
On Error Resume Next
Dim cnn As ADODB.Connection
Dim strCommand As String
' Open a connection to the database
Set cnn = New ADODB.Connection
With cnn
    .Provider = cProvider
    .Properties("Jet OLEDB:System database") = cMDWfile
    .Open "Data Source=" & cDBName _
        & ";User ID=" & cAdminUser _
        & ";Password=" & cAdminPW
    If Err.Number <> 0 Then Debug.Print Err.Number, Err.Description

    ' build the command to create the user
    strCommand = "ADD USER " & pUserName & " TO " & pGroupName & ";"
    Debug.Print strCommand
    ' execute the command to create the user
    .Execute strCommand
    If Err.Number = 0 Then
        ' nop
Else
Debug.Print Err.Number, Err.Description
End If
End With
cnn.Close
Set cnn = Nothing
End SubDropping a user from a group does not remove the user. The user can be assigned to another group, or you can drop the user using the DropUserADO procedure.
Sub DropUserFromGroupADO(pUserName As String, pGroupName As String)
On Error Resume Next
Dim cnn As ADODB.Connection
Dim strCommand As String
' Open a connection to the database
Set cnn = New ADODB.Connection
With cnn
.Provider = cProvider
.Properties("Jet OLEDB:System database") = cMDWfile
.Open "Data Source=" & cDBName _
& ";User ID=" & cAdminUser _
& ";Password=" & cAdminPW
If Err.Number <> 0 Then Debug.Print Err.Number, Err.Description
' build the command to create the user
strCommand = "DROP USER " & pUserName & " FROM " & pGroupName & ";"
Debug.Print strCommand
' execute the command to create the user
.Execute strCommand
If Err.Number = 0 Then
' nop
Else
    Debug.Print Err.Number, Err.Description
    End If
End With

cnn.Close
Set cnn = Nothing
End Sub16.5.2.3.4. Maintaining Database Permissions with ADO
The next four procedures demonstrate techniques for granting permissions to users or groups (GrantPermissionsOnTableADO and GrantPermissionsToObjectADO) and revoking permissions from users or groups (RevokePermissionsFromTableADO and RevokePermissionsFromObjectADO).
Permissions can be granted to either user groups or individual users. (The name of the parameter pUserName is not meant to imply that it must be a user.) This is fortunate, since the ideal setup is to grant permissions to groups and then add users to groups so they can have the permissions they need.
Unlike the procedures that update the user group and user information, the correct database must be specified in the Data Source to grant permissions to the correct objects. (The discussion about the MDW file explains the detachment between the MDW file and the database being secured.)
For these procedures, the pPermissions parameter can be one privilege (see the table later in this chapter) or many privileges separated by commas. If the username has embedded spaces, enclose the name within square brackets ([]). You may wish to change the code to always add the brackets.
While not generally recommended, using PUBLIC for the group/username (pUserName) will set permissions for the default users group account so that everyone will get the assigned privileges. The best use for this would be to grant CONNECT permission to the database since this will permit all users access to the database but not necessarily to all objects in the database.
Sub GrantPermissionsOnTableADO(pUserName As String, _
                 pTableName As String, pPermissions As String)
On Error Resume Next
Dim cnn As ADODB.Connection
Dim strCommand As String
' Open a connection to the database
Set cnn = New ADODB.Connection
With cnn
    .Provider = cProvider
    .Properties("Jet OLEDB:System database") = cMDWfile
    .Open "Data Source=" & cDBName _
        & ";User ID=" & cAdminUser _
        & ";Password=" & cAdminPW
    If Err.Number <> 0 Then Debug.Print Err.Number, Err.Description

    ' build the command to create the user
    strCommand = "GRANT " & pPermissions _
               & " ON TABLE " & pTableName _
               & " TO " & pUserName & ";"
    Debug.Print strCommand
    ' execute the command to create the user
    .Execute strCommand
    If Err.Number = 0 Then
        ' nop
    Else
        Debug.Print Err.Number, Err.Description
    End If
End With

cnn.Close
Set cnn = Nothing
End Sub
Permissions are revoked from the user or the group depending on the value of pUserName, if revoking permissions from a user does not affect the permissions of the group to which that user belongs.
Sub RevokePermissionsFromTableADO(pUserName As String, _
               pTableName As String, pPermissions As String)
On Error Resume Next
Dim cnn As ADODB.Connection
Dim strCommand As String
' Open a connection to the database
Set cnn = New ADODB.Connection
With cnn
.Provider = cProvider
.Properties("Jet OLEDB:System database") = cMDWfile
.Open "Data Source=" & cDBName _
& ";User ID=" & cAdminUser _
& ";Password=" & cAdminPW
If Err.Number <> 0 Then Debug.Print Err.Number, Err.Description
' build the command to create the user
strCommand = "REVOKE " & pPermissions _
& " ON TABLE " & pTableName _
& " FROM " & pUserName & ";"
Debug.Print strCommand
' execute the command to create the user
.Execute strCommand
If Err.Number = 0 Then
' nop
Else
Debug.Print Err.Number, Err.Description
End If
End With
cnn.Close
Set cnn = Nothing
End SubGrantPermissionsToObjectADO is a more generic form of the GrantPermissionsToTableADO procedure. This procedure is used for object types other than tables and can easily replace the table-specific procedure.
Sub GrantPermissionsToObjectADO(pUserName As String, _
           pObjType As eObjectTypes, _
           pObjectName As String, _
           pPermissions As String)
On Error Resume Next
Dim cnn As ADODB.Connection
Dim strCommand As String
' Open a connection to the database
Set cnn = New ADODB.Connection
With cnn
    .Provider = cProvider
    .Properties("Jet OLEDB:System database") = cMDWfile
    .Open "Data Source=" & cDBName _
        & ";User ID=" & cAdminUser _
        & ";Password=" & cAdminPW
If Err.Number <> 0 Then Debug.Print Err.Number, Err.Description

' build the command to create the user
strCommand = "GRANT " & pPermissions & " ON "
Select Case pObjType
Case eObjectTypes.Database:
strCommand = strCommand
Case eObjectTypes.Container:
strCommand = strCommand & "CONTAINER"
Case eObjectTypes.Table:
strCommand = strCommand & "TABLE"
Case eObjectTypes.Other:
strCommand = strCommand & "OBJECT"
Case Else
Debug.Print "Object type incorrect"
End Select
strCommand = strCommand & " " _
& pObjectName _
& " TO " & pUserName & ";"
Debug.Print strCommand
' execute the command to create the user
.Execute strCommand
If Err.Number = 0 Then
' nop
Else
Debug.Print Err.Number, Err.Description
End If
End With
cnn.Close
Set cnn = Nothing
End SubRevokePermissionsFromObjectADO is a more generic form of the RevokePermissionsFromTableADO procedure. This procedure is used for object types other than tables, and can easily replace the table-specific procedure.
Sub RevokePermissionsFromObjectADO(pUserName As String,
           pObjType As eObjectTypes, _
           pObjectName As String, _
           pPermissions As String)
On Error Resume Next
Dim cnn As ADODB.Connection
Dim strCommand As String
' Open a connection to the database
Set cnn = New ADODB.Connection
With cnn
    .Provider = cProvider
    .Properties("Jet OLEDB:System database") = cMDWfile
    .Open "Data Source=" & cDBName _
        & ";User ID=" & cAdminUser _
        & ";Password=" & cAdminPW
    If Err.Number <> 0 Then Debug.Print Err.Number, Err.Description

    ' build the command to create the user
    strCommand = "REVOKE " & pPermissions & " ON "
    Select Case pObjType
        Case eObjectTypes.Database:
            strCommand = strCommand
Case eObjectTypes.Container:
strCommand = strCommand & "CONTAINER"
Case eObjectTypes.Table:
strCommand = strCommand & "TABLE"
Case eObjectTypes.Other:
strCommand = strCommand & "OBJECT"
Case Else
Debug.Print "Object type incorrect"
End Select
strCommand = strCommand & " " _
& pObjectName _
& " FROM " & pUserName & ";"
Debug.Print strCommand
' execute the command to create the user
.Execute strCommand
If Err.Number = 0 Then
' nop
Else
Debug.Print Err.Number, Err.Description
End If
End With
cnn.Close
Set cnn = Nothing
End Sub16.5.2.3.5. Sample Set Up Using ADO
The following procedure (ShowSampleADO) shows various ways to call the previous ADO procedures. Embedded comments explain how things work.
Sub ShowSampleADO()
Debug.Print "Start Samples..."
' add a user with a Personal ID and Password
Call AddUserADO("DerfFred", "34434ox94f21", "DerfFred")
' if you do not know the old password,
' specifying the "NULL" keyword will work.
' See the AlterUserPasswordADO procedure for more information
Call AlterUserPasswordADO("DerfFred", "NULL", "NULL")
' To embed a space in the user name,
' enclose the username in square brackets
Call AddUserADO("[Mike Ekim]", "2120s95mr2foarw", "")
' notice user names are not case sensitive
Call DropUserADO("[mike ekim]")
' Give the user the usual permissions but don't allow INSERT
' (Prefer not to do this. But show as a sample anyway.)
Call GrantPermissionsOnTableADO _
    ("DerfFred", "WebBasedList", "SELECT, DELETE, UPDATE") ' Add a group
Call AddGroupADO("Group1", "325dao42") ' give permissions to the group Call GrantPermissionsOnTableADO _
    ("Group1", "WebBasedList", "SELECT, DELETE, UPDATE")
' add a user to the group
Call AddUserToGroupADO("DerfFred", "Group1")
' since the user has the same permissions as the group,
' revoke permissions from the user
' Notice this is using the more generic "Revoke.." procedure
Call RevokePermissionsFromObjectADO _
("DerfFred", Table, "WebBasedList", "SELECT, DELETE, UPDATE")
' More samples setting permissions Call GrantPermissionsToObjectADO _
("PUBLIC", Database, "Database", "CONNECT")
Call GrantPermissionsToObjectADO _
("DerfFred", Container, "Tables", "SELECT")
Call GrantPermissionsToObjectADO _
("DerfFred", Container, "Forms", "SELECT")
Call GrantPermissionsToObjectADO("DerfFred", Other, "Query1", "DROP")
' these next three calls show that when the group is dropped,
' users are automatically dropped from the group
' (an error will be displayed on DropUserFromGroupADO)
Call DropGroupADO("Group1")
Call AddGroupADO("Group1", "325dao42")
Call DropUserFromGroupADO("DerfFred", "Group1")
Debug.Print "End samples"
End SubThe following table details the privileges and their descriptions.
16.5.2.4. User-Level Security Using ADOX
The previous section has shown you how to maintain user-level security programmatically using ADO and the Jet engine. Another method to maintain security through programming is to use Microsoft ADO Ext. for DDL and Security (ADOX).
ADOX uses an object model that supports the Catalog, Group, and User objects. Using these objects you can perform most of the tasks described in the ADO above. Because of the object model, developing VBA procedures to maintain security can be easier. That is, rather than having to learn all of the correct SQL syntax, you can utilize Intellisense in the Visual Basic Editor to help build the right VBA statements in your code.
ADOX also attempts to do some of the work for you. For example, ADOX will provide the personal ID for you. You may like it to do this. On the other hand, since you won't know what the PID is, this can make it difficult to recreate an MDW file, if necessary.
For more information about ADOX, you can visit the Microsoft Developers Network library. See the article http://msdn.microsoft.com/library/default.asp?url=/library/en-us/ado270/htm/pg_adox_fundamentals_1.asp.