
Chapter 13
Designing with Patterns
IN THIS CHAPTER
![]() Applying pattern swatches to paths and shapes
Applying pattern swatches to paths and shapes
![]() Applying patterns to strokes and text
Applying patterns to strokes and text
![]() Creating your own patterns
Creating your own patterns
![]() Scaling and position patterns within graphics
Scaling and position patterns within graphics
![]() Layering multiple patterns
Layering multiple patterns
Pattern fills are discrete artwork than can be applied to fills and strokes in an almost unimaginable range of ways, including but far from limited to
- Fabric and fashion design
- Typographic effects
- Stroke patterns for dynamic effect
- A design treatment for graphics
I use these examples in the chapter to introduce you to how to apply patterns from Illustrator’s impressive presets. I also show you how to create and apply your own custom patterns.
Patterns, explored in this chapter, have a cousin in Illustrator: pattern brushes, which also can be deployed to design and apply repeating artwork, as I explain in Chapter 11. When do you use which? The short story is, if you want to design a pattern that repeats along a stroke, including on the borders of a shape (such as a rectangular shape that serves as a picture frame), I usually advise starting with a pattern brush. But if you want to fill a shape, use a pattern swatch.
Applying Patterns
Illustrator’s multiple sets of patterns are a valuable design resource. If you find one that works for your illustration, there’s no sense reinventing the wheel. Exploring available preset patterns is also an excellent way to begin to acclimate yourself to deploying any pattern — preset or homemade.
Pattern swatches are stashed in, accessed from, and organized within the Swatches panel, which they share with color swatches. And like color swatches, pattern swatches can be applied to not just the fill but also the stroke of an object. If you’re not comfortable using and organizing content in the Swatches panel, I suggest popping over to the section in Chapter 11 on managing color swatches.
To access Pattern libraries, choose Window ⇒ Swatch Libraries ⇒ Patterns. A submenu displays three groupings of pattern swatch libraries: Basic Graphics, Decorative, and Nature, as shown in Figure 13-1, and each of those submenus reveals additional sets of patterns.

FIGURE 13-1: Illustrator’s pattern swatches libraries.
Applying a pattern to a fill
Let’s begin an exploration of applying patterns to the most common way patterns are used: fills. Most common? Wait! (I hear you thinking), aren’t patterns always applied to fills? No, patterns can be applied also to strokes.
Pattern swatches can be applied to closed paths (the first anchor is also the last), or open paths (the first and last anchors differ). And pattern swatches can be applied to Live Paint faces or edges. (See Chapter 11 for an explanation of how to use Live Paint to intuitively add color to objects formed by intersecting paths.)
Use the following steps to apply a preset pattern to a shape or a path (open or closed).
-
Draw or select a path or a shape.
Any path or shape is fine, but if you're using these steps as a learning example, choose a simple shape so you can focus on exploring how patterns work.
-
Make sure the fill icon is active in the Tools panel.
Remember, you can apply pattern swatches to fills or strokes, so be sure the fill icon is selected.
-
Open a swatch pattern library.
Choose Window ⇒ Swatch Libraries ⇒ Patterns and then select a submenu and a library within that submenu. In Figure 13-2, I’m opening the Basic Graphics_Textures library.

FIGURE 13-2: Opening a swatch pattern library.
-
Click a pattern in the swatch library to apply it to the selected object, as illustrated in Figure 13-3.
 To aid in quickly browsing through multiple pattern swatch libraries, use the left and right triangles just to the right of the Swatches Library menu icon, at the bottom of the Swatches panel.
Pattern swatches (and all swatches) that you apply to objects in your document are added to the Swatches panel. All patterns added to the Swatches panel will be saved with the document. In Figure 13-4, you can see several patterns that have been applied in the document listed in the Swatches panel.

FIGURE 13-3: Applying pattern swatches to a selected object.
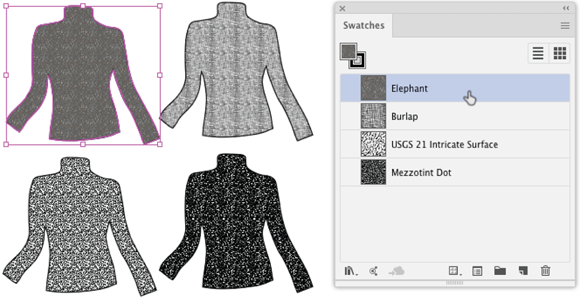
FIGURE 13-4: Several applied patterns.
Applying patterns to strokes
Applying a pattern fill to a stroke is a quick, easy, and underrated way to apply patterns to create cool outlines for objects such as picture frames, map borders, and even freehand drawings.
Why underrated? Because the standard workflow for creating and applying a design for something like a picture frame is to create and use a pattern brush (as described in Chapter 9). Defining a pattern brush, when you need one, is not a waste of time, mind you! Pattern brushes should be created and deployed when you need complex stroke patterns that include separate artwork for corners and paths.
But if all you need is a single pattern applied to a stroke, you can do that easily and effectively with a pattern swatch.
The process of applying a pattern to a stroke is similar to applying a pattern to a fill. The big difference is that you need to make sure Stroke is active in the Tools panel before you try to apply the pattern to a stroke, as shown in Figure 13-5.
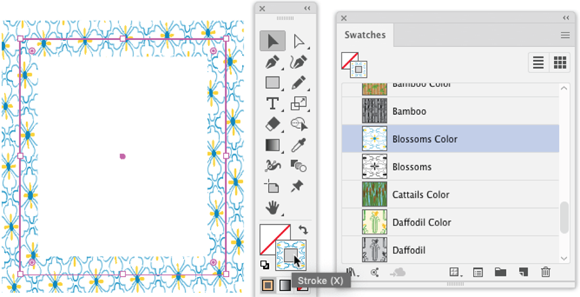
FIGURE 13-5: A pattern swatch applied to a stroke.
Applying patterns to text
Another underrated technique, in my opinion, is applying patterns to text. I see many of my students labor to create artistic text with tools such as the Pen, the Pencil, or the Blob Brush when they could streamline their workflow by at least roughing out their artistic text with pattern fills.
Normally you apply a pattern to the fill of a selected text, not the stroke. In fact, you might find it helpful to apply a solid color to a text stroke to set off text to which a pattern fill has been applied so that the text is a bit more readable, as shown in Figure 13-6.
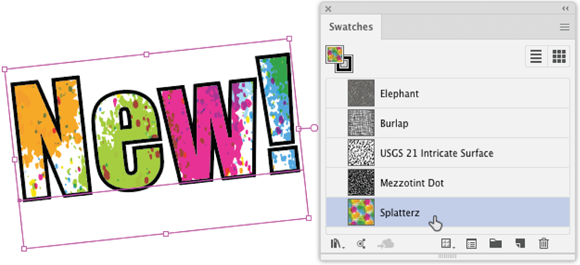
FIGURE 13-6: A pattern swatch applied to text, with a solid color stroke.
Creating Your Own Patterns
It’s easy to make your own pattern fills. And, after you do that, Illustrator offers a massive set of options for configuring how that fill is displayed. This massive set of options is used mainly by fabric designers and other creatives who need micro-control over how a pattern is displayed on a mockup of an article of clothing.
In this section, I introduce you to the technique for defining pattern options, but I focus on more widely applicable techniques for defining the relationship between a fill pattern and an object using the Scale tool.
Let’s start with the easy part: The following steps are used to create a pattern from artwork.
-
Select the artwork you want to use as a pattern.
You can use shapes, symbols, or embedded raster images (such as artwork you created in Photoshop).
What you can't do is create a pattern from an object to which a pattern has been applied. If you want to use an object to which a pattern fill has been applied, first expand the object (choose Object ⇒ Expand).
-
Drag the artwork into the Swatches panel (as shown in Figure 13-7) and name it.
After you drag artwork into the Swatches panel, the default pattern name is New Pattern Swatch (followed by a number). Select Swatch Options from the panel menu to enter a new name.

FIGURE 13-7: Adding a custom pattern to the Swatches panel.
-
Test your pattern swatch on a stroke or fill.
With your new pattern swatch selected in the Swatches panel and the Fill box selected in the Tools panel, draw a path or shape and observe how the pattern is applied, as shown in Figure 13-8.

FIGURE 13-8: Testing a custom pattern swatch.
After you use artwork to define a pattern swatch, the original artwork will not turn into a path filled by the pattern swatch. It remains a graphic object that does not have any pattern fill applied.
Transforming Patterns
When you apply patterns to objects, you can use the Scale tool to scale the pattern, with or without scaling the object. And you can scale an object with or without scaling the pattern. The same is true for applying rotation to a pattern.
Confusing? Let me illustrate and it will make sense. But before we dive in, a cautionary note: When you rescale or rotate a pattern interactively using any of the techniques in this section, the changes you make to the pattern design stick to the next object you create.
Scaling a pattern and object together
Let’s start with the easiest, most intuitive, and most widely applied way to scale an object with a pattern fill. Follow these steps to scale a pattern and an object to which the pattern is applied together:
- Select the object to be rescaled.
-
Keep the object you are rescaling selected, and open the Scale dialog.
Double-click the Scale tool in Tools panel. The Scale tool is part of the Rotate tool flyout in the Tools panel. You can also activate it by pressing S.
-
In the Scale dialog, enter the scale percentage you want to apply.
- Select the Preview check box so you can interactively see the effect of scaling changes.
- If you want to maintain the height-to-width aspect ratio in your object, leave the Uniform option selected and enter a single percent value in the Scale box.
- If you want to distort the height-to-width aspect ratio in your object, choose the Non-Uniform option and enter separate percent values for Horizontal and Vertical scaling.
- Leave both Transform Objects and Transform Patterns selected.
The Scale Corners and Scale Strokes and Effects check boxes are not specifically applicable to scaling patterns, with one exception. If you've applied a pattern fill to a stroke, you can apply the scaling you've defined for that fill by selecting the Scale Strokes and Effects check box.
- When the preview matches your desired result, click OK to apply the rescaling, as shown in Figure 13-9.

FIGURE 13-9: Rescaling a pattern and object together.
Scaling patterns and objects separately
What if you don't want to change the size of an object, but you do want to adjust how the pattern fills the object?
The process is the same as the one I just mapped out for rescaling patterns and objects together, except if you want to scale only the object (and leave the pattern the same size), deselect the Transform Patterns check box when you apply new scaling, as shown in Figure 13-10.
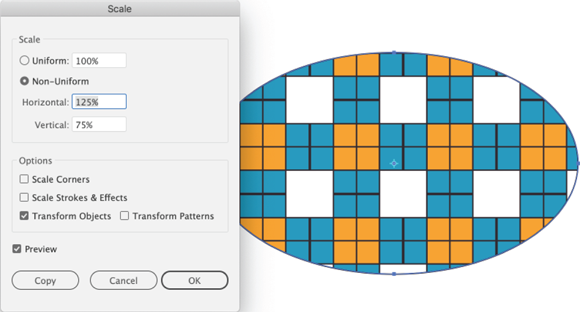
FIGURE 13-10: Rescaling an object but not the pattern.
If you want to just rescale a pattern fill within an object (and leave the object the same size), deselect the Transform Objects check box and select the Transform Patterns check box when you apply new scaling, as shown in Figure 13-11.
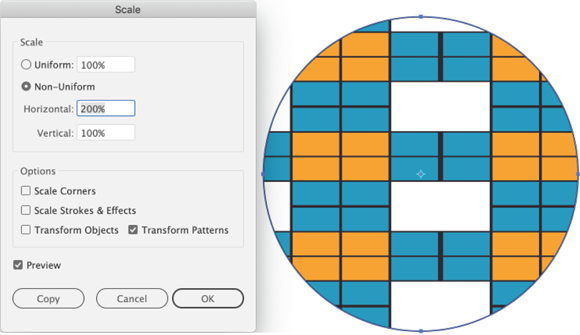
FIGURE 13-11: Rescaling a pattern fill within an object without changing the object.
Rotating and moving patterns
You can achieve some interesting effects by rotating a pattern within the object to which the pattern has been applied. Follow these steps to rotate a pattern within an object:
- Select the object with the pattern fill.
-
Keep the object with the pattern fill selected, and open the Rotate dialog.
Double-click the Rotate tool in the toolbox to open the Rotate dialog box. Select the Rotate tool from the Tools panel, or just press R to make the tool active.
- Enter a rotation angle for the pattern.
- Select the Preview check box if it is not selected so you can interactively see the effect of rotating the pattern.
- Leave Transform Patterns selected. The Rotate dialog can be used to rotate any object. If that were the objective here, you could select the Transform Objects check box.
- Experiment with different rotation angles until you achieve the effect you want.
- When you have defined a rotation angle for the pattern, click OK, as shown in Figure 13-12.
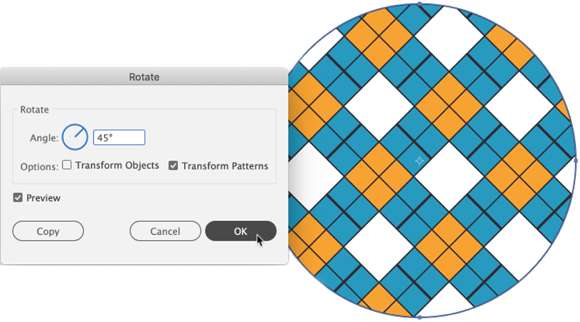
FIGURE 13-12: Rotating a pattern within an object.
Moving a pattern within a shape
You also can move a pattern within a selected object. Use this technique to fine-tune how a pattern fits into a shape. The process feels a bit unintuitive, but I walk through exactly how to do this. Note that this process can be used not just to move a pattern within a shape but also to scale or rotate the pattern.
To move a pattern within a shape, follow these steps:
- Select the object with the pattern fill.
-
Move the pattern fill using the Selection tool with the grave accent key.
The grave accent key is usually paired with the tilde key on your keyboard.
With the grave accent key depressed, click and drag the pattern with the Selection tool. An outline of the new position of the fill is displayed as you drag, as shown in Figure 13-13.
- When you properly locate the pattern within the object, just release the grave accent key.
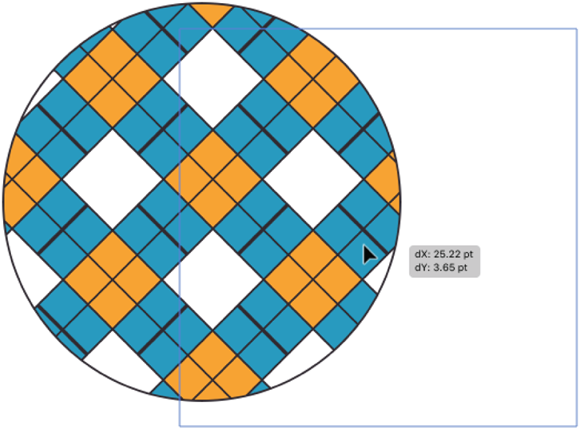
FIGURE 13-13: Moving a pattern within an object.
Stacking patterns
You can create complex fills by stacking two or more patterns. You can stack patterns over patterns, or you can create a pattern fill and stack it on top of a solid color (or gradient) fill. To stack patterns, you need to first have at least two pattern swatches ready to use. The most efficient way to do that is to have them in the Swatches panel before you start stacking pattern fills.
With your pattern swatches ready to use, you layer swatch patterns in the Appearance panel with the following steps:
- With the pattern swatches you want in the Swatches panel, select a path to which the fills will be applied.
- With the path to which the first pattern swatch will be applied selected, add the swatch to the Appearance panel:
- Choose Window ⇒ Appearance to display the Appearance panel.
- Select the Fill row in the Appearance panel.
- Click the first pattern fill for this path in the Swatches panel, as shown in Figure 13-14.
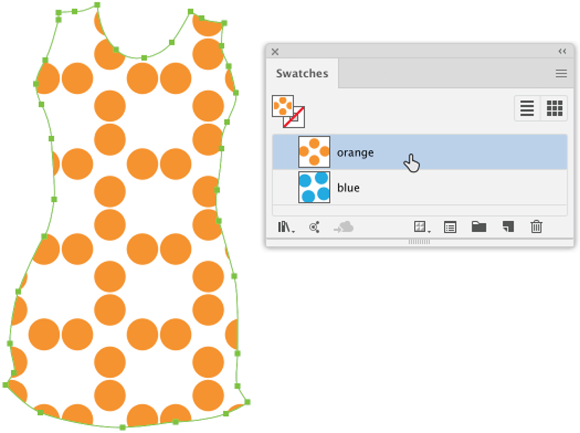
FIGURE 13-14: Beginning to stack pattern fills in the Appearance panel.
- Add a second pattern.
- On the Appearance panel menu, choose Add New Fill.
- Select the new second row in the Appearance panel and click the second pattern swatch in the Swatches panel, as shown in Figure 13-15.
-
Restack the patterns.
Click and drag in the Appearance panel to change the stacking order of the fills, as shown in Figure 13-16.
Now that you know how to stack and reorder pattern fills in the Appearance panel, you can mix up complex and dynamic fills.
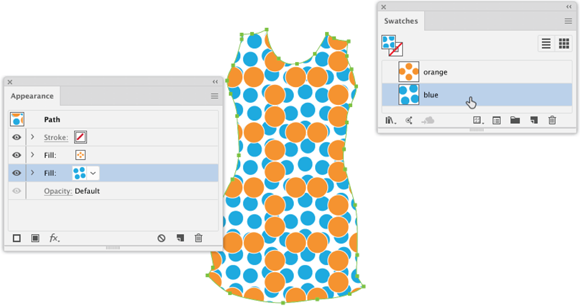
FIGURE 13-15: Adding a second pattern to an object.

FIGURE 13-16: Restacking patterns.
Defining Pattern Options
You can use the techniques covered so far in this chapter to create and manipulate patterns with a significant amount of control and detail. In addition to what I focus on here, you can create patterns from scratch also by entering pattern mode (choose Object ⇒ Pattern Make), with or without artwork selected.
But before wrapping up this exploration of designing with patterns, I want to briefly introduce you to an almost unlimited array of even more detailed options for defining how patterns are displayed. These options are available in pattern edit mode.
To fine-tune pattern options for a specific pattern, just double-click the pattern in the Swatches panel to open pattern edit mode. Here you can both adjust and preview how patterns will be displayed, as shown in Figure 13-17.
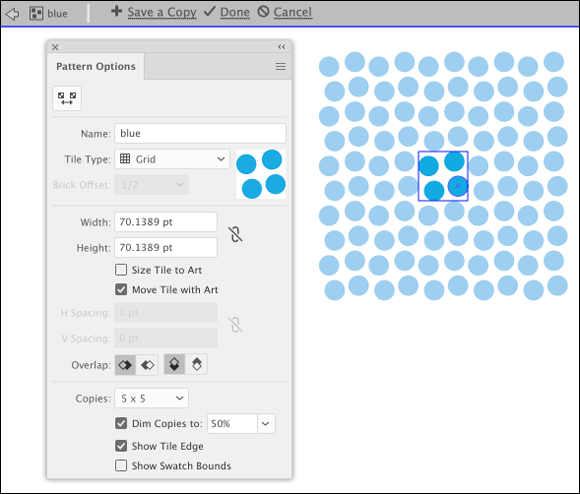
FIGURE 13-17: Defining pattern display in pattern edit mode.
Some of the options in pattern edit mode are intuitive, such as Name. Others, not so much. Here are some key options:
- Tile Type: Defines how the pattern will repeat:
- Grid tiling results in the center of each tile being horizontally and vertically aligned to the center of the adjacent tiles.
- Brick by Row tiles are rectangular in shape and arranged in rows. Centers of tiles in rows are horizontally aligned. Centers of tiles in alternate columns are vertically aligned.
- Brick by Column tiles are rectangular in shape and arranged in columns. Centers of tiles in columns are vertically aligned. Centers of tiles in alternate columns are horizontally aligned.
- Hex by Column tiles are hexagonal in shape and arranged in columns. Centers of tiles in the columns are vertically aligned. Centers of tiles in alternate columns are horizontally aligned.
- Hex by Row tiles are hexagonal in shape and arranged in rows. Centers of tiles in the rows are horizontally aligned. Centers of tiles in alternate rows are vertically aligned.
- Brick Offset: Applies to only Brick options:
- Brick by Row defines by how much tile width the centers of tiles in adjacent rows are out of vertical alignment.
- Brick by Column defines by how much tile height the centers of tiles in adjacent columns are out of horizontal alignment.
- Size Tile to Art: When deselected, allows you to define the overall height and width of the tile. Select values that are larger or smaller than the height and width of the artwork. Values larger than the size of the artwork cause the tile to grow larger than the artwork and insert empty space between tiles. Values smaller than the size of the artwork cause artwork in adjacent tiles to overlap.
When this option is selected, shrinks the size of the tile to the size of the artwork being used to create the pattern.
- Move Tile with Art: Ensures that moving the artwork causes the tile to move as well.
- Overlap: Defines how tiles will stack front-to-back when they overlap.
- Copies: Defines how many copies of the tile are displayed when the repeating pattern is previewed in Edit Pattern mode. The following additional options are available:
- Dim Copies sets the percentage of opacity for the display of the copies. (At 10 percent, copies of the pattern are almost completely transparent; at 90 percent, copies are almost completely opaque.)
- Show Tile Edge displays a box around the actual tile (not the preview copies).
- Show Swatch Bounds displays a unit portion of the pattern that is repeated to create the pattern.
-
Exit Pattern Edit mode and save your changes.
If you just want to apply the changes to the pattern, choose Done. If you want to keep your original, choose Save a Copy in the breadcrumb menu at the top of pattern edit mode and assign a new name.
Clearly, you have many options in pattern edit mode for defining how patterns will fill paths. The nicest thing about working in pattern options mode is that it provides an interactive preview of how your pattern will look in different scenarios. Instead of trying to memorize what each option does, you can experiment and see the results in real time before you accept changes to the pattern definition.
My last word of advice in defining pattern options is to avail yourself of the Save a Copy option in pattern options mode so you can always revert to your original pattern if you decide the edits you’ve made aren’t working out the way you want.