
Chapter 11
Designing in Living Color
IN THIS CHAPTER
![]() Understanding how print and screen color work
Understanding how print and screen color work
![]() Applying colors to objects
Applying colors to objects
![]() Organizing colors in panels
Organizing colors in panels
![]() Getting theming help from Illustrator CC
Getting theming help from Illustrator CC
![]() Intuitively applying color with Live Paint
Intuitively applying color with Live Paint
Illustrator provides a range of tools and features for choosing and applying color to strokes and fills. Some panels help you choose colors based on the colors you’re already using. Other panels help you share or create coherent color schemes. You can choose from preset groups of colors, or you can mix your own sets of selected colors. I show you how to do all that in this chapter.
Exciting! Everything you need to inspire and facilitate your creativity.
But hit pause here. Before you starting defining and applying color, it is important, no — I won’t soft-pedal this — it is critical to choose an appropriate color mode for your project: print or screens.
In this chapter, I explain the (very) different ways in which screen and print color are defined and how to apply color to strokes and fills. I also introduce you to powerful design features that will assist you in creating aesthetic color schemes for your graphics. Finally, I show you how to use Live Paint to apply color to parts of your artwork that Illustrator would not normally consider objects.
Understanding Print versus Screen Color
Why do I insist that defining color mode is a, if not the, starting point in any design project? Here, as in most chapters, I return to the mantra: Work backward. Color is applied in different ways for screens versus print projects, and the sets of available colors are different as well. If you try to use the wrong color mode for your intended output, you're shoving a left shoe on a right foot, to invoke a crude but cautionary metaphor.
Printers, particularly commercial printers, layer different colors of ink to produce a spectrum of colors. This process is referred to as subtractive because, for instance, when cyan is applied on top of yellow, the result is less yellow. Screens, on the other hand, use an additive process in which you add colors (red, green, and blue) together with various levels of intensity to project colored light. Those color pixels are backlit and can produce a larger spectrum of color than is possible to create by subtractive mixing of colors on a printed page.
In Chapter 2, I demonstrate how to define a color mode for a new document. Reviewing that won’t take long because you simply choose between CMYK or RGB.
Defining color for print
The range of color available in print is smaller than that visible by eye. In other words, just because you can see a color on your screen doesn’t mean it will print.
 To avoid designing with colors that will not reproduce in print, you must choose print-appropriate colors from the beginning of the print design process.
 In the section on printing in Chapter 2, I emphasize communicating with your print professional at the very beginning of designing output for print with color. I repeat, highlight, and emphasize that here because the most important questions you need to ask your print professional are what kinds of colors are available, how do you define them, and how do you best preview how the colors will look in print.
Preparing documents for four-color printing
If your document is destined for print output at a commercial print shop, and the folks at the print shop advised you to give them an Illustrator file with CMYK color (a typical scenario), be sure your document is using CMYK color mode. Check by choosing File ⇒ Document Color Mode ⇒ CMYK, as shown in Figure 11-1.

FIGURE 11-1: Defining CMYK as a document color mode.
Four-color print processes create colors by mixing cyan, magenta, yellow, and black — collectively referred to as CMYK (K represents black to prevent confusion with blue).
You define CMYK colors in the Color panel (choose Window ⇒ Color to display that panel). As you can see in Figure 11-2, you can either click in the color palette at the bottom of the panel to select a color, or enter values for cyan, magenta, yellow, and black (K) using sliders to define a color.
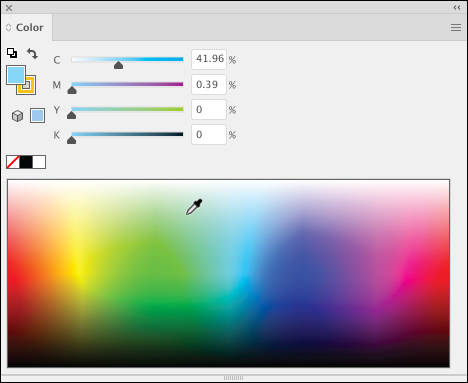
FIGURE 11-2: Defining CMYK color.
Some quality inkjet printers enhance the set of printable colors by adding other cartridges such as light cyan, light magenta, or red, green, and blue. But regardless of how many colors are mixed in the print process, it is still necessary to generate a much larger set of colors by layering ink of different colors.
Using spot color or Pantone colors
You can mix CMYK colors by hand, or you can choose from sets of color books that correspond to commercial print colors.
Pantone colors are the most widely applied of these color sets. The workflow for applying Pantone color to a selected object is as follows:
-
Choose a color or set of colors from a Pantone color book.
You can purchase a Pantone book, or many professional print shops will loan you one. Work with your printer to see a sample of your chosen color(s) on the paper or medium (glass, fabric, plastic, or other material).
- To configure Illustrator to make your chosen color available, view the Swatch panel for the appropriate color book:
- Select Window ⇒ Swatches to view the Swatches panel.
- From the Swatches panel menu, choose Open Swatch Library ⇒ Color Books ⇒ and then select the color book you are using, as shown in Figure 11-3.
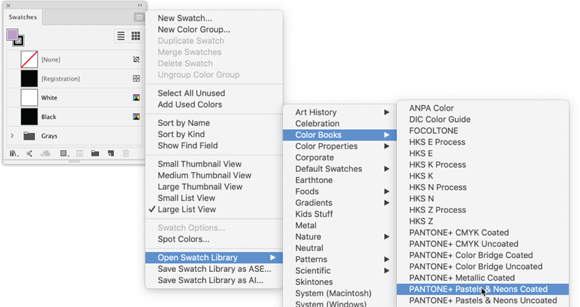
FIGURE 11-3: Adding a Pantone color book to the Swatches panel.
-
To apply a color from a selected color book, select an object’s stroke or fill, and click the color in the Swatches panel, as shown in Figure 11-4.
You can target a stroke or a fill by using the boxes at the bottom of the Tools panel.
I explain how to use, manage, and save swatches later in this chapter.
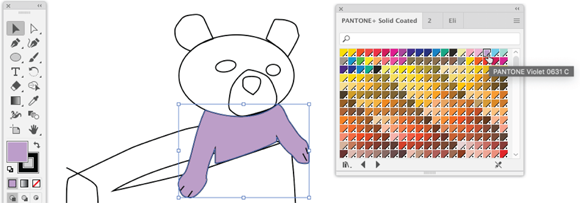
FIGURE 11-4: Applying a Pantone color to a selected fill.
Choosing RGB color for screens
The spectrum of color visible on a monitor is wider than that available in print. The darkest purple and deepest reds, for example, can't be fully reproduced using techniques that create printed colors. The number of colors that contemporary screens can reproduce with RGB (red, green, blue) color is in the millions, and designers can safely design with the expectation that users will be viewing artwork on monitors that support that range of color. (In the increasingly rare event that users’ screens don’t support that range of colors, the range of color will degrade gracefully enough to be acceptable in almost every scenario.)
RGB color is defined in values between 0 and 255. So, for example, an RGB setting of 0,255,0 (red=0, blue=225, green=0) produces solid green.
Follow these steps to define and apply an RGB color to a selected object:
-
Make sure your document is set to use RGB color.
Choose File ⇒ Document Color Mode ⇒ RGB.
- Select the object to which the color will be applied.
- Define an RGB color in the Color panel:
- Choose Window ⇒ Color.
- For red (R), green (G), and blue (B): Enter a value, or use the sliders to define a color, or click a color in the palette at the bottom of the panel. If you know the hexadecimal color value (six-digit code prefaced with # that is used in HTML and CSS for web design), you can enter that value as a way of defining an RGB color, as shown in Figure 11-5.
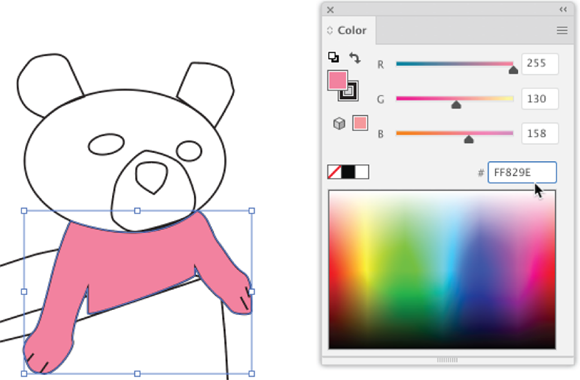
FIGURE 11-5: Defining an RGB color with a hexadecimal value.
Understanding web safe color
Contemporary screens, defined as 24-bit color, handle millions of colors. But it hasn’t always been that way. In earlier eras of digital design, illustrators had to be conscious of a much more limited palette of colors that were guaranteed to be supported in screens.
Today, designers do not need to concern themselves with constraining color selection to what were considered web safe colors in an earlier era of screen design (except in rare circumstances).
Configuring grayscale
Black and white printing generally allows you to apply a range of grayscale shades. You can select and apply grayscale shading by choosing Grayscale on the Color panel menu, as shown in Figure 11-6.

FIGURE 11-6: Converting a color to grayscale.
Managing the Color of Strokes and Fills
I just described how to apply color from the Swatches and Color panels. But you can apply color to a selected object’s stroke or fill (or both) in many ways, including the following:
- Tools panel
- Control or Properties panels
- Swatches panel
I explain some of the most accessible and quickest ways to apply color next.
Apply color from the Tools panel
The Tools panel isn’t the most powerful way to access stroke and fill color, but sometimes it’s the most convenient, sufficient for accessing color on the quick.
To apply color to a stroke or to apply fill to a selected object (or objects) from the Tools panel, follow these steps:
-
Double-click either the Stroke or Fill color selection box.
Doing so displays the Color panel if it's not already displayed. The colors displayed reflect the document’s color mode.
Press X to toggle back and forth between stroke and fill.
-
Click a color in the color picker to apply that color to the selected object’s stroke or fill.
If the Stroke box is selected, the color will be applied to the object’s stroke. If the Fill box is selected, the color is applied to the fill.
In Figure 11-7, I’m applying a blue fill and generating CMYK color values.
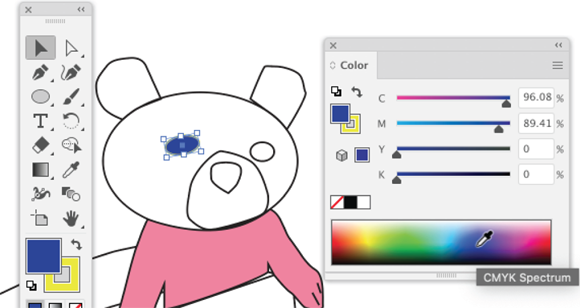
FIGURE 11-7: Applying a fill color from the toolbox.
-
Click the Out of Gamut warning icon if necessary to correct colors defined with RGB in a document using CMYK color mode.
If you define a color with RGB settings in a CMYK document, and the defined color isn’t reproducible with CMYK printing, an Out of Gamut warning icon appears. Click the warning icon to change the selected RGB color to the closest CMYK match.
The Color panel also presents an out of web color warning (cube) icon if you select an RGB color in an RGB color mode document that is not web safe. As I explain earlier in the chapter, web safe color is no longer a significant issue for screen design.
Apply color from the Control or Properties panel
Assigning color to strokes and fills in the Properties panel has the advantage of providing one-stop-shopping for defining other properties of a selected object (or objects) beyond color. You can, for example, define a stroke weight along with the stroke color.
To apply color to a stroke or to apply fill to a selected object (or objects) from the Properties panel, click the Fill or Stroke box in the Appearance section of the panel. A pop-out panel appears, with a color mixer at the bottom and the leftmost icon at the top displaying color as a swatch, as shown in Figure 11-8.

FIGURE 11-8: Using the color mixer to apply a fill color to two selected objects from the Properties panel.
Using the Control panel to apply color is my favorite technique because the Control panel includes quick access to so many properties and the panel doesn’t fill up much of the workspace.
Click the fill or stroke color buttons in the Control panel to display color swatches, as shown in Figure 11-9.
You can display color mixers instead of color swatches by Shift-clicking the color swatches in the Control panel.

FIGURE 11-9: Choosing a color swatch for selected strokes from Control panel.
Using Color Guides and Color Themes
In the preceding section, I illustrate how to choose and apply stroke and fill colors using the color picker in the Color panel that appears in various forms when you apply color from the Tools panel, the Properties panel, or the Control panel.
But what if you need some help choosing colors? Illustrator has a couple panels that can assist you: the Color Guide panel and the Color Themes panel.
Getting color advice
The Color Guide panel generates a set of color swatches that go well with a base color that you define. That set of colors adjusts, chameleon-like, as you add (or delete) colors from your illustration. As you assign new colors, the Color Guide panel changes.
To view the Color Guide panel, choose Window ⇒ Color Guide. The drop-down menu at the top of the panel, shown in Figure 11-10, presents different color groups generated using different harmony rules — ways of generating complementary colors to the set of selected colors based on applying different mathematical calculations to numeric representations of colors.

FIGURE 11-10: Getting color advice from the Color Guide panel.
The Color Guide panel menu provides micro-control over what colors are displayed, as well as options for saving sets of generated colors:
- Students of color theory will find the Edit Colors menu option in the Color Guide panel helpful. Choosing this option displays a window where you can dynamically adjust the way colors are generated for the Color Guide, as shown in Figure 11-11.

FIGURE 11-11: The Edit Colors window.
- The Save Color Group to Swatch Panel tool adds the set of colors at the top of the Color Guide to the document Swatch panel. This panel is saved along with the document.
- The Color Guide Options dialog lets you constrain how many colors are generated in the Color Guide, and how closely they match colors used in the open document.
Styling with Adobe color themes
Illustrator’s Color Themes panel integrates Adobe Color, the free-to-anyone tool for generating color schemes that is high on my list of free online graphic design tools. If you aren’t tuned into Adobe Color, check it out at https://color.adobe.com.
Adobe Color gives you access to searchable shared color schemes and makes it easy to create your own color sets, including from uploaded photos. Anyone can use it — and again, it’s free! But if you do license Adobe Illustrator CC in any form, you can log into Adobe Color and save color schemes. (To save color schemes, you need a subscription to Adobe CC.)
Adobe Color is both a full-fledged app in its own right and intuitive, so I won’t document how it works here. I think you can explore it thoroughly on your own. After you create color schemes in Adobe Color, you can access those themes (as well as create your own or used shared themes) by choosing Window ⇒ Color Themes.
Here are some ways in which you can avail yourself of the creative power of Adobe Color:
- To use Adobe Color from Illustrator to create new themes, click the Create tab in the Adobe Color Themes panel.
- To use shared themes, click the Explore tab.
- To access saved color themes, choose Windows ⇒ Color Themes and choose the My Themes tab.
- To access a shared theme, click the Explore tab. If you add a theme in Color Themes after you launch Illustrator, refresh the browser window running Adobe to update and add the latest theme(s).
- To use a somewhat truncated interface to create a new theme, select the Create tab. (However, creating new themes is more easily managed by using the full online version of Adobe Color.)
After you find a theme or themes you want to use for your illustration, use the following techniques to apply colors from a theme in the Explore or My Themes tab to objects in a document:
- To apply a color from a theme to a selected fill, target a fill in the Control panel or Tools panel and then click the color in the Adobe Custom Themes panel (the My Themes tab). In Figure 11-12, I’m applying a fill from my Stuffed Animals theme.
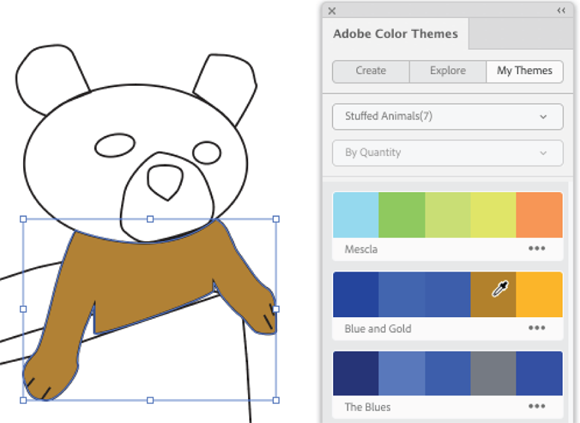
FIGURE 11-12: Applying a fill color from a custom color theme.
- To apply a color from a theme to a selected stroke, target a stroke in the Control panel or Tools panel and then click the color in the Adobe Custom Themes panel (the My Themes tab). In Figure 11-13, I’m applying a fill from a shared color theme.
- To add colors in the Adobe Color Themes panel to your document’s Swatch panel, click the ellipses under a theme to open a pop-up menu and choose Add to Swatches, as shown in Figure 11-14.
- To add a single color (or selected colors) from a theme available in your Illustrator document, click the color to make it active and drag it from the Tools, Properties, or Control panel to the Swatches panel, as shown in Figure 11-15.

FIGURE 11-13: Applying a stroke color from a shared color theme.
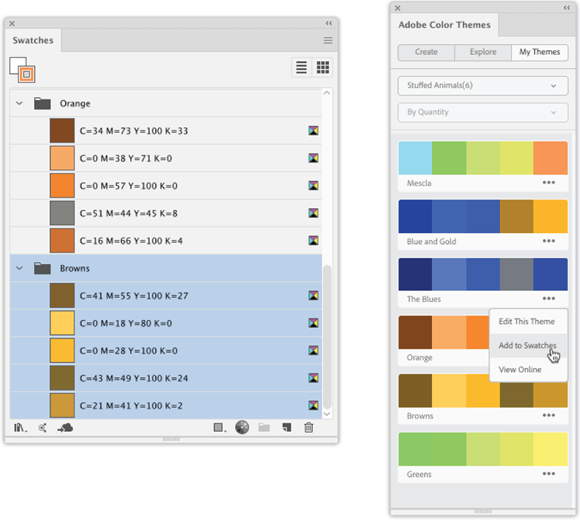
FIGURE 11-14: Adding a color theme to the Swatches panel for a document.

FIGURE 11-15: Adding a single color from a theme to the Swatches panel for a document.
Managing Color Swatches
The Swatches panel functions like a painter’s palette, holding the colors you need to work with in your document. In the preceding section, I explain how to add colors from Adobe Color Theme to your document’s Swatches panel. Now I take a moment, or at least a few pages, to document key functions of the Swatches panel.
Swatches are named colors, tints, gradients, and patterns. In this chapter, I focus on adding colors to the Swatches panel, but the basic rules I explain apply to adding gradients (see Chapter 12) and patterns (see Chapter 13) as well. Color swatches can be grouped to help keep sets of related colors easily accessible.
And, importantly, swatches are saved with the document in which they are created. When you return to a saved document and view the Swatches panel, all the swatches you created in that document are still available.
Adding colors to the Swatches panel
To add a color to the Swatches panel, use any of the following techniques:
- Select a color using the color picker or Color panel and drag the color from the Tools panel, Control panel, Properties panel, or Color panel to the Swatches panel, as shown in Figure 11-16.
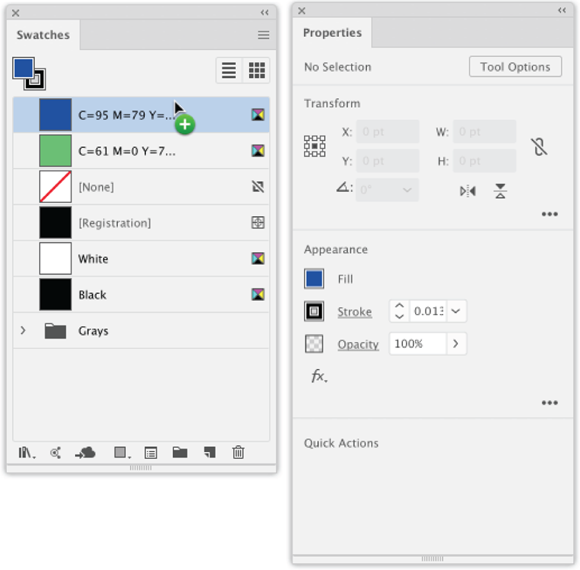
FIGURE 11-16: Adding a color from the Properties panel to the Swatches panel.
- Use the Eyedropper tool to click any color in a placed object (including a photo) to add the color to the Color panel, Properties panel, or color picker in the Tools panel, as shown in Figure 11-17. Then drag the color from the panel to the Swatches panel.
-
In the Swatches panel, click the New Swatch icon (it looks like a piece of paper with a folded corner) or select New Swatch on the panel menu. Define and name the color in the New Swatch dialog, as shown in Figure 11-18, and click OK.

FIGURE 11-17: Selecting a color from a placed photo with the Eyedropper tool.
The new color in Figure 11-18, named Pinkish-12, is converted from a process color (from a color book) to a global (defined) CMYK color, and is being saved to my Stuffed Animals library of colors.
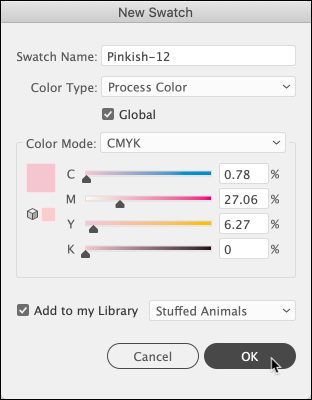
FIGURE 11-18: Adding a color from a photo to the Swatches panel.
The Global check box converts Pantone or other process colors to regular CMYK colors.
The Add to My Library check box adds the color to a selected color library available in all your Adobe CC apps. You can open libraries of swatches in other Illustrator documents, but Swatch in CC libraries appear in separate panels and are not saved with the document in which they are created.
Changing the display of swatches
The Swatches panel menu provides a set of intuitive options for grouping, duplicating, deleting, selecting, sorting, and displaying swatches.
A few of these options merit a bit of explanation:
- To clean up the Swatches panel by removing all unused swatches, choose Select All Unused and then Delete Swatches.
- To find a swatch by name, choose Select Show Find Field on the Swatches panel menu and then start typing the swatch's name in the Find text box at the top of the panel.
- You can reorder swatches manually (by dragging them in the panel) or by selecting Sort By Name or Sort By Kind on the Swatches panel menu.
- To access Swatch libraries (collections of preset colors), choose Open Swatch Library and then select the library.
You can save an open Illustrator document as a swatch library. You retrieve saved swatch libraries by choosing Window ⇒ Swatch Libraries ⇒ Other Library and navigating to and opening the library.
Creating and Merging Live Paint Groups
Here’s the problem Live Paint was invented to solve: Often, you'll find that you want to apply paint to an Illustrator path that isn’t really a path. Instead, what looks like it should be an easily selectable and fillable region, such as the intersecting area of the two ellipses in Figure 11-19, isn’t an object. The two ellipses are objects, but the area where they intersect is not an object to which a fill can be applied without Live Paint.

FIGURE 11-19: A conventional fill can't be applied to the area where the two ellipses intersect.
The rules for what is fillable (or strokeable, if that’s a word) change with Live Paint. In Live Paint, every intersecting path forms an editable path, and the regions formed by these paths can be filled individually — handy features when you're coloring in artwork.
Creating Live Paint groups
Live Paint groups even use different terminology than normal Illustrator paths:
- Strokes are called edges in Live Paint.
- Fillable areas formed by edges are faces.
Before you can edit Live Paint edges, or fill in Live Paint faces, you need to convert exiting paths to Live Paint groups. To convert paths to Live Paint groups, follow these steps:
-
Use a selection tool to select all the paths you want to convert to a Live Paint group.
Any selection technique works, but given the nature of Live Paint regions, you’ll likely want to use the Selection tool to draw a marquee around objects.
- Choose Object ⇒ Live Paint ⇒ Make, as shown in Figure 11-20.
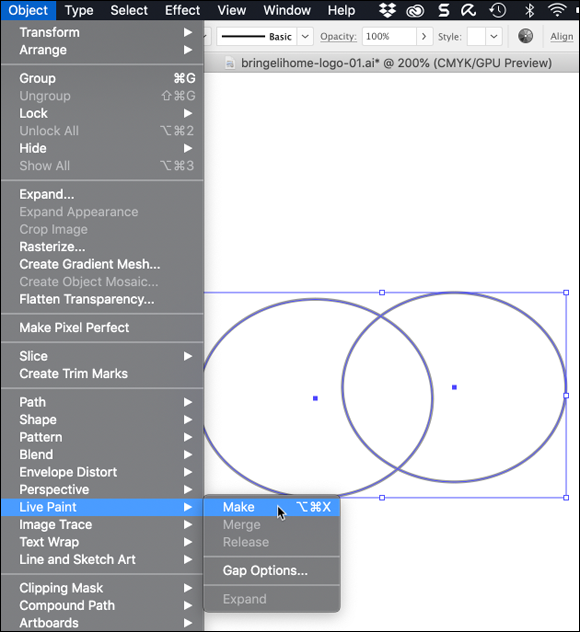
FIGURE 11-20: Converting selected objects into a Live Paint group.
Coloring Live Paint faces
To apply a fill color to a Live Paint face, follow these steps:
- Select a color in the Tools, Control, or Properties panel.
- Press K to select the Live Paint Bucket tool.
- Click a Live Paint face to apply the color, as shown in Figure 11-21.

FIGURE 11-21: Applying a color fill to a Live Paint face.
Live Paint is a little more intuitive when applied to faces (fills) than to edges (strokes).
Editing Live Paint edges
Use the Live Paint Selection tool (Shift+L) to paint Live Paint Group edges. The Live Paint Selection tool is not just for coloring Live Paint edges. This tool treats every line segment formed by intersecting lines as a separate line that can be selected, painted, or deleted.
Selecting Live Paint edges are useful, for instance, if you’re editing scanned artwork and need to be able to easily select line segments, or if you find it more intuitive and rational to think of every line segment as a distinct line. You select edges with the Live Paint Selection tool also to apply color to edges.
The Live Paint Selection tool is particularly useful when you want to select a Live Paint edge, but it can be used also to select Live Paint faces. As you hover over a section of a Live Paint group with the Live Paint Selection tool, the tool displays as a black triangle when a face is selected, as shown in Figure 11-22.

FIGURE 11-22: Selecting a Live Paint face with the Live Paint Selection tool.
Still, the most applicable use of the Live Paint Selection tool is for selecting and coloring Live Paint edges. Figure 11-23 shows an edge selected, with the cursor icon displaying as an unfilled triangle.

FIGURE 11-23: Selecting a Live Paint edge with the Live Paint Selection tool.
To apply a color to a Live Paint edge, follow these steps:
- Define a stroke color in the Tools, Properties, or Control panel.
- Press Shift-L to activate the Live Paint Selection tool.
- Click to select a Live Paint edge, and then click a color from the Color or Swatch panel, as shown in Figure 11-24.
If you delete an edge between two Live Paint faces, the paint (fill color) flows into newly expanded faces.
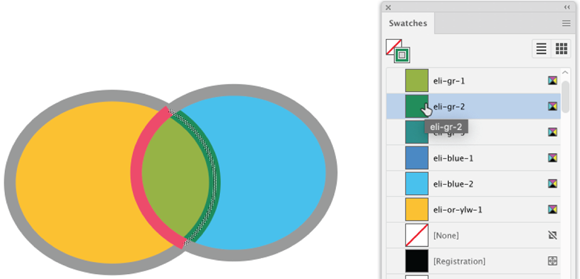
FIGURE 11-24: Using the Live Paint Selection tool to color an edge.
Controlling Live Paint faces and edges
Selecting Live Paint faces and edges takes a bit of practice, so experiment with a simple example such as the intersection ellipses I used here. After you get comfortable with Live Paint, you’ll find that it makes it much easier and, yes, more fun to color illustrations.
But there are some additional techniques you will want to be aware of to control the process of creating Live Paint groups and coloring them. I explore those next.
Setting gaps
When you apply fills to faces in Live Paint Groups, the fill sometimes flows into nearby faces. Whether or not the fill will flow through gaps between faces depends on how you set the Live Paint Gap options.
Here’s how to define those gaps:
-
To access features of Live Gaps, choose Object ⇒ Live Paint ⇒ Gap Options.
The Gap Options dialog opens, as shown in Figure 11-25. This is where you change gap settings.

FIGURE 11-25: Defining gap options.
-
To define what size gaps will constrain fills, select the Gap Detection check box if it is deselected.
With the Small Gaps option, fills will flow through any gap that isn’t small. The Large Gaps option stops paint from flowing through any gap except large ones. Medium Gaps is in-between.
To define a custom gap value, choose Custom Gaps and enter a value.
-
To customize the preview color, choose a color from the Gap Preview Color drop-down.
The default color is red.
- To use trial-and-error in setting gaps, select a Live Paint group before you define gap options.
- If you have a Live Paint group selected, the Gaps Found value will reflect the gaps detected by your settings.
- If you select Preview, you can see the effect of the gap settings you create applied to a selected Live Paint group. In Figure 11-26, the gap that will be closed is indicated by a thin red line.
- After you define the Live Paint Gap settings, click OK.
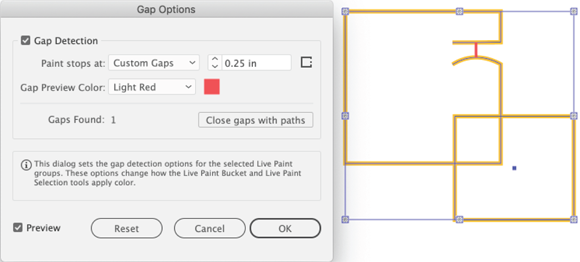
FIGURE 11-26: Previewing gap detection.
Editing Live Paint groups
What if you want to convert a Live Paint group back to normal Illustrator paths to facilitate editing those paths? Good news. You can! To convert a selected Live Paint group to normal Illustrator paths, choose Object ⇒ Live Paint ⇒ Expand. Bad news: The fill and stroke are permanently separated into distinct objects, which makes editing them as regular Illustrator objects more complicated.
You can also merge selected Live Paint groups. To do that, choose Object ⇒ Live Paint ⇒ Merge, as shown in Figure 11-27.
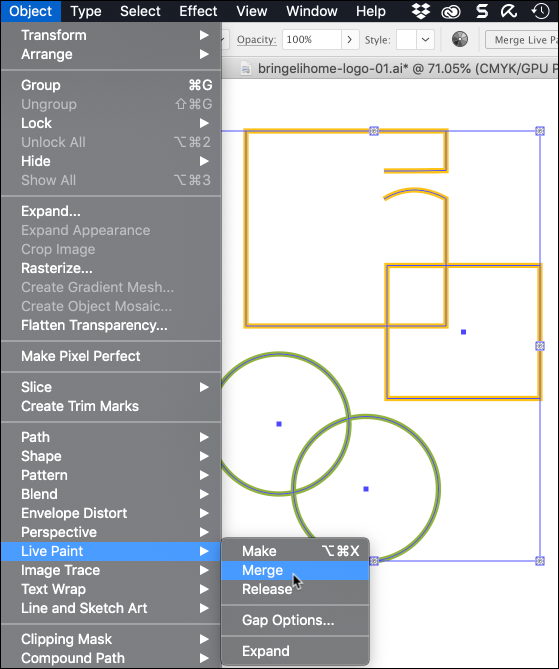
FIGURE 11-27: Merging two Live Paint groups.
To apply fill attributes to many faces at once, click and drag with the Live Paint Bucket across those faces in the Live Paint group, as shown in Figure 11-28.
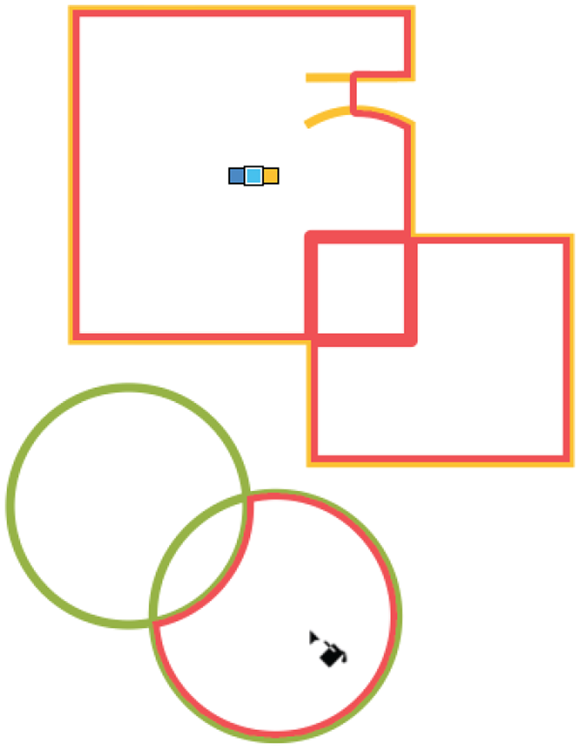
FIGURE 11-28: Applying Live Paint color to multiple faces.
To apply fill attributes to all faces in a Live Paint group that have the same fill, triple-click one of the faces.
Using Live Paint wisely
You pay a price for converting normal Illustrator paths to Live Paint groups. Transparency, effects, and stacked strokes or stacked fills are lost.
Type, embedded raster images, and brushes do not convert to Live Paint groups. Of course, if you find that you’ve destroyed an illustration by converting paths to Live Paint groups, you can undo the Live Paint by choosing Ctrl+Z (Windows) or ⌘ +Z (Mac).
Many things that you create or apply in Illustrator don’t work in Live Paint groups, including the following:
- Blends
- Brushes
- Effects
- Gradient meshes
- Stacked fills and strokes from the Appearance panel
- Symbols
- Transparency
Live Paint groups are often easier to apply colors to but less flexible than normal Illustrator paths. So, if you use Live Paint, I suggest a workflow where you do basic editing with Live Paint groups first, and then convert to regular Illustrator paths for other tools and effects if needed.