
Chapter 1
Navigating Illustrator’s Interface
IN THIS CHAPTER
![]() Launching and configuring Illustrator
Launching and configuring Illustrator
![]() Using and customizing the toolbar
Using and customizing the toolbar
![]() Accessing and organizing panels
Accessing and organizing panels
![]() Using the Control panel and the Properties panel
Using the Control panel and the Properties panel
Adobe Illustrator’s interface can seem complicated, confusing, and sometimes redundant. Here’s why: It is complicated, confusing, and sometimes redundant. But there are good reasons why.
One reason is that people use Illustrator in so many different ways. Illustrator really is a jack-of-all-trades, and so the folks who develop it need to provide alternative pathways to get things done. For example, an artist designing a logo and an engineer sketching an electrical system have different needs and likely different approaches to drawing, and demand different ways to access Illustrator’s features.
The second reason why Illustrator’s interface is daunting is that there's so much in this application! A quick perusal of this book's Table of Contents will give you a sense of how many different things Illustrator is used for.
Finally, and perhaps ironically, some of the complexity of Illustrator’s interface comes from the very complexity of the app. The hard-working and creative team of developers who make Illustrator powerful and contemporary have their finger on the pulse of users like you! And as new generations of illustrators enter the Adobe Illustrator community, the development team endeavors to provide different alternatives to make the interface more inviting and accessible. For example, Illustrator’s toolbar now contains more than 80 tools. Displaying all those tools would make the entire set overwhelming and inaccessible, so Illustrator provides a basic version of the toolbar with a small subset of tools. This approach makes life easier if you need one of those tools but more complex if you need a tool that was left out of the basic box.
All that said, relax! In this chapter, I provide a guide to the key features in Illustrator and how to access them.
Surveying the Illustrator Universe
In the bulk of this book, I focus on documenting how to get things done: for example, how to create, save and print illustrations (Chapter 2); how to draw lines and shapes (Chapter 4); and how to select and assign color (Chapter 11). The book is non-linear, so you’re invited to jump to just what you need. If you’re like me, you want to find out how to solve a problem, not understand how something works — at least at first. Other people, with more orderly minds I suspect, like to immerse themselves in the how before they get to the what.
If you have started with this chapter, you might be just entering into the Illustrator universe with a rational impulse to find out how to navigate your way around an interface that includes over 80 tools, hundreds of menu options, and at least two distinct but significantly overlapping options for accessing the most commonly used features: the Control panel and the Properties panel. These two panels provide similar sets of options, and which panel you use is really a matter of which one you find more comfortable to work with.
My mission in this opening chapter is not to present encyclopedic documentation of everything in the byzantine Illustrator interface. Instead, I provide a basic guide to where to find what, along with a curated documentation of features you will almost certainly need.
Launching Illustrator
Although people use Illustrator in different ways, a large section of designs travel through a few workflows. When you launch Illustrator, the opening home screen provides access to these frequently traveled express lanes to get you on your way:
- Learn tab: The Learn tab, shown in Figure 1-1, provides access to a set of helpful video tutorials. You can watch them in sequence as a continuous learning experience, or choose a topic to help you solve a pressing challenge.
FIGURE 1-1: Illustrator tutorials accessible from the home screen.
- Start a New File Fast section: Because there are a number of frequently traveled pathways to creating files, the options in the Start a New File Fast section of the home screen allow easy access to basic settings for print and screen projects. These are not templates; they are packaged sets of properties such as units of measurements (points, pixels, inches, and more) and color modes (such as RGB or CMYK). Choosing one of these options can jump-start a project. I zoom in on these options in Chapter 2.
- Open button: When you want to open an existing file, Illustrator kindly presents you with a set of template thumbnails — types of projects, such as a letterhead, a poster, a website, or an app prototype. If you can't find the file in the thumbnails, use the Sort and Filter options, shown in Figure 1-2, to search for the file.

FIGURE 1-2: Choosing from recently opened files.
Using and Customizing Toolbars
After you open or create a document, Illustrator’s toolbar is the single most essential element in creating illustrations. Illustrator provides two toolbars, Basic and Advanced. The Basic toolbar is highly customizable.
The Basic toolbar, which is displayed by default when Illustrator is launched, includes a curated set of frequently used tools. The Basic toolbar is highly customizable. To add tools to the Basic toolbar, click the ellipses (edit toolbar)) icon at the bottom of the Basic toolbar. The tools drawer appears. You can display or hide tools using the four Show options at the bottom of the tools drawer. Or you can drag any tool into the Basic toolbar, as shown in Figure 1-3.
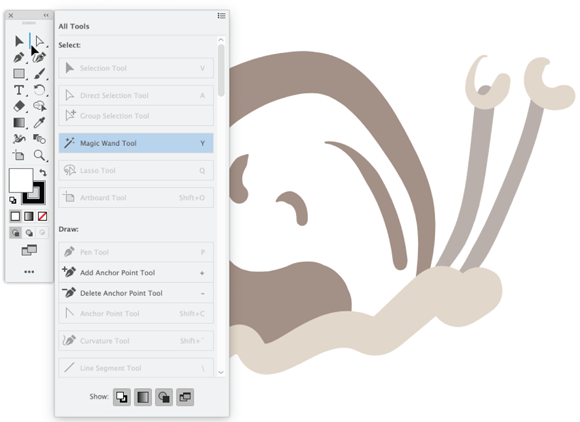
FIGURE 1-3: Adding the Magic Wand to the Basic toolbar.
The Advanced toolbar includes every tool available in Illustrator. You can toggle from the Basic to the Advanced toolbar by choosing Windows ⇒ Toolbars ⇒ Advanced. You can’t change the tools that appear there.
Accessing and Arranging Panels
You use features in panels to tweak, tune, touch up, and transform artwork. Every chapter in this book, and every substantial Illustrator project, involves using features available through panels. But here I want to focus on a couple features of panels above and beyond how any specific panel works.
You can also quickly set up a work environment for typical workflows such as print, web, or typography by choosing Window ⇒ Workspace and then selecting a type of project from the submenu. I’m choosing the Essentials workspace in Figure 1-4.

FIGURE 1-4: Using a workspace to populate the screen with selected sets of panels.
An Illustrator workspace is defined by which panels are displayed. You can configure your own workspace by adding and arranging panels, or you can use one of the presets. The contradiction is that the more panels you display, the more features you have quick access to but the less space you have to draw something! So, if you find your workspace cluttered with too many panels, you have a few options:
- Temporarily hide all panels by tapping the Tab key. A second tap restores the panels.
- Clear the workspace of extraneous panels and revert to a minimalist workspace with just the Basic toolbar by choosing Window ⇒ Workspace ⇒ Essentials.
- Dock one panel by dragging it by its tab to another panel. (You can dock it in the top or bottom of a panel or group it in the panel.) In Figure 1-5, I’m dragging the Color Guide panel to the bottom of the Color panel. The image on the right shows the docked Color Guide panel.
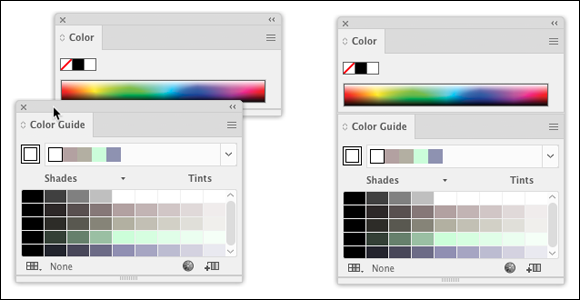
FIGURE 1-5: Docking a panel.
- Group panels by dragging the tab of one panel into the title bar of another panel. In Figure 1-6, I grouped the Color and Color Guide panels.
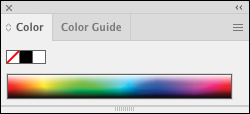
FIGURE 1-6: Grouped panels.
- Collapse panels (including groups of panels) into icons by clicking the << (double arrows) in the upper-right of the panel or panel group.
Panels are your friend. But like any friend, they can become a bit too much at times. So when you find your workspace overwhelmed by panels, use any of the tips just listed to reduce clutter and free up space for designing!
Using the Control Panel or the Properties Panel
The two most robust panels in Illustrator are the Control panel and the Properties panel. Both panels have many features that overlap. And both panels are context-sensitive, meaning the options they display depend on what you're doing and what objects you select.
For example, in Figure 1-7, I selected a box of type (the word Control). Both the Control panel (at the top of the screen) and the Properties panel (on the right) provide access to fill and stroke color, character and paragraph style options, font, font size, and opacity.
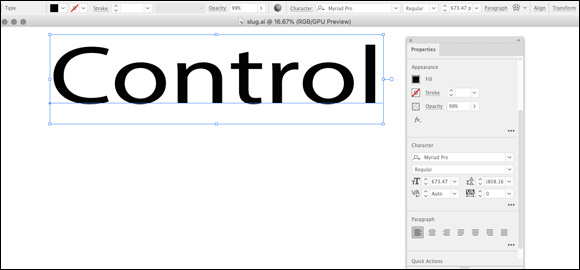
FIGURE 1-7: Option for styling type in the Control and Properties panels.
The differences, essentially, are that the Properties panel has more options for selected objects and the Control panel takes up less space.
Choosing between the Control and Properties panels
Because many features in the Control and Properties panels overlap, which panel should you use?
I know Illustrator experts who fall out on all sides of this argument: Control panel! Properties panel! Both? My opinion: I think the extra design space that the Properties panel occupies isn't worth its extra features.
Again, the choice is yours, and I explain how to set up and use both panels.
Options on the Control and Properties panels
The Control and Properties panels share the following features:
- When text is displayed as a link, you can click the link text to display a related panel or dialog box. For example, in Figure 1-8, I’ve accessed the Character panel from the Control panel. That frequently used option (accessing the Character panel) is available in the Control panel but not the Properties panel.

FIGURE 1-8: Opening a panel from linked text in the Control panel.
- When nothing is selected, the panels provide options for defining document properties. In Figure 1-9, I’m changing the unit of measurement for my document in the Properties panel.
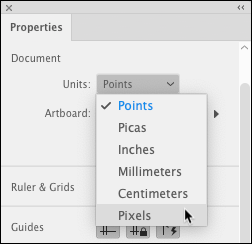
FIGURE 1-9: Configuring document properties in the Properties panel.
One difference between the Control and Properties panels is that you can resize, dock, or group the Properties panel just like other panels, but the Control panel usually sits atop the workspace. However, you can drag the Control panel (by the left edge) down the screen to any other vertical position.
As you explore Illustrator’s features in this book or on your own, you’ll come to form your own views and feelings about how much to rely on the Properties panel and how much to depend on the Control panel.