
Chapter 2
Creating, Saving, Exporting, and Printing Files
IN THIS CHAPTER
![]() Setting up documents
Setting up documents
![]() Accessing tools and panels
Accessing tools and panels
![]() Organizing project with artboards
Organizing project with artboards
![]() Handing off Illustrator graphics
Handing off Illustrator graphics
My number one rule for Illustrator projects is this: Work backward. If a project is headed for a print shop, start with a call to the printer to find out what specs you need to meet. If your artwork is to be handed off to a web developer, check in with the developer to find out what kind of resolution he needs. If an animator needs a vector graphic, find out what kind of code she needs.
That said, you don’t really create Illustrator graphics backward! You start by defining a document. Then you define artboards — the discrete elements in a document that can be easily shared in any combination (you can hand off all of a document’s artboards, some of them, or just one to a web developer or print project). And you can gather and share content in other ways, such as selections and library items.
But that said, even in the earliest stages of creating a graphic in Illustrator, it pays — literally in terms of time and energy expended — to work with as clear a picture as possible of where your project will end up. On a website? In a print ad? On a poster? In a digital animation? Each of these outcomes requires a specific color mode, is defined with different units of measurement, and will have other constraints that should be built into the project as early as possible to avoid having to tear up the work and start over.
In this chapter, I sketch out the basic process of identifying your output, and then creating a document; organizing your content into artboards; exporting and saving documents, artboards and selections; and sharing objects that produce the kind of output you need.
Creating Documents
The first step in doing anything in Illustrator is to create a document. But right away you are confronted with important initial choices. Why? Essentially because Illustrator graphics can take two pathways: print and screen. The way colors are defined and objects are measured varies greatly between these two paths.
Am I saying that when you conceive of a project you need to know whether or not the output is aimed at print output or screen output or both? Basically, yes. Although you can change horses in the middle of the stream, you might create unnecessary complications in sizing and coloring objects. It's best to anticipate the output and — to repeat my mantra — work backward from there.
Making basic choices for a document
Shortly I walk you through my curated set of options for creating a document, but all the options boil down to three essential choices: color mode, units of measurement, and dimensions:
- Print color or web color: Projects destined for commercial printing should probably be created with CMYK color. That said, even high-quality personal printers, and some commercial print workflows, accept or prefer RGB color. CMYK (cyan, magenta, yellow, and black) is referred to as subtractive color because these four colors are printed on top of each other to create a full range of colors. RGB (red, green, blue) is referred to as additive color because red, green, and blue dots of varying intensity are combined on a screen to generate a spectrum of color.
- Units of measurement: You use pixels for web and other increments (such as inches, centimeters, or points) for print projects.
- Dimensions (height and width): Because vector graphics are infinitely scalable, sometimes dimensions are not that relevant. But when illustrations are aimed at a specific device with a set width and height (such as a mobile phone app), viewport (a defined website width), or print output (such as a poster or postcard), you want to define an artboard (or multiple artboards) that matches those dimensions. I explain how artboards work later in this chapter, but the short story is that they are defined spaces in the Illustrator canvas that can be easily shared for print or screens.
Using presets
Illustrator comes loaded with document presets. You access these presets by clicking the Create New button in the opening Illustrator screen, or by choosing File ⇒ New. Those presets are grouped into the tabs shown in Figure 2-1: Recent, Saved, Mobile, Web, Print, Film & Video, and Art & Illustration.

FIGURE 2-1: Document presets grouped in tabs.
The tabs at the top of the screen provide access to the different categories. After you select a category, the opening screen displays both presets and templates (more developed projects that you can customize).
The View All Presets link pushes the templates down the screen and displays all the available presets. Figure 2-2 shows presets available in the Mobile tab of the New Document dialog, as well as the Preset Details panel on the right, which displays (and can be used to configure) basic color mode, dimension, and print settings.

FIGURE 2-2: Mobile presets.
Presets are handy time-savers. And most of them are pretty self-explanatory: The Recent tab shows presets and custom document configurations you’ve used recently, and the other presets are organized by output. They provide instant access to color mode, units of measurement, and dimensions for different kinds of projects, as well as more detailed options (such as printer-only features) applicable to specific media.
 I think most readers will find adding profiles to the Saved tab in the New Document dialog to be more hassle than it is worth. But if you have a need to create saved profiles, and you are fluent in navigating hidden system folders, you can save new profiles.
To save a new profile on a Mac, save a blank document with the appropriate settings to the New Document Profiles folder in this path: Users ⇒ Library ⇒ Application Support ⇒ Adobe ⇒ Adobe Illustrator 23 ⇒ [your language] ⇒ New Document Profiles.
To save a new profile in Windows, save a blank document with appropriate settings to the New Document Profiles folder in this page: Users ⇒ AppData ⇒ Roaming ⇒ Adobe ⇒ Adobe Illustrator 23 ⇒ [your language] ⇒ x64 ⇒ New Document Profiles.
My preferred work-around for custom presets is to simply create blank documents with settings I need, and save them as an Illustrator document that I can edit and resave with new filenames.
Defining color mode, artboard size, and raster resolution
Although the presets are nice, they don’t match every project you will do. So you need to know how to configure document features by hand.
To define document color mode, units of measurement, dimensions, and other details, click the More Settings button. This opens the More Settings dialog, revealing the full set of options for new documents.
The essential document setting options are as follows:
- Name defines the default filename when you save or export the entire document.
- Profile can shortcut the process of defining document settings by letting you choose or change the kind of document you are creating.
- Number of artboards defines how many artboards of the defined size will be generated. The set of diagrams to the right of the number of artboards defines how the artboards will be arranged. The Spacing drop-down configures the space between each artboard on the canvas, and the Rows/Columns spinner defines the number of rows or columns that will display artboards. I explain how artboards work later in this chapter in the section “Deploying Artboards.”
- Size drop-down options can shortcut the process of defining the width and height for your document. The options depend on the profile you selected. For example, if you choose a print profile, sizes include A4, a Letter, or a Tabloid, among others. If you choose Mobile profile, the options include iPad, Apple Watch, and Google pixel.
- Width and Height boxes define the width and height of your project. If you are generating multiple artboards, all the artboards will inherit this width and height. The Orientation options toggle between portrait and landscape orientation.
- Units is where you choose a unit of measurement appropriate to your project: pixels for digital output or points, picas, inches, millimeters, or centimeters for print.
- Bleed is relevant only for files sent directly to print production, such as postcards, posters, or other print media (for example, shirts or mugs). If you're preparing graphics to send directly to a print shop, consult with the printer on what kind of bleed to define, if any. (For an explanation of when and how to apply bleeds, see the “Communicating with your printer” section, later in this chapter.
- Color Mode options are RGB for screen output and CMYK for commercial printing.
- Raster Effects settings define the resolution of bitmap effects (such as Photoshop Effects) applied to your illustration. For an explanation of raster effects, see Chapter 14.
- Preview mode is normally left at the default setting. The Overprint option allows you to preview how commercial print output will look. Consult with your commercial printer on if, when, and how to use this option.
After you configure document settings, click Create Document.
What if you change your mind about a document setting? You can change settings at any stage of a project by choosing File ⇒ Document Color Settings (for color mode) or File ⇒ Document Setup (for everything else, including units of measurement).
Deploying Artboards
As I briefly noted, the canvas is the area of the Illustrator workspace where you create graphics. The canvas is basically everything you see on the screen except the interface (such as the menu, Control panel, and other panels). I walk through the non-canvas sections of the workspace in Chapter 1.
Within the canvas, artboards are discrete, sized spaces that make it easy to export, share, or print sections of the canvas. That’s a lot of workflow help!
Here’s how I like to think about artboards: They are both coherent and discrete. Too philosophical? Okay, here’s the point: Artboards inherit and share many properties of the document they lie within, such as color mode or raster effect resolution. (I explain these options earlier in the chapter in the “Defining color mode, artboard size, and raster resolution” section.) And that’s nice because it means you can work on different graphics, including differently sized graphics, with shared properties.
For example, you might have a project where you design a print poster, palm card, and plastic banner for an event. Although these will be different in size, they will likely use the same set of colors and maybe other features such as symbols (which I explain in Chapter 10).
Or you might use multiple artboards of the same size to prepare a prototype of a mobile app that shows different states of user interaction. Here, dozens of artboards might be helpful. Again, this project has common document properties that apply to all artboards, such as RGB color and pixels as the unit of measurement.
To help you get your money’s worth out of artboards, I first review some basic rules for creating and using them. Then I walk you through the two scenarios I just identified — print project and app prototype — to help you understand the efficacy of artboards and to expose you to key techniques for deploying artboards.
Defining artboards
You can have 1 to 1,000 artboards per document. I’ve never used 1,000 artboards in a project, but it’s nice to know they’re there if I need them. As I explain in the beginning of this chapter, you can set the number of artboards for a document when you first create it, but you can also add and remove artboards after you begin work on a document.
The Artboard tool is part of the Basic toolset (I explain how to manage tools in Chapter 1). You create artboards in a document by selecting the Artboard tool and drawing interactively on the canvas, as shown in Figure 2-3.

FIGURE 2-3: Drawing an artboard.
Or you can generate an artboard by clicking the New Artboard icon in the Artboard pane or the Control (or Properties) panel. The Artboard Options dialog shown in Figure 2-4 opens.

FIGURE 2-4: Generating an artboard with the Artboard Options dialog.
Generating an artboard allows you to name the artboard as you create it, along with defining the dimensions and location digitally.
You can manage artboards in many ways. The following shows you how to define and take advantage of the artboard options I think you’ll find helpful in organizing and sharing projects.
To resize or move an artboard interactively, follow these steps:
- With the Artboard tool, click once inside the artboard.
- Drag to move the artboard, as shown in Figure 2-5.
- Click and drag on a side or corner (square-shaped) bounding box to resize the artboard, as shown in Figure 2-6.
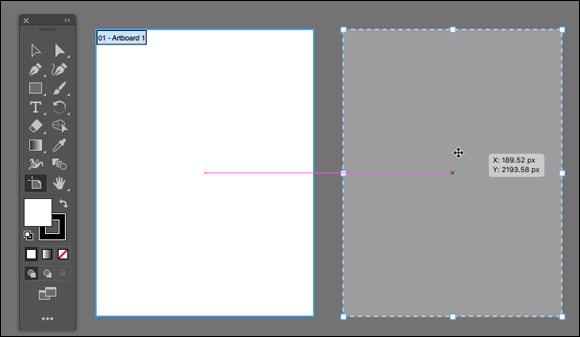
FIGURE 2-5: Moving an artboard.
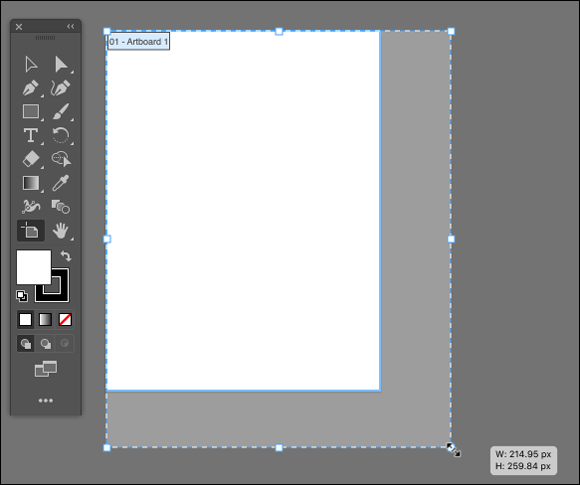
FIGURE 2-6: Resizing an artboard.
You can change any artboard property by using the Control or Properties panel:
- The Presets drop-down provides quick access to commonly used sizes. My favorite feature here is the Fit to Artwork Bounds option, which resizes the selected artboard to shrink in size to where it just fits around all the artwork within it. By sizing an artboard to an exact fit around its content, you avoid exporting or printing blank space in your graphic.
- The Name box is the easiest way to change the selected artboard name.
- The Move/Copy Artwork with Artboard option is on by default but can be turned off if you want to move an artboard while leaving the content where it is.
- The Artboard Options box opens a dialog with options that apply to all selected artboards in a document. I find the Show Center Mark useful when centering content in an artboard. You can use this dialog also to rename multiple selected artboards with sequential numbering. For example, if I rename a bunch of selected artboards DK, I end up with DK-1, DK-2, DK-3, and so on.
- The X value in the Control panel defines the vertical location; the Y value defines the horizontal location.
- The Width and Height values resize the artboard. Use the lock icon to lock the height-to-width aspect ratio while you resize.
- The Rearrange All icon opens up a panel with different options for arranging your artboards in an orderly way on the canvas.
A couple of other artboard essential tips:
- To hide all objects that are not within an artboard, choose View ⇒ Trim.
- To delete an artboard, select it with the Artboard tool and click Delete.
Using artboards for a multidimensional project
Let me illustrate a basic but typical multi-artboard workflow: one where you create different versions of the same graphic but with different dimensions. In doing that, I share some techniques and approaches you can apply to your own particular needs.
Suppose that you are tasked with designing an ad that will run in different social media platforms and in different orientations: square, horizontal (landscape), and portrait (vertical). The ad must have the same basic content but fit the following size specs:
- Square: 1080 pixels
- Vertical: 1080 pixels wide by 1350 pixels high
- Horizontal: 1200 pixels by 628 pixels
The following steps are an efficient way to set up the artboards for this project:
- Create a new document with one 1080 px square artboard, as shown in Figure 2-7.
- Choose File ⇒ New, and bypass the New Document dialog by clicking More Settings. The More Settings dialog appears.
- Name the project Ads.
- In the Profile drop-down, choose Web.
- In the Number of Artboards box, enter 3.
- Set the artboard arrangement to Arrange by Row (the third icon).
- In the Height and Width boxes, enter 1080. The Units setting will default to Pixels, and the Color Mode to RGB. These and other defaults are fine.
- Click Create New Document.

FIGURE 2-7: Defining a three-artboard document.
- Name the three artboards Square, Vertical, and Horizontal:
- If the Artboards panel is not displayed, choose Window ⇒ Artboards.
- Double-click the name of Artboard 1 and type Square. In the same way, rename the second artboard Vertical and the third artboard Horizontal.
- Choose View ⇒ Fit All in Window to see all three artboards, as shown in Figure 2-8.

FIGURE 2-8: Naming artboards.
- Resize the Vertical and Horizontal artboards:
- In the Artboard panel, double-click the icon to the right of the artboard named Vertical. In the Control panel that appears, change the height to 1350 px and click OK.
- In a similar way, change the dimensions of the Horizontal artboard to 1200 pixels wide by 628 pixels high.
-
Arrange the artboards to create a more coherent display:
- Click Rearrange All Artboards in the Control panel. The Rearrange All Artboards dialog opens.
- Keep the Arrange by Row layout and the left-to-right Layout Order settings you defined when you created the document. Leave the spacing set to 20 pixels, and leave Move Artwork with Artboards selected, as shown in Figure 2-9, then click OK.

FIGURE 2-9: Arranging artboards.
This step keeps the basic layout structure in place, but resets the spacing between the resized artboards so they don’t overlap.
-
Design your ad on one of the artboards.
In Figure 2-10, I started with the square ad.
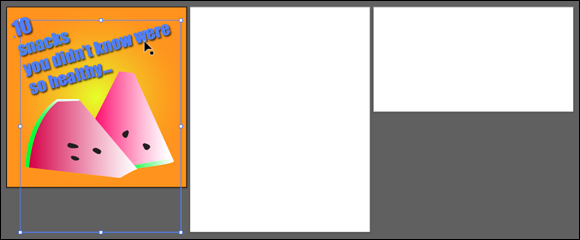
FIGURE 2-10: Designing a single artboard.
- Copy the first ad content to the other artboards:
- Use the Selection or Direct Selection tool to select all the content in the first artboard, the one with the content.
- Choose Edit ⇒ Cut.
- Choose Edit ⇒ Paste on All Artboards.
- The Paste on All Artboards technique pays for itself when you're working with dozens or even hundreds of artboards! Of course, the pasted artwork doesn’t fit properly in differently sized artboards. Fixing that is the last step.
- Edit the design of the horizontal and vertical artboards to make the square content fit, as shown in Figure 2-11.

FIGURE 2-11: Customizing designs for different artboards.
What do you do with a set of artboards? They are automatically saved as part of your Illustrator document. After that, you can export one, some, or all of them for screen or print output. I explain how to do that next.
Exporting, Saving, and Printing
You can export, save, and print several kinds of objects in Illustrator:
- An entire document
- One, some, or all artboards in a document
- Selected objects
- Assets
You share Illustrator files for a wide range of print and screen output options by exporting them to one of a long list of file formats. Exported files can't be edited in Illustrator.
You save Illustrator files when you need to edit them in the future.
Sometimes you export files for print or web output, and then save them. Sometimes you can save Illustrator files in formats that you can hand off to print or web designers and edit them.
In this section, I first describe how to save files that you can open and edit in Illustrator. Then I explain how to export or print documents, artboards, selections, and assets. Finally, I share some tips on printing and working with commercial printers.
Saving Illustrator files
You can save Illustrator files in any of these formats:
- AI, Illustrator’s native format and AIT (Illustrator templates).
- EPS, a widely supported vector format used for sharing files with other vector-editing apps and printers.
- Adobe PDF, a portable vector format accessible to anyone with Acrobat Reader.
- SVG or SVG (Compressed) files for screen output. See Chapter 18 for an in-depth exploration of working with SVG files.
Saving projects as EPS, PDF, or SVG files gives you the option of retaining the ability to edit the files in Illustrator.
Each of the options for saving Illustrator files has distinct options. If you are handing off a file in any of them, check with the team you are handing off to, to find out if there are specific settings they require. I share some tips on saving AI, EPS, and PDF files for print output at the end of this chapter, and explore SVG output for digital projects in Chapter 18.
The following steps apply to saving files as AI, EPS, and PDF formats:
- Choose File ⇒ Save, File ⇒ Save As (to save an existing file with a new name), or File ⇒ Save a Copy (to create a duplicate copy of a file).
- Navigate to a location for the file and enter a filename.
-
In the Format drop-down, choose one of the available formats (AI, EPS, or PDF).
If the file format you want to use (such as PNG or TIFF) is not available in the Format drop-down, the format is available for export but not saving. - Click Save to open the Options dialog for the file format you selected. The options will differ depending on the format but the following choices are widely available and useful:
- If you're saving to AI or EPS format, the Version drop-down defines the version of Illustrator with which you want your file to be compatible. If you are saving to PDF, the Compatibility drop-down defines what versions of PDF will be able to open the file. Legacy formats don’t support all features.
- Font embedding options allow you to embed fonts for users who will receive the file but may not have the required fonts.
- The Create PDF Compatible File option for saving AI files allows the file to be opened with Adobe Reader as well as apps that support importing Illustrator documents.
- The Include Linked Files option embeds any linked files in your illustration.
- The Embed ICC Profiles option is used by some print shops to ensure color integrity. Consult with your print shop on whether and how to use this option.
- The Use Compression option reduces file size.
- The Save Each Artboard to a Separate File option is available in Illustrator files with multiple artboards. Along with the resulting set of artboard-based files, a master file is created with all artboards.
If you're simply saving an Illustrator project to access it, to edit it, or to share it with someone who has Illustrator, save the file as an Illustrator file.
Exporting files
Illustrator files (as well as artboards, assets, and selections) can be exported to a variety of print- and web-compatible file formats. These files can't be edited in Illustrator, so you will almost always want to save as well as export projects as Illustrator files.
Web designers may ask you for SVG files, which retain Illustrator editing capability (see Chapter 18). More likely, web designers will ask you for web-compatible PNG or JPG files. I explore export options for those formats in Chapter 17.
Print designers may be able to work with your Illustrator files. Or they might require TIF or other print-only raster images. In those instances, get the specs for the exported files from your print partner.
You export files by choosing File ⇒ Export ⇒ Export for Screens or File ⇒ Export ⇒ Export for As (for print). Options vary depending on the output format. And, again, I’ll repeat a mantra that runs through this chapter and any discussion of output in this book: Ask the person to whom you are handing off the file what options he or she prefers.
Using artboards and assets for output
When you save or export Illustrator documents with multiple artboards, you can choose to export or save any set of artboards.
For example, if you're exporting a document to PNG output for screens, the Artboards tab (shown in Figure 2-12) allows you to define which artboards to export.

FIGURE 2-12: Exporting selected artboards.
Communicating with your printer
Today, print shops can turn Illustrator artwork into anything, from a poster to a coffee mug, a t-shirt to a message printed on glass. Each project has its own requirements, and the trick is to communicate effectively with your printer from the beginning.
I asked Lydia Ochavo from UpPrinting.com, a widely used online print service, to share advice applicable to just about any print project in Illustrator. Here are some of her tips. Refer to the beginning of this chapter for notes on how to define documents to meet these specs:
- Print shops provide templates for frequently used output. Download and use them before you begin your project. UpPrinting has templates at
www.uprinting.com/print-templates. - Although Illustrator vector files are scalable, it’s safest to submit files to the printer sized to the actual output size.
- Most printers require a 1/8" bleed around your artwork. Make sure that all printable content is inside the bleed.
- Set raster resolution to at least 300 dpi.
- Use CMYK color mode because professional print shops print only in CMYK.
- Many print shops prefer PDF format to Illustrator AI files.
- When you need an exact color match and your printer supports the use of Pantone color, use Pantone colors. Pantone colors are available from Swatch panels in Illustrator. You can use a Pantone color book to preview how a color will print. Those color books are available from your printer.