
Chapter 9
Painting with Brushes
IN THIS CHAPTER
![]() The role of brushes in Illustrator design
The role of brushes in Illustrator design
![]() Setting the painter in you free with the Paintbrush tool
Setting the painter in you free with the Paintbrush tool
![]() Applying brushstrokes to paths
Applying brushstrokes to paths
![]() Navigating Illustrator’s Brush libraries
Navigating Illustrator’s Brush libraries
![]() Creating custom brushes
Creating custom brushes
You can add a spectacular range of patterns, designs, and flourishes to strokes with Illustrator’s set of brushes. And you can paint interactively with brushes applied to the Paintbrush tool. In an informal survey of Illustrator users I conducted while preparing to write this book, faces lit up when designers insisted that I squeeze in a substantial exploration of brushes. Let’s face it, Illustrator brushes are fun!
In this chapter, you get introduced to an almost unlimited array of built-in and custom-made brushes. I also show you how to paint interactively on your screen with those brushes, and how to apply brushstrokes to existing artwork.
Unleashing Your Creativity with Brushes
Before I dive into how-to's on using Illustrator brushes, it will be helpful to start by distinguishing between two ways to work with brushes:
- Create artwork using other tools, such as the Pen, Pencil, or Curvature tools, and then apply brushstrokes.
- Apply brushstrokes as you create paths with the Paintbrush tool.
In the first method, you create the artwork by using any drawing tool (such as the Pen, Pencil, or Curvature tool). Then select a path, and click a brush in the Brushes panel, choose a brush from the Properties or Control panel, or create a DIY brush (I show you how shortly). The brushstroke is applied to the stroke. Apply a stroke color and weight, and observe the effect, as shown in Figure 9-1.

FIGURE 9-1: Applying a brush to a path.
In the second method, you choose a brush or make your own, and then use the Paintbrush tool to paint on the screen. Figure 9-2 demonstrates loading the Paintbrush tool by choosing a brush, and then painting interactively on the canvas.
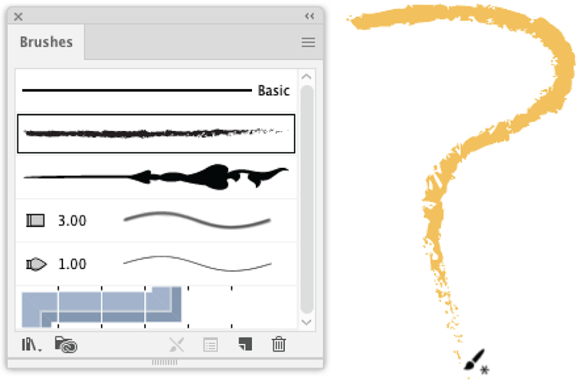
FIGURE 9-2: Painting with the Paintbrush tool.
That’s the short story. Much more is involved in taking full advantage of the palette of brushes and the ways in which you can apply them, so let’s dive in more deeply.
Painting with the Paintbrush
Painting with the Paintbrush tool is similar to drawing with the Pencil tool. If the Pencil tool isn’t a reference point for you, it might be worth bouncing quickly to the section on the Pencil tool in Chapter 8. The most obvious and dramatic difference between the two tools is that the Paintbrush tool applies the selected brushstroke to a path as you draw but the Pencil tool applies a defined stroke (and fill) but can't, on its own, apply brushstrokes.
When you’re drawing with the Paintbrush tool, you release the mouse button when you finish drawing a path. You can also create a closed path with the Paintbrush tool. Hold down the Alt (Windows) or Option (Mac) key as you drag. The Paintbrush tool displays a small circle. When you release the mouse button (without first releasing the Alt or Option key), the path becomes closed.
You double-click the Paintbrush tool to open the Paintbrush Tool Options dialog. The options are similar to those for the Pencil tool, such as how smooth a path you want to draw, and how closely you want the path to adhere to every movement of your stylus or mouse. For more detail, I will save us all a tree and point you back to the Setting Pencil Tool options section of Chapter 8 to get oriented on these features.
And, as with the Pencil tool, Illustrator generates anchors as you draw with the Paintbrush tool. The number of anchor points is determined by the length and complexity of the path and by the Paintbrush tolerance settings. If you choose the Keep Selected option in the Paintbrush Options dialog, you’ll see the generated anchors as soon as you draw a brushstroke, as shown in Figure 9-3.

FIGURE 9-3: Revealing anchors in a brush path.
Applying Brushes to Paths
As mentioned, you can apply a paintbrush to a stroke in two ways. One way is to draw directly with the Paintbrush tool. The other way, which I focus on now, is to click a path and then click a brush.
You can use the same technique to replace a brush. For paths that already have a brush applied, select the path and then select a different brush in the Brushes panel to change the applied brush.
Working with the Brushes panel
The bottom of the Brushes panel has six icons. Because these icons access many of the key ways you can define and apply brushes, I'll introduce them to you now, from left-to-right:
- Access Brush Libraries: These are collections of preset brushes that come with Illustrator. You can also create your own brushes (as explained later in the chapter). Here, we focus on exploiting the substantial set of prestyled brushes.
- Libraries Panel: Share objects (including defined brushes) between apps and between users using Creative Cloud Library.
-
Remove Brush Stroke: Remove a brushstroke from selected paths, as shown in Figure 9-4.
 You remove brushes from a selected path by clicking the Remove Brush Stroke tool in the Brushes panel, not the Delete button. The Delete button deletes the brush from the panel, meaning you have to go dig for it when you need it again.
FIGURE 9-4: Removing a brush from a path.
- Options of Selected Objects: Different brushes have different options, sometimes very different. I explain how you define brush options for different brushstrokes later in this section.
- New Brush: Define your own brushes, either by copying and editing an existing brush or creating one from scratch.
- Delete Brush: Access the brush libraries, remove a brushstroke, define options for the selected object, create a new brush, or delete the selected brush.
Navigating the Brush libraries
Now that you know how to draw with the Paintbrush tool and apply brushes to strokes, it’s time to explore how to find and create brushes.
Brush libraries, accessible through the icons at the bottom of the Brush panel or the Brush panel menu, are organized by their look and purpose. Arrow brushes, for example, paint with arrows. You can click or drag brushes from any of these libraries (which open in their own panels) into the Brushes panel for easy access in your document, as shown in Figure 9-5.
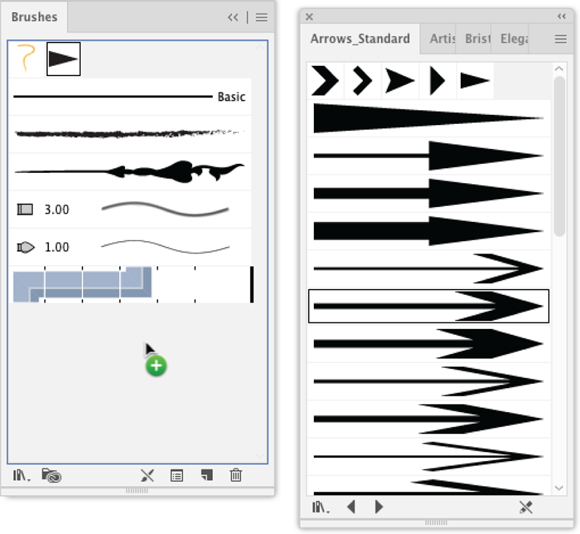
FIGURE 9-5: Adding brushes to the Brushes panel.
Five types of brushes are available:
- Calligraphic brushes apply strokes that look like ink flow from calligraphy pens.
- Scatter brushes scatter pattern objects along a path.
- Art brushes stretch a single artwork along the entire length of a path.
- Bristle brushes create strokes that look like they were painted with a paintbrush (with visible individual bristles).
- Pattern brushes include up to five tiles that interactively associate with the sides, corners, and endpoints of a stroke.
Note that brush types define the way in which a brush is applied to paths whereas brush libraries are sets of prestyled brushes.
You can filter the Brushes panel to display any or all of these types of brushes by selecting or deselecting different kinds of brushes from the list that appears when you open the panel menu. In Figure 9-6, the Brushes panel was filtered to display only calligraphic brushes.

FIGURE 9-6: Filtering the Brushes panel for calligraphic brushes.
Creating DIY Brushes
You can create your own calligraphic, scatter, art, bristle, and pattern brushes. The process for creating any brush has these features in common:
- Create the brush, name it, and save it.
- Then apply the brush to any path(s) or load it onto the Paintbrush tool to paint with it.
- Edit the brush style in the Brushes panel by double-clicking it. When you edit a brush, the changes can be applied to all paths to which the brushstroke has been applied.
Each type of brush has distinctive properties and options. Exploring them all would require a book in itself. Instead, I highlight some of the most exciting properties and widely applicable options for customizing brushes.
 In the following sections, I take you through the process of defining each of the five types of brushes. If you’re planning to use only a particular brush or brushes, I suggest that you read through the process for all five brushes. Why? During a discussion of a specific brush, I also introduce techniques applicable to all brushes.
Editing existing bristle brushes to create new ones
The simplest way to create your own brush is to take an existing one and tweak it. Rephrase, as they say in TV legal dramas: The most efficient way to create your own brush is to take an existing one and tweak it.
If an existing brush is close to what you need or can be a basis for you to creatively experiment, start with that brush.
Exploring the Bristle Brush library
The bristle brush lets you create paths that have the look and feel of strokes created with an actual brush. As with every brush, you can either load the Paintbrush tool with a bristle brush or apply bristle brushstrokes to any shape or path.
To explore the library of preset bristle brushes, choose Window ⇒ Brush Libraries ⇒ Bristle Brush ⇒ Bristle Brush Libraries. I know that those last two menu steps seem redundant, but work your way through them and you’ll get to the Bristle Brush library. Alternately, you can get to the Bristle Brush library from the Brushes panel by selecting Open Brush Library ⇒ Bristle Brush ⇒ Bristle Brush Libraries.
The Bristle Brush menu gives you the option of viewing the available brushes in list or thumbnail view. You get a bit better preview of how the brushstroke will look by choosing thumbnail view, shown in Figure 9-7.

FIGURE 9-7: Surveying bristle brushes in thumbnail view.
The icons on the left side of the brush previews indicate the tip shape of the bristle brush. These shapes include round (more like a pen); flat (more like a brush); and fan (spread out strokes, similar to the effect of pushing down hard on a real paintbrush). Bristle brush types can vary in bristle length, stiffness, paint opacity, and other features. I show you how these are defined shortly.
One way to explore the effect of each of these brushes is to draw a path with any drawing tool, define a stroke weight and color, and then click the different preset bristle brushes one by one. Figure 9-8 demonstrates a bristle brush called Mop.
You can experiment with bristle brushstrokes also by loading the Paintbrush tool with one of the bristle brushes and painting on the canvas, as shown in Figure 9-9.

FIGURE 9-8: Applying a bristle brush to a path.

FIGURE 9-9: Painting with a bristle brush.
If you have a Wacom Intuos 3 or higher tablet with Art (6D) pen, the bristle brushstrokes applied with the Paintbrush are sensitive to pressure, tilt, and other features built into the tablet and pen.
You can define opacity (transparency) for bristle brushstrokes. And, because bristle brushstrokes are usually defined with space between bristles, that space adds another see-through dimension (along with transparency) when you apply bristle brushstrokes over a background, as shown in Figure 9-10.
Creating a new brush by copying and editing an existing one
Having explored some of the features of the Bristle Brush tool, let me show you how to create your own custom bristle brushes. In the process, I use the bristle brush as an example of how to create a brush by copying and editing another brush.

FIGURE 9-10: Underlying objects show through transparencies and gaps in bristle brushstrokes.
To create a custom brush based on a preset bristle brush, follow these steps:
-
Add a bristle brush to the Brushes panel.
With one brush selected in the Bristle Brush Library panel, click the panel menu and choose Add to Brushes, as shown in Figure 9-11. If the Brushes panel is not visible, choose Window ⇒ Brushes to display it.

FIGURE 9-11: Adding a bristle brush to the Brushes panel.
- Rename and customize the bristle brush:
- Double-click the brush in the Brushes panel (not the Bristle Brush Library panel). The Bristle Brush Options dialog opens.
- In the Name area, enter a new name.
-
Experiment with changing the brush properties.
The ten options in the Shapes drop-down list access different types of brush designs. When you select one, an illustration of the brush appears below the selection to help you choose which type of brush you want to work with.
Here’s how the different options affect the behavior of a brush:
- Size: Defines the diameter of the brush.
- Bristle Length: Defines the distance from the start to the end of the bristle.
- Bristle Density: Sets the number of bristles in a specified area, ranging from 1% to 100%, calculated in relation to the brush size and bristle length.
- Bristle Thickness: Defines the thickness using a scale ranging from fine (0%) to course (100%).
- Paint Opacity: Defines the degree of transparency of the bristle brushstroke, ranging from 1% (very transparent) to 100% (no transparency). (Parts of underlying objects show through between bristles, but bristle brushstrokes also have definable transparency.)
- Stiffness: Defines the rigidity of bristles, ranging from very flexible (1%) to very stiff (100%).
- When the brush preview in the Bristle Brush Options dialog (see Figure 9-12) reflects the look you are aiming for, click OK to save the definition of your new custom brush.
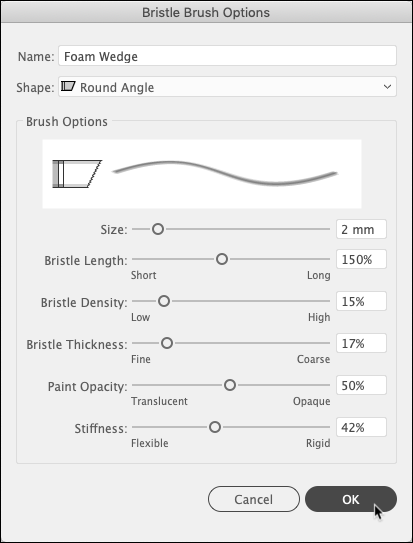
FIGURE 9-12: Defining a custom brush.
The new defined brush appears in the Brushes panel, as shown in Figure 9-13, ready to apply with the Paintbrush tool or to be applied to any strokes.

FIGURE 9-13: Applying a custom bristle brushstroke.
Crafting calligraphic brushes
Calligraphy is a form of styling characters (letters, numbers, or punctuation) as designs. In traditions that go back thousands of years, calligraphy is created with a broad-tipped brush.
In Illustrator, calligraphic brushstrokes can vary in size, angle, shape, and randomness (variety) in the brushstroke width. Calligraphic brush shapes vary from almost round to very flat, but it is the ovalness that gives calligraphic brushes their unique styling. Calligraphic brushes (like the ones in Figure 9-14) are never round because a completely round calligraphic brush would simply apply a wider band around a stroke.

FIGURE 9-14: Viewing some of Illustrator’s calligraphic brushes.
Many nice preset calligraphic brushes are available in the Artistic_Calligraphic library. To access them from the Brushes panel menu, choose Open Brush Library ⇒ Artistic ⇒ Artistic_Calligraphic.
If you don’t find a calligraphic brush that fits your need, you can create your own. To create a custom calligraphic brush, and then tweak it through experimenting, follow these steps:
- Begin to define a new calligraphic brush:
- Choose New Brush from the Brushes panel menu. The New Brush dialog opens.
- Select New Calligraphic Brush and then click OK. The Calligraphic Brush Options dialog opens.
- Name the brush by entering a descriptive name in the Name box.
-
Click OK to save the new brush.
Even though you haven’t changed anything but the brush name at this point, save the brush now. It appears in the Brushes panel, as shown in Figure 9-15.
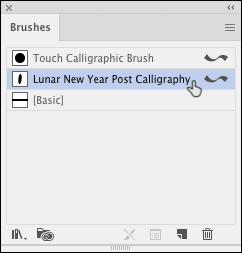
FIGURE 9-15: A custom calligraphic brush in the Brushes panel.
- With a stroke selected, use the Calligraphic Brush Options dialog to customize the calligraphic brush while observing the effect on a stroke:
- With a path to which a calligraphic brushstroke has been applied selected, make sure the applied calligraphic brush is selected in the Brushes panel.
- Choose Brush Options from the Brushes panel menu. The Calligraphic Brush Options dialog opens.
- Keep the Preview box selected, as it is by default. That way, you can see the effect of changes you make on the stroke to which you applied the brush.
-
In the Angle box, enter a value to define the angle of the brush.
You might want to start with a 30 degree angle. As noted, don't define round brushes when you're going for a calligraphy look, but brush roundness can vary from almost round to almost flat.
- In the Size box, enter a value to define the diameter of the circle that would enclose the brush if the brush were round.
- Choose Fixed or Random settings:
- Select either Fixed or Random on the drop-down menus. The drop-down menu for each option has Fixed and Random options. (Additional options are available if Illustrator has detected that you're using a supported tablet or stylus or both.) Fixed generates a brush with a fixed angle, roundness, or diameter. Random generates a brush with random variations in angle, roundness, or diameter.
- Enter a value in the Variation box to specify the parameters that constrain how brush characteristic can vary. For example, when the Diameter value is 36 points and the Variation value is 6, as in Figure 9-16, the diameter can range from 30 points to 42 points.
- Click OK to save the new calligraphic brush pattern.

FIGURE 9-16: Defining and previewing settings for a new custom calligraphic brush.
Applying or designing art brushes
Art brushes stretch to the length of the path to which they are applied. For example, if you apply the same flower art brush to different sized strokes, you create different sized flowers, as shown in Figure 9-17.
Those of you familiar with symbols in Illustrator might note, in looking at Figure 9-17, that the use of an art brush here is similar to the way symbols can be splayed about a canvas and updated globally.

FIGURE 9-17: An art brush applied to differently sized paths.
The routine for creating an art brush is relatively simple:
- Select the object that will become the brush.
- Drag the artwork onto the Brushes panel, as shown in Figure 9-18.
-
Choose the New Art Brush option from the dialog that opens and click OK.
The Art Brush Options dialog opens with the brush design selected in the preview window.
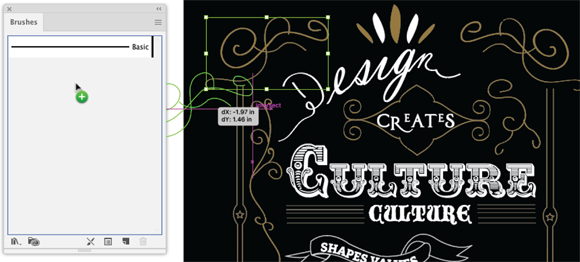
FIGURE 9-18: Creating a new art brush from an object.
-
In the Name field, enter a name.
The bulk of the work of designing an art brush takes place when creating the object you drag into the Brushes panel. Often the rest of the default options in this dialog, shown in Figure 9-19, work pretty well.

FIGURE 9-19: Defining an art brush.
- In the Direction area, select the up arrow to make the pattern appear in an intuitive, right-side-up manner as you draw a path up with a drawing tool.
- In the Width area, enter a value to define how large the art will display relative to the stroke path.
- Check out a couple other options in the dialog:
- Normally, you’ll want to select the Scale Proportionately option to keep the height-to-width ratio unchanged as you rescale the object to which the art brush is applied.
- One other option to explore is the set of Flip Along and Flip Across check boxes in the Options area. These options allow you to reverse the symbol either horizontally or vertically.
- When you're satisfied with the art brush options, click OK.
With an art brush defined, select any path and click the brush in the Brushes panel to apply it to the selected path.
Defining scatter brushes
Scatter brushes are intuitively named — they scatter artwork along a path. As with all brushes, you can draw interactively with a scatter brush by using the Paintbrush tool, or you can apply a scatter brush pattern to an existing path.
Defining any brush is easier if you can do so interactively. Simply try different options and observe the effect as the brushstroke is applied to something on the canvas. I show you that trial-and-error method in the “Crafting calligraphic brushes” section, where I walk through the procedure for applying a brushstroke to a path and then tweaking the brush while you watch the changes take effect on a stroke. If you’re working with scatter brushes, I suggest looking at that section.
This approach applies in spades to defining scatter brushes. Rather than trying to decipher the algorithms behind the various options for defining this (or really any) brush, it's more intuitive to generate a new brush by using default options, and then test it on a stroke as you edit the options. You apply that workflow again in the following steps to define a new scatter brush:
-
Start by creating artwork to use as a brush.
Small objects patterns are generally best.
-
Drag artwork onto the Brushes panel.
The New Brush dialog appears.
- Click OK.
-
Choose the New Scatter Brush option.
The Scatter Brush Options dialog appears.
- In the Scatter Brush Options dialog, enter a name for the brush in the Name area.
- Without changing the default option settings, click OK to generate the brush.
Next, the work of tweaking the brush begins. Here’s how to style brush options that produce the effect you want with your scatter brush:
- Draw a path in the canvas and apply the brush.
-
Double-click the brush you just created in the Brushes panel.
The Scatter Brush Option dialog reopens with a Preview check box.
- Enable the preview by selecting the Preview check box.
- Use the sliders and lists in the dialog to modify the pattern while observing the effect:
- Size: Defines the size of the pattern in relation to the size of the original drawing.
- Spacing: Controls the spacing between instances of the artwork.
- Scatter slider: Defines how far apart the scatter brush art will scatter away from the path to which the brush is applied.
- Rotation: Defines how much objects will rotate as the brush is applied to a curved path. Rotation setting can be applied relative to either the path (defined by how you draw) or the page (relative to the document).
-
In the Scatter Brush Options dialog, use the Colorization Method pop-up list to define how coloring is added (or not added) to the original stroke color.
Click the tips (lightbulb) icon for an explanation of how this works.
- Observe the effect of different option settings for the brush, applied to a path as shown in Figure 9-20, and when the settings are what you are aiming for, click OK.
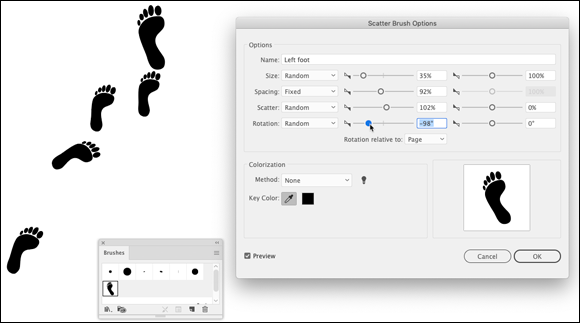
FIGURE 9-20: Interactively defining scatter brush options.
Creating pattern brushes
Pattern brushes repeat the object on the path. Astute readers who just read the preceding section of this chapter might exclaim, “Wait! I thought that’s what scatter brushes do.” I hear you. And you’re right. What distinguishes pattern brushes is that they more closely adhere to the path they are applied to, and their fine-tuning features make it possible to design complex and detailed effects. I find it helpful to mentally associate pattern brushes with an intricately designed picture frame.
Pattern brushes can get complicated because the process can involve as many as five different object panels for the start, finish, side (center), inside corner, and outside corner panels. Note I said they can involve up to five different objects in a single pattern brush. But they don’t have to. You can create an interesting pattern brush with just one element.
Keep the following in mind when you design corner and side patterns:
- Brush patterns tile perpendicular to the path, so when a path turns, the patterns turn with the path.
- Corner tiles rotate 90° clockwise when the path changes direction. That means if you design a corner tile that works well in the upper-right corner of a rectangular border, it will adapt appropriately to the other three corners in the rectangle.
Figure 9-21 shows a couple patterns that can be used to create a pattern brush. The top pattern serves as a corner; the bottom pattern will fit on the sides of a shape.

FIGURE 9-21: Artwork for a pattern swatch.
As with all brush design workflow, you can use trial-and-error to tweak your designs.
Follow these steps to create a two-swatch pattern brush that works as a picture frame:
-
Create two patterns, one for the corners and one for the sides of a rectangle that you can use to frame objects.
Keep the artwork as simple as possible.
-
In the Swatches panel, drag the corner pattern into the panel, as shown in Figure 9-22, and name it Corner.
If the Swatches panel is not visible, choose Window ⇒ Swatches.
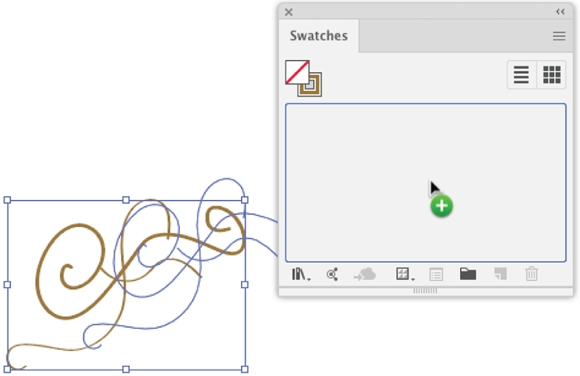
FIGURE 9-22: Dragging a corner pattern into the Swatches panel.
- If you want to rename the swatch, double-click the swatch name in the Swatches panel and type a new name.
- Drag the second graphic, the one to be used for the sides of a frame, and name it Side, as shown in Figure 9-23.
- Create a new pattern brush and name it Frame:
- On the Brushes panel menu, choose New Brush.
- In the New Brush dialog, choose New Pattern Brush and click OK.
- In the Pattern Brush Options dialog, enter Frame in the Name area.

FIGURE 9-23: Naming swatches.
- Define the corner tile by using the corner swatch you created:
- Click the Outer Corner Tile icon. The icon is on the far left in the set of five pattern swatches.
- Choose the Corner swatch from the set that appears in the drop-down, as shown in Figure 9-24.
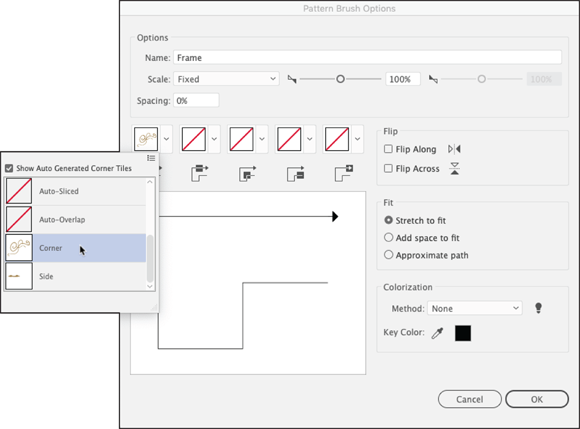
FIGURE 9-24: Choosing a corner swatch.
-
Define the side tile by using the side swatch you created.
Use the same process you used in the preceding step.
-
Leave the default settings as is and click OK.
You can tweak settings as you experiment with applying the pattern brush.
- Test the pattern brush by applying it to the stroke of a rectangle:
- Draw a rectangle.
- If you want to test your frame with an image or a color background, apply that to the fill of the rectangle.
- Apply the border using the Properties panel or the Control panel (shown in Figure 9-25).
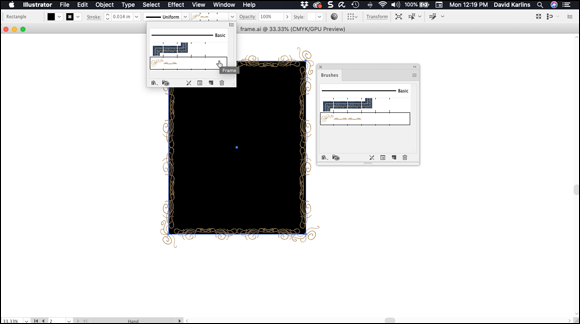
FIGURE 9-25: Applying a pattern brush to a rectangular frame.
-
With your pattern brushstroke applied to a rectangle, double-click the brush in the Brushes panel to make adjustments:
- Make sure the Preview check box is selected.
- Experiment first with the three different Fit settings.
- Also experiment with the Scale slider. In Figure 9-26, I changed the Fit from Stretch to Fit to Add Space to Fit, and scaled the brush down to 75%. That makes the border’s effect less cluttered.
For the kind of pattern I created in this example, most other default settings work well.

FIGURE 9-26: Tweaking a pattern brush.
-
After your preview test matches the look you're aiming for, click OK.
You're prompted to apply the changes to strokes to which the pattern brush has been applied.
- Click the Apply to Strokes button.
Using Brushes with a Drawing Tablet
In exploring different brushes in this chapter, I noted that some options for designing and applying brushes are available only in tablets. If you're drawing with a tablet, such as a Wacom tablet, you can select drawing tools like the Pencil, Pen, brush, or shape tools, and draw freehand using your tablet.
Calligraphic brushes, for example, take on special attributes when you use a drawing tablet. When your operating system detects your drawing tablet, Illustrator provides additional pressure and pen stroke options for using your tablet’s pen. The most widely supported feature is pressure — the harder you press, the thicker the calligraphic brushstroke.