
Chapter 20
Top Ten Productivity Tips
IN THIS CHAPTER
![]() Quickly generating layers from a document
Quickly generating layers from a document
![]() Shortcuts for editing images back and forth between Illustrator and Photoshop
Shortcuts for editing images back and forth between Illustrator and Photoshop
![]() Batch-processing image placement and format
Batch-processing image placement and format
![]() Importing editable Word files
Importing editable Word files
Illustrator users have their favorite sets of shortcuts, tips, tricks, timesavers, and techniques for producing better output faster. I have mine, and more importantly, so do other full-time Illustrator designers I’ve met over the decades. Here, I share a few of the ones I’ve found most valuable.
In the credit-where-credit-is-due department, the book's tech editor, Jean-Claude Tremblay, suggested several tips in this chapter.
Generate Layers
Illustrator enables you to automatically generate layers from objects in a document. This feature is useful when you need to hand over layers to an animator.
You generate layers from objects in a document by choosing Release to Layers from the Layers panel. The panel menu has two Release to Layers options: Build and Sequence. The differences are easier to show than tell. Figure 20-1 shows what happens when I generate layers using the Build option — the resulting layers start with the object lowest in the back-to-front arrangement, and build additional objects with each layer.
When I use the Release to Layers (Sequence) option, each object gets its own layer, as shown in Figure 20-2.
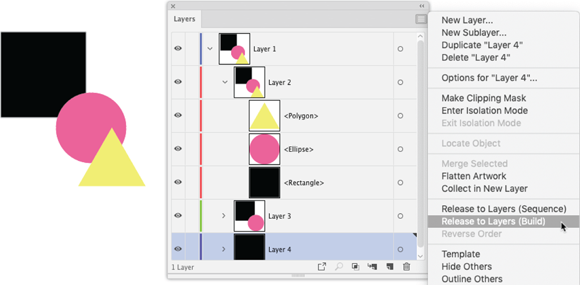
FIGURE 20-1: Building layers.

FIGURE 20-2: Sequencing layers.
Use Shapes for Guides
In Chapter 4, I show you how to draw isometric shapes and how to use perspective grids to draw objects with vanishing points off in the distance. Here’s an additional technique you can use to make it easier (and faster) to draw isometric shapes: Rotate a shape and use that to create a guide.
To transform an object into a guide, select the object and choose View ⇒ Guides ⇒ Make, as shown in Figure 20-3.
After you generate guides, you can use them to more quickly draw objects at any angle, as shown in Figure 20-4.
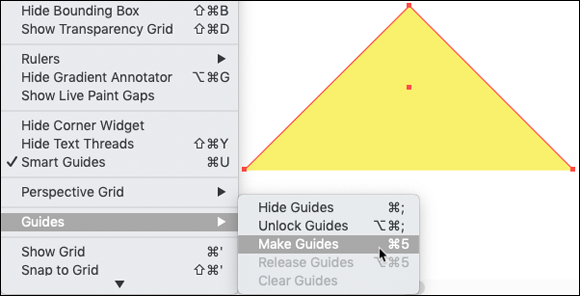
FIGURE 20-3: Generating guides from an object.

FIGURE 20-4: Using guides generated from a triangle.
By the way, you can customize the color of guides. I changed the color from the default cyan (which might not reproduce well in the book) to black. To change the color of guides, choose Edit ⇒ Preferences (Windows) or Illustrator ⇒ Preferences (Mac), and then choose Guides & Grid from the submenu. Options appear for changing the color and style of guides (or grids).
Generate Guides from Rulers
Guides help align objects, size objects, or locate objects quickly and precisely. Guides are especially handy for interior design, scaled drawings (such as maps), and technical illustrations.
You can generate guides quickly by dragging horizontal or vertical rules onto the canvas. That’s not big news to those who have been using Illustrator for a while, but here are a couple tips you might not be aware of:
- If you hold down the Alt key (Windows) or ⌘ key (Mac) while you drag a horizontal ruler onto the canvas, you toggle to generating a vertical guide. And vice versa: If you drag a vertical ruler onto the canvas and hold down the Alt or ⌘ key, you generate a horizontal guide.
- If you hold down the Shift key while you drag a rule onto the canvas, you constrain the location of the resulting guide to the nearest grid subdivision.
By the way, if you drag the upper-left corner, where the left and top rulers intersect, you can reset the starting values for rulers to zero at the point you drag them to, as shown in Figure 20-5.
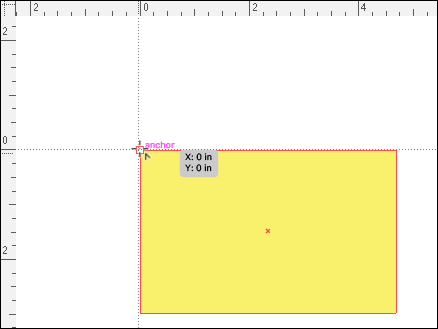
FIGURE 20-5: Setting a new starting point for horizontal and vertical rulers.
Place Multiple Files
If you work with illustrations that involve a lot of placed objects, you can streamline your workflow by importing them in an Illustrator document all at once, instead of one at a time.
Choose File ⇒ Place, and in the file dialog opened by your operating system, use Shift-click or Ctrl-click (Windows) or ⌘ -click (Mac) to select all the files you want to place.
After you click in your Illustrator document and place the first image, your cursor reloads to place the second image, then the third, and so on. You can cycle through imported images by using the arrow keys on your keyboard to choose which one to place. As you drop one image after another into your document, the number of remaining images to place is displayed, as shown in Figure 20-6.

FIGURE 20-6: Counting files being placed in a document.
Import Photoshop Files
When you place Photoshop files in an Illustrator document, you can use import options to fine-tune how layers, color, and text are handled during the placement process.
To access Photoshop import options, choose File ⇒ Place, and then navigate to and click a Photoshop file. The file dialog displays a Show Import Options check box. If you select that check box before clicking Place in the dialog, the Photoshop Import Options dialog appears, as shown in Figure 20-7.

FIGURE 20-7: Photoshop import options.
The Photoshop Import Options dialog lets you choose whether to convert Photoshop layers to objects or flatten them into a single image, and — if you elect to maintain layers — whether to import hidden layers. In Figure 20-7, my graphic doesn’t match the color mode of my Illustrator file and I’m being warned that this will affect transparency effects assigned to layers.
 To access these features, be sure to link placed Photoshop files instead of embedding them. I explain the difference and how to manage linked and embedded files in Chapter 3.
Edit Placed Objects
Here’s another tip to help manage linked Photoshop files placed in Illustrator. You can quickly and easily edit those placed files in Photoshop by using the Edit Original button in the Control panel, as shown in Figure 20-8.

FIGURE 20-8: Launching Photoshop to edit a linked image.
This feature works only if you've linked the placed image. It doesn’t work if you've embedded the placed image. But, if you did embed the file while placing it, you can use the Unembed button in the Control panel to convert your placed image to a linked image. I explain how to manage linked and embedded placed files in Chapter 3.
Import Word Files
Illustrator’s word-processing features continue to improve. Thankfully for those of us who have the spelling skills of a third grader, we now have red squiggly underlining to indicate words that don’t show up in the dictionary.
That said, you’ll improve your workflow by doing as much of your text editing as possible in Microsoft Word or another application that exports to the .docx format.
If you choose File ⇒ Place, navigate to a Word file, and click Place, the Microsoft Word Options dialog appears, as shown in Figure 20-9.

FIGURE 20-9: Importing a Word file.
Handy options in that dialog allow you to elect whether or not to include table of contents, footnotes and endnotes, and index text. And the Remove Text Formatting option strips all styling from the content before you dump it into Illustrator.
Crop a Placed Image
Those of us who have been using Illustrator for decades managed to survive without the capability to crop images, crazy as that sounds. Now, to crop an image, you just select the image, click the Crop Image button in the Control panel, define a crop area, and click Apply, as shown in Figure 20-10.

FIGURE 20-10: Cropping an image.
The capability to crop images in Illustrator may not be news to you, but here’s a tip you probably were not aware of: When you crop an image, you can set the image's resolution. Note in Figure 20-10 that I’ve set the resolution to 72 ppi (appropriate for normal resolution web images).
I explain how to define raster image resolution in more depth in Chapter 17.
Play Actions
You can use the Actions panel (Window ⇒ Actions) to record, play, edit, or delete sets of actions. But even without spending time recording actions, you can expedite many frequently performed tasks using the built-in set of actions in the panel.
For example, if you want to export a file as a medium-quality JPEG, choose that option in the set of preset actions, and click the play icon, as shown in Figure 20-11.
You can take actions to another level by combining them. For example, if I want to export an image to three different raster formats, all I have to do is select three actions (for GIF, JPEG, and PNG), and click the play icon, as shown in Figure 20-12.
Each action plays in sequence, while I kick back, have a healthy (or unhealthy) snack, and watch Illustrator process all three of my raster images.

FIGURE 20-11: Using a preset action to save a file as a JPEG.
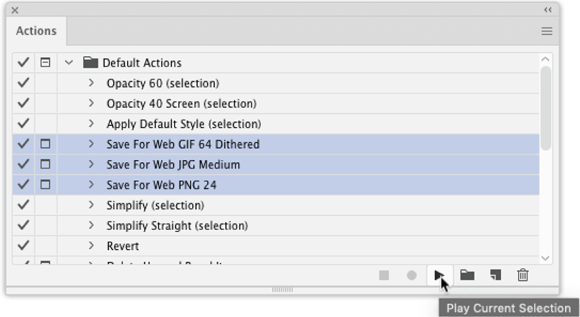
FIGURE 20-12: Playing a set of actions.
Use Shortcut Keys
My final productivity tip is so basic it might escape your radar: Use shortcut keys. Illustrator has over 400 keyboard shortcuts for everything from choosing tools to zooming in and out.
You’ll find the whole set at https://helpx.adobe.com/illustrator/using/default-keyboard-shortcuts.html. The time you invest in reading through the list and highlighting the keystrokes you need will pay off quickly in time saved.