
Chapter 10
Improving Workflow with Symbols
IN THIS CHAPTER
![]() Using symbols to rationalize workflow and reduce file size
Using symbols to rationalize workflow and reduce file size
![]() Accessing and deploying symbols from libraries
Accessing and deploying symbols from libraries
![]() Creating dynamic symbols
Creating dynamic symbols
![]() Applying and editing dynamic symbols
Applying and editing dynamic symbols
![]() Spraying symbols
Spraying symbols
Symbols are objects that are displayed as instances in a document. A single symbol can be deployed as many instances in an Illustrator document. Each individual instance can be placed, resized, reshaped, and edited in various ways. But each instance retains essential qualities of the original symbol.
So what’s in it for you, when it comes to using symbols? Plenty! Regardless of your level of expertise, the kind of graphics you create, or your workflow, symbols save time, make it much easier to orchestrate graphics across large illustrations, can radically reduce file size, and play a special role in sending screen-friendly SVG files to animators and web designers.
In this chapter, I show you how to use symbols to be more productive, and how to hand off lean, small file size illustrations to print and screen developers. Along the way, I introduce you to Illustrator’s substantial set of symbol libraries and some powerful techniques for deploying and editing symbols.
Rationalizing Workflow with Symbols
The following are scenarios in which symbols save time, file size, and rationalize workflow:
- You can use symbols when you're including objects in your illustration that repeat in various iterations. For example, you can use symbols for shrubs in a landscape, for stars in a skyscape, or for fish in the sea. Symbols allow you to quickly generate and tweak multiple objects without having to create each one separately.
- After you use a symbol to deploy instances in your illustration, you can globally edit all the instances. The process works like Find and Replace in a text document: Illustrator tracks down all the instances of an edited symbol and applies changes that you define.
- As noted, symbols in print and screen illustrations reduce file size. I’ve seen the effective application of symbols cut file size by as much as 90 percent.
- Artwork that you want to map onto a 3D effect must be saved as a symbol. (See the section on generating 3D effects and mapping artwork in Chapter 14 for details.)
- Symbols can be translated into SVG code when an Illustrator file is saved in SVG format, facilitating animation and interactivity in a website or app.
Using Illustrator’s preset symbols
Symbols are associated with Illustrator documents. To access symbols, you place them in the Symbols panel. When you save a document, the set of symbols in the panel is saved with the document.
When you place a symbol in a document, you create a symbol instance. That symbol instance is more or less a clone (more or less because it is an editable clone) of the symbol.
The real excitement comes when you create your own symbols, but for prototyping, for quick layouts, or when Illustrator already has a set of applicable symbols, it's expedient to simply grab symbols from one of Illustrator’s many symbol libraries.
Adding symbols to a document
The following steps demonstrate how to populate a document with flower symbols. The following steps apply with minor adjustments to deploying symbols from any library.
- In an open document, view the Symbols panel and manage how symbols are displayed:
- If the Symbols panel is not visible, choose Window ⇒ Symbols.
- If the document already has symbols associated with it, those symbols will be displayed in the panel. A set of representative symbols appears by default when you create a document.
- Use options on the panel menu to sort the list of symbols alphabetically, or to view the symbols as thumbnails, a small list, or a large list, as shown in Figure 10-1.
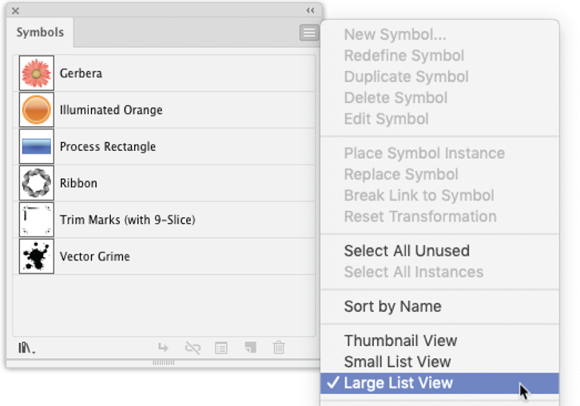
FIGURE 10-1: Viewing the Symbols panel in large list view.
-
Clean up the Symbols panel:
- From the Symbols panel, choose Select All Unused.
- With the symbols selected, click the delete icon at the bottom of the Symbols panel as shown in Figure 10-2.
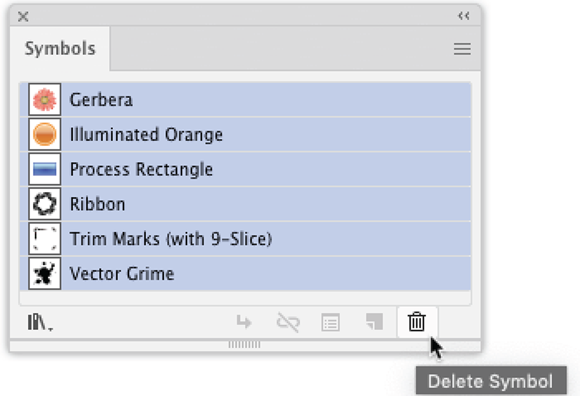
FIGURE 10-2: Deleting unused symbols.
 Don’t worry, you’re not deleting these symbols from Illustrator. You’re just disassociating them from the current document to clean up clutter, get rid of unnecessary content in your saved file, and make room for a more accessible display of symbols you choose to add to the Symbols panel.
 - Add flower symbols to the Symbols panel:
- On the Symbols panel menu, choose Open Symbol Library to view all available libraries and then click Flowers. Or click the library (leftmost) icon at the bottom of the Symbols panel and then click Flowers, as shown in Figure 10-3.
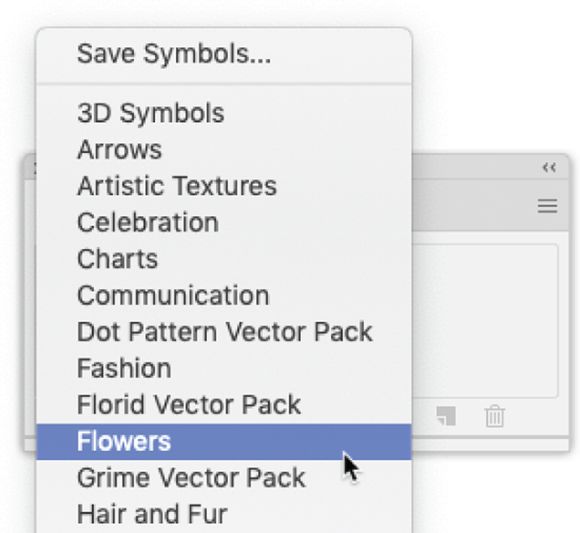
FIGURE 10-3: Viewing the Flowers panel.
- Click several flower symbols in the Flowers panel to add them to the Symbols panel, as shown in Figure 10-4.
- Close the Flower panel.
- On the Symbols panel menu, choose Open Symbol Library to view all available libraries and then click Flowers. Or click the library (leftmost) icon at the bottom of the Symbols panel and then click Flowers, as shown in Figure 10-3.
- Create and manipulate flower symbol instances:
- Drag symbols out of the Symbols panel onto the canvas. If you drag symbols directly from the Flowers panel (or any other Symbols library), those symbols are automatically added to the Symbols panel.
- If you copy and paste symbol instances in the canvas, the copies retain the properties of symbols. Or, in other words, you create more symbol instances.
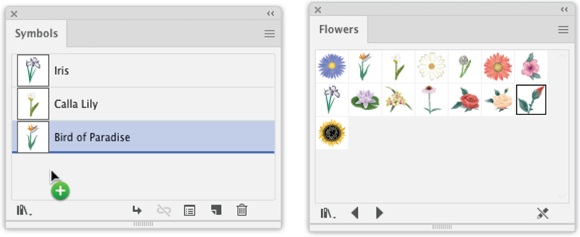
FIGURE 10-4: Populating the Symbols panel with symbols from the Flowers library.
-
Edit the display of individual symbol instances.
- The + symbol in the center of each selected instance is the symbol registration point. The + symbol distinguishes symbol instances from other artwork and is used for transformation.
- Each instance can be individually selected and moved, scaled, rotated, sheared, or reflected.
- You can also apply transparency, apply effects, and modify appearance in the Appearance panel. Figure 10-5 shows two instances of a bird of paradise symbol, sized differently.
- To revert a symbol instance to its unedited state, select and choose Reset Transformation on the Symbols panel menu.

FIGURE 10-5: Sizing and rotating a selected symbol instance.
The symbols that come with Illustrator are static symbols, which means your ability to manipulate them is limited. You have more flexibility in manipulating individual symbol instances with dynamic symbols. I show you how those work in the next section of this chapter. - Replace a selected batch of symbol instances with instances of another symbol:
- Select a set of symbols in the canvas.
- Select a different symbol in the Symbols panel.
- From the Symbols panel library, choose Replace Symbol, as shown in Figure 10-6.
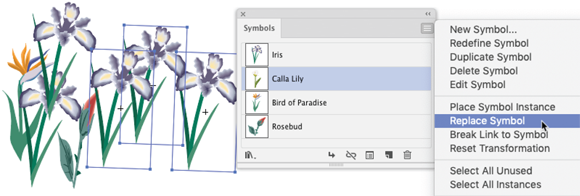
FIGURE 10-6: Replacing instances of one symbol with instances of a different symbol.
Managing symbols
Despite the fact that symbols are a nice mix of uniformity and flexibility, there comes a time when symbol instances aren’t flexible enough and get in the way of the creative process. Breaking the link between a symbol and an instance gives you more flexibility and freedom in manipulating the artwork, unconstrained from any symbol definition. And detaching symbol instances from their symbols allows you to edit those instances as objects, without disturbing the display of other artwork.
You can break the linkage between a symbol and an instance in the following ways:
- From the Symbols panel library, choose Break Link to Symbol.
- At the bottom of the panel, select the break link to symbol icon.
- Right-click the instance and choose Break Link to Symbol from the context menu.
- Click the Break Link button in the Control or Properties panel.
Here are a couple other tips that will help you be more productive with symbols:
- To quickly select all instances of a symbol, click the symbol in the Symbols panel and choose Select All Instances. Or choose Select ⇒ Same ⇒ Symbol Instance.
- After you populate a custom symbols panel, you can save it for reuse in other documents by choosing Save Symbol Library on the panel menu.
Getting Creative with Dynamic Symbols
Custom dynamic symbols uncork much greater productivity and creativity options than the static symbols you just examined. The rules and techniques for selecting symbols and deploying symbol instances in the preceding section apply to symbols from an existing symbol library and symbols you create. And they work for both static and dynamic symbols. But custom dynamic symbols are even more powerful:
- Edits to individual dynamic symbol instances do not affect the master symbol design.
- Changes to a master design are applied to all instances of the symbol.
In short: When you create and deploy symbols, you'll want to make them dynamic symbols and take advantage of additional instance-editing features.
Creating dynamic symbols
The following steps demonstrate how to create a dynamic symbol. As noted, the techniques for deploying and editing preset static symbol instances examined in the preceding section apply also to custom dynamic symbol instances, so I don’t repeat those techniques here:
- In an open document, create, name, and set properties for a new dynamic symbol.
- If the Symbols panel is not visible, choose Window ⇒ Symbols.
- If the document already has symbols associated with it, choose Select All Unused and then Delete Symbol to clean up the Symbols panel.
-
Create new artwork to be used as a symbol, select and drag it into the Symbols panel (see Figure 10-7), and name the new symbol.
Avoid text, placed images, or mesh objects because they don’t work well as dynamic symbols.
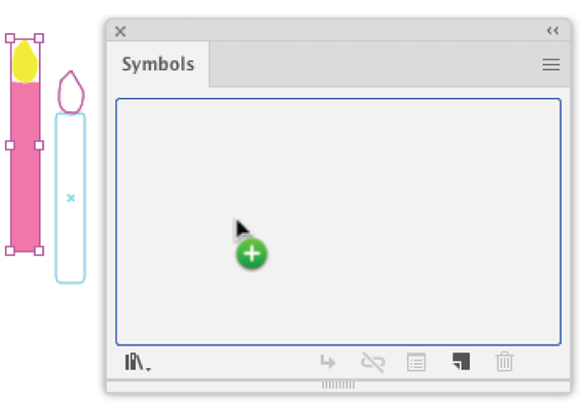
FIGURE 10-7: Creating a new symbol from artwork in the canvas.
-
Define symbol options:
- In the Symbol Options dialog that appears, enter a name in the Name box.
- If you're preparing symbols for Flash, use the Export Type drop-down, the Registration options, and the Enable Guides for 9-Slice Scaling. (See documentation in Flash for how these kinds of symbols fit into a Flash workflow.)
- Choose Dynamic Symbol and then click OK to define the symbol.
The artwork you dragged into the Symbols panel becomes a symbol instance, appearing as an icon in the Symbols panel with a small + in the lower-right corner, as shown in Figure 10-8.
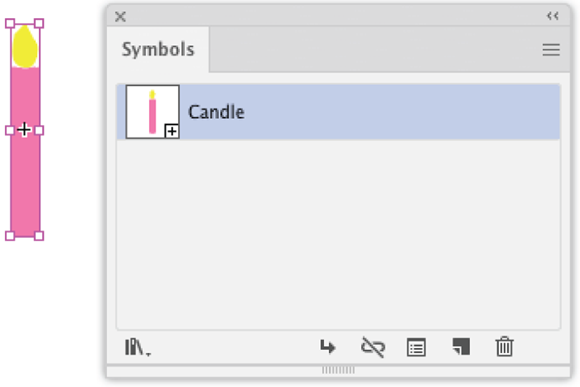
FIGURE 10-8: Examining a custom dynamic symbol instance.
Orchestrating dynamic symbol instances
I chose the metaphor of “orchestrating” dynamic symbol instances because all the musicians are (I hope) playing the same tune and even the same part, but different musicians (such as the lead violinist) might be playing a slightly different part within the constraints of what the entire section is doing.
And similarly, dynamic symbol instances are constrained by the definition of the master symbol but can also have individuality, if you want to get psychological about it. The following steps illustrate how this feature works:
-
Drag multiple instances of a dynamic symbol into your document and name them.
You can select individual instances and name them in the Control panel, as shown in Figure 10-9.
- Edit part of a dynamic symbol instance:
- Use the Direct Selection tool to select part of a symbol instance. You can Shift-click to select multiple sections of multiple instances.
- Modify fill color, stroke color, opacity, and effects. You use the same techniques when editing a symbol that you use to edit an object.
- Apply new styling to the selected objects within the symbol instances. In Figure 10-10, I’m applying a new fill color to the candles but not the flames.

FIGURE 10-9: Naming a symbol instance.

FIGURE 10-10: Styling selected candles (but not flames) within a group of instances.
-
Edit a dynamic symbol:
- Select the symbol in the Symbols panel and choose Edit Symbol on the panel menu to enter symbol editing mode.
- Edit the symbol objects’ fill, stroke, rotation, transparency, effects, and other properties.
- Use the left arrow at the top of symbol editing mode to exit the mode, as shown in Figure 10-11. Changes in the master symbol are applied to all instances of the dynamic symbol without changing specific edits to individual dynamic symbol instances.
Figure 10-11 shows a revolve effect (see Chapter 14 to learn to apply revolve effects) applied to the candle and a gradient applied to the flame (see Chapter 12 for instructions on how to define and apply a radial gradient).
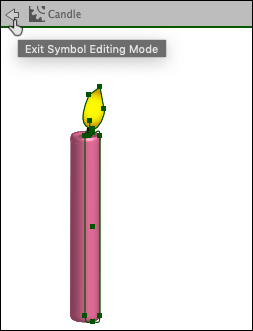
FIGURE 10-11: Exiting symbol editing mode, applying edits to a dynamic symbol.
In Figure 10-12, those changes (the rotation and gradient) have been applied to the symbol but instances where the fill color was changed retained their fill.
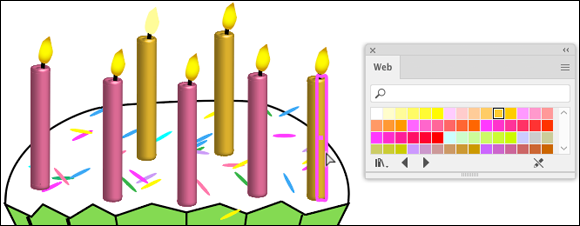
FIGURE 10-12: Edits to a dynamic symbol applied to instances.
Spraying Symbols
Like spraying paint from an aerosol can, you can spray symbols onto an illustration. You spray symbols when you need a lot of symbol instances in a hurry and the exact placement isn’t an issue, not when you need precision-placed artwork. Think creating a flock of birds; a blizzard of hail stones; or a swarm of ants. Okay, sorry about that last image; replace that in your mind with a forest of beautiful redwoods.
How do you deploy sprayed symbols? A few definitions (much as I usually try to avoid them) will help guide the way:
- The Symbol Sprayer tool gets loaded with a symbol, and sprays that symbol on the canvas.
- The batch of symbol instances created by the Symbol Sprayer tool is a symbol set.
- Symbolism tools (and there are several) distort and reshape selected instances in a symbol set.
The symbolism tools are not part of the Basic toolbar. To add them, click the edit toolbar icon (ellipses) at the bottom of the toolbar, and drag the Symbol Sprayer or other symbolism tools to the Basic toolbar.
The starter tool in spraying symbols is the Symbol Sprayer tool. Like the symbolism tools, it is not part of the Basic toolbar, but it is easily accessible with the Shift+S keyboard shortcut.
With the Symbol Sprayer tool selected, click a symbol and then scribble on the canvas, as shown in Figure 10-13.

FIGURE 10-13: Spraying symbol instances with the Symbol Sprayer.
Setting Symbol Sprayer options
To adjust Symbol Sprayer options, double-click the Symbol Sprayer tool to open the Symbolism Options dialog. Some of the options are intuitive:
- Diameter: Defines the area in which the spray is applied — kind of like changing the setting on a showerhead from a wide spray (large diameter) to a fine, high-pressure spray (small diameter).
- Intensity: Defines the rate at which the tool generates instances.
- Symbol Set Density: Defines how many instances come out of the sprayer, with larger values creating more dense sets of instances. A value of 10 generates the densest concentration of symbols (and a value of 1 the lowest concentration of symbols).
- Show Brush Size and Intensity: Change the tool’s cursor to display the diameter and intensity of the symbol as you spray symbols on a canvas.
Other options are usually best left at their default settings, but you might want to experiment with them if you’re going to be doing massive symbol spraying. The options selected in Figure 10-14 create a very dense symbol set within a relatively small spray area.
The set of adjustments is complicated, but if you find yourself applying a ton of symbols with the Symbol Sprayer tool, you can apply trial-and-error to see how they work with different settings.
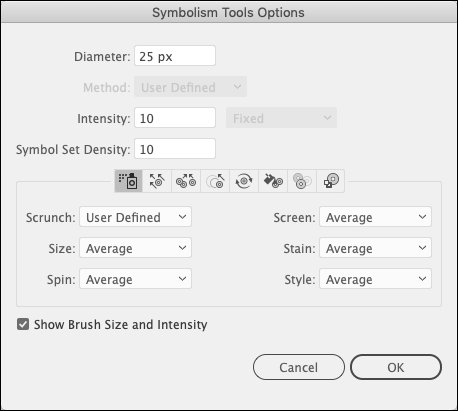
FIGURE 10-14: Defining Symbol Sprayer options.
Managing sets of sprayed symbols
After you spray symbols, you can add to the set of instances by spraying some more. Even if you do some other editing and deselect the set of instances, you can add to it by reselecting it and using the Symbol Sprayer tool some more.
A set of sprayed instances can be moved, rotated, sized, or deleted like other objects. Figure 10-15 shows a set of sprayed symbol instances being resized.

FIGURE 10-15: Resizing a set of sprayed symbols.
Edits made to the master symbol will be applied to symbol instances created with the Symbol Sprayer. However, you can't edit instances created by the Symbol Sprayer, even if you used it to apply dynamic symbols.