
We've looked now at many of the default capabilities of Share. In the rest of this chapter, we will examine various ways in which Share can be configured.
Alfresco developers were influenced early on by the Spring framework in the creation and architecture of the Alfresco software. The core Java code is based on Spring, and much of the Spring philosophy of flexibility and easy configurability was carried through to the creation of the Surf web framework and to other design aspects of the Alfresco platform.
Note
Beginning with the 3.2 release of Alfresco, many repository configurations within Alfresco can be made without shutting down the entire Alfresco server. Alfresco was designed to work as a collection of independent subsystems, although the ability to use subsystems is available only as a feature of the Enterprise version of Alfresco. Alfresco subsystems can be administered using a JMX client, like JConsole. JConsole is available from the OpenJDK group. http://openjdk.java.net/tools/svc/jconsole/. Information about JMX and Alfresco subsystem configuration is available on the Alfresco wiki. http://wiki.alfresco.com/wiki/JMX
Alfresco Share is heavily dependent on the Alfresco repository for persisting web assets, files, and collaboration content stored within the document library. Much of the communication made from Share to the Alfresco repository is done via web service calls.
Because of Share's dependence on the repository, it's important to understand how the repository can be configured and monitored. When the repository starts up, it loads information specified in the repository system configuration files.
The system configuration files are loaded in the following order:
tomcat/webapps/alfresco/WEB-INF/classes/alfresco/repository.propertiestomcat/webapps/alfresco/WEB-INF/classes/domain/hibernate-cfg.properties- All property files within the subfolders of
tomcat/webapps/alfresco/WEB-INF/classes/alfresco/subsystems tomcat/shared/classes/alfresco-global.properties
The properties files were designed so that out of the box configuration settings can be overridden by the user with different values.
Since the file alfresco-global.properties is loaded last, the best practice is to centralize configuration property changes in this one file. This is the practice that Alfresco recommends, and by following this recommendation, configurations can be much more easily identified when it's time to upgrade the system, and the risk that configurations might get lost during upgrades is minimized.
Note
If you use an Alfresco installation wizard, values of the file alfresco-global.properties are modified as the wizard runs. During installation, some of the properties set in the file relate to the location of where Alfresco content will be stored, the location of the Lucene full-text index information, database connection properties, paths to third-party software, database driver connect information, and hibernate properties.
In addition to property files, Alfresco can be configured by making changes to Spring-context bean files. All of these files have filenames that end with context.xml. Alfresco uses bean files for configuring both the base Alfresco repository and also the Share application.
The principle file for configuring Share is share-config.xml. This file is located in the tomcatwebappsshareWEB-INFclassesalfresco directory. It is used for configuration because it is referenced from the Spring-context bean file slingshot-application-context.xml, which can be found in that same directory.
Note
Internally, much of the Alfresco Share source code still refers to slingshot, the product code name used for Share before the Share product was actually named.
Overrides to the standard settings in share-config.xml should be put in a file named share-config-custom.xml, which is placed in the tomcatsharedclassesalfrescoweb-extension directory.
Copy the following code from the file share-config.xml and place it into the file share-config-custom.xml with the value for the tag<client-debug> set to true. Doing this will put Share pages into debug mode as shown in the screenshot below:
<config replace="true">
<flags>
<!--
Developer debugging setting to turn on DEBUG mode for client scripts in the browser
-->
<client-debug>true</client-debug>
<!--
LOGGING can always be toggled at runtime when in DEBUG mode (Ctrl, Ctrl, Shift, Shift).
This flag automatically activates logging on page load.
-->
<client-debug-autologging>false</client-debug-autologging>
</flags>
</config>
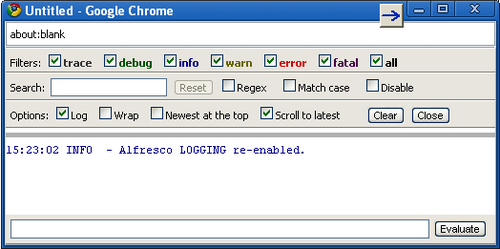
After making this change and restarting the server, bring up the client browser debugger and navigate to a page within Share. Then type the following four keys in sequence to bring up the JavaScript debug browser window at runtime: Ctrl, Ctrl, Shift, Shift. This won't work in Microsoft Internet Explorer. In that case, you can get the debug window to launch by appending the parameter log=on to the end of the page URL. For example, try using a URL of the following format:
http://localhost:8080/share/page/user/admin/dashboard?log=on
Note
For client-side browser debugging, Firebug with Firefox, Google Chrome, or Inspector with Safari are recommended browsers. The Alfresco JavaScript debugger uses Tim Down's log4javascript library. Detailed information and a tutorial can be found online at http://log4javascript.org/docs/quickstart.html.
Some logging will occur automatically into the debug window. You can modify existing JavaScript code or write new code that uses the client logging feature that will write messages to this window. The syntax of the logger is based on the methods available in the Java log4j logger. For example, the following methods are available within JavaScript code:
Alfresco.logger.debug();
Alfresco.logger.info();
Alfresco.logger.warn();
Alfresco.logger.error();
Alfresco.logger.fatal();
Note
Remember that if you do things like turn on debugging or increase the amount of information being written to the log file, it can seriously affect system performance. If you intend to use the system for production, the settings should be reverted to their original values when you have completed your experiments.
The file share-config.xml also controls which aspects are available on the user interface to be applied to content objects. To override the standard list of aspects, the following code should be copied from share-config.xml, modified as appropriate, and then pasted into the file share-config-custom.xml:
<aspects>
<!-- Aspects that a user can see -->
<visible>
<aspect name="cm:generalclassifiable" />
<aspect name="cm:complianceable" />
<aspect name="cm:dublincore" />
<aspect name="cm:effectivity" />
<aspect name="cm:summarizable" />
<aspect name="cm:versionable" />
<aspect name="cm:templatable" />
<aspect name="cm:emailed" />
<aspect name="emailserver:aliasable" />
<aspect name="cm:taggable" />
<aspect name="app:inlineeditable" />
</visible>
<!-- Aspects that a user can add. Same as "visible" if left empty -->
<addable>
</addable>
<!-- Aspects that a user can remove. Same as "visible" if left empty -->
<removeable>
</removeable>
</aspects>
The file share-config.xml controls which content types are available from the user interface. To override the standard list, copy the following code, which defines the available content types, modify as appropriate, and paste into the file share-config-custom.xml:
<types>
<type name="cm:content">
<subtype name="cm:mysubtype" />
</type>
<type name="cm:folder">
</type>
</types>
Later on, we will be creating new content types, based on the types of documents and records kept in your organization. This configuration makes the custom content types available through the Share user interface. In the example here, a new content type called cm:mysubtype is added to the content types available.
Depending on the level of sophistication of the end user and also on the way in which you intend to use Share within your organization, the ability to expose all of the Alfresco repository from Share can either be a welcome capability or something that you may prefer to turn off.
The default behavior in Share is for access to the Repository to be available. In the long term, Alfresco plans to replace the JSF Explorer client with Share, so Share will ultimately need to be able to handle all the repository and library service capabilities that the Explorer client is now capable of doing.
The visibility of the Repository link is controlled by the RepositoryLibrary section of the file share-config.xml. It is possible to configure this behavior by making changes to the following XML block and adding it to the file share-config-custom.xml:
<config evaluator="string-compare" condition="RepositoryLibrary" replace="true">
<!--
Whether the link to the Repository Library appears in the header component or not.
-->
<visible>true</visible>
<!--
Root nodeRef for top-level folder.
-->
<root-node>alfresco://company/home</root-node>
<tree>
<!--
Whether the folder Tree component should enumerate child folders or not.
This is a relatively expensive operation, so should be set to "false" for Repositories with broad folder structures.
-->
<evaluate-child-folders>false</evaluate-child-folders>
<!--
Optionally limit the number of folders shown in treeview throughout Share.
-->
<maximum-folder-count>500</maximum-folder-count>
</tree>
</config>
To display or not to display the link is controlled by the<visible> tag. By changing this code block, it is also possible to set the root folder from where the repository navigation will start, and to configure properties for the display of the navigation tree:
There are also some Spring-context bean files specific to Records Management. These configuration files are located in the tomcatwebappsalfrescoWEB-INFclassesalfrescomoduleorg_alfresco_module_dod5015 directory.
In particular, the file rm-job-context.xml is of interest. This file defines two cron jobs that run at scheduled times in the background. One job sends e-mail notifications when the records become due for review. The other job checks records and updates them based on their lifecycle disposition instructions. The file defines the cron schedule for when these background jobs will be run:
|
Filename |
Description |
|---|---|
|
|
Beans for RM Rest API |
|
|
The beans that implement RM actions |
|
|
The beans that implement RM capabilities |
|
|
Sends out e-mail notifications for records that are due for review and background process to check and update record lifecycles |
|
|
The Records Management service registry |
|
|
The beans that the intercept method calls to the repository services to enforce security based on the currently authenticated user |
The log4j.properties file for the Share application controls the level of detail of output written at the server to the Alfresco log file. Information being logged is specific to operations that occur in Share. The file is configured to allow very granular control over what type of information or debug information will be written. This file is located in the tomcatwebappsshareWEB-INFclasses directory.
Note
There is a companion parallel file, also called log4j.properties, located in the tomcatwebappsalfrescoWEB-INFclasses directory. This file controls debugging information relative to Alfresco repository operations. Often, to get debug information printed about a repository operation that is initiated by a Share webscript accessing the repository, it is necessary to also configure the settings in this file.
The first page of Alfresco Share that a user sees after logging into Share is the dashboard. This is the user's home page. Dashboards show up in other parts of Share too. For example, the first page of each Share site is also a dashboard and is configured in a way that is identical to how the user home page dashboard is configured.
We've seen that the user can customize the layout of the home dashboard page and pick which of the dashlets will be available on that page. In a similar way, the owner of each Share site can configure the way that the site dashboard page will be presented to site members when they access the site.
Both user dashboards and site dashboards have default layouts that are configured with default or preset dashlets. Preset dashboard settings are configured in the file presets.xml which is located in the directory shareWEB-INFclassesalfrescosite-datapresets.
When we open the presets.xml file, we find that it consists of groups of<preset> tags. The overall structure of the file presets.xml can be seen here:
<?xml version='1.0' encoding='UTF-8'?>
<presets>
<!-- Well known preset used to generate the default Collaboration Site dashboard -->
<preset id="site-dashboard">
...
</preset>
<!-- Well known preset used to generate the default User dashboard -->
<preset id="user-dashboard">
...
</preset>
<!-- Well known preset used to generate the default RM Site dashboard -->
<preset id="rm-site-dashboard">
...
</preset>
<!-- Well known preset used to generate the Sharepoint protocol integration Site -->
<preset id="document-workspace">
...
</preset>
<!-- Well known preset used to generate the Sharepoint protocol integration meeting Site -->
<preset id="meeting-workspace">
...
</preset>
</presets>
The first three<preset> tag sections of the file define default configurations for site dashboards, user dashboards, and the dashboard for the Records Management site. Let's look now in detail at the structure of the data defined in the<preset> tag sections.
The preset IDs for the dashboards defined in this file correspond to the unique ID of a type of dashboard. For example, when a site is created, it is assigned the ID site-dashboard; when the Records Management site is created, the rm-site-dashboard ID is assigned; and when a user is created, the user-dashboard ID is assigned.
An example of when the ID is assigned to a dashboard element can be found in the file webappsshareWEB-INFclassesalfrescosite-webscriptsorgalfrescomodulescreate-site.get.js. This JavaScript controller contains code that hardcodes the ID to be used with sites as site-dashboard:
var sitePresets = [{id: "site-dashboard", name: msg.get("title.collaborationSite")}];
model.sitePresets = sitePresets;
In a similar way, when the Records Management site is first created, the file webappsshareWEB-INFclassesalfrescosite-webscriptsorgalfrescoutilscreate-rmsite.get.js defines the ID of the site to be rm-site-dashboard. Actually, we've already seen this in the previous chapter with the discussion of setting up the Records Management dashlet.
Each preset section in presets.xml contains a<pages> tag section that defines the parameters of the Spring Surf dashboard page. Here we see the preset page specification for a site dashboard, as configured in the presets.xml file:
<pages>
<page id="site/${siteid}/dashboard">
<title>Collaboration Site Dashboard</title>
<title-id>page.siteDashboard.title</title-id>
<description>Collaboration site's dashboard page</description>
<description-id>page.siteDashboard.description</description-id>
<template-instance>dashboard-3-columns</template-instance>
<authentication>user</authentication>
<properties>
<sitePages>[{"pageId":"wiki-page"}, {"pageId":"blog-postlist"}, {"pageId":"documentlibrary"}, {"pageId":"calendar"},{"pageId":"links"}, {"pageId":"discussions-topiclist"},{"pageId":"data- lists"}]</sitePages>
</properties>
</page>
</pages>
An important piece of configuration information defined here for the page is the template-instance. In this example for the site dashboard, we can see that it specifies, by default, to use the template called dashboard-3-columns. The template-instance definition files can be found in the directory webappsshareWEB-INFclassesalfrescosite-data emplate-instances. That directory also contains the other dashboard layouts that Share supports with no additional customization. All five of the available dashboard template-instance layouts are shown here:
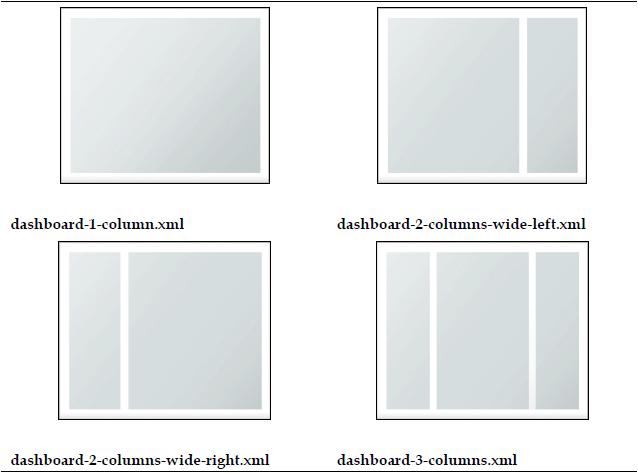
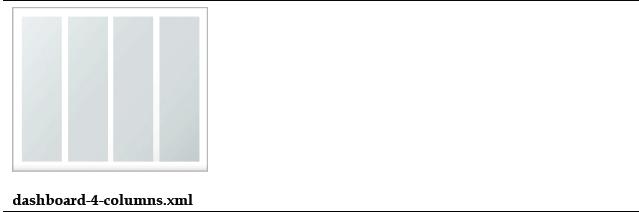
These five standard layout formats are referenced in the file webappsshareWEB-INFclassesalfrescosite-webscriptsorgalfrescocomponentsdashboardcustomized-layout.get.js. Changing available layouts or adding new ones can be done by modifying the list of layouts defined in this file. In the Alfresco 3.3.1 release, available layout templates are hardcoded in a JavaScript array as follows:
// Hardcoded templates until proper service exists
var layouts = [
{templateId: "dashboard-1-column", noOfColumns: 1, description: msg.get("msg.template-1-column")},
{templateId: "dashboard-2-columns-wide-right", noOfColumns: 2, description: msg.get("msg.template-2-columns-wide-right")},
{templateId: "dashboard-2-columns-wide-left", noOfColumns: 2, description: msg.get("msg.template-2-columns-wide-left")},
{templateId: "dashboard-3-columns", noOfColumns: 3, description: msg.get("msg.template-3-columns")},
{templateId: "dashboard-4-columns", noOfColumns: 4, description: msg.get("msg.template-4-columns")}
];
Looking back again at the page tag of a preset definition in presets.xml for the site dashboard, we also see that default site pages are defined. This information is stored in the property sitePages. By default, a standard site will include pages for a wiki, a blog, a document library, a calendar, a list of links, a discussions page, and a data list page. These page links are visible across the top of the site as seen here:
The pages of the Records Management site are defined in the presets.xml file as follows:
<pages>
<page id="site/${siteid}/dashboard">
<title>Records Management Site Dashboard</title>
<title-id>page.rmSiteDashboard.title</title-id>
<description>Records Management site's dashboard page</description>
<description-id>page.rmSiteDashboard.description</description-id>
<template-instance>dashboard-3-columns</template-instance>
<authentication>user</authentication>
<properties>
<sitePages>[{"pageId":"documentlibrary"}, {"pageId":"rmsearch"}]</sitePages>
<pageMetadata>{"documentlibrary":{"titleId":"page.rmDocumentLibrary. title", "descriptionId":"page.rmDocumentLibrary.description", "type":"dod5015"}}</pageMetadata>
</properties>
</page>
</pages>
As we can see from this file, by default, there are only two pre-configured site pages for Records Management — the document library (or File Plan), and the Records Search page. In the next image, we can see these page navigation links as they are displayed across the top of the Records Management site:

Another thing to notice in the Spring Surf page description is that the text labels for the dashboard page titles and description are defined. The<title-id> and the<description-id> tags contain this information. The text strings referred to by the values for these tags are stored in properties files. For example, text strings like page.rmSiteDashboard.title, which is the default title for a site dashboard, can be found in webappsshareWEB-INFclassesalfrescomessagesslingshot.properties, and the strings for the Records Management site can be found in webappsshareWEB-INFclassesalfrescomessagesdod5015.properties.
The presets.xml file also defines which dashlets are to be included on the dashboard layouts and where the dashlets will be positioned in the layout. In the presets.xml configuration file, the dashlet region-id positions are named based on their position in the layout. The convention is to name the region-id in the format component-<column>-<row>. For example, the region-id component-2-1 refers to the first row position at the top of the second column.
The dashlets that appear on a dashboard are defined in the components section for the dashboard preset definition. For example, the components definition for the Records Management dashboard is defined as follows:
<components>
<!-- title -->
<component>
<scope>page</scope>
<region-id>title</region-id>
<source-id>site/${siteid}/dashboard</source-id>
<url>/components/title/collaboration-title</url>
</component>
<!-- navigation -->
<component>
<scope>page</scope>
<region-id>navigation</region-id>
<source-id>site/${siteid}/dashboard</source-id>
<url>/components/navigation/collaboration-navigation</url>
</component>
<!-- dashboard components -->
<component>
<scope>page</scope>
<region-id>component-1-1</region-id>
<source-id>site/${siteid}/dashboard</source-id>
<url>/components/dashlets/site-welcome</url>
</component>
<component>
<scope>page</scope>
<region-id>component-2-1</region-id>
<source-id>site/${siteid}/dashboard</source-id>
<url>/components/dashlets/docsummary</url>
<properties>
<dod5015>true</dod5015>
</properties>
</component>
<component>
<scope>page</scope>
<region-id>component-2-2</region-id>
<source-id>site/${siteid}/dashboard</source-id>
<url>/components/dashlets/activityfeed</url>
</component>
<component>
<scope>page</scope>
<region-id>component-3-1</region-id>
<source-id>site/${siteid}/dashboard</source-id>
<url>/components/dashlets/site-profile</url>
</component>
<component>
<scope>page</scope>
<region-id>component-3-2</region-id>
<source-id>site/${siteid}/dashboard</source-id>
<url>/components/dashlets/colleagues</url>
</component>
</components>
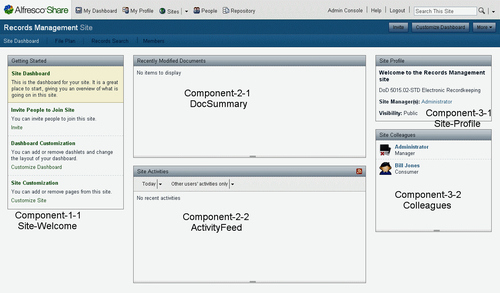
First, the title and navigation components are defined for the page. After that, each of the preset dashlets for the dashboard is defined. The URL tag specifies the unique path identifier for the dashlet and the region-id defines the position on the dashboard where the dashlet will appear, using the convention for positioning that we just discussed. The next figure labels the dashlets by position and URL name on a screenshot of the preset Records Management site dashboard:
The Alfresco architecture was designed in a way to provide for a high degree of configurability as we have seen. By modifying the presets.xml file, we can redefine the initial dashboard settings for both user and site dashboard pages. We have seen that both the layout of the dashboard and dashlets can be configured in this file.
But Alfresco best practice is not to directly modify Alfresco source files. Instead changes to standard configuration files should be stored in the extension and web-extension directories. Files placed in these directories override settings found in standard Alfresco files.
In the case of the preset.xml file, best practice would be to create a new file in the directory called tomcatsharedclassesalfrescoweb-extensionsite-datapresetspresets.xml. We can in fact do that, and Alfresco will pick up our modified presets.xml file, but the changes we make may not be applied in the way that we intended.
Attempting to override the presets.xml file in this way, at least in the Alfresco Share 3.3.1 release, tries to aggregate all components for the dashboard that are defined in both the original file as well as the override file. Components from both, the standard presets.xml file and the new override file in the web-extensions area will be merged. New components that you define in the override file will display, but standard components will continue to display in the column where they were originally defined. Because of this, when overriding in this way, it isn't possible to remove any of the standard dashlet components. This behavior is a bug which may be corrected in a future version of Share.
So, if you wish to modify the preset configuration, the recommendation would be to create an override file and place it in the web-extensionsite-datapresets area like we just discussed, restart the server, and then check your results. If the layout isn't what you expected, at least in the short term, until this behavior is changed, it is necessary to make changes directly to the standard Alfresco presets.xml file.
Note
Remember that when a dashboard is created for the first time, the configuration that it uses is based on dashboard settings found in presets.xml. The newly created dashboard configuration is then saved. Any changes made later to the presets.xml file will be applied only to newly created dashboards for users and sites. Dashboards that existed prior to changes in the presets.xml file will not be affected.
We have just seen how initial dashboard layouts are defined by using the presets.xml file. Once the dashboard is created, and each time it is modified from the Alfresco Share user interface, the dashboard configuration is saved.
Note
Alfresco is in the middle of re-architecting Web Content Management (WCM) and the AVM storage area used by WCM. The goal is to ultimately unify the AVM content storage with the standard Alfresco repository storage. Because of that, in the future, there may be refactoring or changes made with the way that Alfresco Share persists data to the AVM store.
The persisted dashboard configuration information is currently stored within the Alfresco storage area called AVM. We can use the Node Browser tool within the administration console of the Alfresco JSF Explorer client to see how the dashboard configuration information is persisted within Alfresco. The Node Browser feature is not yet available via the Share interface.
To access the Node Browser, open the Alfresco JSF client. For example, in a local installation, the Alfresco JSF explorer client can be accessed at:
http://localhost:8080/alfresco
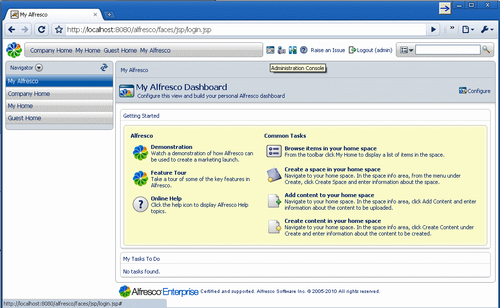
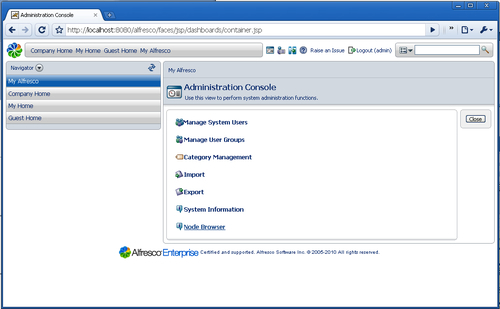
Log in as the administrator and then click on the Administration Console. From there, the Node Browser can be accessed:
Within the Node Browser, click on the Store labeled avm://sitestore. This storage area is typically used for storing Web Content Management assets, but it is also used by Alfresco Share for storing application data. At the top level of the AVM Store, scroll down the page and you will see a list of the child nodes that exist at the root of the store:
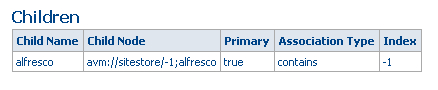
Next, click on the child node link labeled something like avm://sitestore/-1;alfresco. After navigating into this first child node, scroll down again to see the children of the new node:

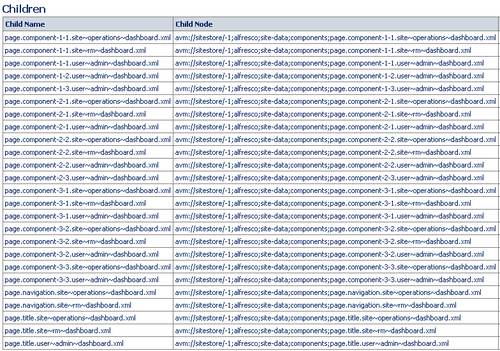
At this point, we have navigated into the Alfresco Share site-data node. Under this node, Share site data is persisted. Again, navigate a level lower by clicking on the link for the child node named site-data. After doing that, at the level we are within the node hierarchy, we can again scroll down and find the children of this node. Here we can see the children containing additional site information for site components and site pages:

If we first look at the child nodes for the components node, we will see something like the following list of children. Here we recognize the components from the site and user dashboards:
If we click through on any of these child nodes, we will see the detailed properties associated with these component nodes. The information shown near the top of the node browser screen for any one of these nodes looks similar to the following table:
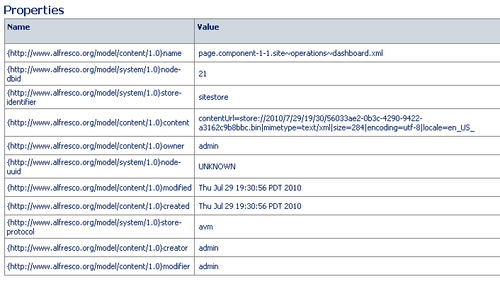
Here we can see that the value for the property {http://www.alfresco.org/model/content/1.0}content is contentUrl=store://2010/7/29/19/30/56033ae2-0b3c-4290-9422-a3162c9b8bbc.bin|mimetype=text/xml|size=284|encoding=utf-8|locale=en_US_. This is a bit cryptic, but the first part of the value represents the location of the XML data on disk in the Alfresco repository.
In this example, the following is the file path: 2010/7/29/19/30/56033ae2-0b3c-4290-9422-a3162c9b8bbc.bin.
If we look at the Alfresco alf_dir location on disk, we can locate a file at the path location of C:Alfrescoalf_datacontentstore2010729193056033ae2-0b3c-4290-9422-a3162c9b8bbc.bin. The file ends with a binary file extension, but if we open the file in a text editor, we can see that the contents of the file are actually in XML. In this example, we can see the XML fragment for this component:
<?xml version="1.0" encoding="UTF-8"?>
<component>
<guid>page.component-1-1.site~operations~dashboard</guid>
<scope>page</scope>
<region-id>component-1-1</region-id>
<source-id>site/operations/dashboard</source-id>
<url>/components/dashlets/site-welcome</url>
</component>
By using this technique, although it is somewhat tedious, it is possible to find where Share site configuration information for individual components is persisted.
In a similar way, we can also drill down to find persisted Share data for pages. Above, we saw how to find the child node for Share page site-data in the node browser. If we click on that site-data page node, we come to a page where there are two child nodes:

Here we see that page data that is specific to a site and common to all users is stored under a child node named site. Page data that is stored as a per-user preference configuration is stored under the user node.
If we first investigate the site node, we find that it too has child nodes, one for each site defined within Share:

Clicking on one of the sites, like the rm site (the Records Management site shortname), we can see the node within the AVM Store where data for the Records Management site is persisted:

If we click through on this node, we can find the XML fragment file in the Alfresco repository where the persisted Records Management dashboard page information is stored.
If we go back to the user page node that we saw above and click on that now, we'll find persisted page information grouped by individual users. In this example, the only user defined in the system is user admin:

Clicking on this child node, we can see the user preferences for user admin that are persisted for the user dashboard home page. Finally, clicking through on this node, we would then find the reference to the XML file fragment stored in the Alfresco repository:

We saw above that modifying the presets.xml configuration file can cause all new user and site dashboards to take on this default information. Any dashboards that had been created prior to the change in the presets.xml file would not be affected.
To change dashboard component and page information that existed prior to modifying the presets.xml file, it's necessary to manually re-configure the dashboards using the Share user interface. This can be a daunting job if you need to change very many dashboard pages.
Another option to fix outdated dashboards would be to programmatically use the technique of finding the persisted component and page data for each pre-existing dashboard in the AVM store and then add, remove, or overwrite those file fragments with the new dashboard information.
The root-scoped object called sitedata plays a key role in server-side JavaScript webscripts that access and manipulate Alfresco Share site data. We saw in the previous chapter how the sitedata object was used during the creation of the Records Management site. Now, let us see how we could use it to gain access to persisted dashboard component and page data.
Using JavaScript, we can reference a user dashboard page object using the following syntax: sitedata.getPage("user/admin/dashboard"). If we also append the toXML() method to this object, we can more easily see the contents of the object. It will look something like this:
sitedata.getPage("user/admin/dashboard").toXML()
<page>
<title>User Dashboard</title>
<title-id>page.userDashboard.title</title-id>
<description>Users dashboard page</description>
<description-id>page.userDashboard.description</description-id>
<authentication>user</authentication>
<template-instance>dashboard-4-columns</template-instance>
<page-type-id>generic</page-type-id>
</page>
Here we see an XML fragment that describes the dashboard page object. The definition includes the name of the template-instance, title and description. In a similar way, we can query and find the XML content for this template-instance:
sitedata.findTemplate("user/admin/dashboard").toXML()
<?xml version="1.0" encoding="UTF-8"?>
<template-instance>
<template-type>org/alfresco/dashboard</template-type>
<description>Four columns</description>
<properties>
<gridClass>yui-g</gridClass>
<gridColumn1>5</gridColumn1>
<gridColumn2>5</gridColumn2>
<gridColumn3>5</gridColumn3>
<gridColumn4>5</gridColumn4>
</properties>
</template-instance>
Instead of using sitedata.findTemplate(), we could have found the template-instance XML data using this command: sitedata.getTemplate("dashboard-4-columns").toXML(), where we discovered the template-instance name dashboard-4-columns in the XML result from getPage().
In a similar way, we could query dashboard component information too. For example, consider the following:
sitedata.getComponent("page", "component-2-2", "user/admin/dashboard").toXML()
<?xml version="1.0" encoding="UTF-8"?>
<component>
<guid>page.component-2-2.user~admin~dashboard</guid>
<scope>page</scope>
<region-id>component-2-2</region-id>
<source-id>user/admin/dashboard</source-id>
<url>/components/dashlets/my-activities</url>
</component>
Note
A complete description of sitedata and other root-scoped objects that are available within the Spring Surf web framework in Share can be found on the Alfresco wiki: http://wiki.alfresco.com/wiki/Surf_Platform_-_Freemarker_Template_and_JavaScript_API
In the previous subsection, we mentioned that in some cases it might be desirable to programmatically update large numbers of dashboard configuration settings. The JavaScript code used in Share for manually updating dashboards provides good examples of how to programmatically interact with the sitedata root-scoped object to add, modify, and delete dashlets on a dashboard.
Code in the JavaScript file webappsshareWEB-INFclassesalfrescosite-webscriptsorgalfrescocomponentsdashboardcustomize-dashlets.get.js provides an example of how to find and get references to the dashlets contained on a dashboard page. The JavaScript file customize-dashboard.post.json.js in that same directory gives good examples of how to manipulate dashlets. For example, that JavaScript file uses the following code to delete a dashlet:
sitedata.unbindComponent("page", regionId, dashboardPage);
That same JavaScript file also has an example that demonstrates how to add a new dashlet:
With a background understanding of CSS files, creating a new theme within Share is a fairly straightforward task.
The best way to start is to navigate to the tomcatwebappsshare hemes directory. There you will see directories, one for each of the standard available themes. Choose one of these directories other than the default one, like greenTheme.
Copy this entire folder for the theme and all of the files in it and then rename the folder based on the name of the new theme. We need to make the copy directly in the webappsshare hemes directory. Rename the new directory. Here we will just use the name newTheme. Copying the default theme folder may work as well, but in early releases of Alfresco theming, there were some problems with using the default folder because the default theme files had some references in them that were valid only for the default theme.
Next copy the file tomcatwebappsshareWEB-INFclassesalfrescosite-data hemesgreenTheme.xml to tomcatsharedalfrescoweb-extensionsite-data heme
ewTheme.xml.
The contents of this file should be edited to look something like:
<?xml version='1.0' encoding='UTF-8'?>
<theme>
<title>New Theme</title>
<title-id>theme.newTheme</title-id>
</theme>
Finally, restart the Alfresco server's software. That is all you need to do to make a new theme available for configuration in the admin console. After doing that, by making changes to the CSS files and images in the new theme folder, the new look for the theme can be created.
Note
While there is a single theme applied to the whole Share site, that theme can be overridden for a single page by appending the parameter theme=newTheme to the URL for the page. For example, the following URL will display the dashboard for the Records Management site using the newly created theme:
http://localhost:8080/share/page/site/rm/dashboard?theme=newTheme.
We saw in the previous section how the presets.xml file initialized the pages that are assigned to a site. In standard sites, site pages will be links to things like wiki or blog pages. In the Records Management site, there are only two preset page navigation links, and they are both unique to Records Management. Preset Records Management site page links are for the File Plan and for Records Search.
Note
To see how the Share top navigation toolbar is constructed, it is useful to examine the files in the directory webappsshareWEB-INFclassessite-webscriptsorgalfrescocomponents
avigationcollaboration-navigation. The JavaScript file collaboration-navigation.get.js builds the list of page links to include in the toolbar. The file collaboration-navigation.get.html.ftl contains the FreeMarker markup that specifies the layout of the toolbar. From the markup of the layout, we see that each Share site will always include a link to get to the top-level dashboard for the site at the beginning and another link to access the members of the site as the last item on the toolbar.
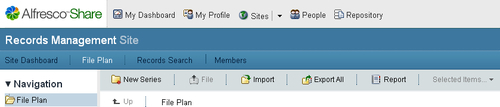
If we click into any of the pages from the top navigation, a secondary set of menu/icon links then becomes available. For example, if we are at the dashboard level of the Records Management site and we click on the File Plan link, we will go to the File Plan page where there is a secondary top navigation toolbar or header bar that includes options like New Series, File, Import, and Report:
Like most of the user interface code everywhere else in Share, this secondary toolbar is controlled via a presentation webscript. In the Records Management site, the base name for the webscript is dod5015-toolbar.*. For standard Share sites, the corresponding webscript files are named toolbar.*, and those files rely heavily on the library files include oolbar.lib.js and include oolbar.lib.ftl. The JavaScript controller and FreeMarker files for these webscripts are located in the directory webappsshareWEB-INFclassesalfrescosite-webscriptsorgalfrescocomponentsdocumentlibrary.
For Records Management, file dod5015-toolbar.get.html.ftml defines the presentation markup for the secondary toolbar. File dod5015-toolbar.get.js is the JavaScript controller file and it determines the preferences for the user accessing the page and the available actions that will display in the drop-down action menu that applies to the selected row items.