
We will now look at how some of the internals work for filing records within Share. First, we will look at the Flash-based Upload File dialog for filing electronic files. Then we will also look at the internals of the dialog form used for registering non-electronic records.
One of the interesting features of Alfresco Share that we discussed earlier in this chapter is the ability to quickly multi-select many files for upload at one time. Share has one of the best browser-based multi-file upload implementations available.
Traditional HTML web pages are very awkward when it comes to the handling of the uploading of files. HTML file uploads are possible because of a feature of the HTML<form> tag. File uploads in HTML require that the form be declared with multipart encoding and include input fields of type "file".
There are numerous restrictions for security reasons about how client-side JavaScript can interact with the input field and the HTML form. By using AJAX and dynamic HTML, it may be possible to work around some of those restrictions, but in terms of development, it is convoluted and equivalent to standing on your head.
Share bypasses the limitations of HTML file uploads and instead uses, by default, an Adobe Flash component to assist with file upload. The result is an upload process that is fast and elegant.
Let's investigate to see how Flash-based uploads work within Share.
File uploads for the Records Management site is initiated from the File Plan page. In the "How does it work?" section in the chapter discussing the File Plan, we have already looked at some of the internals of how that page works.
We saw earlier that the file documentlibrary.ftl defines the overall layout for the File Plan page. Within that file, there are three<@region> tags that relate to file uploads. We've seen in previous chapters that<@region> tags are used to define reusable components on a Spring-Surf web page. Normally, the file upload components are hidden and displayed only when the dialogs need to be visible. The regions are:
|
Region name |
Description |
|---|---|
|
dod5015-file-upload |
Dialog that prompts the user to either file an electronic or non-electronic document. |
|
dod5015-html-upload |
Dialog to upload a single file using a standard HTML multi-part form submit. |
|
dod5015-flash-upload |
Dialog to select and upload multiple files at one time using a Flash component. |
The files corresponding to the component definitions for these regions can be found in the directory tomcatwebappsshareWEB-INFclassesalfrescosite-webscriptsorgalfrescocomponentsupload.
The launch of the upload form is initiated by clicking on the toolbar File Plan button called Upload. The JavaScript controller for the Toolbar component on the File Plan is found in the file dod5015-toolbar.get.js. This file is in the tomcatwebappssharecomponentsdocumentlibrary directory. The event handler for mouse clicks on the Upload button is also handled in this file.
The onFileUpload method pops up a standard Alfresco pop-up window with three buttons prompting the user to select from non-electronic file upload, electronic file upload, or cancel:
onFileUpload: function DLTB_onFileUpload(e, p_obj)
{
var me = this;
Alfresco.util.PopupManager.displayPrompt(
{
title: this.msg("message.file.type.title"),
text: this.msg("message.file.type"),
buttons: [
{
text: this.msg("button.electronic"),
handler: function DLTB_onFileUpload_electronic()
{
this.destroy();
me.onElectronicRecord.call(me);
},
isDefault: true
},
{
text: this.msg("button.non-electronic"),
handler: function DLTB_onFileUpload_nonElectronic()
{
this.destroy();
me.onNonElectronicDocument.call(me);
}
},
{
text: this.msg("button.cancel"),
handler: function DLTB_onFileUpload_cancel()
{
this.destroy();
}
}]
});
}
In this code, we see the method defined to handle the display of the electronic upload window:
onElectronicRecord: function DLTB_onElectronicRecord()
{
if (this.fileUpload === null)
{
this.fileUpload = Alfresco.getRecordsFileUploadInstance();
}
// Show uploader for multiple files
this.fileUpload.show(
{
siteId: this.options.siteId,
containerId: this.options.containerId,
uploadDirectory: this.currentPath,
filter: [],
mode: this.fileUpload.MODE_MULTI_UPLOAD,
thumbnails: "doclib",
onFileUploadComplete:
{
fn: this.onFileUploadComplete,
scope: this
}
});
}
Here we see the toolbar code calling into the code for the upload components. The call to Alfresco.getRecordsFileUploadInstance() creates Alfresco.RecordsFileUpload, as defined in the dod5015-fileupload.js file. That component checks to see whether the user has Flash installed or not, and depending on that, decides which pop up to display next.
If Flash is installed, the component Alfresco.RecordsFlashUpload is used, which enables multi-file uploads, otherwise the Alfresco.RecordsHtmlUpload component is used to upload files on a one-by-one basis.
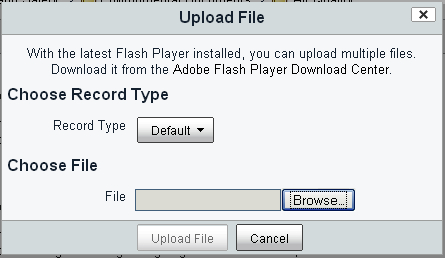
When Flash is not available, the dialog that is displayed is as follows. We can see that with this pop up, the user is limited to selecting only a single file at a time for upload:
In the case where the user has Flash installed, then the upload process is based on Flash and is handled by the two JavaScript files: flash-upload.js and dod5015-flash-upload.js, which extends from the former file. These are client-side JavaScript files and are located in the tomcatwebappssharecomponentsupload directory.
The File Plan page upload dialog borrows via inheritance much of the same functionality that is used for file upload by the standard Share site Document Library. One main difference with the File Plan version of the upload dialog and the standard version is the additional button at the top of the dialog with a drop-down menu for selecting a record type.
The values that show up in the Record Type drop-down menu are populated from a hardcoded JavaScript array that is defined in the file dod5015-flash-upload.get.js.
The record type selector button, the upload button, and the cancel buttons are all buttons built using YUI. The main panel where files to be uploaded are listed is also a YUI control, the data table. We discussed previously how the YUI data table is used in the documentlist component of the File Plan page and lists the records stored at the current path in the File Plan.
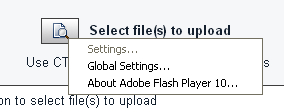
But the magic of the dialog is due to the Flash upload control. The Flash component is front and center in the dialog. It is displayed as the icon for the button to launch the file selector dialog, and it behaves differently as compared to standard HTML components. If we right-click the mouse on the file select button, we'll see some Flash-specific menu options that aren't available with any of the other buttons on the screen:
Note
File upload of multiple files in Share is made possible with the YUI 2 Uploader component http://developer.yahoo.com/yui/uploader/.
The YUI library includes an SWF file that handles the actual Flash upload. On startup of the Flash upload component, an instance of the YUI uploader object is constructed. The following code is from the onReady method from the file flash-upload.js:
// Create and save a reference to the uploader so we can call it later
this.uploader = new YAHOO.widget.Uploader(this.id + "-flashuploader- div",
Alfresco.constants.URL_CONTEXT + "themes/" +
Alfresco.constants.THEME + "/images/upload-button-sprite.png", true);
this.uploader.subscribe("fileSelect", this.onFileSelect, this, true);
this.uploader.subscribe("uploadComplete",this.onUploadComplete, this, true);
this.uploader.subscribe("uploadProgress",this.onUploadProgress, this, true);
this.uploader.subscribe("uploadStart",this.onUploadStart, this, true);
this.uploader.subscribe("uploadCancel",this.onUploadCancel, this, true);
this.uploader.subscribe("uploadCompleteData",this. onUploadCompleteData, this, true);
this.uploader.subscribe("uploadError",this.onUploadError, this, true);
this.uploader.subscribe("contentReady", this.onContentReady, this, true);
The first argument passed in to the YUI uploader constructor is the HTML element where the upload button will be located on the pop up, as specified in the FreeMarker template file dod5015-flash-upload.get.html.ftl. We also note here that the upload icon for the button is customizable by the Share theme.
Once the uploader control is created, subscriptions to uploader events are created next, each with a reference to the handler method corresponding to the event.
Clicking on the Flash select file button launches the selection dialog from Flash. After files have been selected, the onFileSelect handler method is called to process the results. This handler populates the data table of the upload dialog with the names of the files selected. The YUI data table was created and initialized in the onReady() method by making a call to _createEmptyDataTable():
// Definition of the data table column
var myColumnDefs = [
{ key: "id", className:"col-left", resizable: false, formatter: formatLeftCell },
{ key: "name", className:"col-center", resizable: false, formatter: formatCenterCell },
{ key: "created", className:"col-right", resizable: false, formatter: formatRightCell }
];
// The data tables underlying data source.
var myDataSource = new YAHOO.util.DataSource([]);
myDataSource.responseType = YAHOO.util.DataSource.TYPE_JSARRAY;
myDataSource.responseSchema =
{
fields: ["id", "name", "created", "modified", "type", "size", "progress"]
};
YAHOO.widget.DataTable._bStylesheetFallback = !!YAHOO.env.ua.ie;
var dataTableDiv = Dom.get(this.id + "-filelist-table");
this.dataTable = new YAHOO.widget.DataTable(dataTableDiv, myColumnDefs, myDataSource,
{
scrollable: true,
height: "100px",
width: "620px",
renderLoopSize: 0,
MSG_EMPTY: this.msg("label.noFiles")
});
this.dataTable.subscribe("postRenderEvent", this.onPostRenderEvent, this, true);
this.dataTable.subscribe("rowDeleteEvent", this.onRowDeleteEvent, this, true);
Here we see that the DataSource is set up to populate the data table from a JavaScript array that holds the result list of selected files that are returned by the YUI Uploader component. The fields in the data of the response are specified. The onFileSelect method then adds rows with the file information to the table.
When we are ready to upload the selected files, the user clicks on the Upload Files button, and the click handler onUploadButtonClick() calls the _uploadFromQueue() method to start the upload, looping over and starting the upload process for each of the files. The files are actually uploaded when the YUI Flash Uploader posts the file information back to the repository using a URL similar to http://localhost:8080/share/proxy/alfresco/api/upload;jsessionid=4406234BCC8F787ADCB202EA369792D8.
From a developer's perspective, the implementation of the dialog for filing a non-electronic record is interesting because it demonstrates how to include an Alfresco form in a pop-up dialog.
We saw above how JavaScript code for the Upload button on the File Plan page is invoked when the Upload button is pushed. Similarly, the onNonElectronicDocument method in the dod5015-toolbar.js file controls the dialog for uploading non-electronic files.
At the start of this method, labels for the title and header are prepared. The variable destination is also set. The value for destination is the node reference for the Folder where the non-electronic record is to be placed after it is created:
onNonElectronicDocument: function DLTB_onNonElectronicDocument()
{
var destination = this.modules.docList.doclistMetadata.parent.nodeRef,
label = "label.new-rma_nonElectronicDocument",
msgTitle = this.msg(label + ".title"),
msgHeader = this.msg(label + ".header");
// Intercept before dialog show
var doBeforeDialogShow = function DLTB_onNonElectronicDocument_doBeforeDialogShow(p_form, p_dialog)
{
Dom.get(p_dialog.id + "-dialogTitle").innerHTML = msgTitle;
Dom.get(p_dialog.id + "-dialogHeader").innerHTML = msgHeader;
};
After that, the method becomes more interesting. We create the URL that will make the Form service render the creation form for a record of type rma:nonElectronicDocument:
var templateUrl = YAHOO.lang.substitute(Alfresco.constants.URL_SERVICECONTEXT + "components/form?itemKind={itemKind}&itemId={itemId}&destination ={destination}&mode={mode}&submitType={submitType} &showCancelButton=true",
{
itemKind: "type",
itemId: "rma:nonElectronicDocument",
destination: destination,
mode: "create",
submitType: "json"
});
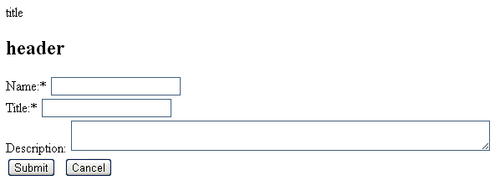
Using the YUI string substitution utility function, the variable templateUrl is created. If we convert this into a URL and call it directly from the browser, we can get an idea about how the form in the pop up will look. Using the following URL, where we have appended the htmlid http://localhost:8080/share/service/components/form?itemKind=type&itemId=rma:nonElectronicDocument&destination=workspace://SpacesStore/0da4440e-9cea-4af4-b951-18c03342ad6b&mode=create&submitType=json&showCancelButton=true&htmlid=rm, we see something like the following screenshot:
This is the raw, unformatted content of the form. The next step then is to create the Alfresco dialog that will actually display as a pop up containing the form. In the createRecord method, the size of the dialog is set as well as methods for handling success or failure of the item creation:
// Using Forms Service, so always create new instance
var createRecord = new Alfresco.module.SimpleDialog(this.id + "- createRecord");
createRecord.setOptions(
{
width: "33em",
templateUrl: templateUrl,
actionUrl: null,
destroyOnHide: true,
doBeforeDialogShow:
{
fn: doBeforeDialogShow,
scope: this
},
onSuccess:
{
fn: function DLTB_onNonElectronicDocument_success(response)
{
var fileName = response.config.dataObj["prop_cm_name"];
YAHOO.Bubbling.fire("metadataRefresh",
{
highlightFile: fileName
});
Alfresco.util.PopupManager.displayMessage(
{
text: this.msg("message.new-record.success", fileName)
});
},
scope: this
},
onFailure:
{
fn: function DLTB_onNonElectronicDocument_failure(response)
{
Alfresco.util.PopupManager.displayMessage(
{
text: this.msg("message.new-record.failure")
});
},
scope: this
}
}).show();
}
When the form is finally rendered within the dialog, it looks like the following screenshot:

Very similar logic is used to pop up a form for the Folder creation dialog. See the method onNewContainer(), also defined in the file dod5015-toolbar.js.