Let's now discuss one way to import a large number of records into the File Plan at one go. One existing tool that will let us do this is called the Alfresco Bulk Filesystem Import tool. The Import tool imports into Alfresco, from a specified directory that is local to the Alfresco server, the folder structure underneath that directory and all the files that are contained within it.
Note
The Alfresco Bulk Filesystem Import tool can be downloaded from Google Code at http://code.google.com/p/alfresco-bulk-filesystem-import/. The import tool was written by Peter Monks, an employee of Alfresco.
The Import tool was intended to support the import of folders and files into the standard Alfresco repository. The tool works fairly well in being able to import files quickly and has achieved some amount of popularity in the Alfresco community. However, one caveat is that the Import tool isn't part of the standard Alfresco product and, as such, isn't officially supported. If we have a lot of files to import though, it is definitely something worth checking out.
The other thing to note is that it is likely that the Import tool was not built with any thought about Records Management in mind, and because of that, and because of the special characteristics of the records File Plan, there are some considerations that we need to keep in mind when applying the Import tool to Records Management content.
One problem to note in particular is with record Categories. The tool does not provide a way to be able to associate a disposition schedule with the Category.
If the intent is to have the disposition schedule apply at the record level, the Import tool won't help because once records are filed under a Folder of the Category, it is no longer possible to go back and create a disposition schedule as one that applies at the record level. If Categories, Folders, and records are imported with a single batch run, this then causes a problem.
On the other hand, if the disposition is to be applied at the Folder level, importing Categories should work, but dispositions will need to be added to each Category after the tool is run.
For Records Management purposes, it is probably best to limit the use of the Import tool to the bulk import of Folders and records into the File Plan. The File Plan Series and Category structure should already be in place when the tool is run.
Installing the Import tool is easy and quick to do. First, the Alfresco server should be shut down. Then, download and copy the AMP file for the Import tool and place it in the amps directory under the alfresco root. Finally, from within the alfresco root directory, run the apply_amps.bat batch file.
After installing the tool, there is a very simple web page that we can bring up to try it. If we go to the URL http://localhost:8080/alfresco/service/bulk/import/filesystem, we will see a page similar to the following:
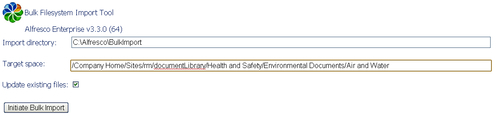
Next, we need to prepare some files for import. As an example, let's place files into a local server directory called BulkImport.
Note
Note that the Import tool will fail to work correctly when run from a client machine that specifies a path that is not available for the server to reach.

Associated with each folder and file to be imported into the directory is a corresponding "shadow" properties file that contains the metadata for that item. The naming convention for the "shadow" files is to simply append .metadata.properties to the file or folder name.
In this example, there is a single folder and 11 content items, and each item is associated with a "shadow" file. For the folder, the properties file Air.Quality.metadata.properties has the following contents:
type=rma:recordFolder
cm:name=Air Quality
cm:title=Air Quality
rma:identifier=2010-0000000001f
The properties file specifies that the content model type for the imported folder be rma:recordFolder, which is a Records Management Folder. We specify the name and title of the Folder. We also specify a unique record identifier for it, something that is generally automatically assigned when the Folder is created via the web application. The identifier needs to be just that, a unique string.
Similarly, one property file to hold associated metadata is defined for each of the files. An example of one of the property files is shown as follows:
type=cm:content
aspects=rma:declaredRecord,cm:author
cm:name=Study on Air Quality in Jakarta, Indonesia
cm:title=Study on Air Quality in Jakarta, Indonesia
cm:author=Bulk Import
rma:originator=Dick Weisinger
rma:originatingOrganization=Formtek, Inc.
rma:publicationDate=2010-11-21T10:15:00.000Z
rma:dateFiled=2010-11-21T10:15:00.000Z
rma:declaredAt=2010-11-21T10:15:00.000Z
rma:declaredBy=Dick Weisinger
rma:identifier=2010-0000000001b
In this file, we declare the content model type to be cm:content. We also attach two aspects to the imported content, namely, cm:author and rma:declaredRecord. By adding the rma:declaredRecord aspect, we are able to simulate the autodeclaration of this record at the time of import.
We need to be careful here. Before a record can be declared, it is first necessary that all mandatory metadata be completed. rma:originator, rma:originatingOrganization, and rma:publicationDate are all mandatory fields, and because of that, we make sure that we include values for them here.
Similar to the case of the imported Folder, we also specify a unique value for the rma:identifier here.
Note that the properties that are datetime values, such as rma:dateFiled, need to be specified as values formatted using the ISO 8601 time format. The validation of the time format is very strict and the string needs to be complete in specifying the date and time down to the millisecond with time zone suffix, as shown in the code example above.
Note
ISO 8601 is discussed again in more detail in Chapter 10, relative to creating search queries.
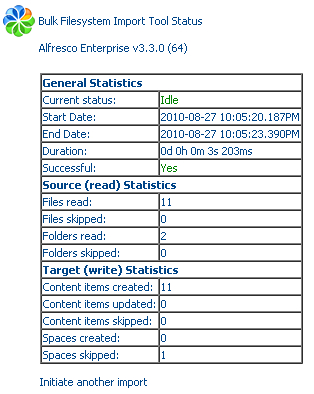
Once the content and properties files are in place, running the Import tool is straightforward. The path to the local files and folders to be imported is specified, and the target folder within Alfresco is specified. The import process is quick, and the tool updates its progress every few seconds. After the import is complete, a results screen like the following one displays the status and summary of the import job.
In this example, we see that the folder and all 11 content items have been successfully imported. All of the content items that have all mandatory metadata completed are marked as having been filed, are declared as records, and have been linked to the Category disposition schedule: